Inhaltsverzeichnis
Werbung
Verfügbare Sprachen
Verfügbare Sprachen
Quicklinks
Copyright Notice:
Copyright Notice:
Copyright Notice:
Copyright Notice:
Copyright Notice:
No part of this installation guide may be reproduced, transcribed, transmitted, or trans-
lated in any language, in any form or by any means, except duplication of documen-
tation by the purchaser for backup purpose, without written consent of ASRock Inc.
Products and corporate names appearing in this guide may or may not be registered
trademarks or copyrights of their respective companies, and are used only for identifica-
tion or explanation and to the owners' benefit, without intent to infringe.
Disclaimer:
Disclaimer:
Disclaimer:
Disclaimer:
Disclaimer:
Specifications and information contained in this guide are furnished for informational
use only and subject to change without notice, and should not be constructed as a
commitment by ASRock. ASRock assumes no responsibility for any errors or omissions
that may appear in this guide.
With respect to the contents of this guide, ASRock does not provide warranty of any kind,
either expressed or implied, including but not limited to the implied warranties or
conditions of merchantability or fitness for a particular purpose. In no event shall
ASRock, its directors, officers, employees, or agents be liable for any indirect, special,
incidental, or consequential damages (including damages for loss of profits, loss of
business, loss of data, interruption of business and the like), even if ASRock has been
advised of the possibility of such damages arising from any defect or error in the guide
or product.
This device complies with Part 15 of the FCC Rules. Operation is subject to the
following two conditions:
(1) this device may not cause harmful interference, and
(2) this device must accept any interference received, including interference that
may cause undesired operation.
CALIFORNIA, USA ONLY
The Lithium battery adopted on this motherboard contains Perchlorate, a toxic
substance controlled in Perchlorate Best Management Practices (BMP) regulations
passed by the California Legislature. When you discard the Lithium battery in
California, USA, please follow the related regulations in advance.
"Perchlorate Material-special handling may apply, see
www.dtsc.ca.gov/hazardouswaste/perchlorate"
ASRock Website: http://www.asrock.com
Copyright©2009 ASRock INC. All rights reserved.
ASRock P45X3 Deluxe Motherboard
Published May 2009
1 1 1 1 1
Werbung
Inhaltsverzeichnis

Verwandte Anleitungen für ASROCK P45X3 Deluxe


Inhaltszusammenfassung für ASROCK P45X3 Deluxe
- Seite 1 ASRock. ASRock assumes no responsibility for any errors or omissions that may appear in this guide. With respect to the contents of this guide, ASRock does not provide warranty of any kind, either expressed or implied, including but not limited to the implied warranties or conditions of merchantability or fitness for a particular purpose.
-
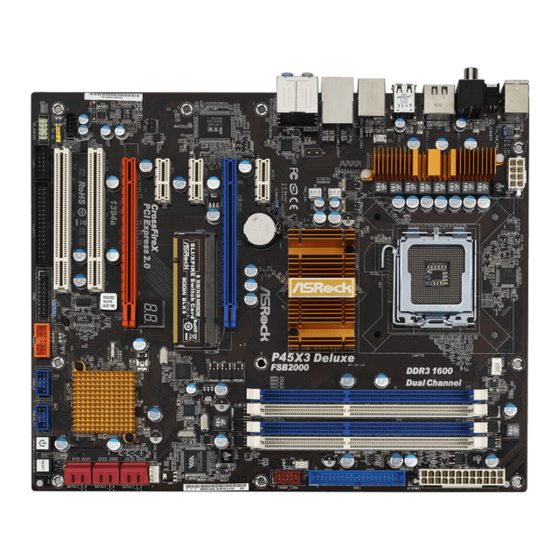
Seite 2: Motherboard-Layout
Sixth SATAII Connector (SATAII_6; Red) PCI Express x1 Slot (PCIE1) Reset Switch (RSTBTN) Clear CMOS Jumper (CLRCMOS1) Power Switch (PWRBTN) Power Fan Connector (PWR_FAN1) USB 2.0 Header (USB10_11, Blue) NB Fan Connector (NB_FAN1) 2 2 2 2 2 ASRock P45X3 Deluxe Motherboard... - Seite 3 “ok”. Choose “2CH”, “4CH”, “6CH”, or “8CH” and then you are allowed to select “Realtek HDA Primary output” to use Rear Speaker, Central/Bass, and Front Speaker, or select “Realtek HDA Audio 2nd output” to use front panel audio. 3 3 3 3 3 ASRock P45X3 Deluxe Motherboard...
-
Seite 4: Package Contents
In case any modifications of this manual occur, the updated version will be available on ASRock website without further notice. You may find the latest VGA cards and CPU support lists on ASRock website as well. ASRock website http://www.asrock.com If you require technical support related to this motherboard, please visit our website for specific information about the model you are using. - Seite 5 - 1 x IEEE 1394 Port - 7 x Ready-to-Use USB 2.0 Ports - 1 x Powered eSATAII/USB Connector - 1 x RJ-45 LAN Port with LED (ACT/LINK LED and SPEED LED) 5 5 5 5 5 ASRock P45X3 Deluxe Motherboard...
- Seite 6 - Supports Smart BIOS Support CD - Drivers, Utilities, AntiVirus Software (Trial Version) Unique Feature - ASRock OC Tuner (see CAUTION 11) - Intelligent Energy Saver (see CAUTION 12) - Instant Boot - ASRock Instant Flash (see CAUTION 13) - Hybrid Booster:...
- Seite 7 64-bit compliant (see CAUTION 16) Certifications - FCC, CE, WHQL * For detailed product information, please visit our website: http://www.asrock.com WARNING Please realize that there is a certain risk involved with overclocking, including adjusting the setting in the BIOS, applying Untied Overclocking Technology, or using the third- party overclocking tools.
- Seite 8 64-bit / Vista / XP 64-bit / XP SP1 or SP2 / 2000 SP4. 11. It is a user-friendly ASRock overclocking tool which allows you to surveil your system by hardware monitor function and overclock your hardware devices to get the best system performance under Windows ®...
- Seite 9 CPU surface is unclean or if there is any bent pin on the socket. Do not force to insert the CPU into the socket if above situation is found. Otherwise, the CPU will be seriously damaged. 9 9 9 9 9 ASRock P45X3 Deluxe Motherboard...
- Seite 10 Use your left hand index finger and thumb to support the load plate edge, engage PnP cap with right hand thumb and peel the cap from the socket while pressing on center of PnP cap to assist in removal. ASRock P45X3 Deluxe Motherboard...
- Seite 11 Step 5. Connect fan header with the CPU fan connector on the motherboard. Step 6. Secure excess cable with tie-wrap to ensure cable does not interfere with fan operation or contact other components. ASRock P45X3 Deluxe Motherboard...
- Seite 12 It is not allowed to install a DDR or DDR2 memory module into DDR3 slot;otherwise, this motherboard and DIMM may be damaged. If you adopt a DDR3 1600 memory module, you can only install it on DDR3_A1 slot. ASRock P45X3 Deluxe Motherboard...
-
Seite 13: Installing A Dimm
DIMM if you force the DIMM into the slot at incorrect orientation. Step 3. Firmly insert the DIMM into the slot until the retaining clips at both ends fully snap back in place and the DIMM is properly seated. ASRock P45X3 Deluxe Motherboard... - Seite 14 PCIE2 / PCIE5 / SLI/XFire Switch Card Retention Slot Configurations PCIE2 Slot PCIE5 Slot SLI/XFire Switch Card (Blue) (Orange) Retention Slot Single Graphics Card PCIE x16 (Default) Dual Graphics Cards PCIE x8 PCIE x8 in CrossFireX Mode ASRock P45X3 Deluxe Motherboard...
-
Seite 15: Installing An Expansion Card
1. If you plan to install only one PCI Express VGA card on this motherboard, please install it on PCIE2 slot (Blue). In this mode, you do not need to adjust the default setting of ASRock SLI/XFire Switch Card, and please do not remove or lose ASRock SLI/XFire Switch Card when it is still in working condition. - Seite 16 Edition co-processor graphics card, must be installed correctly to benefit from the CrossFireX multi-GPU platform. 2. If you pair a 12-pipe CrossFireX Edition card with a 16-pipe card, both cards will operate as 12-pipe cards while in CrossFireX mode. ASRock P45X3 Deluxe Motherboard...
- Seite 17 ATI graphics card manuals for detailed installation guide. Step 1. There is one ASRock SLI/XFire Switch Card factory-mounted on this motherboard. This card served as a switch between the default mode (x16) and CrossFireX mode (x8 / x8). ASRock SLI/XFire Switch Card is factory-mounted with its default mode (x16) side toward the retention slot base.
- Seite 18 CrossFire Bridge Interconnects on the top of Radeon graphics cards. (CrossFire Bridge is provided with the graphics card you purchase, not bundled with this motherboard. Please refer to your graphics card vendor for details.) CrossFire Bridge ASRock P45X3 Deluxe Motherboard...
- Seite 19 Step 12. Restart your computer. Step 13. Install the VGA card drivers to your system, and restart your computer. ® Then you will find “ATI Catalyst Control Center” on your Windows taskbar. ATI Catalyst Control Center ASRock P45X3 Deluxe Motherboard...
- Seite 20 This motherboard supports Surround Display upgrade. With the external add-on PCI Express VGA cards, you can easily enjoy the benefits of Surround Display feature. For the detailed instruction, please refer to the document at the following path in the Support CD: ..\ Surround Display Information ASRock P45X3 Deluxe Motherboard...
- Seite 21 5 seconds. However, please do not clear the CMOS right after you update the BIOS. If you need to clear the CMOS when you just finish updating the BIOS, you must boot up the system first, and then shut it down before you do the clear- CMOS action. ASRock P45X3 Deluxe Motherboard...
- Seite 22 (SATAII_5: see p.2, No. 16) (SATAII_6: see p.2, No. 17) Serial ATA (SATA) Either end of the SATA data cable Data Cable can be connected to the SATA / SATAII hard disk or the SATAII (Optional) connector on this motherboard. ASRock P45X3 Deluxe Motherboard...
- Seite 23 Trusted Platform Module (TPM) (19-pin TPM1) system, which can securely (see p.2 No. 26) store keys, digital certificates, passwords, and data. A TPM system also helps enhance network security, protects digital identities, and ensures platform integrity. ASRock P45X3 Deluxe Motherboard...
- Seite 24 “Front Mic” of “Playback” portion. ® For Windows Vista / Vista 64-bit OS: Go to the "Front Mic" Tab in the Realtek Control panel. Click "Set Default Device" to make the Front Mic as the default record device. ASRock P45X3 Deluxe Motherboard...
- Seite 25 If you plan to connect the 3-Pin CPU fan to the CPU fan connector on this motherboard, please connect it to Pin 1-3. Pin 1-3 Connected 3-Pin Fan Installation ATX Power Connector Please connect an ATX power supply to this connector. (24-pin ATXPWR1) (see p.2 No. 8) ASRock P45X3 Deluxe Motherboard...
- Seite 26 HDMI_SPDIF header, providing SPDIF audio output to HDMI VGA (3-pin HDMI_SPDIF1) card, allows the system to (see p.2 No. 30) connect HDMI Digital TV/ projector/LCD devices. Please connect the HDMI_SPDIF connector of HDMI VGA card to this header. ASRock P45X3 Deluxe Motherboard...
- Seite 27 You are not allowed to use Clear CMOS switch function if you set up the system password. If you want to clear the CMOS values, please clean your system password in advance or refer to page 21 “Clear CMOS jumper” description instead. ASRock P45X3 Deluxe Motherboard...
- Seite 28 Store the Uncompressed pointer for future use in PMM. Copying Main BIOS into memory. Leaves all RAM below 1MB Read-Write including E000 and F000 shadow areas but closing SMRAM. Restore CPUID value back into register. Give control to BIOS POST (ExecutePOSTKernel). ASRock P45X3 Deluxe Motherboard...
- Seite 29 ROMs. Initializes all the output devices. Allocate memory for ADM module and uncompress it. Give control to ADM module for initialization. Initialize language and font modules for ADM. Activate ADM module. ASRock P45X3 Deluxe Motherboard...
- Seite 30 Uninstall POST INT1Ch vector and INT09h vector. Deinitializes the ADM module. Prepare BBS for Int 19 boot. End of POST initialization of chipset registers. Save system context for ACPI. Passes control to OS Loader (typically INT19h). ASRock P45X3 Deluxe Motherboard...
- Seite 31 Advanced screen IDE Configuration. B. Set “SATAII Configuration” to [Enhanced], and then in the option “Configure SATAII as”, please set the option to [IDE]. ® STEP 2: Install Windows Vista / Vista 64-bit OS on your system. ASRock P45X3 Deluxe Motherboard...
- Seite 32 / Vista 64-bit OS on your system. When you see “Where do you want to install Windows?” page, please insert the ASRock Support CD into your optical drive, and click the “Load ® ® Driver” button on the left on the bottom to load the Intel AHCI drivers.
- Seite 33 Main Menu automatically if “AUTORUN” is enabled in your computer. If the Main Menu does not appear automatically, locate and double-click on the file “ASSETUP. EXE” from the BIN folder in the Support CD to display the menus. ASRock P45X3 Deluxe Motherboard...
-
Seite 34: Einführung
1. Einführung 1. Einführung 1. Einführung Wir danken Ihnen für den Kauf des ASRock P45X3 Deluxe Motherboard, ein zuverlässiges Produkt, welches unter den ständigen, strengen Qualitätskontrollen von ASRock gefertigt wurde. Es bietet Ihnen exzellente Leistung und robustes Design, gemäß der Verpflichtung von ASRock zu Qualität und Halbarkeit. Diese Schnellinstallationsanleitung führt in das Motherboard und die schrittweise Installa-... -
Seite 35: Spezifikationen
- PCIE x1 Gigabit LAN 10/100/1000 Mb/s - Realtek RTL8111DL - Unterstützt Wake-On-LAN E/A-Anschlüsse I/O Panel an der - 1 x PS/2-Mausanschluss Rückseite - 1 x PS/2-Tastaturanschluss - 1 x Koaxial-SPDIF-Ausgang - 1 x optischer SPDIF-Ausgang - 1 x IEEE 1394 Port ASRock P45X3 Deluxe Motherboard... - Seite 36 - Unterstützt I. O. T. (Intelligente Übertakten Technologie) - Unterstützt Smart BIOS Support-CD - Treiber, Dienstprogramme, Antivirussoftware (Probeversion) Einzigartige - ASRock OC Tuner (siehe VORSICHT 11) Eigenschaft - Intelligent Energy Saver (Intelligente Energiesparfunktion) (siehe VORSICHT 12) - Sofortstart - ASRock Instant Flash (siehe VORSICHT 13)
- Seite 37 - Schrittloser CPU-Frequenz-Kontrolle (siehe VORSICHT 14) - ASRock U-COP (siehe VORSICHT 15) - Boot Failure Guard (B.F.G. – Systemstartfehlerschutz) Hardware Monitor - Überwachung der CPU-Temperatur - Motherboardtemperaturerkennung - Drehzahlmessung für CPU/Gehäuse/Notebook/Stromlüfter - CPU-Lüftergeräuschdämpfung - Spannungsüberwachung: +12V, +5V, +3.3V, Vcore Betriebssysteme - Unterstützt Microsoft ®...
- Seite 38 überblicken und Ihre Hardware-Geräte übertakten, um die beste ® Systemleistung unter der Windows Umgebung zu erreichen. Besuchen Sie bitte unsere Website für die Operationsverfahren von ASRock OC Tuner. ASRock-Website: http://www.asrock.com 12. Mit einem fortschrittlichen, eigenständigen Hard- und Softwaredesign nutzt der Intelligent Energy Saver eine revolutionäre Technologie, die bisher unerreichte Energieeinsparungen ermöglicht.
- Seite 39 CPU und Kühlkörper zu sprühen. ® 16. AHCI Funktionen werden unter Windows 2000 Betriebssystem nicht ® unterstützt. Wir empfehlen, unter Windows 2000 den IDE-Modus zu nutzen. Detaillierte Einrichtungshinweise finden Sie auf Seite 59 der „Bedienungsanleitung“ auf der Unterstützungs-CD. ASRock P45X3 Deluxe Motherboard...
-
Seite 40: Sicherheitshinweise Vor Der Montage
Bevor Sie die 775-Pin CPU in den Sockel sitzen, prüfen Sie bitte, ob die CPU-Oberfläche sauber ist und keine der Kontakte verbogen sind. Setzen Sie die CPU nicht mit Gewalt in den Sockel, dies kann die CPU schwer beschädigen. ASRock P45X3 Deluxe Motherboard... - Seite 41 775-Pin CPU Um die CPU ordnungsgemäß einsetzen zu können, richten Sie die zwei Orientierungskerben der CPU mit den beiden Markierungen des Sockels aus. Schritt 2-3. Drücken Sie die CPU vorsichtig in vertikaler Richtung in den Sockel. ASRock P45X3 Deluxe Motherboard...
- Seite 42 Schritt 4. Sockel schließen: Schritt 4-1. Drehen Sie die Ladeplatte auf den Kühlkörper (IHS). Schritt 4-2. Drücken Sie leicht auf die Ladeplatte und schließen Sie den Ladehebel. Schritt 4-3. Sichern Sie Ladehebel und Ladeplatte mithilfe des Hebelverschlusses. ASRock P45X3 Deluxe Motherboard...
- Seite 43 Uhrzeigersinn zu drehen, wird der Kühlkörper nicht ordnungsgemäß am Motherboard befestigt. Schritt 5. Schließen Sie den Lüfter an den CPU- Lüfteranschluss des Motherboards. Schritt 6. Befestigen Sie überschüssiges Kabel mit Band, um eine Störung des Lüfters oder Kontakt mit anderen Teilen zu vermeiden. ASRock P45X3 Deluxe Motherboard...
-
Seite 44: Installation Der Speichermodule (Dimm)
2.3 Installation der Speichermodule (DIMM) 2.3 Installation der Speichermodule (DIMM) 2.3 Installation der Speichermodule (DIMM) Die Motherboards P45X3 Deluxe bieten vier 240-pol. DDR3 (Double Data Rate 3) DIMM-Steckplätze und unterstützen die Dual-Kanal-Speichertechnologie. Für die Dual-Kanalkonfiguration dürfen Sie nur identische (gleiche Marke, Geschwindigkeit, Größe und gleicher Chiptyp) DDR3 DIMM-Paare in den... -
Seite 45: Einsetzen Eines Dimm-Moduls
Schäden am Mainboard und am DIMM-Modul. Schritt 3: Drücken Sie die DIMM-Module fest in die Steckplätze, so dass die Halteklammern an beiden Enden des Moduls einschnappen und das DIMM-Modul fest an Ort und Stelle sitzt. ASRock P45X3 Deluxe Motherboard... - Seite 46 Express -Steckplätze) -Steckplätze) -Steckplätze) -Steckplätze) Es gibt einen 2 PCI-Steckplätze und 5 PCI Express-Steckplätze am P45X3 Deluxe Motherboard. PCI-Slots: PCI-Slots werden zur Installation von Erweiterungskarten mit dem 32bit PCI-Interface genutzt. PCI Express-Slots: PCIE1 / PCIE3 / PCIE4 (PCIE x1-Steckplatz; weiß) wird für PCI Express-Karten mit x1 Lane-Breite-Karten verwendet, z.B.
-
Seite 47: Einbau Einer Erweiterungskarte
Sie sie bitte im PCIE2-Steckplatz (blau). In diesem Modus brauchen Sie die Standardeinstellung der ASRock SLI/XFire-Switch-Karte nicht zu ändern. Entfernen oder lockern Sie nicht die ASRock SLI/XFire-Switch-Karte, wenn sie sich noch im Betriebszustand befindet. 2. Informationen über kompatible PCI Express-VGA-Karten im CrossFireX Modus und CrossFireX -Konfigurationsabläufe finden Sie auf Seite 16 in... -
Seite 48: Einstellung Der Jumper
Sie nicht, den Jumper wieder zu entfernen, nachdem das CMOS gelöscht wurde. Wenn Sie den CMOS-Inhalt gleich nach dem Aktualisieren des BIOS löschen müssen, müssen Sie zuerst das System starten und dann wieder ausschalten, bevor Sie den CMOS-Inhalt löschen. ASRock P45X3 Deluxe Motherboard... -
Seite 49: Integrierte Header Und Anschlüsse
(SATAII_6: siehe S.2 - No. 17) Datenübertragungsrate bis 3,0 Gb/s. Serial ATA- (SATA-) SJedes Ende des SATA Datenkabel Datenkabels kann an die SATA / SATAII Festplatte oder das (Option) SATAII Verbindungsstück auf dieser Hauptplatine angeschlossen werden. ASRock P45X3 Deluxe Motherboard... - Seite 50 (TPM: Vertrauenswürdiges (siehe S.2 - No. 26) Plattformmodul), auf dem sich Schlüssel, Digitalzertifikate, Kennwörter und Daten auf sichere Weise speichern lassen. Ein TPM-System hilft auch bei der Verbesserung der Netzwerksicherheit, schützt digitale Identitäten und sorgt für Plattformintegrität. ASRock P45X3 Deluxe Motherboard...
- Seite 51 Für Betriebssystem Windows ® Vista / Vista 64-Bit: Rufen Sie die Registerkarte “Front Mic” (Vorderes Mikr.) im Realtek- Bedienfeld auf. Klicken Sie auf “Set Default Device” (Standardgerät einstellen), um das vorderseitige Mikrofon als Standard- Aufnahmegerät zu übernehmen. ASRock P45X3 Deluxe Motherboard...
- Seite 52 Motherboards anschließen möchten, verbinden Sie ihn bitte mit den Pins 1 – 3. Pins 1–3 anschließen Lüfter mit dreipoligem Anschluss installieren ATX-Netz-Header Verbinden Sie die ATX- Stromversorgung mit diesem (24-pin ATXPWR1) Header. (siehe S.2 - No. 8) ASRock P45X3 Deluxe Motherboard...
- Seite 53 Der HDMI_SPDIF-Anschluss stellt einen SPDIF- (HDMI_SPDIF1, dreipolig) Audioausgang für eine HDMI- (siehe S.2 - No. 30) VGA-Karte zur Verfügung und ermöglicht den Anschluss von HDMI-Digitalgeräten wie Fernsehgeräten, Projektoren, LCD-Geräten an das System. Bitte verbinden Sie den ASRock P45X3 Deluxe Motherboard...
- Seite 54 Schalterfunktion Clear CMOS (CMOS löschen) zu verwenden. Wenn Sie die CMOS-Werte entfernen möchten, müssen Sie zuerst Ihr Systemkennwort entfernen, oder Sie können sich stattdessen auch auf die Beschreibung “Clear CMOS jumper” (CMOS löschen-Jumper) auf Seite 48 beziehen. ASRock P45X3 Deluxe Motherboard...
- Seite 55 Bildschirm (Erweitert), dann „IDE Configuration“ (IDE-Konfiguration). B. Stellen Sie “SATAII-Konfiguration” auf [Erweitert] ein, stellen Sie danach “SATAII konfigureren als” auf [IDE] ein. SCHRITT 2: Installieren Sie Windows ® 2000 / XP / XP 64-Bit in Ihrem System. ASRock P45X3 Deluxe Motherboard...
-
Seite 56: Windows Funktionalität Installieren
64-Bit Betriebssystem auf Ihrem System zu installieren. Wenn die Frage “Wo möchten Sie Windows installieren?” erscheint, legen Sie bitte die ASRock Support CD in Ihr optisches Laufwerk ein. Klicken Sie anschließend die ® “Treiber laden”-Schaltfläche links unten, um die Intel AHCI-Treiber zu installieren. - Seite 57 ASSETUP.EXE im BIN-Verzeichnis der Support-CD, um die Menüs aufzurufen. Das Setup-Programm soll es Ihnen so leicht wie möglich machen. Es ist menügesteuert, d.h. Sie können in den verschiedenen Untermenüs Ihre Auswahl treffen und die Programme werden dann automatisch installiert. ASRock P45X3 Deluxe Motherboard...
-
Seite 58: Contenu Du Paquet
1. Introduction 1. Introduction Merci pour votre achat d’une carte mère ASRock P45X3 Deluxe, une carte mère très fiable produite selon les critères de qualité rigoureux de ASRock. Elle offre des performances excellentes et une conception robuste conformément à l’engagement d’ASRock sur la qualité... - Seite 59 - PCIE x1 Gigabit LAN 10/100/1000 Mb/s - Realtek RTL8111DL - Support du Wake-On-LAN Panneau arrière I/O Panel - 1 x port souris PS/2 - 1 x port clavier PS/2 - 1 x Port de sortie coaxial SPDIF ASRock P45X3 Deluxe Motherboard...
- Seite 60 - Compatible pour événements de réveil ACPI 1.1 - Gestion jumperless - Support SMBIOS 2.3.1 - CPU, VCCM, VTT Tension Multi-ajustement - Supporter I. O. T. (Technologie d’Overclocking Intelligent) - Prise en charge du Smart BIOS ASRock P45X3 Deluxe Motherboard...
- Seite 61 CD d’assistance - Pilotes, utilitaires, logiciel anti-virus (Version d’essai) Caractéristique - Tuner ASRock OC (voir ATTENTION 11) unique - Économiseur d’énergie intelligent (voir ATTENTION 12) - l'Instant Boot - ASRock Instant Flash (voir ATTENTION 13) - L’accélérateur hybride: - Contrôle direct de la fréquence CPU...
- Seite 62 . Si vous voulez utiliser la fonction CrossFireX , veuillez suivre les instruc- tions à la page 17 pour inverser tout d’abord le sens de la carte ASRock à connecteur SLI/XFire. Pour l’entrée microphone, cette carte mère supporte les deux modes stéréo et mono.
- Seite 63 <F6> durante o teste de arranque POST ou premir a tecla <F2> para exibir o menu de configuração do BIOS para aceder ao ASRock Instant Flash. Execute esta ferramenta para guardar o novo ficheiro de BIOS numa unidade flash USB, numa disquete ou num disco rígido, em seguida, poderá...
- Seite 64 Etape 2-1. Tenez le processeur par ses bords là où se trouvent des lignes noires. Etape 2-2. Orientez le paquet avec le dissipateur thermique intégré (IHS) vers le haut. Repérez la broche 1 et les deux encoches d’orientation. ASRock P45X3 Deluxe Motherboard...
- Seite 65 Etape 4-2. Tout en appuyant doucement sur la plaque de chargement, engagez le levier de chargement Etape 4-3. Fixez le levier de chargement avec la languette de la plaque de chargement sous la languette de retenue du levier de chargement. ASRock P45X3 Deluxe Motherboard...
- Seite 66 Etape 6. Fixez la longueur de câble en excès avec du ruban adhésif pour vous assurer que le câble ne gênera pas le fonctionnement du ventilateur ou n’entrera pas en contact avec les autres composants. ASRock P45X3 Deluxe Motherboard...
- Seite 67 2.3 Installation des modules m émoire [DIMM] 2.3 Installation des modules m émoire [DIMM] La carte mère P45X3 Deluxe dispose de quatre emplacements DIMM DDR3 (Double Data Rate 3) de 240-broches, et supporte la Technologie de Mémoire à Canal Double. Pour effectuer une configuration à canal double, vous devez toujours installer des paires de DIMM DDR3 identiques (de la même marque, de la...
- Seite 68 DIMM. Etape 3. Insérez fermement le module DIMM dans son emplacement jusqu’à ce que les clips de maintien situés aux deux extrémités se ferment complètement et que le module DIMM soit inséré correctement. ASRock P45X3 Deluxe Motherboard...
- Seite 69 PCIE2 / PCIE5 / SLI/XFire Slot PCIE2 Slot PCIE5 Slot de maintien de la (bleu) (orange) carte switch SLI/XFire Carte graphique simple PCIE x16 (Par défaut) Cartes graphiques PCIE x8 PCIE x8 doubles en mode CrossFireX ASRock P45X3 Deluxe Motherboard...
- Seite 70 PCIE2 (bleu). Dans ce mode, vous n’avez pas besoin d’ajuster le réglage par défaut de la carte switch ASRock SLI/XFire, veuillez ne pas enlever ni desserrer la carte switch ASRock SLI/XFire alors qu’elle est toujours en état de marche.
- Seite 71 BIOS à jour. Si vous avez besoin d’effacer la CMOS lorsque vous avez fini de mettre le BIOS à jour, vous devez d’abord initialiser le système, puis le mettre hors tension avant de procéder à l’opération d’effacement de la CMOS. ASRock P45X3 Deluxe Motherboard...
- Seite 72 3,0 Gb/s. Câble de données Toute cote du cable de data SATA Série ATA (SATA) peut etre connecte au disque dur SATA / SATAII ou au connecteur (en option) SATAII sur la carte mere. ASRock P45X3 Deluxe Motherboard...
- Seite 73 Un système TPM permet également de renforcer la sécurité des réseaux, protège les identités numériques, et assure l’intégrité de la plate-forme. ASRock P45X3 Deluxe Motherboard...
- Seite 74 / Vista 64 bits : Allez à l’onglet «Front Mic» ( Mic. Avant) dans le panneau de commandes Realtek. Cliquez sur «Configurer le dispositif par défaut» pour faire du Mic Avant le dispositif d’enregistrement par défaut. ASRock P45X3 Deluxe Motherboard...
- Seite 75 CPU sur cette carte mère, veuillez le connecter aux broches 1-3. Installation de ventilateur à 3 broches Broches 1-3 connectées En-tête d’alimentation ATX Veuillez connecter l’unité d’alimentation ATX sur cet en- (ATXPWR1 br. 24) tête. (voir p.2 No. 8) ASRock P45X3 Deluxe Motherboard...
- Seite 76 SPDIF vers la carte VGA HDMI, (voir p.2 No. 30) et permettant au système de se connecter au un téléviseur numérique HDMI /un projecteur / un périphérique LCD. Veuillez brancher le connecteur HDMI_SPDIF de la carte VGA HDMI sur ce connecteur. ASRock P45X3 Deluxe Motherboard...
- Seite 77 Si vous voulez effacer les valeurs du CMOS, veuillez d’abord effacer le mot de passe de votre système ou vous référer plutôt à la description “Clear CMOS jumper (Cavalier d’effacement du CMOS)” de la page 71. ASRock P45X3 Deluxe Motherboard...
- Seite 78 RAID sans fonctions RAID sans fonctions RAID sans fonctions RAID ® Si vous voulez installer Windows Vista / Vista 64-bit sur vos disques durs SATA / SATAII sans les fonctions RAID, veuillez suivre la procédure ci-dessous. ASRock P45X3 Deluxe Motherboard...
- Seite 79 / Vista 64-bits sur votre système. Lorsque vous voyez la page “Où souhaitez-vous installer Windows ?”, veuillez insérer le CD Support d’ ASRock dans votre lecteur optique, et cliquer sur le bouton “Charger le pilote” en bas à gauche ®...
- Seite 80 CD-ROM. Le Menu principal s’affiche automatiquement si “AUTORUN” est activé dans votre ordinateur. Si le Menu principal n’apparaît pas automatiquement, localisez dans le CD technique le fichier “ASSETUP.EXE” dans le dossier BIN et double-cliquez dessus pour afficher les menus. ASRock P45X3 Deluxe Motherboard...
-
Seite 81: Contenuto Della Confezione
1. Introduzione Grazie per aver scelto una scheda madre ASRock P45X3 Deluxe, una scheda madre affidabile prodotta secondo i severi criteri di qualità ASRock. Le prestazioni eccellenti e il design robusto si conformano all’impegno di ASRock nella ricerca della qualità e della resistenza. - Seite 82 - 1 x porta PS/2 per mouse - 1 x porta PS/2 per tastiera - 1 x Porta coassiale SPDIF Out - 1 x Porta ottica SPDIF Out - 1 x porte IEEE 1394 - 7 x porte USB 2.0 già integrate ASRock P45X3 Deluxe Motherboard...
- Seite 83 - Smart BIOS supportato CD di - Driver, utilità, software antivirus (Versione dimostrativa) supporto Caratteristica - Sintonizzatore ASRock OC (vedi ATTENZIONE 11) speciale - Intelligent Energy Saver (Risparmio intelligente dell’energia) (vedi ATTENZIONE 12) - Instant Boot - ASRock Instant Flash (vedi ATTENZIONE 13)
- Seite 84 64 bit (vedi ATTENZIONE 16) Certificazioni - FCC, CE, WHQL * Per ulteriori informazioni, prego visitare il nostro sito internet: http://www.asrock.com AVVISO Si prega di prendere atto che la procedura di overclocking implica dei rischi, come anche la regolazione delle impostazioni del BIOS, l’applicazione della tecnologia Untied Overclocking Technology, oppure l’uso di strumenti di overclocking forniti da terzi.
- Seite 85 64-bit / Vista / XP 64 bit / XP SP1; SP2/2000 SP4. 11. Si tratta di uno strumento di sicronizzazione ASRock di face uso in grado di implementare il controllo del sistema tramite la funzione di hardware monitor e sincronizzare le Vostre unita‘ hardware per ottenere la migliore prestazione in Windows .
- Seite 86 5. Nell’usare i giraviti per fissare la scheda madre al telaio non serrare eccessivamente le viti! Altrimenti si rischia di danneggiare la scheda madre. ASRock P45X3 Deluxe Motherboard...
- Seite 87 Fase 1-3. Ruotare di circa 100 gradi la piastra di carico per aprirla completamente. Fase 2. Inserire la CPU 775-Pin: Fase 2-1. Tenere la CPU dai bordi segnati con linee nere. ASRock P45X3 Deluxe Motherboard...
- Seite 88 2. Questo tappo deve essere inserito se se la scheda madre deve essere restituita per l’assistenza. Fase 4. Chiudere la presa: Fase 4-1. Ruotare la piastra di carico sull’IHS. Fase 4-2. Bloccare la leva di carico mentre si preme leggermente sulla piastra di carico. ASRock P45X3 Deluxe Motherboard...
- Seite 89 CPU sulla scheda madre. Fase 6. fissare il cavo in eccesso con fascette per assicurare che il cavo non interferisca con il funzionamento della ventola o che venga a contatto con gli altri componenti. ASRock P45X3 Deluxe Motherboard...
- Seite 90 2.3 Installazione dei moduli di memoria (DIMM) 2.3 Installazione dei moduli di memoria (DIMM) La scheda madre P45X3 Deluxe fornisce quattro alloggiamenti DIMM DDR3 (Double Data Rate 3) a 240 pin, e supporta la tecnologia Dual Channel Memory. Per la configurazione a due canali, è necessario installare sempre coppie identiche (stessa marca, velocità, dimensioni e tipo di chip) di DIMM DDR3 negli alloggiamenti...
- Seite 91 DIMM stessa. Step 3. Inserire saldamente la DIMM nello slot fino a far scattare completamente in posizione i fermagli di ritegno alle due estremità e fino ad installare correttamente la DIMM nella sua sede. ASRock P45X3 Deluxe Motherboard...
- Seite 92 Slot di espansione (Slot PCI ed Slot PCI Express) Slot di espansione (Slot PCI ed Slot PCI Express) Sulla scheda madre P45X3 Deluxe c’è 2 slot PCI ed 5 slot PCI Express. Slot PCI: Sono utilizzati per installare schede di espansione con Interfaccia PCI a 32-bit.
- Seite 93 PCIE2 (blu). In questo modo, non è necessario regolare le impostazioni predefinite della scheda Switch ASRock SLI/XFire; non rimuovere o allentare la scheda Switch ASRock SLI/XFire mentre è in condizioni operative. 2. Per informazioni sulla compatibilità delle schede PCI Express con modalità...
- Seite 94 Non cancellare la CMOS subito dopo aver aggiornato il BIOS. Se è necessario cancellare la CMOS una volta completato l’aggiornamento del BIOS, è necessario riavviare prima il sistema, e poi spegnerlo prima di procedere alla cancellazione della CMOS. ASRock P45X3 Deluxe Motherboard...
- Seite 95 3.0 Gb/s. Cavi dati Serial ATA (SATA) Una o altra estremità del cavo di dati SATA può essere (Opzionale) collegata al disco rigido SATA / SATAII o al connettore di SATAII su questa cartolina base. ASRock P45X3 Deluxe Motherboard...
- Seite 96 (vedi p.2 Nr. 26) (TPM), che può archiviare in sicurezza chiavi, certificati digitali, password e dati. Un sistema di TPM aiuta anche a migliorare la sicurezza di rete, protegge le identità digitali e garantisce l’integrità della piattaforma. ASRock P45X3 Deluxe Motherboard...
- Seite 97 Per il sistema operative Windows ® Vista / Vista 64-bit: Andare alla scheda “Microfono anteriore” nel pannello di controllo d i Realtek. Fare clic su “Imposta dispositivo predefinito” per impostare il microfono anteriore come dispositivo predefinito per la registrazione. ASRock P45X3 Deluxe Motherboard...
- Seite 98 Se si intende collegare la ventola CPU a 3 piedini al connettore della ventola CPU su questa scheda madre, collegarla ai piedini 1-3. Piedini 1-3 collegati Installazione della ventola a 3 piedini Connettore alimentazione ATX Collegare la sorgente d’alimentazione ATX a questo (24-pin ATXPWR1) connettore. (vedi p.2 Nr. 8) ASRock P45X3 Deluxe Motherboard...
- Seite 99 SPDIF su scheda (3-pin HDMI_SPDIF1) HDMI VGA, consente al (vedi p.2 Nr. 30) sistema di collegare dispositivi per TV digitale HDMI/proiettori/ LCD . Collegare il connettore HDMI_SPDIF della scheda VGA HDMI a questo header. ASRock P45X3 Deluxe Motherboard...
- Seite 100 è necessario annullare la password di sistema, oppure fare riferimento alla descrizione della sezione “Jumper Clear CMOS” (Jumper cancella CMOS) a pagina 94. 1 0 0 1 0 0 1 0 0 1 0 0 1 0 0 ASRock P45X3 Deluxe Motherboard...
- Seite 101 Se si desidera installare Windows Vista / Vista 64-bit sulle unità disco rigido SATA / SATAII senza funzioni RAID, seguire le istruzioni esposte di seguito. 1 0 1 1 0 1 1 0 1 1 0 1 1 0 1 ASRock P45X3 Deluxe Motherboard...
- Seite 102 64-bit sul sistema. Quando si vede la pagina “Where do you want to install Windows?” (Dove si vuole eseguire l’istallazione di Windows), inserire il CD di supporto ASRock nell’unità ottica e fare clic sul pulsante “Carica driver” , in basso a sinistra, per caricare i driver Intel ®...
- Seite 103 Menù principale. Se il Menù principale non appare automaticamente, posizionarsi sul file “ASSETUP.EXE” nel CESTINO del CD di supporto e cliccare due volte per visualizzare i menù. 1 0 3 1 0 3 1 0 3 1 0 3 1 0 3 ASRock P45X3 Deluxe Motherboard...
-
Seite 104: Contenido De La Caja
1. Introducción 1. Introducción Gracias por su compra de ASRock P45X3 Deluxe placa madre, una placa de confianza producida bajo el control de calidad estricto y persistente. La placa madre provee realización excelente con un diseño robusto conforme al compromiso de calidad y resistencia de ASRock. - Seite 105 - 1 x puerto de salida óptica SPDIF - 1 x puerto IEEE 1394 - 7 x puertos USB 2.0 predeterminados 1 0 5 1 0 5 1 0 5 1 0 5 1 0 5 ASRock P45X3 Deluxe Motherboard...
- Seite 106 - Compatible con Smart BIOS CD de soport - Controladores, Utilerías, Software de Anti Virus (Versión de prueba) Característica - Sintonizador de ASRock OC (vea ATENCIÓN 11) Única - Administrador de energía inteligente (vea ATENCIÓN 12) 1 0 6 1 0 6...
- Seite 107 - Instant Boot - ASRock Instant Flash (vea ATENCIÓN 13) - Amplificador Híbrido: - Stepless control de frecuencia de CPU (vea ATENCIÓN 14) - ASRock U-COP (vea ATENCIÓN 15) - Protección de Falla de Inicio (B.F.G..) Monitor - Sensibilidad a la temperatura del procesador...
- Seite 108 64 bits / Vista / XP 64 bits / XP SP1; SP2/2000 SP4. 11. Es una herramienta de overclocking de ASRock de usuario-fácil que le permite a supervisar su sistema por la función de monitor de hardware y overclock sus dispositivos de hardware para obtener el mejor funcionamiento del sistema bajo el entorno de Windows ®...
- Seite 109 13. ASRock Instant Flash es una utilidad de programación del BIOS que se encuentra almacenada en la memoria Flash ROM. Esta sencilla herramienta de actualización de BIOS le permitirá actualizar el BIOS del sistema sin necesidad de acceder a ningún sistema operativo, como MS-DOS o Windows ®...
- Seite 110 No introduzca la CPU en el socket por la fuerza si se produce la situación anterior. Si lo hace, puede producir daños graves en la CPU. 1 1 0 1 1 0 1 1 0 1 1 0 1 1 0 ASRock P45X3 Deluxe Motherboard...
- Seite 111 Step 2-4. Compruebe que la CPU se encuentra en el socket y la orientación coincide con la indicada por las muescas. 1 1 1 1 1 1 1 1 1 1 1 1 1 1 1 ASRock P45X3 Deluxe Motherboard...
- Seite 112 (Aplique el material termal de interfaz) Paso 1. Aplique el material termal de interfaz en el centro del IHS de la superficie del socket. 1 1 2 1 1 2 1 1 2 1 1 2 1 1 2 ASRock P45X3 Deluxe Motherboard...
- Seite 113 Paso 6. Fije el cable que sobre con un lazo para asegurarse de que el cable no interfiere en el funcionamiento del ventilador y tampoco entra en contacto con otros componentes. 1 1 3 1 1 3 1 1 3 1 1 3 1 1 3 ASRock P45X3 Deluxe Motherboard...
- Seite 114 2.3 Instalación de Memoria 2.3 Instalación de Memoria La placa P45X3 Deluxe ofrece cuatro ranuras DIMM DDR3 de 240 pines, y soporta Tecnología de Memoria de Doble Canal. Para la configuración de doble canal, necesitará instalar siempre pares DIMM DDR3 idénticos (de la misma marca, velocidad, tamaño y tipo) en las ranuras del mismo color.
- Seite 115 Paso 3. Inserte la DIMM con firmeza dentro de la ranura hasta que los clips de sujeción de ambos lados queden completamente introducidos en su sitio y la DIMM se haya asentado apropiadamente. 1 1 5 1 1 5 1 1 5 1 1 5 1 1 5 ASRock P45X3 Deluxe Motherboard...
- Seite 116 Express) Express) Express) Express) La placa madre P45X3 Deluxe cuenta con 2 ranuras PCI y 5 ranuras PCI Express. Ranura PCI: Para instalar tarjetas de expansión que tienen 32-bit Interface PCI. Ranura PCI Express: La ranura PCIE1 / PCIE3 / PCIE4 (ranura PCIE x1, Blanca) se utiliza contarjetas PCI Express con ancho de banda x1, como las tarjetas Gigabit LAN, y SATA2.
- Seite 117 1. Si desea instalar sólo una tarjeta PCI Express VGA en esta placa base, instálela en la ranura PCIE2 (Azul). Así no necesitará ajustar la configuración predeterminada de la tarjeta conmutadora SLI/XFire. No extraiga ni pierda la tarjeta conmutadora ASRock SLI/XFire si funciona correctamente. 2. Para obtener información de las tarjetas VGA CrossFireX Mode PCI Express y de los procedimientos de instalación de CrossFireX...
- Seite 118 CMOS cuando acabe de finalizar la actualización de la BIOS, debe arrancar primero el sistema y, a continuación, apagarlo antes de realizar la acción de borrado de CMOS. 1 1 8 1 1 8 1 1 8 1 1 8 1 1 8 ASRock P45X3 Deluxe Motherboard...
- Seite 119 SATA puede ser conectado con el disco duro (Opcional) de SATA / SATAII o el conectador de SATAII en esta placa base. 1 1 9 1 1 9 1 1 9 1 1 9 1 1 9 ASRock P45X3 Deluxe Motherboard...
- Seite 120 Los sistemas TPM también mejoran la seguridad de la red, protegen las identidades digitales y garantizan la integridad de la plataforma. 1 2 0 1 2 0 1 2 0 1 2 0 1 2 0 ASRock P45X3 Deluxe Motherboard...
- Seite 121 Haga clic en «Establecer dispositivo predeterminado» para convertir el ntizan la micrófono central en el dispositivo de grabación predeterminado. plataforma. 1 2 1 1 2 1 1 2 1 1 2 1 1 2 1 ASRock P45X3 Deluxe Motherboard...
- Seite 122 Instalación del ventilador de 3 contactos Cabezal de alimentación ATX Conecte la fuente de alimentación ATX a su cabezal. (24-pin ATXPWR1) (vea p.2, N. 8) 1 2 2 1 2 2 1 2 2 1 2 2 1 2 2 ASRock P45X3 Deluxe Motherboard...
- Seite 123 (vea p.2, N. 30) conectarse a dispositivos de TV Digital HDMI / proyectores / Dispositivos LCD. Conecte el conector HDMI_SPDIF de la 1 2 3 1 2 3 1 2 3 1 2 3 1 2 3 ASRock P45X3 Deluxe Motherboard...
- Seite 124 “Clear CMOS Jumper” (Puente de borrado de memoria CMOS) en la página 118. 1 2 4 1 2 4 1 2 4 1 2 4 1 2 4 ASRock P45X3 Deluxe Motherboard...
- Seite 125 (Optimizada), y luego configure la opción que aparece en “Configure SATAII as” (“Configurar SATAII como”) a [IDE]. PASO 2: Instale Windows ® 2000 / XP / XP 64 bits en su sistema. 1 2 5 1 2 5 1 2 5 1 2 5 1 2 5 ASRock P45X3 Deluxe Motherboard...
- Seite 126 Windows?” (¿Dónde desea instalar Windows?), inserte el CD de soporte de ASRock en la unidad óptica y haga clic en el botón “Load Driver” (Cargar controlador) situado en la parte inferior izquierda para cargar los controladores AHCI de Intel ®...
- Seite 127 Principal automáticamente si «AUTORUN» está habilitado en su computadora. Si el Menú Principal no aparece automáticamente, localice y doble-pulse en el archivo “ASSETUP.EXE” para iniciar la instalación. 1 2 7 1 2 7 1 2 7 1 2 7 1 2 7 ASRock P45X3 Deluxe Motherboard...
- Seite 128 1 5 1 1 5 1 1 5 1 1 5 1 1 5 1 ASRock P45X3 Deluxe Motherboard...
- Seite 129 ® ® ® ® ® ® ® 1 5 2 1 5 2 1 5 2 1 5 2 1 5 2 ASRock P45X3 Deluxe Motherboard...
- Seite 130 1 5 3 1 5 3 1 5 3 1 5 3 1 5 3 ASRock P45X3 Deluxe Motherboard...
- Seite 131 ® “ ” ® ® ® ® 1 5 4 1 5 4 1 5 4 1 5 4 1 5 4 ASRock P45X3 Deluxe Motherboard...
- Seite 132 “ ” “ ” ® ® ® ® “ ” 1 5 5 1 5 5 1 5 5 1 5 5 1 5 5 ASRock P45X3 Deluxe Motherboard...
- Seite 133 1 5 6 1 5 6 1 5 6 1 5 6 1 5 6 ASRock P45X3 Deluxe Motherboard...
- Seite 134 Pin1 Pin1 1 5 7 1 5 7 1 5 7 1 5 7 1 5 7 ASRock P45X3 Deluxe Motherboard...
- Seite 135 1 5 8 1 5 8 1 5 8 1 5 8 1 5 8 ASRock P45X3 Deluxe Motherboard...
- Seite 136 DDR3_A1 DDR3_A2 DDR3_B1 DDR3_B2 (3)* “ ” 1 5 9 1 5 9 1 5 9 1 5 9 1 5 9 ASRock P45X3 Deluxe Motherboard...
- Seite 137 1 6 0 1 6 0 1 6 0 1 6 0 1 6 0 ASRock P45X3 Deluxe Motherboard...
- Seite 138 1 6 1 1 6 1 1 6 1 1 6 1 1 6 1 ASRock P45X3 Deluxe Motherboard...
- Seite 139 “ ” ® 1 6 2 1 6 2 1 6 2 1 6 2 1 6 2 ASRock P45X3 Deluxe Motherboard...
- Seite 140 “ ” “ ” “ ” “ ” 1 6 3 1 6 3 1 6 3 1 6 3 1 6 3 ASRock P45X3 Deluxe Motherboard...
- Seite 141 1 6 4 1 6 4 1 6 4 1 6 4 1 6 4 ASRock P45X3 Deluxe Motherboard...
- Seite 142 1 6 5 1 6 5 1 6 5 1 6 5 1 6 5 ASRock P45X3 Deluxe Motherboard...
- Seite 143 ® ® ® ® “ ” “ ” “ ” “ ” ® “ ” “ ” 1 6 6 1 6 6 1 6 6 1 6 6 1 6 6 ASRock P45X3 Deluxe Motherboard...
- Seite 144 4 3 2 1 1 6 7 1 6 7 1 6 7 1 6 7 1 6 7 ASRock P45X3 Deluxe Motherboard...
- Seite 145 1 6 8 1 6 8 1 6 8 1 6 8 1 6 8 ASRock P45X3 Deluxe Motherboard...
- Seite 146 RESET CMOS “ ” 1 6 9 1 6 9 1 6 9 1 6 9 1 6 9 ASRock P45X3 Deluxe Motherboard...
- Seite 147 ® ® ® ® ® ® ® 1 7 0 1 7 0 1 7 0 1 7 0 1 7 0 ASRock P45X3 Deluxe Motherboard...
- Seite 148 ® ® ® ® ® ® ® ® ® ® ® 1 7 1 1 7 1 1 7 1 1 7 1 1 7 1 ASRock P45X3 Deluxe Motherboard...
- Seite 149 “ ” “ ” “ ” 1 7 2 1 7 2 1 7 2 1 7 2 1 7 2 ASRock P45X3 Deluxe Motherboard...
- Seite 150 1 7 3 1 7 3 1 7 3 1 7 3 1 7 3 ASRock P45X3 Deluxe Motherboard...
- Seite 151 ® ® ® ® ® ® ® 1 7 4 1 7 4 1 7 4 1 7 4 1 7 4 ASRock P45X3 Deluxe Motherboard...
- Seite 152 1 7 5 1 7 5 1 7 5 1 7 5 1 7 5 ASRock P45X3 Deluxe Motherboard...
- Seite 153 ® ® ® “ ” 1 7 6 1 7 6 1 7 6 1 7 6 1 7 6 ASRock P45X3 Deluxe Motherboard...
- Seite 154 ® ® ® ® ® ® ® ® 1 7 7 1 7 7 1 7 7 1 7 7 1 7 7 ASRock P45X3 Deluxe Motherboard...
- Seite 155 ® ® 1 7 8 1 7 8 1 7 8 1 7 8 1 7 8 ASRock P45X3 Deluxe Motherboard...
- Seite 156 1 7 9 1 7 9 1 7 9 1 7 9 1 7 9 ASRock P45X3 Deluxe Motherboard...
- Seite 157 1 8 0 1 8 0 1 8 0 1 8 0 1 8 0 ASRock P45X3 Deluxe Motherboard...
- Seite 158 1 8 1 1 8 1 1 8 1 1 8 1 1 8 1 ASRock P45X3 Deluxe Motherboard...
- Seite 159 1 8 2 1 8 2 1 8 2 1 8 2 1 8 2 ASRock P45X3 Deluxe Motherboard...
- Seite 160 1 8 3 1 8 3 1 8 3 1 8 3 1 8 3 ASRock P45X3 Deluxe Motherboard...
- Seite 161 ® 1 8 4 1 8 4 1 8 4 1 8 4 1 8 4 ASRock P45X3 Deluxe Motherboard...
- Seite 162 1 8 5 1 8 5 1 8 5 1 8 5 1 8 5 ASRock P45X3 Deluxe Motherboard...
- Seite 163 1 8 6 1 8 6 1 8 6 1 8 6 1 8 6 ASRock P45X3 Deluxe Motherboard...
- Seite 164 1 8 7 1 8 7 1 8 7 1 8 7 1 8 7 ASRock P45X3 Deluxe Motherboard...
- Seite 165 ® ® ® ® ® 1 8 8 1 8 8 1 8 8 1 8 8 1 8 8 ASRock P45X3 Deluxe Motherboard...
- Seite 166 4 3 2 1 1 8 9 1 8 9 1 8 9 1 8 9 1 8 9 ASRock P45X3 Deluxe Motherboard...
- Seite 167 1 9 0 1 9 0 1 9 0 1 9 0 1 9 0 ASRock P45X3 Deluxe Motherboard...
- Seite 168 RESET CMOS ® ® ® ® ® ® 1 9 1 1 9 1 1 9 1 1 9 1 1 9 1 ASRock P45X3 Deluxe Motherboard...
- Seite 169 ® ® ® ® ® ® ® ® ® ® ® ® 1 9 2 1 9 2 1 9 2 1 9 2 1 9 2 ASRock P45X3 Deluxe Motherboard...
- Seite 170 ® ® 1 9 3 1 9 3 1 9 3 1 9 3 1 9 3 ASRock P45X3 Deluxe Motherboard...
- Seite 171 1 9 4 1 9 4 1 9 4 1 9 4 1 9 4 ASRock P45X3 Deluxe Motherboard...
- Seite 172 ® ® ® ® ® ® ® 1 9 5 1 9 5 1 9 5 1 9 5 1 9 5 ASRock P45X3 Deluxe Motherboard...
- Seite 173 1 9 6 1 9 6 1 9 6 1 9 6 1 9 6 ASRock P45X3 Deluxe Motherboard...
- Seite 174 ® ® ® ® ® ® 1 9 7 1 9 7 1 9 7 1 9 7 1 9 7 ASRock P45X3 Deluxe Motherboard...
- Seite 175 ® ® ® ® ® 1 9 8 1 9 8 1 9 8 1 9 8 1 9 8 ASRock P45X3 Deluxe Motherboard...
- Seite 176 1 9 9 1 9 9 1 9 9 1 9 9 1 9 9 ASRock P45X3 Deluxe Motherboard...
- Seite 177 2 0 0 2 0 0 2 0 0 2 0 0 2 0 0 ASRock P45X3 Deluxe Motherboard...
- Seite 178 2 0 1 2 0 1 2 0 1 2 0 1 2 0 1 ASRock P45X3 Deluxe Motherboard...
- Seite 179 DDR3_A1 DDR3_A2 DDR3_B1 DDR3_B2 (3) * 2 0 2 2 0 2 2 0 2 2 0 2 2 0 2 ASRock P45X3 Deluxe Motherboard...
- Seite 180 2 0 3 2 0 3 2 0 3 2 0 3 2 0 3 ASRock P45X3 Deluxe Motherboard...
- Seite 181 2 0 4 2 0 4 2 0 4 2 0 4 2 0 4 ASRock P45X3 Deluxe Motherboard...
- Seite 182 ® ® 2 0 5 2 0 5 2 0 5 2 0 5 2 0 5 ASRock P45X3 Deluxe Motherboard...
- Seite 183 2 0 6 2 0 6 2 0 6 2 0 6 2 0 6 ASRock P45X3 Deluxe Motherboard...
- Seite 184 2 0 7 2 0 7 2 0 7 2 0 7 2 0 7 ASRock P45X3 Deluxe Motherboard...
- Seite 185 ® ® ® ® 2 0 8 2 0 8 2 0 8 2 0 8 2 0 8 ASRock P45X3 Deluxe Motherboard...
- Seite 186 4 3 2 1 2 0 9 2 0 9 2 0 9 2 0 9 2 0 9 ASRock P45X3 Deluxe Motherboard...
- Seite 187 2 1 0 2 1 0 2 1 0 2 1 0 2 1 0 ASRock P45X3 Deluxe Motherboard...
- Seite 188 RESET CMOS ® ® ® ® ® ® ® ® 2 1 1 2 1 1 2 1 1 2 1 1 2 1 1 ASRock P45X3 Deluxe Motherboard...
- Seite 189 ® ® ® ® ® ® ® ® ® ® ® ® ® ® 2 1 2 2 1 2 2 1 2 2 1 2 2 1 2 ASRock P45X3 Deluxe Motherboard...
- Seite 190 ® ® ® ® ® ® ® ® 2 1 3 2 1 3 2 1 3 2 1 3 2 1 3 ASRock P45X3 Deluxe Motherboard...
- Seite 191 2 1 4 2 1 4 2 1 4 2 1 4 2 1 4 ASRock P45X3 Deluxe Motherboard...
- Seite 192 2 1 5 2 1 5 2 1 5 2 1 5 2 1 5 ASRock P45X3 Deluxe Motherboard...
- Seite 193 ® ® ® ® ® ® ® 2 1 6 2 1 6 2 1 6 2 1 6 2 1 6 ASRock P45X3 Deluxe Motherboard...
- Seite 194 2 1 7 2 1 7 2 1 7 2 1 7 2 1 7 ASRock P45X3 Deluxe Motherboard...
- Seite 195 ® ® ® ® ® ® 2 1 8 2 1 8 2 1 8 2 1 8 2 1 8 ASRock P45X3 Deluxe Motherboard...
- Seite 196 ® ® ® ® ® 2 1 9 2 1 9 2 1 9 2 1 9 2 1 9 ASRock P45X3 Deluxe Motherboard...
- Seite 197 2 2 0 2 2 0 2 2 0 2 2 0 2 2 0 ASRock P45X3 Deluxe Motherboard...
- Seite 198 2 2 1 2 2 1 2 2 1 2 2 1 2 2 1 ASRock P45X3 Deluxe Motherboard...
- Seite 199 2 2 2 2 2 2 2 2 2 2 2 2 2 2 2 ASRock P45X3 Deluxe Motherboard...
- Seite 200 2 2 3 2 2 3 2 2 3 2 2 3 2 2 3 ASRock P45X3 Deluxe Motherboard...
- Seite 201 2 2 4 2 2 4 2 2 4 2 2 4 2 2 4 ASRock P45X3 Deluxe Motherboard...
- Seite 202 2 2 5 2 2 5 2 2 5 2 2 5 2 2 5 ASRock P45X3 Deluxe Motherboard...
- Seite 203 ® ® 2 2 6 2 2 6 2 2 6 2 2 6 2 2 6 ASRock P45X3 Deluxe Motherboard...
- Seite 204 2 2 7 2 2 7 2 2 7 2 2 7 2 2 7 ASRock P45X3 Deluxe Motherboard...
- Seite 205 2 2 8 2 2 8 2 2 8 2 2 8 2 2 8 ASRock P45X3 Deluxe Motherboard...
- Seite 206 ® ® ® ® 2 2 9 2 2 9 2 2 9 2 2 9 2 2 9 ASRock P45X3 Deluxe Motherboard...
- Seite 207 ® 4 3 2 1 2 3 0 2 3 0 2 3 0 2 3 0 2 3 0 ASRock P45X3 Deluxe Motherboard...
- Seite 208 2 3 1 2 3 1 2 3 1 2 3 1 2 3 1 ASRock P45X3 Deluxe Motherboard...
- Seite 209 RESET CMOS ® ® ® ® ® ® ® ® 2 3 2 2 3 2 2 3 2 2 3 2 2 3 2 ASRock P45X3 Deluxe Motherboard...
- Seite 210 ® ® ® ® ® ® ® ® ® 2 3 3 2 3 3 2 3 3 2 3 3 2 3 3 ASRock P45X3 Deluxe Motherboard...
- Seite 211 ® ® ® ® ® ® ® ® ® ® ® 2 3 4 2 3 4 2 3 4 2 3 4 2 3 4 ASRock P45X3 Deluxe Motherboard...
- Seite 212 ® ® ® 2 3 5 2 3 5 2 3 5 2 3 5 2 3 5 ASRock P45X3 Deluxe Motherboard...