Herunterladen Inhalt Inhalt Diese Seite drucken

Werbung

Verfügbare Sprachen
  • DE

Verfügbare Sprachen

  • DEUTSCH, seite 30
All manuals and user guides at all-guides.com
Copyright Notice:
Copyright Notice:
Copyright Notice:
Copyright Notice:
Copyright Notice:
No part of this installation guide may be reproduced, transcribed, transmitted, or trans-
lated in any language, in any form or by any means, except duplication of documen-
tation by the purchaser for backup purpose, without written consent of ASRock Inc.
Products and corporate names appearing in this guide may or may not be registered
trademarks or copyrights of their respective companies, and are used only for identifica-
tion or explanation and to the owners' benefit, without intent to infringe.
Disclaimer:
Disclaimer:
Disclaimer:
Disclaimer:
Disclaimer:
Specifications and information contained in this guide are furnished for informational
use only and subject to change without notice, and should not be constructed as a
commitment by ASRock. ASRock assumes no responsibility for any errors or omissions
that may appear in this guide.
With respect to the contents of this guide, ASRock does not provide warranty of any kind,
either expressed or implied, including but not limited to the implied warranties or
conditions of merchantability or fitness for a particular purpose. In no event shall
ASRock, its directors, officers, employees, or agents be liable for any indirect, special,
incidental, or consequential damages (including damages for loss of profits, loss of
business, loss of data, interruption of business and the like), even if ASRock has been
advised of the possibility of such damages arising from any defect or error in the guide
or product.
This device complies with Part 15 of the FCC Rules. Operation is subject to the
following two conditions:
(1) this device may not cause harmful interference, and
(2) this device must accept any interference received, including interference that
may cause undesired operation.
CALIFORNIA, USA ONLY
The Lithium battery adopted on this motherboard contains Perchlorate, a toxic
substance controlled in Perchlorate Best Management Practices (BMP) regulations
passed by the California Legislature. When you discard the Lithium battery in
California, USA, please follow the related regulations in advance.
"Perchlorate Material-special handling may apply, see
www.dtsc.ca.gov/hazardouswaste/perchlorate"
ASRock Website: http://www.asrock.com
Published August 2009
Copyright©2009 ASRock INC. All rights reserved.
ASRock P55M Pro Motherboard
1 1 1 1 1

Werbung

Inhaltsverzeichnis
loading

Inhaltszusammenfassung für ASROCK P55M Pro

  • Seite 1 ASRock. ASRock assumes no responsibility for any errors or omissions that may appear in this guide. With respect to the contents of this guide, ASRock does not provide warranty of any kind, either expressed or implied, including but not limited to the implied warranties or conditions of merchantability or fitness for a particular purpose.
  • Seite 2: Motherboard-Layout

    16Mb SPI Flash (HDMI_SPDIF1, Yellow) USB 2.0 Header (USB12_13, Blue) Internal Audio Connector: CD1 (Black) Front Panel IEEE 1394 Header Front Panel Audio Header (FRONT_1394, Red) (HD_AUDIO1, Lime) USB 2.0 Header (USB10_11, Blue) 2 2 2 2 2 ASRock P55M Pro Motherboard...
  • Seite 3 See the table below for connection details in accordance with the type of speaker you use. TABLE for Audio Output Connection Audio Output Channels Front Speaker Rear Speaker Central / Bass Side Speaker (No. 9) (No. 6) (No. 7) (No. 5) 3 3 3 3 3 ASRock P55M Pro Motherboard...
  • Seite 4 In “Advanced Options” screen, select “Independent Headphone”, and click “OK” to save your change. If you enable Multi-Streaming function, Side Speaker function will be disabled. You can only choose to enable either Multi-Streaming function or Side Speaker function. 4 4 4 4 4 ASRock P55M Pro Motherboard...
  • Seite 5: Package Contents

    In case any modifications of this manual occur, the updated version will be available on ASRock website without further notice. You may find the latest VGA cards and CPU support lists on ASRock website as well. ASRock website http://www.asrock.com If you require technical support related to this motherboard, please visit our website for specific information about the model you are using.
  • Seite 6 - 1 x RJ-45 LAN Port with LED (ACT/LINK LED and SPEED LED) - 1 x IEEE 1394 Port - HD Audio Jack: Side Speaker/Rear Speaker/Central/Bass/ Line in/Front Speaker/Microphone (see CAUTION 6) 6 6 6 6 6 ASRock P55M Pro Motherboard...
  • Seite 7 - Supports Smart BIOS Support CD - Drivers, Utilities, AntiVirus Software (Trial Version) Unique Feature - ASRock OC Tuner (see CAUTION 9) - Intelligent Energy Saver (see CAUTION 10) - Instant Boot - ASRock Instant Flash (see CAUTION 11) - ASRock OC DNA (see CAUTION 12)
  • Seite 8 64-bit / Vista / XP 64-bit / XP SP1 or SP2. It is a user-friendly ASRock overclocking tool which allows you to surveil your system by hardware monitor function and overclock your hardware devices to get the best system performance under Windows ®...
  • Seite 9 Please visit our website for the operation procedures of Intelligent Energy Saver. ASRock website: http://www.asrock.com/feature/IES/index.html 11. ASRock Instant Flash is a BIOS flash utility embedded in Flash ROM. This convenient BIOS update tool allows you to update system BIOS without entering operating systems first like MS-DOS or Windows ®...
  • Seite 10 * The graphics cards with * mark are supported under Windows Vista / Vista 64-bit only. * For the latest updates of the supported PCI Express VGA card list for CrossFireX Mode, please visit our website for details. ASRock website: http://www.asrock.com/support/index.htm ASRock P55M Pro Motherboard...
  • Seite 11 CPU surface is unclean or if there is any bent pin on the socket. Do not force to insert the CPU into the socket if above situation is found. Otherwise, the CPU will be seriously damaged. ASRock P55M Pro Motherboard...
  • Seite 12 Pin1 Pin1 alignment key 1156-Pin Socket orientation key notch 1156-Pin CPU For proper inserting, please ensure to match the two orientation key notches of the CPU with the two alignment keys of the socket. ASRock P55M Pro Motherboard...
  • Seite 13 Please be noticed that this motherboard supports Combo Cooler Option (C.C.O.), which provides the flexible option to adopt two different CPU cooler types, Socket LGA 775 and LGA 1156. The white throughholes are for Socket LGA 1156 CPU fan. ASRock P55M Pro Motherboard...
  • Seite 14 It is not allowed to install a DDR or DDR2 memory module into DDR3 slot;otherwise, this motherboard and DIMM may be damaged. Please install the memory module into the white slot (DDR3_B1) for the first priority. ASRock P55M Pro Motherboard...
  • Seite 15: Installing A Dimm

    DIMM if you force the DIMM into the slot at incorrect orientation. Step 3. Firmly insert the DIMM into the slot until the retaining clips at both ends fully snap back in place and the DIMM is properly seated. ASRock P55M Pro Motherboard...
  • Seite 16: Installing An Expansion Card

    Step 4. Align the card connector with the slot and press firmly until the card is completely seated on the slot. Step 5. Fasten the card to the chassis with screws. Step 6. Replace the system cover. ASRock P55M Pro Motherboard...
  • Seite 17 Step 1. Insert one Radeon graphics card into PCIE1 slot and the other Radeon graphics card to PCIE3 slot. Make sure that the cards are properly seated on the slots. ASRock P55M Pro Motherboard...
  • Seite 18 Step 2. Connect the DVI monitor cable to the DVI connector on the Radeon graphics card on PCIE1 slot. (You may use the DVI to D-Sub adapter to convert the DVI connector to D-Sub interface, and then connect the D-Sub monitor cable to the DVI to D-Sub adapter.) ASRock P55M Pro Motherboard...
  • Seite 19 Step 6. Double-click “ATI Catalyst Control Center”. Click “View”, select “CrossFireX ”, and then check the item “Enable CrossFireX ”. Select the option according to the total GPU number on the Radeon graphics cards. Click “Apply”. ASRock P55M Pro Motherboard...
  • Seite 20 ATI Technologies Inc., and is used only for identification or explanation and to the owners’ benefit, without intent to infringe. * For further information of ATI CrossFireX technology, please check AMD website for updates and details. ASRock P55M Pro Motherboard...
  • Seite 21 5 seconds. However, please do not clear the CMOS right after you update the BIOS. If you need to clear the CMOS when you just finish updating the BIOS, you must boot up the system first, and then shut it down before you do the clear- CMOS action. ASRock P55M Pro Motherboard...
  • Seite 22: Power Cable

    SATA power cable to the power connector on each drive. Then (Optional) connect to the SATA connect the white end of SATA HDD power connector connect to the power cable to the power power supply connector of the power supply. ASRock P55M Pro Motherboard...
  • Seite 23 A TPM system also helps enhance network security, protects digital identities, and ensures platform integrity. Infrared Module Header This header supports an optional wireless transmitting and (5-pin IR1) receiving infrared module. (see p.2 No. 24) ASRock P55M Pro Motherboard...
  • Seite 24 (see p.2 No. 21) Chassis and Power Fan Connectors Please connect the fan cables to the fan connectors and (4-pin CHA_FAN1) match the black wire to the (see p.2 No. 20) ground pin. (3-pin PWR_FAN1) (see p.2 No. 4) ASRock P55M Pro Motherboard...
  • Seite 25: Atx Power Connector

    Besides one default IEEE 1394 port on the I/O panel, there is one (9-pin FRONT_1394) IEEE 1394 header (see p.2 No. 17) (FRONT_1394) on this motherboard. This IEEE 1394 header can support one IEEE 1394 port. ASRock P55M Pro Motherboard...
  • Seite 26 (Optional) HDMI_SPDIF header on the motherboard. Then connect the white end (B or C) of HDMI_SPDIF cable to the HDMI_SPDIF connector of HDMI VGA card. A. black end B. white end (2-pin) C. white end (3-pin) ASRock P55M Pro Motherboard...
  • Seite 27 STEP 1: Set up BIOS. A. Enter BIOS SETUP UTILITY Advanced screen Storage Configuration. B. Set the option “SATAII Operation Mode” to [IDE]. ® STEP 2: Install Windows XP / XP 64-bit OS on your system. ASRock P55M Pro Motherboard...
  • Seite 28 When you see “Where do you want to install Windows?” page, please insert the ASRock Support CD into your optical drive, and click the “Load Driver” button on the left on the bottom to load the Intel ®...
  • Seite 29 Main Menu automatically if “AUTORUN” is enabled in your computer. If the Main Menu does not appear automatically, locate and double-click on the file “ASSETUP. EXE” from the BIN folder in the Support CD to display the menus. ASRock P55M Pro Motherboard...
  • Seite 30: Einführung

    1. Einführung 1. Einführung 1. Einführung Wir danken Ihnen für den Kauf des ASRock P55M Pro Motherboard, ein zuverlässiges Produkt, welches unter den ständigen, strengen Qualitätskontrollen von ASRock gefertigt wurde. Es bietet Ihnen exzellente Leistung und robustes Design, gemäß der Verpflichtung von ASRock zu Qualität und Halbarkeit.
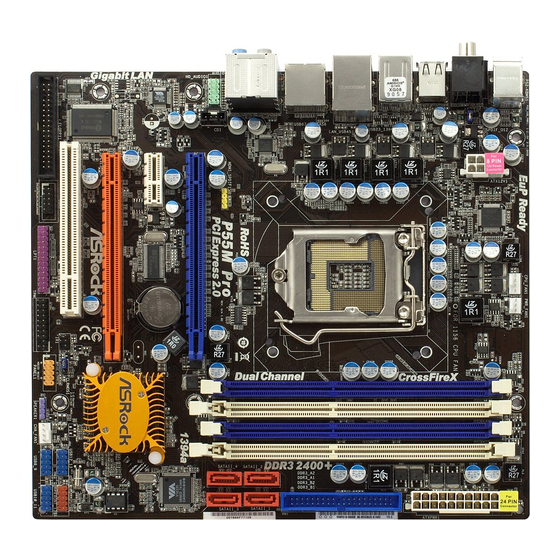
  • Seite 31: Spezifikationen

    - 1 x PS/2-Tastaturanschluss - 1 x Koaxial-SPDIF-Ausgang - 1 x optischer SPDIF-Ausgang - 6 x Standard-USB 2.0-Anschlüsse - 2 x eSATAII/USB-Anschluss mit Stromversorgung - 1 x RJ-45 LAN Port mit LED (ACT/LINK LED und SPEED LED) ASRock P55M Pro Motherboard...
  • Seite 32 - Unterstützt I. O. T. (Intelligente Übertakten Technologie) - Unterstützt Smart BIOS Support-CD - Treiber, Dienstprogramme, Antivirussoftwar (Probeversion) Einzigartige - ASRock OC Tuner (siehe VORSICHT 9) Eigenschaft - Intelligent Energy Saver (Intelligente Energiesparfunktion) (siehe VORSICHT 10) - Sofortstart - ASRock Instant Flash (siehe VORSICHT 11)
  • Seite 33 Speichergröße weniger als 4 GB betragen, da unter Windows XP und ® Windows Vista™ etwas Speicher zur Nutzung durch das System reserviert wird. Unter Windows ® XP 64-bit und Windows ® Vista ™ 64-bit mit 64-Bit-CPU besteht diese Einschränkung nicht. ASRock P55M Pro Motherboard...
  • Seite 34 Dateisystem FAT32/16/12 benutzen muss. 12. Allein der Name – OC DNA* – beschreibt es wörtlich, was die Software zu leisten vermag. OC DNA ist ein von ASRock exklusiv entwickeltes Dienstprogramm, das Nutzern eine bequeme Möglichkeit bietet, Übertaktungseinstellungen aufzuzeichnen und sie Anderen mitzuteilen.
  • Seite 35 Stromversorgung dem Standard entsprechen, was bedeutet, dass bei einem Stromverbrauch von 100 mA die 5-Volt-Standby-Energieeffizienz höher als 50% sein sollte. Für die Wahl einer EuP-fähigen Stromversorgung empfehlen wir Ihnen, weitere Details beim Hersteller der Stromversorgung abzufragen. ASRock P55M Pro Motherboard...
  • Seite 36: Sicherheitshinweise Vor Der Montage

    Bevor Sie die 1156-Pin CPU in den Sockel sitzen, prüfen Sie bitte, ob die CPU-Oberfläche sauber ist und keine der Kontakte verbogen sind. Setzen Sie die CPU nicht mit Gewalt in den Sockel, dies kann die CPU schwer beschädigen. ASRock P55M Pro Motherboard...
  • Seite 37 Seiten. Schritt 3-2. Halten Sie das Teil mit dem IHS (Integrated Heat Sink – integrierter Kühlkörper) nach oben. Suchen Sie Pin 1 und die zwei Orientierungseinkerbungen. Orientierungskerbe Ausrichtungsmarkierung Pin1 Pin1 Ausrichtungsmarkierung Orientierungskerbe 1156-Pin Sockel 1156-Pin CPU ASRock P55M Pro Motherboard...
  • Seite 38 Schritt 4. Sockel schließen: Schritt 4-1. Drehen Sie die Ladeplatte auf den Kühlkörper (IHS). Schritt 4-2. Drücken Sie leicht auf die Ladeplatte und schließen Sie den Ladehebel. Schritt 4-3. Sichern Sie Ladehebel und Ladeplatte mithilfe des Hebelverschlusses. ASRock P55M Pro Motherboard...
  • Seite 39 Beachten Sie bitte, dass dieses Motherboard die Combo- Kühleroption unterstützt, die eine flexible Möglichkeit zur Aufnahme von zwei verschiedenen CPU-Kühlertypen, Socket LGA 775 und LGA 1156, bietet. Das weiße Durchgangsloch ist für den CPU- Lüfter im Socket LGA 1156 vorgesehen. ASRock P55M Pro Motherboard...
  • Seite 40: Installation Der Speichermodule (Dimm)

    2.3 Installation der Speichermodule (DIMM) 2.3 Installation der Speichermodule (DIMM) 2.3 Installation der Speichermodule (DIMM) Die Motherboards P55M Pro bieten vier 240-pol. DDR3 (Double Data Rate 3) DIMM-Steckplätze und unterstützen die Dual-Kanal-Speichertechnologie. Für die Dual-Kanalkonfiguration dürfen Sie nur identische (gleiche Marke, Geschwindigkeit, Größe und gleicher Chiptyp) DDR3 DIMM-Paare in den...
  • Seite 41: Einsetzen Eines Dimm-Moduls

    Schäden am Mainboard und am DIMM-Modul. Schritt 3: Drücken Sie die DIMM-Module fest in die Steckplätze, so dass die Halteklammern an beiden Enden des Moduls einschnappen und das DIMM-Modul fest an Ort und Stelle sitzt. ASRock P55M Pro Motherboard...
  • Seite 42: Erweiterungssteckplätze (Pci-Steckplätze Und Pci Express Express -Steckplätze) Express -Steckplätze)

    -Steckplätze) -Steckplätze) Express Express -Steckplätze) Es gibt einen 1 PCI-Steckplätze und 3 PCI Express-Steckplätze am P55M Pro Motherboard. PCI-Slots: PCI-Slots werden zur Installation von Erweiterungskarten mit dem 32bit PCI-Interface genutzt. PCI Express-Slots: PCIE1 (PCIE x16-Steckplatz; blau) wird für PCI Express x16 Lane-Breite-Grafikkarten oder für die Installation von PCI...
  • Seite 43 2.6 “Surround Display” 2.6 “Surround Display” Dieses Motherboard unterstützt Surround Display-Aufrüstung. Mit zusätzlichen PCI Express-VGA-Karte können Sie die Vorteile der Surround Display-Funktion problemlos genießen. Für detaillierte Informationen, siehe folgendes Dokument auf beiliegender Support-CD: ..\ Surround Display Information ASRock P55M Pro Motherboard...
  • Seite 44: Einstellung Der Jumper

    Sie nicht, den Jumper wieder zu entfernen, nachdem das CMOS gelöscht wurde. Wenn Sie den CMOS-Inhalt gleich nach dem Aktualisieren des BIOS löschen müssen, müssen Sie zuerst das System starten und dann wieder ausschalten, bevor Sie den CMOS-Inhalt löschen. ASRock P55M Pro Motherboard...
  • Seite 45: Integrierte Header Und Anschlüsse

    (SATAII_4: siehe S.2 - No. 13) aktuelle SATAII-Schnittstelle ermöglicht eine Datenübertragungsrate bis 3,0 Gb/s. Serial ATA- (SATA-) SJedes Ende des SATA Datenkabel Datenkabels kann an die SATA / SATAII Festplatte oder das (Option) SATAII Verbindungsstück auf dieser Hauptplatine angeschlossen werden. ASRock P55M Pro Motherboard...
  • Seite 46 Dieser Anschluss unterstützt ein Trusted Platform Module-System (19-Pin TPM1) (TPM: Vertrauenswürdiges (siehe S.2 - No. 25) Plattformmodul), auf dem sich Schlüssel, Digitalzertifikate, Kennwörter und Daten auf sichere Weise speichern lassen. Ein TPM-System hilft auch bei der Verbesserung der ASRock P55M Pro Motherboard...
  • Seite 47: Interne Audio-Anschlüsse

    D. MIC_RET und OUT_RET sind nur für den HD-Audioanschluss gedacht. Diese Anschlüsse müssen nicht an die AC’97-Audioleiste angeschlossen werden. E. Rufen Sie das BIOS-Setup-Dienstprogramm auf. Wechseln Sie zu Erweiterte Einstellungen und wählen Sie Chipset-Konfiguration. Setzen Sie die Option Frontleistenkontrolle von [Automatisch] auf [Aktiviert]. ASRock P55M Pro Motherboard...
  • Seite 48: Gehäuselautsprecher-Header

    Obwohl dieses Motherboard einen 24-pol. ATX-Stromanschluss bietet, kann es auch mit einem modifizierten traditionellen 20-pol. ATX-Netzteil verwendet werden. Um ein 20-pol. ATX-Netzteil zu verwenden, stecken Sie den Stecker mit Pin 1 und Pin 13 ein. Installation eines 20-pol. ATX-Netzteils ASRock P55M Pro Motherboard...
  • Seite 49 (HDMI_SPDIF1, dreipolig) Audioausgang für eine HDMI- (siehe S.2 - No. 33) VGA-Karte zur Verfügung und ermöglicht den Anschluss von HDMI-Digitalgeräten wie Fernsehgeräten, Projektoren, LCD-Geräten an das System. Bitte verbinden Sie den HDMI_SPDIF-Anschluss der HDMI-VGA-Karte mit diesem Anschluss. ASRock P55M Pro Motherboard...
  • Seite 50 Wenn Sie Windows ® XP / XP 64-Bit / Vista / Vista 64-Bit ohne RAID- Funktionalität auf Ihren SATA / SATAII-Festplatten installieren, dann folgen Sie bitte je nach dem zu installierenden Betriebssystem den folgenden Schritten. ASRock P55M Pro Motherboard...
  • Seite 51: Windows Xp / Xp 64-Bit Ohne Raid-Funktionalität Installieren

    64-Bit Betriebssystem auf Ihrem System zu installieren. Wenn die Frage “Wo möchten Sie Windows installieren?” erscheint, legen Sie bitte die ASRock Support CD in Ihr optisches Laufwerk ein. Klicken Sie anschließend die “Treiber laden”-Schaltfläche links unten, um die Intel ®...
  • Seite 52 ASSETUP.EXE im BIN-Verzeichnis der Support-CD, um die Menüs aufzurufen. Das Setup-Programm soll es Ihnen so leicht wie möglich machen. Es ist menügesteuert, d.h. Sie können in den verschiedenen Untermenüs Ihre Auswahl treffen und die Programme werden dann automatisch installiert. ASRock P55M Pro Motherboard...
  • Seite 53: Contenu Du Paquet

    1. Introduction 1. Introduction Merci pour votre achat d’une carte mère ASRock P55M Pro, une carte mère très fiable produite selon les critères de qualité rigoureux de ASRock. Elle offre des performances excellentes et une conception robuste conformément à l’engagement d’ASRock sur la qualité...
  • Seite 54 - 1 x port clavier PS/2 - 1 x Port de sortie coaxial SPDIF - 1 x Port de sortie optique SPDIF - 6 x ports USB 2.0 par défaut - 2 x Connecteur eSATAII/USB alimenté ASRock P55M Pro Motherboard...
  • Seite 55 - Prise en charge du Smart BIOS CD d’assistance - Pilotes, utilitaires, logiciel anti-virus (Version d’essai) Caractéristique - Tuner ASRock OC (voir ATTENTION 9) unique - Économiseur d’énergie intelligent (voir ATTENTION 10) - l'Instant Boot - ASRock Instant Flash (voir ATTENTION 11)
  • Seite 56 All manuals and user guides at all-guides.com - L’accélérateur hybride: - Contrôle direct de la fréquence CPU (voir ATTENTION 13) - ASRock U-COP (voir ATTENTION 14) - Garde d’échec au démarrage (B.F.G.) - Combo Cooler Option (C.C.O.) (voir ATTENTION 15) - DEL veilleuse Surveillance - Contrôle de la température CPU...
  • Seite 57 Energy Saver. Site Web ASRock : http://www.asrock.com/feature/IES/index.html 11. O ASRock Instant Flash é um utilitário de flash do BIOS incorporado na memória Flash ROM. Esta prática ferramenta de actualização do BIOS permite-lhe actualizar o BIOS do sistema sem necessitar de entrar nos ®...
  • Seite 58 5v en mode de veille doit être supérieure à 50% pour 100 mA de consommation de courant. Pour choisir une alimentation électrique conforme à la norme EuP, nous vous recommandons de consulter votre fournisseur de courant pour plus de détails. ASRock P55M Pro Motherboard...
  • Seite 59 Si c’est le cas, ne forcez pas pour insérer le processeur dans le socket. Sinon, le processeur sera gravement endommagé. ASRock P55M Pro Motherboard...
  • Seite 60 Etape 3-2. Orientez le paquet avec le dissipateur thermique intégré (IHS) vers le haut. Repérez la broche 1 et les deux encoches d’orientation. Détrompeur Encoche d’orientation broche 1 broche 1 Détrompeur Socket 1156 broches Encoche d’orientation Processeur 1156 broches ASRock P55M Pro Motherboard...
  • Seite 61 L’exemple ci-dessous illustre l’installation du dissipateur thermique pour un processeur 1366 broches. (Appliquez le matériau d’interface thermique) Etape 1. Appliquez le matériau d’interface thermique au centre de IHS sur la surface du socket. peur broche 1 peur roches ASRock P55M Pro Motherboard...
  • Seite 62 Cooler Option (C.C.O.), qui offre un choix flexible pour adopter deux types différents de refroidisseurs de CPU, les sockets LGA 775 et LGA 1156. Les trous traversant blancs sont pour le ventilateur de CPU au socket LGA 1156. ASRock P55M Pro Motherboard...
  • Seite 63 2.3 Installation des modules m émoire [DIMM] 2.3 Installation des modules m émoire [DIMM] La carte mère P55M Pro dispose de quatre emplacements DIMM DDR3 (Double Data Rate 3) de 240-broches, et supporte la Technologie de Mémoire à Canal Double. Pour effectuer une configuration à canal double, vous devez toujours installer des paires de DIMM DDR3 identiques (de la même marque, de la même...
  • Seite 64 DIMM. Etape 3. Insérez fermement le module DIMM dans son emplacement jusqu’à ce que les clips de maintien situés aux deux extrémités se ferment complètement et que le module DIMM soit inséré correctement. ASRock P55M Pro Motherboard...
  • Seite 65 Slot d’extension (Slots PCI et Slots PCI Express) Slot d’extension (Slots PCI et Slots PCI Express) Il y a 1 ports PCI et 3 ports PCI Express sur la carte mère P55M Pro. Slots PCI: Les slots PCI sont utilisés pour installer des cartes d’extension dotées d’une interface PCI 32 bits.
  • Seite 66 VGA PCI Express, vous pouvez facilement jouir des avantages de la caractéristique de l’affichage Surround. Pour les instructions détaillées, veuillez vous reporter au document qui se trouve sur le chemin suivant dans le CD d’assistance : ..\ Surround Display Information ASRock P55M Pro Motherboard...
  • Seite 67 BIOS à jour. Si vous avez besoin d’effacer la CMOS lorsque vous avez fini de mettre le BIOS à jour, vous devez d’abord initialiser le système, puis le mettre hors tension avant de procéder à l’opération d’effacement de la CMOS. ASRock P55M Pro Motherboard...
  • Seite 68 3,0 Gb/s. Câble de données Toute cote du cable de data SATA Série ATA (SATA) peut etre connecte au disque dur SATA / SATAII ou au connecteur (en option) SATAII sur la carte mere. ASRock P55M Pro Motherboard...
  • Seite 69 (TPM1 br. 19) un système Trusted Platform (voir p.2 No. 25) Module (TPM ou module de plateforme de confiance), qui peut stocker des clés de sécurité, des certificats numériques, des mots de passe et des données. Un système ASRock P55M Pro Motherboard...
  • Seite 70 Configuration du jeu de puces. Définir l’option panneau de commande de [Auto] à [Activé]. En-tête du panneau système Cet en-tête permet d’utiliser plusieurs fonctions du (PANEL1 br.9) panneau système frontal. (voir p.2 No. 23) ASRock P55M Pro Motherboard...
  • Seite 71 ATX 20 broches, branchez à l’alimentation électrique ainsi qu’aux broches 1 et 13. 20-Installation de l’alimentation électrique ATX Connecteur ATX 12V Veuillez connecter une unité d’alimentation électrique ATX (ATX12V1 br.8) 12V sur ce connecteur. (voir p.2 No. 2) ASRock P55M Pro Motherboard...
  • Seite 72 Câble HDMI_SPDIF Veuillez connecter l’extrémité noire (A) du câble HDMI_SPDIF (en option) au collecteur HDMI_SPDIF de la carte-mère. Connectez ensuite l’extrémité blanche (B ou C) du câble HDMI_SPDIF au connecteur HDMI_SPDIF de la carte VGA HDMI. ASRock P55M Pro Motherboard...
  • Seite 73 A. Accédez à BIOS SETUP UTILITY (Utilitaire de configuration BIOS) écran Avancé Configuration Storage. B. Réglez «SATAII Operation Mode « sur [IDE]. ETAPE 2 : Installez le système d’exploitation Windows ® XP / XP 64 bits sur votre système. ASRock P55M Pro Motherboard...
  • Seite 74 / Vista 64-bits sur votre système. Lorsque vous voyez la page “Où souhaitez-vous installer Windows ?”, veuillez insérer le CD Support d’ ASRock dans votre lecteur optique, et cliquer sur le bouton “Charger le pilote” en bas à gauche ®...
  • Seite 75 CD-ROM. Le Menu principal s’affiche automatiquement si “AUTORUN” est activé dans votre ordinateur. Si le Menu principal n’apparaît pas automatiquement, localisez dans le CD technique le fichier “ASSETUP.EXE” dans le dossier BIN et double-cliquez dessus pour afficher les menus. ASRock P55M Pro Motherboard...
  • Seite 76: Contenuto Della Confezione

    All manuals and user guides at all-guides.com 1. Introduzione Grazie per aver scelto una scheda madre ASRock P55M Pro, una scheda madre affidabile prodotta secondo i severi criteri di qualità ASRock. Le prestazioni eccellenti e il design robusto si conformano all’impegno di ASRock nella ricerca della qualità e della resistenza.
  • Seite 77 - 1 x Porta ottica SPDIF Out - 6 x porte USB 2.0 già integrate - 2 x Connettore alimentato eSATAII/USB - 1 x porte LAN RJ-45 con LED (LED azione/collegamento e LED velocità) - 1 x porte IEEE 1394 ASRock P55M Pro Motherboard...
  • Seite 78 - Smart BIOS supportato CD di - Driver, utilità, software antivirus (Versione dimostrativa) supporto Caratteristica - Sintonizzatore ASRock OC (vedi ATTENZIONE 9) speciale - Intelligent Energy Saver (Risparmio intelligente dell’energia) (vedi ATTENZIONE 10) - Instant Boot - ASRock Instant Flash (vedi ATTENZIONE 11)
  • Seite 79 - Predisposto EuP (è necessaria l’alimentazione predisposta per il sistema EuP) (vedi ATTENZIONE 16) * Per ulteriori informazioni, prego visitare il nostro sito internet: http://www.asrock.com AVVISO Si prega di prendere atto che la procedura di overclocking implica dei rischi, come anche la regolazione delle impostazioni del BIOS, l’applicazione della tecnologia Untied Overclocking...
  • Seite 80 64-bit / Vista / XP 64 bit / XP SP1; SP2. Si tratta di uno strumento di sicronizzazione ASRock di face uso in grado di implementare il controllo del sistema tramite la funzione di hardware monitor e sincronizzare le Vostre unita‘ hardware per ottenere la migliore prestazione in Windows .
  • Seite 81 5 v è più alta del 50% con un consumo di corrente di 100 mA. Per la scelta di un’alimentatore predisposto EuP consigliamo di verificare ulteriori dettagli con il produttore. ASRock P55M Pro Motherboard...
  • Seite 82 Prima da inserire la CPU da 1156-Pin nel socket, verificare che la superficie della CPU sia pulita e che non ci siano pin piegati nel socket. Non forzare l’inserimento della CPU nel socket se ci sono pin piegati. In caso contrario la CPU potrebbe essere seriamente danneggiata. ASRock P55M Pro Motherboard...
  • Seite 83 (Integrated Heat Sink: dispersore di calore integrato) verso l’alto. Individuare il Pin1 ed i due dentelli chiave d’orientamento. Dente di orientamento Tacca di allineamento Pin1 Pin1 Tacca di allineamento Socket da 1156-Pin Dente di orientamento CPU da 1156-Pin ASRock P55M Pro Motherboard...
  • Seite 84 Fase 4-2. Bloccare la leva di carico mentre si preme leggermente sulla piastra di carico. Fase 4-3. Fissare la leva di carico con la linguetta della piastra di carico che si trova sulla parte inferiore della linguetta di ritenzione della leva di carico. ASRock P55M Pro Motherboard...
  • Seite 85 Notare che questa scheda mare supporta l’opzione C.C.O. (Combo Cooler Option), che fornisce la flessibilità di impiegare due tipi diversi di dispersori di calore CPU, Socket LGA 775 e LGA 1156. I fori di colore bianco sono per la ventola CPU Socket LGA 1156. ASRock P55M Pro Motherboard...
  • Seite 86 2.3 Installazione dei moduli di memoria (DIMM) 2.3 Installazione dei moduli di memoria (DIMM) La scheda madre P55M Pro fornisce quattro alloggiamenti DIMM DDR3 (Double Data Rate 3) a 240 pin, e supporta la tecnologia Dual Channel Memory. Per la configurazione a due canali, è...
  • Seite 87 DIMM stessa. Step 3. Inserire saldamente la DIMM nello slot fino a far scattare completamente in posizione i fermagli di ritegno alle due estremità e fino ad installare correttamente la DIMM nella sua sede. ASRock P55M Pro Motherboard...
  • Seite 88 Slot di espansione (Slot PCI ed Slot PCI Express) Slot di espansione (Slot PCI ed Slot PCI Express) Sulla scheda madre P55M Pro c’è 1 slot PCI ed 3 slot PCI Express. Slot PCI: Sono utilizzati per installare schede di espansione con Interfaccia PCI a 32-bit.
  • Seite 89 Questa scheda madre supporta l’aggiornamento Surround Display. Con la scheda integrativa PCI Express VGA, si possono sfruttare con facilità i benefici della funzione Surround Display. Per le istruzioni dettagliate, fare riferimento al documento nel seguente percorso sul CD di supporto: ..\ Surround Display Information ASRock P55M Pro Motherboard...
  • Seite 90 Non cancellare la CMOS subito dopo aver aggiornato il BIOS. Se è necessario cancellare la CMOS una volta completato l’aggiornamento del BIOS, è necessario riavviare prima il sistema, e poi spegnerlo prima di procedere alla cancellazione della CMOS. ASRock P55M Pro Motherboard...
  • Seite 91 Serial ATA (SATA) cavo di alimentazione SATA al connettore di alimentazione del (Opzionale) Connettere all’ailmentazione drive. Poi connettete l’estremità dei dischi SATA Connettere al gruppo bianca del cavo di alimentazione di alimentazione SATA al connettore power dell’alimentatore. ASRock P55M Pro Motherboard...
  • Seite 92 Collettore modulo infrarossi Questo collettore supporta moduli ad infrarossi optional (5-pin IR1) per la trasmissione e la (vedi p.2 Nr. 24) ricezione senza fili. ASRock P55M Pro Motherboard...
  • Seite 93 Un pannello frontale. (vedi p.2 Nr. 23) aiuta anche a urezza di rete, tità digitali e grità della Collettore casse telaio Collegare le casse del telaio a questo collettore. (4-pin SPEAKER1) (vedi p.2 Nr. 21) ASRock P55M Pro Motherboard...
  • Seite 94 12V, l‘unita‘ puo‘ ancora essere funzionante se viene utilizzata una fornitura elettrica tradizionale a 4-pin ATX 12V. Per usare tale fornitura elettrica 4-pin ATX 12V, prego collegare la presa elettrica al Pin 1 e Pin 5. Installazione elettrica 4-Pin ATX 12V ASRock P55M Pro Motherboard...
  • Seite 95 (opzionale) all’intestazione HDMI_SPDIF sulla scheda madre. Quindi collegare l’estremità bianca (B o C) del cavo HDMI_SPDIF al connettore HDMI_SPDIF della scheda HDMI VGA. A. estremità nera B. estremità bianca (2 pin) C. estremità bianca (3 pin) ASRock P55M Pro Motherboard...
  • Seite 96 Passo 1: Configurare il BIOS. A. Entrare in BIOS SETUP UTILITY (UTILITÀ DI CONFIGURAZIONE DEL BIOS) Advanced screen (Avanzate) Storage Configuration. B. Impostare “SATAII Operation Mode” su [IDE]. Passo 2: Installazione di Windows ® XP / XP 64-bit sul sistema. ASRock P55M Pro Motherboard...
  • Seite 97 64-bit sul sistema. Quando si vede la pagina “Where do you want to install Windows?” (Dove si vuole eseguire l’istallazione di Windows), inserire il CD di supporto ASRock nell’unità ottica e fare clic sul pulsante “Carica driver” , in basso a sinistra, per caricare i driver Intel ®...
  • Seite 98 Inserire il CD di supporto nel lettore CD-ROM. Se la funzione “AUTORUN” è attivata nel computer, apparirà automaticamente il Menù principale. Se il Menù principale non appare automaticamente, posizionarsi sul file “ASSETUP.EXE” nel CESTINO del CD di supporto e cliccare due volte per visualizzare i menù. ASRock P55M Pro Motherboard...
  • Seite 99: Contenido De La Caja

    1. Introducción 1. Introducción Gracias por su compra de ASRock P55M Pro placa madre, una placa de confianza producida bajo el control de calidad estricto y persistente. La placa madre provee realización excelente con un diseño robusto conforme al compromiso de calidad y resistencia de ASRock.
  • Seite 100 - 1 x Puerto LAN RJ-45 con LED (LED de ACCIÓN/ENLACE y LED de VELOCIDAD) - 1 x puerto IEEE 1394 1 0 0 1 0 0 1 0 0 1 0 0 1 0 0 ASRock P55M Pro Motherboard...
  • Seite 101 CD de soport - Controladores, Utilerías, Software de Anti Virus (Versión de prueba) Característica - Sintonizador de ASRock OC (vea ATENCIÓN 9) Única - Administrador de energía inteligente (vea ATENCIÓN 10) - Instant Boot - ASRock Instant Flash (vea ATENCIÓN 11) - ASRock OC DNA (vea ATENCIÓN 12)
  • Seite 102 All manuals and user guides at all-guides.com - ASRock U-COP (vea ATENCIÓN 14) - Protección de Falla de Inicio (B.F.G..) - Opción de refrigeración combinada (C.C.O.) (vea ATENCIÓN 15) - Indicador LED nocturno Monitor - Sensibilidad a la temperatura del procesador...
  • Seite 103 Intelligent Energy Saver. Sitio web de ASRock: http://www.asrock.com/feature/IES/index.html 11. ASRock Instant Flash es una utilidad de programación del BIOS que se encuentra almacenada en la memoria Flash ROM. Esta sencilla herramienta de actualización de BIOS le permitirá actualizar el BIOS del sistema sin necesidad de acceder a ningún sistema operativo, como MS-DOS o...
  • Seite 104 Para seleccionar una fuente de alimentación que cumpla la directiva EuP, le recomendamos que consulte con el fabricante de la fuente de alimentación para obtener más detalles. 1 0 4 1 0 4 1 0 4 1 0 4 1 0 4 ASRock P55M Pro Motherboard...
  • Seite 105 No introduzca la CPU en el socket por la fuerza si se produce la situación anterior. Si lo hace, puede producir daños graves en la CPU. 1 0 5 1 0 5 1 0 5 1 0 5 1 0 5 ASRock P55M Pro Motherboard...
  • Seite 106 Muesca de orientación aguja 1 aguja 1 Tecla de alineación Socket de 1156 agujas Muesca de orientación CPU de 1156 agujas 1 0 6 1 0 6 1 0 6 1 0 6 1 0 6 ASRock P55M Pro Motherboard...
  • Seite 107 Paso 1. Aplique el material termal de interfaz en el (Aplique el material termal de interfaz) centro del IHS de la superficie del socket. ón aguja 1 ujas 1 0 7 1 0 7 1 0 7 1 0 7 1 0 7 ASRock P55M Pro Motherboard...
  • Seite 108 LGA 775 y LGA 1156. Los orificios perforados de color blanco están destinados al ventilador de CPU para zócalos LGA 1156. 1 0 8 1 0 8 1 0 8 1 0 8 1 0 8 ASRock P55M Pro Motherboard...
  • Seite 109 2.3 Instalación de Memoria 2.3 Instalación de Memoria La placa P55M Pro ofrece cuatro ranuras DIMM DDR3 de 240 pines, y soporta Tecnología de Memoria de Doble Canal. Para la configuración de doble canal, necesitará instalar siempre pares DIMM DDR3 idénticos (de la misma marca, velocidad, tamaño y tipo) en las ranuras del mismo color.
  • Seite 110 Paso 3. Inserte la DIMM con firmeza dentro de la ranura hasta que los clips de sujeción de ambos lados queden completamente introducidos en su sitio y la DIMM se haya asentado apropiadamente. 1 1 0 1 1 0 1 1 0 1 1 0 1 1 0 ASRock P55M Pro Motherboard...
  • Seite 111 Express) Express) Express) Express) La placa madre P55M Pro cuenta con 1 ranuras PCI y 3 ranuras PCI Express. Ranura PCI: Para instalar tarjetas de expansión que tienen 32-bit Interface PCI. Ranura PCI Express: La ranura PCIE1 (ranura PCIE x16, Azul) se utiliza con tarjetas PCI Express con ancho de banda x16, o para instalar tarjetas gráficas PCI Express compatibles con la...
  • Seite 112 Express VGA puede disfrutar fácilmente de la función Surround Display. Para obtener instrucciones detalladas, consulte el documento en la siguiente ruta del CD de soporte: ..\ Surround Display Information 1 1 2 1 1 2 1 1 2 1 1 2 1 1 2 ASRock P55M Pro Motherboard...
  • Seite 113 CMOS cuando acabe de finalizar la actualización de la BIOS, debe arrancar primero el sistema y, a continuación, apagarlo antes de realizar la acción de borrado de CMOS. 1 1 3 1 1 3 1 1 3 1 1 3 1 1 3 ASRock P55M Pro Motherboard...
  • Seite 114 SATA puede ser conectado con el disco duro (Opcional) de SATA / SATAII o el conectador de SATAII en esta placa base. 1 1 4 1 1 4 1 1 4 1 1 4 1 1 4 ASRock P55M Pro Motherboard...
  • Seite 115 Los sistemas TPM también mejoran la seguridad de 1 1 5 1 1 5 1 1 5 1 1 5 1 1 5 ASRock P55M Pro Motherboard...
  • Seite 116 Cabezal de panel de sistema Este cabezar acomoda varias dunciones de panel frontal de (9-pin PANEL1) sistema. (vea p.2, N. 23) 1 1 6 1 1 6 1 1 6 1 1 6 1 1 6 ASRock P55M Pro Motherboard...
  • Seite 117 Pins 1 y 13. Instalación de una Fuente de Alimentación ATX de 20 Pins 1 1 7 1 1 7 1 1 7 1 1 7 1 1 7 ASRock P55M Pro Motherboard...
  • Seite 118 TV Digital HDMI / proyectores / Dispositivos LCD. Conecte el conector HDMI_SPDIF de la tarjeta VGA HDMI a esta cabecera. 1 1 8 1 1 8 1 1 8 1 1 8 1 1 8 ASRock P55M Pro Motherboard...
  • Seite 119 ® XP / 64 bits en sus discos duros SATA / SATAII sin funciones RAID, por favor siga los pasos siguientes. 1 1 9 1 1 9 1 1 9 1 1 9 1 1 9 ASRock P55M Pro Motherboard...
  • Seite 120 Windows?” (¿Dónde desea instalar Windows?), inserte el CD de soporte de ASRock en la unidad óptica y haga clic en el botón “Load Driver” (Cargar controlador) situado en la parte inferior izquierda para cargar los controladores AHCI de Intel ®...
  • Seite 121 Principal automáticamente si «AUTORUN» está habilitado en su computadora. Si el Menú Principal no aparece automáticamente, localice y doble-pulse en el archivo “ASSETUP.EXE” para iniciar la instalación. 1 2 1 1 2 1 1 2 1 1 2 1 1 2 1 ASRock P55M Pro Motherboard...
  • Seite 122 All manuals and user guides at all-guides.com 1 4 4 1 4 4 1 4 4 1 4 4 1 4 4 ASRock P55M Pro Motherboard...
  • Seite 123 All manuals and user guides at all-guides.com ® ® ® ® ® ® ® 1 4 5 1 4 5 1 4 5 1 4 5 1 4 5 ASRock P55M Pro Motherboard...
  • Seite 124 All manuals and user guides at all-guides.com 1 4 6 1 4 6 1 4 6 1 4 6 1 4 6 ASRock P55M Pro Motherboard...
  • Seite 125 All manuals and user guides at all-guides.com ® “ ” ® ® ® ® “ ” “ ” 1 4 7 1 4 7 1 4 7 1 4 7 1 4 7 ASRock P55M Pro Motherboard...
  • Seite 126 All manuals and user guides at all-guides.com ® ® 1 4 8 1 4 8 1 4 8 1 4 8 1 4 8 ASRock P55M Pro Motherboard...
  • Seite 127 All manuals and user guides at all-guides.com 1 4 9 1 4 9 1 4 9 1 4 9 1 4 9 ASRock P55M Pro Motherboard...
  • Seite 128 All manuals and user guides at all-guides.com Pin1 Pin1 1 5 0 1 5 0 1 5 0 1 5 0 1 5 0 ASRock P55M Pro Motherboard...
  • Seite 129 All manuals and user guides at all-guides.com 1 5 1 1 5 1 1 5 1 1 5 1 1 5 1 ASRock P55M Pro Motherboard...
  • Seite 130 All manuals and user guides at all-guides.com 1 5 2 1 5 2 1 5 2 1 5 2 1 5 2 ASRock P55M Pro Motherboard...
  • Seite 131 All manuals and user guides at all-guides.com 1 5 3 1 5 3 1 5 3 1 5 3 1 5 3 ASRock P55M Pro Motherboard...
  • Seite 132 All manuals and user guides at all-guides.com 1 5 4 1 5 4 1 5 4 1 5 4 1 5 4 ASRock P55M Pro Motherboard...
  • Seite 133 All manuals and user guides at all-guides.com ® ® 1 5 5 1 5 5 1 5 5 1 5 5 1 5 5 ASRock P55M Pro Motherboard...
  • Seite 134 All manuals and user guides at all-guides.com “ ” “ ” “ ” “ ” 1 5 6 1 5 6 1 5 6 1 5 6 1 5 6 ASRock P55M Pro Motherboard...
  • Seite 135 All manuals and user guides at all-guides.com 1 5 7 1 5 7 1 5 7 1 5 7 1 5 7 ASRock P55M Pro Motherboard...
  • Seite 136 All manuals and user guides at all-guides.com 1 5 8 1 5 8 1 5 8 1 5 8 1 5 8 ASRock P55M Pro Motherboard...
  • Seite 137 All manuals and user guides at all-guides.com 1 2 3 4 1 5 9 1 5 9 1 5 9 1 5 9 1 5 9 ASRock P55M Pro Motherboard...
  • Seite 138 All manuals and user guides at all-guides.com 1 6 0 1 6 0 1 6 0 1 6 0 1 6 0 ASRock P55M Pro Motherboard...
  • Seite 139 All manuals and user guides at all-guides.com ® ® 1 6 1 1 6 1 1 6 1 1 6 1 1 6 1 ASRock P55M Pro Motherboard...
  • Seite 140 All manuals and user guides at all-guides.com ® ® ® ® ® ® ® ® ® 1 6 2 1 6 2 1 6 2 1 6 2 1 6 2 ASRock P55M Pro Motherboard...
  • Seite 141 All manuals and user guides at all-guides.com ® ® ® ® ® ® ® “ ” “ ” 1 6 3 1 6 3 1 6 3 1 6 3 1 6 3 ASRock P55M Pro Motherboard...
  • Seite 142 All manuals and user guides at all-guides.com 1 6 4 1 6 4 1 6 4 1 6 4 1 6 4 ASRock P55M Pro Motherboard...
  • Seite 143 All manuals and user guides at all-guides.com ® ® ® ® ® ® ® 1 6 5 1 6 5 1 6 5 1 6 5 1 6 5 ASRock P55M Pro Motherboard...
  • Seite 144 All manuals and user guides at all-guides.com 1 6 6 1 6 6 1 6 6 1 6 6 1 6 6 ASRock P55M Pro Motherboard...
  • Seite 145 All manuals and user guides at all-guides.com ® ® ® “ ” ® ® ® ® 1 6 7 1 6 7 1 6 7 1 6 7 1 6 7 ASRock P55M Pro Motherboard...
  • Seite 146 All manuals and user guides at all-guides.com ® ® ® ® – 1 6 8 1 6 8 1 6 8 1 6 8 1 6 8 ASRock P55M Pro Motherboard...
  • Seite 147 All manuals and user guides at all-guides.com 1 6 9 1 6 9 1 6 9 1 6 9 1 6 9 ASRock P55M Pro Motherboard...
  • Seite 148 All manuals and user guides at all-guides.com 1 7 0 1 7 0 1 7 0 1 7 0 1 7 0 ASRock P55M Pro Motherboard...
  • Seite 149 All manuals and user guides at all-guides.com 1 7 1 1 7 1 1 7 1 1 7 1 1 7 1 ASRock P55M Pro Motherboard...
  • Seite 150 All manuals and user guides at all-guides.com 1 7 2 1 7 2 1 7 2 1 7 2 1 7 2 ASRock P55M Pro Motherboard...
  • Seite 151 All manuals and user guides at all-guides.com 1 7 3 1 7 3 1 7 3 1 7 3 1 7 3 ASRock P55M Pro Motherboard...
  • Seite 152 All manuals and user guides at all-guides.com 1 7 4 1 7 4 1 7 4 1 7 4 1 7 4 ASRock P55M Pro Motherboard...
  • Seite 153 All manuals and user guides at all-guides.com 1 7 5 1 7 5 1 7 5 1 7 5 1 7 5 ASRock P55M Pro Motherboard...
  • Seite 154 All manuals and user guides at all-guides.com ® ® 1 7 6 1 7 6 1 7 6 1 7 6 1 7 6 ASRock P55M Pro Motherboard...
  • Seite 155 All manuals and user guides at all-guides.com 1 7 7 1 7 7 1 7 7 1 7 7 1 7 7 ASRock P55M Pro Motherboard...
  • Seite 156 All manuals and user guides at all-guides.com 1 7 8 1 7 8 1 7 8 1 7 8 1 7 8 ASRock P55M Pro Motherboard...
  • Seite 157 All manuals and user guides at all-guides.com 1 7 9 1 7 9 1 7 9 1 7 9 1 7 9 ASRock P55M Pro Motherboard...
  • Seite 158 All manuals and user guides at all-guides.com 1 8 0 1 8 0 1 8 0 1 8 0 1 8 0 ASRock P55M Pro Motherboard...
  • Seite 159 All manuals and user guides at all-guides.com 1 2 3 4 1 8 1 1 8 1 1 8 1 1 8 1 1 8 1 ASRock P55M Pro Motherboard...
  • Seite 160 All manuals and user guides at all-guides.com ® ® 1 8 2 1 8 2 1 8 2 1 8 2 1 8 2 ASRock P55M Pro Motherboard...
  • Seite 161 All manuals and user guides at all-guides.com ® ® ® ® ® ® ® ® 1 8 3 1 8 3 1 8 3 1 8 3 1 8 3 ASRock P55M Pro Motherboard...
  • Seite 162 All manuals and user guides at all-guides.com ® ® ® ® ® ® ® ® 1 8 4 1 8 4 1 8 4 1 8 4 1 8 4 ASRock P55M Pro Motherboard...
  • Seite 163 All manuals and user guides at all-guides.com ® ® 1 8 5 1 8 5 1 8 5 1 8 5 1 8 5 ASRock P55M Pro Motherboard...
  • Seite 164 All manuals and user guides at all-guides.com 1 8 6 1 8 6 1 8 6 1 8 6 1 8 6 ASRock P55M Pro Motherboard...
  • Seite 165 All manuals and user guides at all-guides.com ® ® ® ® ® ® ® 1 8 7 1 8 7 1 8 7 1 8 7 1 8 7 ASRock P55M Pro Motherboard...
  • Seite 166 All manuals and user guides at all-guides.com 1 8 8 1 8 8 1 8 8 1 8 8 1 8 8 ASRock P55M Pro Motherboard...
  • Seite 167 All manuals and user guides at all-guides.com ® ® ® ® ® ® ® ® 1 8 9 1 8 9 1 8 9 1 8 9 1 8 9 ASRock P55M Pro Motherboard...
  • Seite 168 All manuals and user guides at all-guides.com ® ® 1 9 0 1 9 0 1 9 0 1 9 0 1 9 0 ASRock P55M Pro Motherboard...
  • Seite 169 All manuals and user guides at all-guides.com 1 9 1 1 9 1 1 9 1 1 9 1 1 9 1 ASRock P55M Pro Motherboard...
  • Seite 170 All manuals and user guides at all-guides.com 1 9 2 1 9 2 1 9 2 1 9 2 1 9 2 ASRock P55M Pro Motherboard...
  • Seite 171 All manuals and user guides at all-guides.com 1 9 3 1 9 3 1 9 3 1 9 3 1 9 3 ASRock P55M Pro Motherboard...
  • Seite 172 All manuals and user guides at all-guides.com 1 9 4 1 9 4 1 9 4 1 9 4 1 9 4 ASRock P55M Pro Motherboard...
  • Seite 173 All manuals and user guides at all-guides.com 1 9 5 1 9 5 1 9 5 1 9 5 1 9 5 ASRock P55M Pro Motherboard...
  • Seite 174 All manuals and user guides at all-guides.com 1 9 6 1 9 6 1 9 6 1 9 6 1 9 6 ASRock P55M Pro Motherboard...
  • Seite 175 All manuals and user guides at all-guides.com ® ® ® 1 9 7 1 9 7 1 9 7 1 9 7 1 9 7 ASRock P55M Pro Motherboard...
  • Seite 176 All manuals and user guides at all-guides.com 1 9 8 1 9 8 1 9 8 1 9 8 1 9 8 ASRock P55M Pro Motherboard...
  • Seite 177 All manuals and user guides at all-guides.com 1 9 9 1 9 9 1 9 9 1 9 9 1 9 9 ASRock P55M Pro Motherboard...
  • Seite 178 All manuals and user guides at all-guides.com 2 0 0 2 0 0 2 0 0 2 0 0 2 0 0 ASRock P55M Pro Motherboard...
  • Seite 179 All manuals and user guides at all-guides.com 1 2 3 4 2 0 1 2 0 1 2 0 1 2 0 1 2 0 1 ASRock P55M Pro Motherboard...
  • Seite 180 All manuals and user guides at all-guides.com 2 0 2 2 0 2 2 0 2 2 0 2 2 0 2 ASRock P55M Pro Motherboard...
  • Seite 181 All manuals and user guides at all-guides.com ® ® ® ® ® ® ® ® ® ® ® ® ® ® 2 0 3 2 0 3 2 0 3 2 0 3 2 0 3 ASRock P55M Pro Motherboard...
  • Seite 182 All manuals and user guides at all-guides.com ® ® ® ® ® ® ® ® ® ® ® ® ® ® ® 2 0 4 2 0 4 2 0 4 2 0 4 2 0 4 ASRock P55M Pro Motherboard...
  • Seite 183 All manuals and user guides at all-guides.com ® ® 2 0 5 2 0 5 2 0 5 2 0 5 2 0 5 ASRock P55M Pro Motherboard...
  • Seite 184 All manuals and user guides at all-guides.com 2 0 6 2 0 6 2 0 6 2 0 6 2 0 6 ASRock P55M Pro Motherboard...
  • Seite 185 All manuals and user guides at all-guides.com 2 0 7 2 0 7 2 0 7 2 0 7 2 0 7 ASRock P55M Pro Motherboard...
  • Seite 186 All manuals and user guides at all-guides.com ® ® ® ® ® ® ® 2 0 8 2 0 8 2 0 8 2 0 8 2 0 8 ASRock P55M Pro Motherboard...
  • Seite 187 All manuals and user guides at all-guides.com 2 0 9 2 0 9 2 0 9 2 0 9 2 0 9 ASRock P55M Pro Motherboard...
  • Seite 188 All manuals and user guides at all-guides.com ® ® ® ® ® ® ® ® 2 1 0 2 1 0 2 1 0 2 1 0 2 1 0 ASRock P55M Pro Motherboard...
  • Seite 189 All manuals and user guides at all-guides.com ® ® 2 1 1 2 1 1 2 1 1 2 1 1 2 1 1 ASRock P55M Pro Motherboard...
  • Seite 190 All manuals and user guides at all-guides.com 2 1 2 2 1 2 2 1 2 2 1 2 2 1 2 ASRock P55M Pro Motherboard...
  • Seite 191 All manuals and user guides at all-guides.com 2 1 3 2 1 3 2 1 3 2 1 3 2 1 3 ASRock P55M Pro Motherboard...
  • Seite 192 All manuals and user guides at all-guides.com 2 1 4 2 1 4 2 1 4 2 1 4 2 1 4 ASRock P55M Pro Motherboard...
  • Seite 193 All manuals and user guides at all-guides.com 2 1 5 2 1 5 2 1 5 2 1 5 2 1 5 ASRock P55M Pro Motherboard...
  • Seite 194 All manuals and user guides at all-guides.com 2 1 6 2 1 6 2 1 6 2 1 6 2 1 6 ASRock P55M Pro Motherboard...
  • Seite 195 All manuals and user guides at all-guides.com 2 1 7 2 1 7 2 1 7 2 1 7 2 1 7 ASRock P55M Pro Motherboard...
  • Seite 196 All manuals and user guides at all-guides.com ® ® ® 2 1 8 2 1 8 2 1 8 2 1 8 2 1 8 ASRock P55M Pro Motherboard...
  • Seite 197 All manuals and user guides at all-guides.com 2 1 9 2 1 9 2 1 9 2 1 9 2 1 9 ASRock P55M Pro Motherboard...
  • Seite 198 All manuals and user guides at all-guides.com 2 2 0 2 2 0 2 2 0 2 2 0 2 2 0 ASRock P55M Pro Motherboard...
  • Seite 199 All manuals and user guides at all-guides.com 2 2 1 2 2 1 2 2 1 2 2 1 2 2 1 ASRock P55M Pro Motherboard...
  • Seite 200 All manuals and user guides at all-guides.com 1 2 3 4 2 2 2 2 2 2 2 2 2 2 2 2 2 2 2 ASRock P55M Pro Motherboard...
  • Seite 201 All manuals and user guides at all-guides.com 2 2 3 2 2 3 2 2 3 2 2 3 2 2 3 ASRock P55M Pro Motherboard...
  • Seite 202 All manuals and user guides at all-guides.com ® ® ® ® ® ® ® ® ® ® ® ® ® ® 2 2 4 2 2 4 2 2 4 2 2 4 2 2 4 ASRock P55M Pro Motherboard...
  • Seite 203 All manuals and user guides at all-guides.com ® ® ® ® ® ® ® ® ® ® ® ® ® ® ® 2 2 5 2 2 5 2 2 5 2 2 5 2 2 5 ASRock P55M Pro Motherboard...
  • Seite 204 All manuals and user guides at all-guides.com ® ® ® 2 2 6 2 2 6 2 2 6 2 2 6 2 2 6 ASRock P55M Pro Motherboard...

Diese Anleitung auch für:

Sp55m pro

Inhaltsverzeichnis