Herunterladen Inhalt Inhalt Diese Seite drucken

Werbung

Verfügbare Sprachen
  • DE

Verfügbare Sprachen

  • DEUTSCH, seite 30
Copyright Notice:
Copyright Notice:
Copyright Notice:
Copyright Notice:
Copyright Notice:
No part of this installation guide may be reproduced, transcribed, transmitted, or trans-
lated in any language, in any form or by any means, except duplication of documen-
tation by the purchaser for backup purpose, without written consent of ASRock Inc.
Products and corporate names appearing in this guide may or may not be registered
trademarks or copyrights of their respective companies, and are used only for identifica-
tion or explanation and to the owners' benefit, without intent to infringe.
Disclaimer:
Disclaimer:
Disclaimer:
Disclaimer:
Disclaimer:
Specifications and information contained in this guide are furnished for informational
use only and subject to change without notice, and should not be constructed as a
commitment by ASRock. ASRock assumes no responsibility for any errors or omissions
that may appear in this guide.
With respect to the contents of this guide, ASRock does not provide warranty of any kind,
either expressed or implied, including but not limited to the implied warranties or
conditions of merchantability or fitness for a particular purpose. In no event shall
ASRock, its directors, officers, employees, or agents be liable for any indirect, special,
incidental, or consequential damages (including damages for loss of profits, loss of
business, loss of data, interruption of business and the like), even if ASRock has been
advised of the possibility of such damages arising from any defect or error in the guide
or product.
This device complies with Part 15 of the FCC Rules. Operation is subject to the
following two conditions:
(1) this device may not cause harmful interference, and
(2) this device must accept any interference received, including interference that
may cause undesired operation.
CALIFORNIA, USA ONLY
The Lithium battery adopted on this motherboard contains Perchlorate, a toxic
substance controlled in Perchlorate Best Management Practices (BMP) regulations
passed by the California Legislature. When you discard the Lithium battery in
California, USA, please follow the related regulations in advance.
"Perchlorate Material-special handling may apply, see
www.dtsc.ca.gov/hazardouswaste/perchlorate"
ASRock Website: http://www.asrock.com
Copyright©2006 ASRock INC. All rights reserved.
ASRock P4i65G Motherboard
Published November 2006
1 1 1 1 1

Werbung

Inhaltsverzeichnis
loading

Inhaltszusammenfassung für ASROCK P4i65G

  • Seite 1 ASRock. ASRock assumes no responsibility for any errors or omissions that may appear in this guide. With respect to the contents of this guide, ASRock does not provide warranty of any kind, either expressed or implied, including but not limited to the implied warranties or conditions of merchantability or fitness for a particular purpose.
  • Seite 2 Internal Audio Connector: AUX1 (White) Secondary Serial ATA Connector (SATA2) Internal Audio Connector: CD1 (Black) Primary Serial ATA Connector (SATA1) Shared USB 2.0 Header (USB4_5, Blue) USB 2.0 Header (USB67, Blue) North Bridge Controller 2 2 2 2 2 ASRock P4i65G Motherboard...
  • Seite 3 USB 2.0 Ports (USB01) RJ-45 Port USB 2.0 Ports (USB23) Line In (Light Blue) VGA Port Line Out (Lime) PS/2 Keyboard Port (Purple) Microphone (Pink) PS/2 Mouse Port (Green) Shared USB 2.0 Ports (USB45) 3 3 3 3 3 ASRock P4i65G Motherboard...
  • Seite 4: Package Contents

    1. Introduction 1. Introduction 1. Introduction 1. Introduction Thank you for purchasing ASRock P4i65G motherboard, a reliable motherboard pro- duced under ASRock’s consistently stringent quality control. It delivers excellent performance with robust design conforming to ASRock’s commitment to quality and endurance.
  • Seite 5: Specifications

    - Support DDR400/333/266 (see CAUTION 4) - Max. capacity: 2GB Hybrid Booster - CPU Frequency Stepless Control (see CAUTION 5) - ASRock U-COP (see CAUTION 6) - Boot Failure Guard (B.F.G.) Expansion Slot - 3 x PCI slots - 1 x AGP slot for 1.5V 8X/4X AGP card (see CAUTION 7) - 1 x AMR slot ®...
  • Seite 6 Overclocking may affect your system stability, or even cause damage to the components and devices of your system. It should be done at your own risk and expense. We are not responsible for possible damage caused by overclocking. 6 6 6 6 6 ASRock P4i65G Motherboard...
  • Seite 7 It may cause permanent damage! ® ® Power Management for USB 2.0 works fine under Microsoft Windows ® SP1 or SP2 / 2000 SP4. It may not work properly under Microsoft Win- ® dows 98/ ME. 7 7 7 7 7 ASRock P4i65G Motherboard...
  • Seite 8: Cpu Installation

    STEP 5: Install CPU fan and heatsink. For proper installation, please kindly refer to the instruction manuals of your CPU fan and heatsink vendors. 8 8 8 8 8 ASRock P4i65G Motherboard...
  • Seite 9: Installing A Dimm

    Step 3. Firmly insert the DIMM into the slot until the retaining clips at both ends fully snap back in place and the DIMM is properly seated. 9 9 9 9 9 ASRock P4i65G Motherboard...
  • Seite 10: Installing An Expansion Card

    PCI slots: The PCI slots are used to install expansion cards that have the 32-bit PCI interface. AGP slot: The AGP slot is used to install a graphics card. The ASRock AGP slot has a special design of clasp that can securely fasten the inserted graphics card.
  • Seite 11 To clear and reset the system parameters to default setup, please turn off the computer and unplug the power cord from the power supply. After waiting for 15 seconds, use a jumper cap to short 2 pins on CLRCMOS0 for 5 seconds. ASRock P4i65G Motherboard...
  • Seite 12 SATA1 interface allows up to 1.5 Gb/s data transfer rate. Serial ATA (SATA) Either end of the SATA data cable Data Cable can be connected to the SATA hard disk or the SATA connector on the motherboard. ASRock P4i65G Motherboard...
  • Seite 13 (AUX1: see p.2 No. 27) AUX1 tuner card, or MPEG card. Front Panel AC’97 Audio Header This is an interface for the front panel audio cable that allows (8-pin AUDIO1) convenient connection and (see p.2 No. 26) control of audio devices. ASRock P4i65G Motherboard...
  • Seite 14 (see p.2 No. 2) so that it can provides sufficient power. Failing to do so will cause the failure to power up. Serial port connector This COM1 connector supports a serial port module. (9-pin COM1) (see p.2 item 23) ASRock P4i65G Motherboard...
  • Seite 15 AGP / PCI bus is in the fixed mode so that FSB can operate under a more stable overclocking environment. Please refer to the warning on page 6 for the possible overclocking risk before you apply Untied Overclocking Technology. ASRock P4i65G Motherboard...
  • Seite 16 Main Menu automatically if “AUTORUN” is enabled in your computer. If the Main Menu does not appear automatically, locate and double-click on the file “ASSETUP.EXE” from the BIN folder in the Support CD to display the menus. ASRock P4i65G Motherboard...
  • Seite 17 ASRock P4i65G Motherboard...
  • Seite 18 ® ® ® ® ® ® ASRock P4i65G Motherboard...
  • Seite 19 ® ® ASRock P4i65G Motherboard...
  • Seite 20 ASRock P4i65G Motherboard...
  • Seite 21 ASRock P4i65G Motherboard...
  • Seite 22 ASRock P4i65G Motherboard...
  • Seite 23 ASRock P4i65G Motherboard...
  • Seite 24 ASRock P4i65G Motherboard...
  • Seite 25 “ ” SATA2 SATA1 ASRock P4i65G Motherboard...
  • Seite 26 AUX1 ASRock P4i65G Motherboard...
  • Seite 27 ASRock P4i65G Motherboard...
  • Seite 28 ASRock P4i65G Motherboard...
  • Seite 29 ® ® ASRock P4i65G Motherboard...
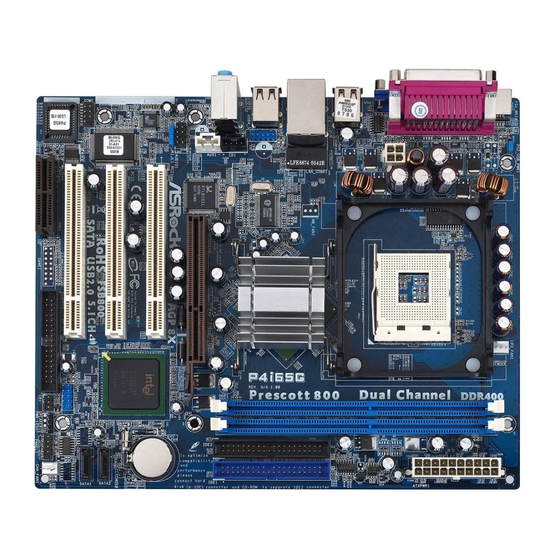
  • Seite 30 1. Einführung 1. Einführung 1. Einführung Wir danken Ihnen für den Kauf des ASRock P4i65G Motherboard, ein zuverlässiges Produkt, welches unter den ständigen, strengen Qualitätskontrollen von ASRock gefertigt wurde. Es bietet Ihnen exzellente Leistung und robustes Design, gemäß der Verpflichtung von ASRock zu Qualität und Halbarkeit.
  • Seite 31: Spezifikationen

    - 2 x Steckplätze für DDR - Unterstützt DDR400/333/266 (siehe VORSICHT 4) - Max. 2GB Hybrid Booster - Schrittloser CPU-Frequenz-Kontrolle (siehe VORSICHT 5) - ASRock U-COP (siehe VORSICHT 6) - Boot Failure Guard (B.F.G. – Systemstartfehlerschutz) Erweiterungs- - 3 x PCI -Steckplätze steckplätze - 1x AGP -Steckplätze, unterstützt 1.5V, 8X/4X AGP-Karten...
  • Seite 32 Dritten, mit einem gewissen Risiko behaftet ist. Overclocking kann sich nachteilig auf die Stabilität Ihres Systems auswirken oder sogar Komponenten und Geräte Ihres Systems beschädigen. Es geschieht dann auf eigene Gefahr und auf Ihre Kosten. Wir übernehmen keine Verantwortung für mögliche Schäden, die aufgrund von Overclocking verursacht wurden. ASRock P4i65G Motherboard...
  • Seite 33 Motherboards! Permanente Beschädigung könnte die Folge sein! Das Power Management für USB 2.0 arbeitet unter Microsoft ® Windows ® XP SP1 oder SP2/2000 SP4 einwandfrei. Unter Microsoft ® Windows ® ME könnte es dagegen zu Störungen kommen. ASRock P4i65G Motherboard...
  • Seite 34 Hebel nach unten drücken, bis er hörbar einrastet. Schritt 5: Installieren Sie einen aktiven CPU-Kühler, der die gesamte Fläche der CPU abdeckt und eine ausreichende Wärmeableitung für den von Ihnen verwendeten CPU-Typ bietet. Weitere Hinweise finden Sie der Installationsanleitung für Ihren CPU-Kühler. ASRock P4i65G Motherboard...
  • Seite 35: Installation Der Speichermodule (Dimm)

    2.2 Installation der Speichermodule (DIMM) 2.2 Installation der Speichermodule (DIMM) 2.2 Installation der Speichermodule (DIMM) Das P4i65G Motherboard bietet zwei 184polige DDR (Double Data Rate) DIMM- Steckplätze und unterstützt Zweikanal-Speichertechnologie. Es müssen immer zwei identische Speichermodule (selbe Marke, Geschwindigkeit, Größe und Chip- Art) in den DDR DIMM-Steckplätzen installiert werden, um die Zweikanal-...
  • Seite 36: Einbau Einer Erweiterungskarte

    2.3 Er 2.3 Er weiterungssteckplätze: (PCI-, A -, und AMR -Slots): Es stehen 3 PCI-, 1 AGP-, und 1 AMR-Slot auf dem P4i65G Motherboard zur Verfügung. PCI-Slots: PCI-Slots werden zur Installation von Erweiterungskarten mit dem 32bit PCI-Interface genutzt. AGP-Slot: Der AGP-Steckplatz dient zur Installation einer Grafikkarte. Der ASRock AGP-Steckplatz hat speziell entwickelte Klammern, die die eingefügte Grafikkarte sicher festhalten.
  • Seite 37: Einstellung Der Jumper

    Systeminformationen wie Systemkennwort, Datum, Zeit und System-Setupeinstellungen. Um die Einstellungen zu löschen und Default-Werte wiederherzustellen, schalten Sie den Computer aus, ziehen Sie den Netzstecker und überbrücken Sie 2-pin von CLRCMOS0 mithilfe des Jumpers für 5 Sekunden. ASRock P4i65G Motherboard...
  • Seite 38: Integrierte Header Und Anschlüsse

    (IDE1, blau) und das CD-ROM mit dem sekundären IDE-Anschluss (IDE2, schwarz). Seriell-ATA-Anschlüsse Diese beiden Serial ATA- (SATA-)Verbínder (SATA1: siehe S.2 - No. 14) SATA2 unterstützten SATA-Datenkabel (SATA2: siehe S.2 - No. 13) für interne SATA1 Massenspeichergeräte. Die aktuelle SATA-Schnittstelle ermöglicht eine Datenübertragungsrate bis 1,5 Gb/s. ASRock P4i65G Motherboard...
  • Seite 39 (siehe S.2 - No. 29) Verwendung der vorderseitigen USB-Anschlüsse durch Verbinden des vorseitigen USB- Kabels mit diesem Header (USB4_5) werden die USB- Anschlüsse 4,5 auf ASRock I/O Plus™ nicht funktionieren. Anschluss für Dieser Anschluss unterstützt Infrarot-Modul einen optionalen Infrarot- Sender/Empfänger.
  • Seite 40 Anschluss und passen Sie den (siehe S.2 - No. 16) schwarzen Draht dem Erdungsstift an. CPU-Lüfteranschluss Verbinden Sie das CPU - Lüfterkabel mit diesem (3-pin CPU_FAN1) Anschluss und passen Sie den (siehe S.2 - No. 5) schwarzen Draht dem Erdungsstift an. ASRock P4i65G Motherboard...
  • Seite 41 (siehe S.2 - No. 2) damit ausreichend Strom geliefert werden kann. Andernfalls reicht der Strom nicht aus, das System zu starten. COM-Anschluss-Header Dieser COM-Anschluss- Header wird verwendet, um (9-pin COM1) ein COM-Anschlussmodul zu (siehe S.2 - No. 23) unterstützen. ASRock P4i65G Motherboard...
  • Seite 42: Entkoppelte Übertaktungstechnologie

    AGP/PCI-Bus in einem fixierten Modus, so dass der FSB in einer stabileren Übertaktungsumgebung arbeiten kann. Beziehen Sie sich auf die Warnung vor möglichen Overclocking-Risiken auf Seite 32, bevor Sie die Untied Overclocking-Technologie anwenden. ASRock P4i65G Motherboard...
  • Seite 43 ASSETUP.EXE im BIN-Verzeichnis der Support-CD, um die Menüs aufzurufen. Das Setup-Programm soll es Ihnen so leicht wie möglich machen. Es ist menügesteuert, d.h. Sie können in den verschiedenen Untermenüs Ihre Auswahl treffen und die Programme werden dann automatisch installiert. ASRock P4i65G Motherboard...
  • Seite 44 1. Introduction 1. Introduction Merci pour votre achat d’une carte mère ASRock P4i65G, une carte mère très fiable produite selon les critères de qualité rigoureux de ASRock. Elle offre des perfor- mances excellentes et une conception robuste conformément à l’engagement d’ASRock sur la qualité...
  • Seite 45: Spécifications

    - Max. 2Go L’accélérateur - Contrôle direct de la fréquence CPU (voir ATTENTION 5) hybride - ASRock U-COP (voir ATTENTION 6) - Garde d’échec au démarrage (B.F.G.) Slot d’extension - 3 x slots PCI - 1 x slot AGP, support des cartes AGP 1.5V, 8X / 4X...
  • Seite 46 Si vous le faites, c’est à vos frais et vos propres risques. Nous ne sommes pas responsables des dommages possibles causés par l’overclocking. ASRock P4i65G Motherboard...
  • Seite 47 Cela pourrait l’endommager de manière définitive! La gestion de l’alimentation pour l’USB 2.0 fonctionne bien sous ® ® Microsoft Windows XP SP1; SP2/2000 SP4. Elle peut ne pas ® ® fonctionner correctement sous Microsoft Windows 98/ME. ASRock P4i65G Motherboard...
  • Seite 48 CPU. Le verrouillage du levier dans son encoche latérale est annoncé par un clic. Etape 5. Installez le ventilateur et le radiateur du CPU. Pour une installation correcte, reportez-vous aux manuels du fabricant du ventilateur et du radiateur de CPU. ASRock P4i65G Motherboard...
  • Seite 49 2.2 Installation des modules mémoire (DIMM) 2.2 Installation des modules mémoire (DIMM) La carte mère P4i65G possède deux emplacements DIMM DDR (Double Débit de données) 184 broches, et prend en charge la technologie Dual Channel Memory. Pour la configuration Double canal, vous devez toujours installer deux modules de mémoire identiques (mêmes marque, vitesse, dimensions et type de chip) dans les...
  • Seite 50 2.3 Slot d’extension (Slots PCI, AGP, et AMR) 2.3 Slot d’extension (Slots PCI, AGP, et AMR) IIl y a 3 slots PCI, 1 slot AGP, et 1 slot AMR sur les cartes mères P4i65G. Slots PCI: Les slots PCI sont utilisés pour installer des cartes d’extension dotées d’une interface PCI 32 bits.
  • Seite 51 Pour effacer et réinitialiser les paramètres du système à leur configuration par défaut, veuillez mettre l’ordinateur hors tension et débrancher le cordon d’alimentation, puis utilisez un capuchon de cavalier pour court-circuiter la 2 broches sur CLRCMOS0 pendant 5 secondes. ASRock P4i65G Motherboard...
  • Seite 52 ATA (SATA) prennent en (SATA1: voir p.2 No. 14) SATA2 charge les câbles SATA pour (SATA2: voir p.2 No. 13) les périphériques de stockage SATA1 internes. L’interface SATA actuelle permet des taux transferts de données pouvant aller jusqu’à 1,5 Go/s. ASRock P4i65G Motherboard...
  • Seite 53 En-tête USB 2.0 partagé Cet en-tête USB4_5 est partagé avec les ports USB 2.0 (USB4_5 br.9) 4 et 5 sur ASRock I/O Plus™. (voir p.2 No. 29) Lorsque vous utilisez les ports USB du panneau frontal en connectant le câble USB du panneau frontal à...
  • Seite 54 (voir p.2 No. 16) Connecteur du ventilateur Veuillez connecter le câble de de l’UC ventilateur d’UC sur ce connecteur et brancher le fil (CPU_FAN1 br. 3) noir sur la broche de terre. (voir p.2 No. 5) ASRock P4i65G Motherboard...
  • Seite 55 Faute de quoi, il ne sera pas possible de mettre sous tension. En-tête de port COM Cette en-tête de port COM est utilisée pour prendre en charge (COM1 br.9) un module de port COM. (voir p.2 No. 23) ASRock P4i65G Motherboard...
  • Seite 56 AGP/PCI est en mode fixe, si bien que le bus FSB peut opérer dans un environnement de surcadençage plus stable. Veuillez vous reporter à l’avertissement en page 46 pour connaître les risques liés à l’overclocking avant d’appliquer la technologie Untied Overclocking. ASRock P4i65G Motherboard...
  • Seite 57 Pour utiliser le CD technique, insérez-le dans le lecteur de CD-ROM. Le Menu principal s’affiche automatiquement si “AUTORUN” est activé dans votre ordinateur. Si le Menu principal n’apparaît pas automatiquement, localisez dans le CD technique le fichier “ASSETUP.EXE” dans le dossier BIN et double-cliquez dessus pour afficher les menus. ASRock P4i65G Motherboard...
  • Seite 58: Contenuto Della Confezione

    Grazie per aver scelto una scheda madre ASRock P4i65G, una scheda madre affidabile prodotta secondo i severi criteri di qualità ASRock. Le prestazioni eccellenti e il design robusto si conformano all’impegno di ASRock nella ricerca della qualità e della resistenza.
  • Seite 59 - Supporta DDR400/333/266 (vedi ATTENZIONE 4) - Max. 2GB Booster ibrido - Stepless control per frequenza del processore (vedi ATTENZIONE 5) - ASRock U-COP (vedi ATTENZIONE 6) - Boot Failure Guard (B.F.G.) Slot di - 3 x slot PCI espansione - 1 x slot AGP, supporta scheda AGP a 1.5V, modelli 8X / 4X...
  • Seite 60 La procedura è eseguita a proprio rischio ed a proprie spese. Noi non possiamo essere ritenuti responsabili per possibili danni provocati dall’overclocking. ASRock P4i65G Motherboard...
  • Seite 61 NON usare schede AGP da 3,3 V nello slot AGP di questa motherboard! Ciò potrebbe provocare danni permanenti! La Gestione Risorse per USB 2.0 funziona perfettamente con Microsoft ® Windows ® XP SP1; SP2/2000 SP4. Potrebbe dare qualche problema con ® ® Microsoft Windows 98/ME. ASRock P4i65G Motherboard...
  • Seite 62: Installazione

    Quando la leva fa clic sulla linguetta laterale significa che è bloccata. Step 5. Installare la ventola del processore e l’heatsink. Per una corretta installazione, per favore fare riferimento ai manuali di istruzione dei produttori della ventola e dell’heatsink del processore. ASRock P4i65G Motherboard...
  • Seite 63 2.2 Installazione dei moduli di memoria (DIMM) 2.2 Installazione dei moduli di memoria (DIMM) La motherboard P4i65G dispone di due slot DIMM DDR (Double Data Rate) a 184 pin e supporta la tecnologia Dual Channel Memory. Per attivare la configurazione Dual Channel Memory bisogna installare sempre due moduli di memoria identici (stessa marca, velocità, dimensioni e tipo di chip) negli slot DIMM.
  • Seite 64 2.3 Slot di espansione (Slot PCI, Slot AGP, e Slot AMR) 2.3 Slot di espansione (Slot PCI, Slot AGP, e Slot AMR) Esistono 3 slot PCI, 1 slot AGP, e 1 slot AMR su entrambe le schede madri P4i65G. Slot PCI: Sono utilizzati per installare schede di espansione con Interfaccia PCI a 32-bit.
  • Seite 65 Per azzerare e ripristinare i parametri di sistema all’impostazione predefinita, spegnere il computer e scollegare il cavo d’alimentazione: utilizzare un cappuccio jumper per cortocircuitare i 2 pin su CLRCMOS0 per 5 secondi. ASRock P4i65G Motherboard...
  • Seite 66 (SATA1: vedi p.2 Nr. 14) SATA2 SATA per dispositivi di (SATA2: vedi p.2 Nr. 13) immagazzinamento interni. SATA1 ATA (SATA) supportano cavi SATA per dispositivi di memoria interni. L’interfaccia SATA attuale permette velocità di trasferimento dati fino a 1.5 Gb/s. ASRock P4i65G Motherboard...
  • Seite 67 USB 2.0 aggiuntive. Collettore USB 2.0 Questo collettore USB4_5 è condiviso condiviso con le porte USB 2.0 4 e 5 su ASRock I/O Plus™. (9-pin USB4_5) Quando si utilizzano le porte (vedi p.2 Nr. 29) USB del pannello frontale,...
  • Seite 68 (vedi p.2 Nr. 16) terra. Connettore ventolina CPU Collegare il cavo della ventolina CPU a questo connettore e far (3-pin CPU_FAN1) combaciare il filo nero al pin (vedi p.2 Nr. 5) terra. ASRock P4i65G Motherboard...
  • Seite 69 (vedi p.2 Nr. 2) in modo che possa fornire energia sufficiente. In caso contrario l’unità non si avvia. Collettore porta COM Questo collettore porta COM è utilizzato per supportare il (9-pin COM1) modulo porta COM. (voir p.2 Nr. 23) ASRock P4i65G Motherboard...
  • Seite 70 Quindi, FSB della CPU è svincolato durante l’overclocking, ma il bus AGP/PCI si trova in modo fisso affinché FSB possa funzionare in un ambiente di overclocking più stabile. Fare riferimento all’avviso di pagina 60 per i possibili rischi dell’overclocking prima di applicare la tecnologia Untied Overclocking Technology. ASRock P4i65G Motherboard...
  • Seite 71 Inserire il CD di supporto nel lettore CD-ROM. Se la funzione “AUTORUN” è attivata nel computer, apparirà automaticamente il Menù principale. Se il Menù principale non appare automaticamente, posizionarsi sul file “ASSETUP.EXE” nel CESTINO del CD di supporto e cliccare due volte per visualizzare i menù. ASRock P4i65G Motherboard...
  • Seite 72: Contenido De La Caja

    1. Introducción 1. Introducción Gracias por su compra de ASRock P4i65G placa madre, una placa de confianza producida bajo el control de calidad estricto y persistente. La placa madre provee realización excelente con un diseño robusto conforme al compromiso de calidad y resistencia de ASRock.
  • Seite 73 - Soporta DDR400/333/266 (vea ATENCIÓN 4) - Max. 2GB Amplificador - Stepless control de frecuencia de CPU (vea ATENCIÓN 5) Híbrido - ASRock U-COP (vea ATENCIÓN 6) - Protección de Falla de Inicio (B.F.G..) Ranuras de - 3 x ranuras PCI Expansión - 1 x slot AGP, soporta tarjeta AGP de 1.5V, 8X / 4X...
  • Seite 74 - Taquímetros de los ventiladores del procesador y del chasis - Monitor de Voltaje: +12V, +5V, +3.3V, Vcore ® ® - En conformidad con Microsoft Windows 98SE / ME / 2000 / XP Certificaciones - FCC, CE, WHQL ASRock P4i65G Motherboard...
  • Seite 75 NO utilice una tarjeta AGP de 3,3V AGP en la ranura AGP de esta placa base. Podría causar daños permanentes. ® Power Management para USB 2.0 funciona bien bajo Microsoft ® Windows XP SP1; SP2/2000 SP4. Es posible que no funcione ® ® propiamente bajo Microsoft Windows 98/ME. ASRock P4i65G Motherboard...
  • Seite 76: Instalación

    CPU, examine su orientación o examine si los pins están ya encorvados. Paso 4. Encierre el zócalo bajando la palanca. Paso 5. Instale el disipador de calor con ventilador del CPU (consulte la documentación del disipador de calor). ASRock P4i65G Motherboard...
  • Seite 77 2.2 Instalación de Memoria 2.2 Instalación de Memoria La placa base P4i65G proporciona dos ranuras DIMM DDR (Double Data Rate, es decir, Tasa doble de datos) de 184 contactos y es compatible con la Tecnología de memoria de canal dual. Para la configuración de canal dual, siempre es necesario instalar dos módulos de memoria idénticos (la misma marca, velocidad, tamaño y...
  • Seite 78 P4i65G. Ranura PCI: Para instalar tarjetas de expansión que tienen 32-bit Interface PCI. Ranura AGP: Para instalar trajeta gráfica. La ranura AGP ASRock tiene un diseño especial de seguro para fijar con seguridad la tarjeta gráfica introducida. NO utilice una tarjeta AGP de 3,3V AGP en la ranura AGP de esta placa base.
  • Seite 79 A continuación, utilice una cubierta de jumper para aislar las agujas 2 pins en CLRCMOS0 du- rante 5 segundos. ASRock P4i65G Motherboard...
  • Seite 80 La SATA1 interfaz SATA actual permite una velocidad de transferencia de 1.5 Gb/s. Cable de datos de Ambos extremos del cable serie ATA (SATA) pueden conectarse al disco duro SATA o la conexión de la placa base. ASRock P4i65G Motherboard...
  • Seite 81 USB del panel (ver p.2, N. 29) frontal conectando el cable USB del panel frontal a este cabezal (USB4_5), los puertos USB 4 y 5 en el ASRock I/O Plus no funcionarán. Conector de módulo Infrared Soporta módulo Infrared de transmisión y recepción...
  • Seite 82 CPU a este conector y haga coincidir el cable negro (3-pin CPU_FAN1) con el conector de tierra. (ver p.2, N. 5) Cabezal de alimentación ATX Conecte la fuente de alimentación ATX a su cabezal. (20-pin ATXPWR1) (ver p.2, N. 7) ASRock P4i65G Motherboard...
  • Seite 83 Operate Mode” en la BIOS está correcta según la condición de su sistema. Para obtener detalles sobre la configuración, consulte las instrucciones que aparecen en la página 27 del “Manual del usuario” en el CD de soporte. ASRock P4i65G Motherboard...
  • Seite 84 Para iniciar la instalación, ponga el CD en el lector de CD y se desplegará el Menú Principal automáticamente si «AUTORUN» está habilitado en su computadora. Si el Menú Principal no aparece automáticamente, localice y doble-pulse en el archivo “ASSETUP.EXE” para iniciar la instalación. ASRock P4i65G Motherboard...

Inhaltsverzeichnis