Herunterladen Diese Seite drucken

Werbung

Verfügbare Sprachen

Verfügbare Sprachen

MONITOR LOFT VDS CON MELODIAS Y MEMORIAS
E
VDS LOFT MONITOR WITH RINGTONES AND MEMORY
EN
MONITEUR LOFT VDS AVEC MÉLODIES ET MÉMOIRES
F
D
MONITOR LOFT VDS MIT KLINGELMELODIEN UND SPEICHER

Werbung

loading

Inhaltszusammenfassung für Fermax 3299

  • Seite 1 MONITOR LOFT VDS CON MELODIAS Y MEMORIAS VDS LOFT MONITOR WITH RINGTONES AND MEMORY MONITEUR LOFT VDS AVEC MÉLODIES ET MÉMOIRES MONITOR LOFT VDS MIT KLINGELMELODIEN UND SPEICHER...
  • Seite 2 MONITOR LOFT VDS CON MELODIAS Y MEMORIAS VDS LOFT MONITOR WITH RINGTONES AND MEMORY MONITEUR LOFT VDS AVEC MÉLODIES ET MÉMOIRES MONITOR LOFT VDS MIT KLINGELMELODIEN UND SPEICHER Cod. 97494b V07_10...
  • Seite 3 Fermax electrónica desarrolla y fabrica equipos de prestigio que cumplen los más altos estándares de diseño y tecnología. Su monitor de videoportero FERMAX le permitirá comunicarse con la placa de calle, ver la persona que le está llamando y abrirle la puerta de entrada si así lo desea.
  • Seite 5 INDICE - INDEX - SOMMAIRE - INHALT LOFT CON MELODÍAS Y MEMORIAS ................. 6 Botones ......................6 Funcionamiento ....................7 Instalación y Conexionado ................8 Programación del monitor ................9 Selección de Melodías ..................10 Características Técnicas ................11 Funciones de memoria .................. 13 LOFT WITH RINGTONES AND MEMORY ..............
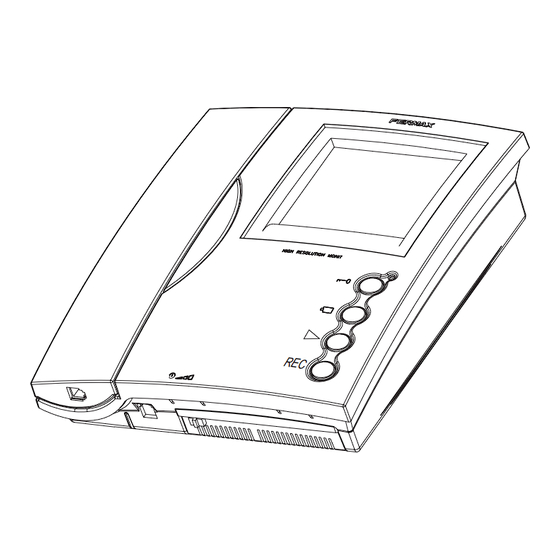
  • Seite 6 Español English Français Deutsch BOTONES - BUTTONS - BOUTON - TASTE Botón de abrepuertas / llamada a conserje. · Estando en conversación con la Placa de Calle, al pulsar este botón se activa el abrepuertas. · Con el teléfono colgado, al pulsar este botón se realiza una llamada al conserje (si existe conserjería). Lock release button / Call guard unit.
  • Seite 7: Türöffnung Für Besucher

    FUNCIONAMIENTO - OPERATION - FONCTIONNEMENT - FUNKTIONSELEMENTE - FUNCIONAMENTO • Llamada Call Appel H IG E S O L U T IO N E R A PA N & TI ¸ max. 30 Seg./Sec./Sek. • Atender la llamada Answer the call Réception de l’appel Rufbeantwortung bla bla...
  • Seite 8 INSTALACIÓN - INSTALLATION - INSTALLATION - BEFESTIGUNG Montaje - Assembly - Montage - Einbau Desmontaje - Disassembly - Démontage - Ansbau 90º CONEXIONES - CONNECTIONS - CONNEXIONS - VERBINDUNGEN DISTRIBUIDOR VIDEO 2 SALIDAS REF.2448 2 OUTPUTS VIDEO DISTRIBUTOR DISTRIBUIDOR VIDEO 2 SALIDAS REF.2448 2 OUTPUTS VIDEO DISTRIBUTOR...
  • Seite 9 data & audio. datos y audio. +, -: power supply (18 Vdc). +, -: alimentación (18 Vdc). V: live (coaxial - video). V: vivo (coaxial - video). M: shield (coaxial - video). M: malla (coaxial - video). Ct: camera activation (10 Vdc). Ct: activación telecamara (10 Vdc).
  • Seite 10 SELECCIÓN MELODÍAS - RINGTONE SELECTION - SÉLECTION MÉLODIES - MELODIEAUSWAHL 1. Con el monitor conectado pulsar el botón de programación (se oirá un tono de confirmación). 2. Una vez en modo programación, pulsar el botón « » para seleccionar secuencialmente las melodías disponibles.
  • Seite 11 1. Drücken Sie die Programmiertaste bei angeschlossenem Monitor. Der Vorgang wird durch einen Signalton bestätigt. 2. Wenn Sie sich im Programmiermodus befinden, drücken Sie die Taste « » um die verfügbaren Töne nacheinander auszuwählen. Drücken Sie die Taste « », um den gerade ausgewählten Ton ausgegeben.
  • Seite 13: Funciones De Memoria

    Funciones de Memoria...
  • Seite 14 FUNCIONES DE MEMORIA Función de memorización de imagenes Estando el monitor Memory en «modo espera» permite la memorización automática de las 127 últimas imágenes captadas por la telecámara al producirse llamadas. Estas imágenes podrán visualizarse posteriormente, indicándose la fecha y hora en la que fueron captadas. El monitor puede funcionar en alguno de los modos representados a continuación, y que se selecciona mediante los botones de función de memorias ( REC ).
  • Seite 15 Presionando , nos desplazamos entre las opciones secuencialmente: BRIGHTNESS, CONTRAST, COLOR, EXIT, BRIGHTNESS, CONTRAST, COLOR... (texto amarillo). MENU BRIGHTNESS DISPLAY CONTRAST TIME COLOR EXIT 23.01.2008 12:37 Estando sobre la opción (texto en amarillo), presionando REC se selecciona la opción (texto rojo). MENU Presionando decrementa (pulsación corta)
  • Seite 16 Presionando , nos desplazamos entre las opciones secuencialmente: BRIGHTNESS, CONTRAST, COLOR, EXIT, BRIGHTNESS, CONTRAST, COLOR... (texto amarillo). Estando sobre la opción (texto en amarillo), presionando REC se selecciona la opción (texto rojo). MENU MENU BRIGHTNESS BRIGHTNESS DISPLAY DISPLAY CONTRAST CONTRAST TIME TIME COLOR...
  • Seite 17 Modo HORA Para ajustar la fecha y hora en el monitor. Estando el Monitor en modo ESPERA (reposo, pantalla monitor apagada), presionar REC más de 2 segundos y visualizaremos la siguiente pantalla: Presionar para desplazarse entre las opcio- nes. Desplazamiento secuencial: DISPLAY, TIME, MENU EXIT, DISPLAY, TIME...
  • Seite 18 Estando sobre la opción (texto en amarillo), presionando REC se selecciona la opción (texto rojo). MENU MENU DA Y DA Y DISPLAY DISPLAY MONTH 01 MONTH 01 YEAR YEAR HOUR 12 HOUR 12 TIME TIME MINUTE 37 MINUTE 37 EXIT 23.01.2008 12:37 EXIT...
  • Seite 19 Modo GRABACIÓN Para grabar una imagen manualmente. En Modo Grabación, el Monitor debe estar encendido con imagen (porque han llamado o porque se ha activado el autoencendido). Foto grabada Total de Fotos realizadas 43/43 Llamada 24/09/2008 12:37 Hora Pulsar REC grabación menos de 2 segundos para grabar la imagen...
  • Seite 20 Modo BORRAR una Foto Para borrar una foto (imagen). En Modo Borrar, el Monitor debe estar encendido con imagen. ULTIMA Foto grabada Total de Fotos realizadas Pulsando muestra imagen anterior 35/43 43/43 Pulsar 22/09/2008 10:11 24/09/2008 12:37 más de 2 segundos Presenta la última imagen grabada Pulsando...
  • Seite 21: Memory Functions

    Memory Functions...
  • Seite 22 MEMORY FUNCTIONS Image Saving Function Keeping the Memory monitor in «standby mode» allows the automatic storage of the last 127 images taken by the video camera on receiving calls. These images can be viewed subsequently, indicating the date and time on which they were taken. The monitor can function in either of the modes displayed below, and which are selected using the memory function buttons ( REC ).
  • Seite 23 Pressing , we move between the options in order: BRIGHTNESS, CONTRAST, COLOUR, EXIT, BRIGHTNESS, CONTRAST, COLOUR... (yellow text). MENU BRIGHTNESS DISPLAY CONTRAST TIME COLOR EXIT 23.01.2008 12:37 Whilst in the option (yellow text), press REC to select that option (red text). MENU Pressing decreases (short press)
  • Seite 24 Pressing , we move between the options in order: BRIGHTNESS, CONTRAST, COLOUR, EXIT, BRIGHTNESS, CONTRAST, COLOUR... (yellow text). Whilst in the option (yellow text), press REC to select that option (red text). MENU MENU BRIGHTNESS BRIGHTNESS DISPLAY DISPLAY CONTRAST CONTRAST TIME TIME COLOR...
  • Seite 25 TIME Mode To adjust the monitor’s date and time. With the Monitor in STANDBY mode (standby, monitor screen off), hold down the REC button for 2 seconds and you will see the following screen: Press to move between the different options. Sequential Order: DISPLAY, TIME, EXIT, DISPLAY, MENU TIME...
  • Seite 26 Whilst in the option (yellow text), press REC to select that option (red text). MENU MENU DA Y DA Y DISPLAY DISPLAY MONTH 01 MONTH 01 YEAR YEAR HOUR 12 HOUR 12 TIME TIME MINUTE 37 MINUTE 37 EXIT 23.01.2008 12:37 EXIT 23.01.2008...
  • Seite 27 RECORDING Mode To record the image manually. In recording mode, the Monitor should be on with the images shown (because a call has been made or the auto-start option has been selected). Photo Saved Total Photos Taken 43/43 Call 24/09/2008 12:37 Save Press REC...
  • Seite 28 Photo DELETE Mode To delete a photo (image). In Delete Mode, the monitor should be on and showing images. LAST Photo saved Total Photos Taken Pressing shows the previous image 35/43 43/43 22/09/2008 10:11 24/09/2008 12:37 Shows the last image saved. Pressing Auto-Start shows the next image...
  • Seite 29: Fonctions De Mémoire

    Fonctions de mémoire...
  • Seite 30 FONCTIONS DE MÉMOIRE Fonction de mémorisation des images Lorsque le moniteur Memory est en « mode attente », il permet de mémoriser automatiquement les 127 dernières images prises par la caméra vidéo lors des appels. Ces images peuvent être visualisées ultérieurement (la date et l’heure de la prise sont indiquées).
  • Seite 31 En appuyant sur , on se déplace parmi les options de manière séquentielle : BRIGHTNESS, CONTRAST, COLOR, EXIT, BRIGHTNESS, CONTRAST, COLOR... (texte jaune). MENU BRIGHTNESS DISPLAY CONTRAST TIME COLOR EXIT 23.01.2008 12:37 Lorsqu’on est sur l’option (texte en jaune), en appuyant sur REC , on la sélectionne (texte rouge). MENU En appuyant sur , l’on descend (frappe brève).
  • Seite 32 En appuyant sur , on se déplace parmi les options de manière séquentielle : BRIGHTNESS, CONTRAST, COLOR, EXIT, BRIGHTNESS, CONTRAST, COLOR... (texte jaune). Lorsqu’on est sur l’option (texte en jaune), en appuyant sur REC , on la sélectionne (texte rouge). MENU MENU BRIGHTNESS...
  • Seite 33 Mode HEURE Pour régler la date et l’heure du moniteur. Lorsque le moniteur est en mode ATTENTE (veille, écran moniteur éteint), appuyer sur REC plus de 2 secondes et l’on verra l’écran suivant : Appuyer sur REC pour se déplacer entre les options.
  • Seite 34 Lorsqu’on est sur l’option (texte en jaune), en appuyant sur REC , on la sélectionne (texte rouge). MENU MENU DA Y DA Y DISPLAY DISPLAY MONTH 01 MONTH 01 YEAR YEAR HOUR 12 HOUR 12 TIME TIME MINUTE 37 MINUTE 37 EXIT 23.01.2008 12:37...
  • Seite 35 Mode ENREGISTREMENT Pour enregistrer une image manuellement. En mode Enregistrement, le moniteur doit être allumé avec l’image (parce qu’il y a eu appel ou parce que l’allumage automatique s’est activé). Photo enregistrée Total de photos prises 43/43 Appel 24/09/2008 12:37 Heure Appuyer sur REC : enregistrement...
  • Seite 36 Mode SUPPRIMER une photo Pour supprimer une photo (image). En mode SUPPRIMER, le moniteur doit être allumé avec image. DERNIÈRE photo enregistrée Total de photos prises En appuyant sur l’image précédente apparaît. 35/43 43/43 22/09/2008 10:11 24/09/2008 12:37 Présente la dernière image enregistrée En appuyant sur Allumage automatique...
  • Seite 37: Speicherfunktionen

    Speicherfunktionen...
  • Seite 38 SPEICHERFUNKTIONEN Bildspeicherfunktion Wenn sich der Monitor Memory im «Bereitschaftsmodus» befindet, lässt er die automatische Speicherung der letzten 127 Bilder zu, die von der Kamera bei der Betätigung der Ruftaste aufgenommen wurden. Diese Bilder können später betrachtet werden, wobei Datum und Uhrzeit der Aufnahme eingeblendet werden.
  • Seite 39 Durch Drücken von scrollen Sie zu den nachfolgenden Optionen: BRIGHTNESS, CONTRAST, COLOR, EXIT, BRIGHTNESS, CONTRAST, COLOR... (gelber Text). MENU BRIGHTNESS DISPLAY CONTRAST TIME COLOR EXIT 23.01.2008 12:37 Wenn man zur Option (gelber Text) scrollt und REC drückt, wird diese ausgewählt (roter Text). MENU Druch Drücken von werden die Werte...
  • Seite 40 Durch Drücken von scrollen Sie zu den nachfolgenden Optionen: BRIGHTNESS, CONTRAST, COLOR, EXIT, BRIGHTNESS, CONTRAST, COLOR... (gelber Text). Wenn man zur Option (gelber Text) scrollt und REC drückt, wird diese ausgewählt (roter Text). MENU MENU BRIGHTNESS BRIGHTNESS DISPLAY DISPLAY CONTRAST CONTRAST TIME TIME...
  • Seite 41 Modus STUNDE Einstellung von Datum und Uhrzeit am Monitor. Wenn sich der Monitor im BEREITSCHAFTSMODUS befindet (Standby, Monitor aus) REC länger als 2 Sekunden drücken, um zum nächsten Programmfenster zu gelangen. drücken, um zwischen den Optionen hin- und herzuschalten. Scrollleiste: DISPLAY, TIME, EXIT, MENU DISPLAY, TIME...
  • Seite 42 Wenn man zur Option (gelber Text) scrollt und REC drückt, wird diese ausgewählt (roter Text). MENU MENU DA Y DA Y DISPLAY DISPLAY MONTH 01 MONTH 01 YEAR YEAR HOUR 12 HOUR 12 TIME TIME MINUTE 37 MINUTE 37 EXIT 23.01.2008 12:37 EXIT...
  • Seite 43 AUFNAHMEMODUS Manuelle Speicherung von Bildern. Im Aufnahmemodus muss der Monitor eingeschaltet sein und ein Bild anzeigen (Anrufauslösung oder Aktivierung der Eigenstartfunktion). Bildaufnahme Anzahl aufgenommener Bilder 43/43 Anruf 24/09/2008 12:37 Uhrzeit Drücken Sie REC der Aufnahme weniger als 2 Sekunden, um das gewünschte Bild Datum aufzunehmen.
  • Seite 44: Vollständige Löschung

    Modus: Bild LÖSCHEN Bild löschen (Aufnahme). Im Modus Löschen, muss der Monitor eingeschaltet sein und ein Bild anzeigen. ZULETZT gespeichertes Bild Alle aufgenommenen Bilder Durch Drücken von , wird das vorige Bild angezeigt 35/43 43/43 22/09/2008 10:11 24/09/2008 12:37 Anzeigen des zuletzt gespeicherten Bildes Dürch das Drücken von Eigenstart...
  • Seite 48 Publicación técnica de caracter informativo editada por FERMAX ELECTRONICA. FERMAX ELECTRONICA, en su política de mejora constante, se reserva el derecho a modificar el contenido de este documento así como las características de los productos que en él se refieren en cualquier momento y sin previo aviso.