Herunterladen Inhalt Inhalt Diese Seite drucken
HP Photosmart R930 serie Bedienungsanleitung

HP Photosmart R930 serie Bedienungsanleitung

Vorschau ausblenden Andere Handbücher für Photosmart R930 serie:
Inhaltsverzeichnis

Werbung

Verfügbare Sprachen
  • DE

Verfügbare Sprachen

  • DEUTSCH, seite 78
HP Photosmart R930 series
Digital Camera

Werbung

Inhaltsverzeichnis
loading

Inhaltszusammenfassung für HP Photosmart R930 serie

  • Seite 1 HP Photosmart R930 series Digital Camera...
  • Seite 2 © Copyright 2007 Hewlett-Packard Development Company, L.P. The information contained herein is subject to change without notice. The only warranties for HP products and services are set forth in the express warranty statements accompanying such products and services. Nothing herein should be construed as constituting an additional warranty. HP shall not be liable for technical or editorial errors or omissions contained herein.
  • Seite 3: Inhaltsverzeichnis

    Contents Getting started Accessing the electronic User Guide.......4 Camera top, side, and back ........6 Camera front and bottom.........7 Setting up your camera Install the battery............9 Charge the battery............9 Turn on the camera..........10 Choose the language..........10 Set the region............10 Set the date and time..........10 Install and format an optional memory card...11 Install the software..........12 Windows............12...
  • Seite 4: Getting Started

    A description of the features power indicator icons • Troubleshooting • Getting assistance from HP • Camera specifications Accessing the electronic User Guide The electronic User Guide is on the HP Photosmart Software CD. HP Photosmart R930 series Digital Camera...
  • Seite 5 To view the User Guide: 1. Insert the HP Photosmart Software CD into the CD drive of your computer. 2. Click View User Guide on the main page of the installation screen. The electronic User Guide is also copied to your computer when you install the HP Photosmart Software.
  • Seite 6: Camera Top, Side, And Back

    Video Record, and Playback (see Picture Capture, Video Record, and Playback on page 20). Shutter button. Zoom lever—Accesses / Zoom while in Picture Capture or Video Record; accesses Thumbnails and Magnify while in Playback. HP Photosmart R930 series Digital Camera...
  • Seite 7: Camera Front And Bottom

    USB connector. Battery Charging light. Overlay button—Turns Touch Screen Image Display overlays on and off (see Using the Touch Screen interface on page 13). 10 Stylus (see Using the Touch Screen interface on page 13). 11 Touch Screen Image Display—Frames images when in Picture Capture or Video Record,...
  • Seite 8 Tripod mount. HP Photosmart R930 series Digital Camera...
  • Seite 9: Setting Up Your Camera Install The Battery

    You can charge the battery in the camera, using the USB cable and power adapter. NOTE: Your camera uses a rechargeable HP Photosmart R07 Lithium Ion battery (L1812A/ L1812B). Do not charge any other battery in the camera or optional quick recharger. Setting up your camera...
  • Seite 10: Turn On The Camera

    2. Touch Next to confirm your choice and display the Date & Time screen. Set the date and time Accurately setting the date and time will help you locate images once you have uploaded them to your computer, HP Photosmart R930 series Digital Camera...
  • Seite 11: Install And Format An Optional Memory Card

    and will ensure that images are accurately marked if you use the date and time imprint feature. 1. Touch to adjust the month, date, and year. 2. Touch Next to confirm your settings and display the Time screen. 3. Touch to adjust the time.
  • Seite 12: Install The Software

    To learn about Windows Vista support for your camera, see www.hp.com/go/windowsvista (English only). If you have trouble installing or using the HP Photosmart Software, see the Hewlett-Packard Technical Support website for more information: www.hp.com/support. Windows 1.
  • Seite 13: Macintosh

    2. Insert the HP Photosmart Software CD into the CD drive and follow the on-screen instructions. If the installation window does not appear, click Start, click Run, type D:\Setup.exe, where D is the letter of your CD drive, then click OK.
  • Seite 14 To reduce smudging and minimize the risk of scratching the Touch Screen, use the stylus that came with your camera. For additional tips and information about the Touch Screen, see the electronic User Guide. HP Photosmart R930 series Digital Camera...
  • Seite 15: Taking Pictures And Recording Video Clips

    3 Taking pictures and recording video clips Slide to either to take pictures or to record video clips. Take a picture You can take a picture when you are in Picture Capture. 1. Slide 2. Frame the subject in the Image Display.
  • Seite 16 4. Press the Shutter button all the way down and release to begin recording video. 5. To stop recording video, press and release the Shutter button again. After you have recorded a video clip, the camera displays it briefly in the Image Display. HP Photosmart R930 series Digital Camera...
  • Seite 17: Reviewing And Deleting Images And Video Clips Review Images And Video Clips

    4 Reviewing and deleting images and video clips Review images and video clips You can review images and video clips in Playback. 1. Slide 2. Touch to scroll through your images and video clips. To play a video clip, touch in the center of the displayed video frame.
  • Seite 18: Transferring And Printing Images Transfer Images

    If you have installed the HP Photosmart Software and need more information, see the Help feature in the HP Photosmart Software. Print images from the camera You can connect the camera to any PictBridge- certified printer to print images.
  • Seite 19 2. Turn off the camera, then connect the camera and printer using the USB cable that came with your camera. 3. Turn on the camera. 4. When the camera is connected to the printer, the Image Display shows an image. Use select the image you want to print.
  • Seite 20: Camera Quick Reference

    To cancel or exit a menu, touch at any time. Picture Capture Menu—Allows you to adjust camera settings that affect the characteristics of future images you capture with your camera. To access this menu, slide HP Photosmart R930 series Digital Camera...
  • Seite 21 , then touch Menu. You can select from the following options: • Shooting Mode (Auto Mode, Close-Up, Theatre, Panorama Right, Panorama Left, Landscape, Portrait, Action, Night Portrait, Beach, Snow, Sunset) • Flash Setting • Self-Timer • Steady Photo • Adaptive Lighting •...
  • Seite 22 Display Timeout • Touch Screen Alignment • Digital Zoom • Remembered Settings • Date & Time • USB Configuration • Language Camera Help Menu—Provides descriptions of camera features and picture-taking tips. To access this menu, HP Photosmart R930 series Digital Camera...
  • Seite 23 touch from any menu, then touch More topics. You can select from the following options: • Top Ten Tips • Camera Accessories • Camera Buttons • Aligning the Touch Screen • Using Shooting Modes • Using Design Gallery • Using Photosmart Express •...
  • Seite 24 HP Photosmart R930 series Digital Camera...
  • Seite 25 Appareil photo numérique HP Photosmart série R930...
  • Seite 26 Les informations contenues dans le présent document sont sujettes à modification sans préavis. Les seules garanties pour les produits et services HP sont énoncées dans les déclarations de garantie expresse accompagnant lesdits produits et services. Aucun élément du présent document ne saurait être interprété comme constituant une garantie supplémentaire.
  • Seite 27 Sommaire Prise en main Accéder au Guide de l'utilisateur au format électronique..............6 Dessus, flanc et arrière de l'appareil photo....7 Façade et dessous de l'appareil photo.....9 Préparation de votre appareil photo Installation de la batterie........10 Chargement de la batterie........10 Mise en marche de l’appareil photo.......11 Choix de la langue..........11 Sélection de la région..........12 Réglage de la date et de l'heure......12...
  • Seite 28 Transfert et impression d'images Transfert d'images..........20 Impression d'images à partir de l'appareil photo..............20 Référence rapide de l'appareil photo....22 Appareil photo numérique HP Photosmart série R930...
  • Seite 29: Prise En Main

    à la batterie, base de l'appareil notamment : photo • L'extension de son autonomie • Une description des icônes d'indication de charge • Résolution des problèmes • Obtenir une assistance auprès de HP Prise en main...
  • Seite 30: Accéder Au Guide De L'utilisateur Au Format Électronique

    Le Guide de l'utilisateur au format électronique se trouve sur le CD HP Photosmart Software. Pour consulter le Guide de l'utilisateur : 1. Insérez le CD HP Photosmart Software dans le lecteur de CD-ROM de votre ordinateur. 2. Cliquez sur Afficher le Guide de l'utilisateur dans la page principale de l'écran d'installation.
  • Seite 31: Dessus, Flanc Et Arrière De L'appareil Photo

    • Si nécessaire, reportez-vous à l'aide en ligne du logiciel HP Photosmart. Dessus, flanc et arrière de l'appareil photo Haut-parleur. Bouton Voyant d'alimentation. Sélecteur : Permet de sélectionner les modes Capture d'images, Enregistrement vidéo et Lecture (voir Capture d'images, enregistrement vidéo et lecture, page 22).
  • Seite 32 Enregistrement vidéo, permet de visualiser les images en mode Lecture et fournit une interface sur l'écran tactile pour accéder aux fonctions de l'appareil photo (voir Utilisation de l'interface sur l'écran tactile, page 16). Appareil photo numérique HP Photosmart série R930...
  • Seite 33: Façade Et Dessous De L'appareil Photo

    Façade et dessous de l'appareil photo Flash. Voyant du retardateur/de la mise au point. Microphone. Volet du compartiment de la carte mémoire/batterie. Filetage pour trépied. Prise en main...
  • Seite 34: Préparation De Votre Appareil Photo Installation De La Batterie

    USB et l'adaptateur secteur. Remarque Votre appareil photo utilise une batterie lithium-ion rechargeable HP Photosmart R07 (L1812A/L1812B). Ne rechargez aucun autre batterie dans l'appareil photo ou le chargeur rapide en option. Appareil photo numérique HP Photosmart série R930...
  • Seite 35: Mise En Marche De L'appareil Photo

    1. Insérez l'extrémité courte du câble USB dans l'appareil photo et l'extrémité large dans l'adaptateur secteur, comme indiqué. 2. Branchez l'adaptateur secteur sur une prise électrique. Lorsque le voyant de charge de la batterie clignote sur l'appareil photo, la batterie est en cours de chargement. La batterie est complètement rechargée lorsque le voyant de charge devient fixe (compter environ 2 à...
  • Seite 36: Sélection De La Région

    2. Touchez Suivant pour confirmer les paramètres sélectionnés et afficher l'écran Heure. 3. Touchez la flèche pour régler l'heure. 4. Une fois que tous les paramètres sont corrects, touchez Terminé. Appareil photo numérique HP Photosmart série R930...
  • Seite 37: Insertion Et Formatage D'une Carte Mémoire (En Option)

    Insertion et formatage d'une carte mémoire (en option) Cet appareil photo prend en charge les cartes mémoire Secure Digital (SD et SDHC) de 32 Mo à 8 Go (standard, haute vitesse et haute capacité). 1. Eteignez l'appareil photo et ouvrez le volet du compartiment de la batterie/carte mémoire.
  • Seite 38: Installation Du Logiciel

    éteignez d'abord l'appareil photo, puis retirez la carte mémoire. Installation du logiciel Le logiciel HP Photosmart permet non seulement de transférer des photos et des clips vidéo sur votre ordinateur, mais aussi de modifier les images stockées (correction de l'effet yeux rouges, rotation, recadrage, redimensionnement, etc.).
  • Seite 39: Macintosh

    2. Insérez le CD HP Photosmart Software dans le lecteur de CD-ROM et suivez les instructions à l'écran. Si la fenêtre d'installation ne s'affiche pas, cliquez sur Démarrer, puis sur Exécuter et saisissez D:\Setup.exe (où D correspond à la lettre désignant le lecteur de CD-ROM).
  • Seite 40: Utilisation De L'interface Sur L'écran Tactile

    Afin de maintenir la propreté et réduire les risques de rayure de l'écran tactile, utilisez le stylet fourni avec l'appareil photo. Pour plus de conseils et d'informations sur l'écran tactile, consultez la version électronique du Guide de l'utilisateur. Appareil photo numérique HP Photosmart série R930...
  • Seite 41: Prises De Vue Et Enregistrement De Clips Vidéo

    3 Prises de vue et enregistrement de clips vidéo Positionnez le sélecteur pour effectuer une prise de vue, ou sur pour enregistrer des clips vidéo. Pour prendre une photo : Vous pouvez prendre des clichés lorsque vous vous trouvez en mode Capture d'images.
  • Seite 42 4. Appuyez à fond sur le déclencheur et relâchez-le pour commencer l'enregistrement vidéo. 5. Pour mettre fin à l'enregistrement vidéo, appuyez de nouveau sur le déclencheur, puis relâchez-le. Une fois l'enregistrement du clip vidéo effectué, l'appareil affiche brièvement celui-ci à l'écran. Appareil photo numérique HP Photosmart série R930...
  • Seite 43: Revisualisation Et Suppression Des Images Et Des Clips Vidéo Revisualisation Des Images Et Des Clips Vidéo

    4 Revisualisation et suppression des images et des clips vidéo Revisualisation des images et des clips vidéo Vous pouvez afficher les images et les clips vidéo en mode Lecture. 1. Positionnez le sélecteur 2. Touchez ou pour parcourir vos images et vos clips vidéo.
  • Seite 44: Transfert Et Impression D'images

    à l'ordinateur, suivez les instructions affichées sur l'ordinateur pour transférer les images. Si vous avez installé le logiciel HP Photosmart et avez besoin de davantage d'informations, consultez l'aide relative au logiciel HP Photosmart. Impression d'images à partir de l'appareil photo Vous pouvez connecter l'appareil photo à...
  • Seite 45 qu'elle contient du papier et qu'elle n'affiche aucun message d'erreur. 2. Eteignez l'appareil photo, puis connectez-le à l'imprimante à l'aide du câble USB fourni avec l'appareil. 3. Allumez l’appareil photo. 4. Une fois l'appareil photo relié à l'imprimante, l'écran affiche une image. Utilisez la flèche pour sélectionner l'image à...
  • Seite 46: Référence Rapide De L'appareil Photo

    à l'aide sur l'appareil. • Touchez une option de menu pour la sélectionner. La présence d'une flèche indique que des options de menu supplémentaires sont disponibles. Touchez la flèche pour afficher les options supplémentaires. Appareil photo numérique HP Photosmart série R930...
  • Seite 47 • Pour sauvegarder les modifications et quitter le menu, touchez le bouton situé dans le coin inférieur droit de l'écran tactile (par exemple, Enregistrer). • Pour accéder à l'aide sur l'appareil photo, touchez l'icône • Pour annuler une opération ou sortir d'un menu, touchez à...
  • Seite 48 Juxtapos. pr créer panorama • Dépl. images sur carte • Configuration Menu Configuration : Vous permet de modifier le comportement de l'appareil photo. Pour accéder à ce menu, touchez l'option Menu à partir du mode Appareil photo numérique HP Photosmart série R930...
  • Seite 49 , puis touchez Configuration. Vous pouvez choisir les options suivantes : • Luminosité écran • Sons de l'appareil • Délai d'extinction de l'écran • Alignement de l'écran tactile • Zoom numérique • Paramètres mémorisés • Date/Heure • Configuration USB • Langue Menu Aide : Comporte des descriptions des fonctionnalités de l'appareil photo et propose des conseils...
  • Seite 50 • Transfert d'images • Gestion des batteries • Obtenir de l'assistance • Aperçu des fonctions de l'appareil • Raccourcis de l'appareil photo • À propos de Appareil photo numérique HP Photosmart série R930...
  • Seite 51 Fotocamera digitale HP Photosmart serie R930...
  • Seite 52 © Copyright 2007 Hewlett-Packard Development Company, L.P. Le informazioni contenute in questo documento sono soggette a modifica senza preavviso. Le uniche garanzie per i prodotti e i servizi HP sono definite nelle dichiarazioni di garanzia esplicita che accompagnano tali prodotti e servizi. Nulla di quanto dichiarato nel presente documento costituisce una garanzia aggiuntiva.
  • Seite 53 Sommario Informazioni preliminari Accesso alla Guida d'uso elettronica......5 Viste superiore, laterale e posteriore della fotocamera...............6 Viste anteriore e inferiore della fotocamera....7 Configurazione della fotocamera Installazione della batteria........9 Carica della batteria..........9 Accensione della fotocamera.........10 Scelta della lingua..........10 Impostazione della regione........11 Impostazione della data e dell'ora......11 Installazione e formattazione di una scheda di memoria opzionale..........12 Installazione del software........13...
  • Seite 54: Informazioni Preliminari

    Usare le funzioni base batteria, tra cui: della fotocamera • Ottimizzazione della durata della batteria • Una descrizione delle icone relative all'indicatore di alimentazione • Soluzione dei problemi • Informazioni per richiedere l'assistenza • Specifiche della fotocamera Fotocamera digitale HP Photosmart serie R930...
  • Seite 55: Accesso Alla Guida D'uso Elettronica

    La Guida d'uso elettronica è disponibile sul CD del software HP Photosmart. Per visualizzare la Guida d'uso: 1. Inserire il CD del software HP Photosmart nell'unità CD del computer. 2. Fare clic su Visualizza la Guida d'uso nella pagina principale della schermata di installazione.
  • Seite 56: Viste Superiore, Laterale E Posteriore Della Fotocamera

    Scatto, Registrazione e Riproduzione (vedere Scatto, Registrazione, Riproduzione a pagina 21). Pulsante otturatore. Leva dello zoom: consente di accedere alla funzione di / zoom quando è attiva la modalità Scatto o Registrazione; consente di Fotocamera digitale HP Photosmart serie R930...
  • Seite 57: Viste Anteriore E Inferiore Della Fotocamera

    accedere alle funzioni Mostra anteprime e Ingrandisci quando è attiva la modalità Riproduzione. Connettore USB. Spia di ricarica della batteria. Pulsante Sovrimpressione: consente di attivare e disattivare il touch screen sul display LCD (vedere Uso dell'interfaccia touch screen a pagina 14). 10 Penna (vedere Uso dell'interfaccia touch screen a pagina 14).
  • Seite 58 Flash. Spia Autoscatto/Supporto messa a fuoco. Microfono. Sportello del vano batteria/scheda di memoria. Attacco treppiede. Fotocamera digitale HP Photosmart serie R930...
  • Seite 59: Configurazione Della Fotocamera Installazione Della Batteria

    È possibile caricare la batteria mentre è nella fotocamera usando l'adattatore e il cavo USB. Nota Questa fotocamera utilizza una batteria ricaricabile agli ioni di litio HP Photosmart R07 (L1812A/L1812B). Non caricare altri tipi di batterie nella fotocamera o nel caricabatterie rapido opzionale.
  • Seite 60: Accensione Della Fotocamera

    Per accendere la fotocamera, premere il pulsante Scelta della lingua 1. Utilizzando il dito o la penna, toccare la lingua desiderata. 2. Toccare Next per confermare la selezione effettuata e visualizzare la schermata Regione. Fotocamera digitale HP Photosmart serie R930...
  • Seite 61: Impostazione Della Regione

    Impostazione della regione Insieme all'impostazione della lingua, l'impostazione della regione determina il formato predefinito per la data. 1. Toccare la regione desiderata. 2. Toccare Avanti per confermare la selezione effettuata e visualizzare la schermata Data e ora. Impostazione della data e dell'ora Impostando con precisione la data e l'ora risulterà...
  • Seite 62: Installazione E Formattazione Di Una Scheda Di Memoria Opzionale

    1. Quando la fotocamera è accesa, spostare 2. Toccare per visualizzare il menu Eliminare. 3. Toccare per visualizzare Formatta scheda, quindi toccare Formatta scheda. Fotocamera digitale HP Photosmart serie R930...
  • Seite 63: Installazione Del Software

    (eliminare gli occhi rossi, ruotare, ritagliare e ridimensionare la foto e tanto altro ancora). Per installare il software HP Photosmart, il computer deve soddisfare i requisiti di sistema indicati sulla confezione della fotocamera. Per maggiori informazioni sul supporto di Windows Vista per la fotocamera, vedere www.hp.com/go/windowsvista (solo in inglese).
  • Seite 64: Macintosh

    2. Inserire il CD del software HP Photosmart nell'unità CD e seguire le istruzioni visualizzate. Se non viene visualizzata la finestra di installazione, fare clic su Start, Esegui, digitare D:\Setup.exe (dove D è la lettera che corrisponde all'unità CD) e quindi fare clic su OK.
  • Seite 65 Per utilizzare il touch screen: • Toccare un pulsante (come mostrato) o una voce di menu sul touch screen. Ad esempio, toccando esce dalla schermata o dal menu corrente. • Quando si inquadra un'immagine o un videoclip, è possibile disattivare il touch screen per visualizzare più...
  • Seite 66: Foto E Videoclip

    3. Premere a metà il pulsante otturatore per bloccare la messa a fuoco e l'esposizione. Il quadro di messa a fuoco sul display LCD si accende con luce verde fissa quando la messa a fuoco è bloccata. Fotocamera digitale HP Photosmart serie R930...
  • Seite 67 4. Premere completamente il pulsante otturatore e rilasciarlo per iniziare la registrazione. 5. Per interrompere la registrazione, premere e rilasciare il pulsante otturatore. Dopo la registrazione, il videoclip viene visualizzato brevemente sul display LCD. Foto e videoclip...
  • Seite 68: Visione E Cancellazione Di Immagini E Videoclip Visione Di Immagini E Videoclip

    Cancellazione di un'immagine Riproduzione si possono Quando è attiva la modalità eliminare singole immagini: 1. Spostare 2. Toccare per selezionare un'immagine o un videoclip. 3. Toccare per visualizzare il menu Eliminare. 4. Toccare Corrente. Fotocamera digitale HP Photosmart serie R930...
  • Seite 69: Trasferimento E Stampa Delle Immagini Trasferimento Delle Immagini

    è collegata al computer, seguire le istruzioni visualizzate sul computer per trasferire le immagini. Se è stato installato il software HP Photosmart e sono necessarie maggiori informazioni, vedere la funzione della guida nel software HP Photosmart. Stampa delle immagini della fotocamera Per stampare le foto, è...
  • Seite 70 7. Terminata la stampa, scollegare la fotocamera dalla stampante. Per ulteriori informazioni sulle opzioni di stampa, vedere la Guida d'uso in formato elettronico o toccare display LCD della fotocamera. Fotocamera digitale HP Photosmart serie R930...
  • Seite 71: Riferimento Rapido Per La Fotocamera

    6 Riferimento rapido per la fotocamera Usare questo capitolo come riferimento rapido alle funzioni della fotocamera. Per maggiori informazioni sulle funzioni della fotocamera, consultare la Guida d'uso elettronica o la guida nella fotocamera. Scatto, Registrazione, Riproduzione • Scatto consente di inquadrare il soggetto sul display LCD e di scattare la foto.
  • Seite 72 • Velocità ISO • Esposizione AE • Configurazione Menu Registrazione: consente di regolare le impostazioni della fotocamera che avranno effetto sui videoclip che si registreranno successivamente. Per accedere a questo menu, spostare , quindi Fotocamera digitale HP Photosmart serie R930...
  • Seite 73 toccare Menu. È possibile scegliere tra le seguenti opzioni: • Qualità video • Autoscatto • • Compensazione esposizione • Bilanciam. bianco • Esposizione AE • Configurazione Menu Riproduzione: consente di utilizzare e manipolare le immagini. Per accedere a questo menu, spostare , quindi toccare Menu.
  • Seite 74 Uso della galleria degli effetti • Uso di Photosmart Express • Stampa immagini • Registrazione videoclip • Revisione foto e video • Assegnazione dei tag alle immagini • Cancellazione immagini • Trasferimento immagini • Manutenzione batterie • Assistenza Fotocamera digitale HP Photosmart serie R930...
  • Seite 75 • Demo delle funzioni della fotocamera • Accesso rapido • Info su Riferimento rapido per la fotocamera...
  • Seite 76 Fotocamera digitale HP Photosmart serie R930...
  • Seite 77 HP Photosmart R930 Digitalkameraserie...
  • Seite 78 © Copyright 2007 Hewlett-Packard Development Company, L.P. Die Informationen in diesem Dokument können ohne vorherige Ankündigung geändert werden. Für HP Produkte und Dienste gelten nur die Gewähr-leistungen, die in den ausdrücklichen Gewährleistungs- erklärungen des jeweiligen Produkts bzw. Dienstes aufgeführt sind.
  • Seite 79 Inhalt Erste Schritte Zugreifen auf das elektronische Benutzerhandbuch...........5 Ober- und Rückseite sowie Seitenfläche der Kamera..............6 Vorder- und Unterseite der Kamera......8 Einrichten Ihrer Kamera Einsetzen des Akkus/der Batterie......9 Aufladen des Akkus..........9 Einschalten der Kamera.........10 Auswählen der Sprache.........10 Einstellen der Region..........11 Einstellen von Datum und Uhrzeit......11 Einsetzen und Formatieren einer optionalen Speicherkarte............12 Installieren der Software.........13...
  • Seite 80: Erste Schritte

    • Installieren der • Informationen zu HP Photosmart- Batterien/Akkus, Software einschließlich: • Vorstellung der • Verlängerung der grundlegenden Batteriebetriebs- Kamerafunktionen dauer • Beschreibung der Stromversorgungs- symbole • Fehlerbehebung • Unterstützung durch • Technische Daten der Kamera HP Photosmart R930 Digitalkameraserie...
  • Seite 81: Zugreifen Auf Das Elektronische

    Das elektronische Benutzerhandbuch befindet sich auf der HP Photosmart Software CD. So zeigen Sie das Benutzerhandbuch an: 1. Legen Sie die HP Photosmart Software CD in das CD- Laufwerk Ihres Computers ein. 2. Klicken Sie auf der Hauptseite der Installationsanzeige auf Benutzerhandbuch anzeigen.
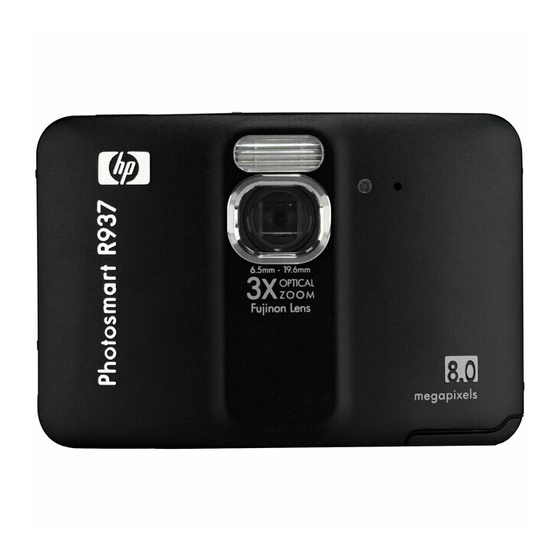
  • Seite 82: Ober- Und Rückseite Sowie Seitenfläche Der Kamera

    • Weitere Informationen zur HP Photosmart-Software finden Sie in der Onlinehilfe für die Software. Ober- und Rückseite sowie Seitenfläche der Kamera Lautsprecher Taste Netzkontrollleuchte Wahlschalter - Dient zum Wechseln zwischen den Modi Bild aufnehmen, Video aufnehmen und Wiedergabe (siehe „Bildaufnahme, Videoaufnahme und Wiedergabe“...
  • Seite 83 Zoomhebel - Dient zum Zugriff auf die / Zoom-Funktion, wenn sich die Kamera im Modus Bild aufnehmen oder Video aufnehmen befindet; dient zum Zugriff auf die Funktionen Miniaturansicht und Vergrößern, wenn sich die Kamera im Modus Wiedergabe befindet. USB-Anschluss Ladekontrollleuchte Overlay - Dient zum Aktivieren/ Taste Deaktivieren der Overlays des Touch Screens...
  • Seite 84: Vorder- Und Unterseite Der Kamera

    Vorder- und Unterseite der Kamera Blitz Selbstauslöser/Fokus-Hilfslicht Mikrofon Klappe des Batterie-/Speicherkartenfachs Stativhalterung HP Photosmart R930 Digitalkameraserie...
  • Seite 85: Einrichten Ihrer Kamera Einsetzen Des Akkus/Der Batterie

    Sie können den Akku unter Verwendung des USB-Kabels oder des Netzteils aufladen. Hinweis Ihre Kamera verwendet einen aufladbaren HP Photosmart R07 Lithium-Ionen-Akku (L1812A/ L1812B). Laden Sie keine anderen Akkus in der Kamera oder dem optionalen Schnellladegerät auf. Einrichten Ihrer Kamera...
  • Seite 86: Einschalten Der Kamera

    Zum Einschalten der Kamera drücken Sie die Taste Auswählen der Sprache 1. Tippen Sie mit dem Finger oder dem Zeigestift auf die gewünschte Sprache. 2. Tippen Sie auf Weiter, um die Auswahl zu bestätigen und die Anzeige Region aufzurufen. HP Photosmart R930 Digitalkameraserie...
  • Seite 87: Einstellen Der Region

    Einstellen der Region Das Standarddatumsformat wird neben der Einstellung für die Sprache auch durch die Einstellung für die Region festgelegt. 1. Tippen Sie auf die gewünschte Region. 2. Tippen Sie auf Weiter, um die Auswahl zu bestätigen und die Anzeige Datum und Zeit aufzurufen. Einstellen von Datum und Uhrzeit Wenn Sie das Datum und die Uhrzeit korrekt einstellen, können Sie die Bilder später schneller finden, nachdem...
  • Seite 88: Einsetzen Und Formatieren Einer Optionalen Speicherkarte

    Speicherkarte entfernt. Stellen Sie daher sicher, dass zuvor alle vorhandenen Bilder auf andere Datenträger übertragen werden. 1. Bringen Sie den Schalter in die Position 2. Tippen Sie auf , um das Menü Löschen aufzurufen. HP Photosmart R930 Digitalkameraserie...
  • Seite 89: Installieren Der Software

    Computer sowie zum Bearbeiten gespeicherter Bilder (u. a. Rote Augen entfernen, Drehen, Zuschneiden und Größe ändern). Um die HP Photosmart-Software installieren zu können, muss Ihr Computer die Systemvoraussetzungen erfüllen, die auf der Verpackung der Kamera angegeben sind. Weitere Informationen zur Unterstützung Ihrer Kamera durch Windows Vista finden Sie unter www.hp.com/go/...
  • Seite 90: Macintosh

    2. Legen Sie die HP Photosmart Software CD in das CD- Laufwerk ein, und befolgen Sie die angezeigten Anweisungen. Wenn das Installationsfenster nicht angezeigt wird, klicken Sie auf Start und Ausführen. Geben Sie dann D:\Setup.exe ein (wobei D für den Buchstaben Ihres CD-Laufwerks steht).
  • Seite 91: Verwenden Der Touch Screen-Oberfläche

    Verwenden der Touch Screen- Oberfläche Diese Kamera ist mit einer Touch Screen-Oberfläche ausgestattet, über die Sie auf die Menüs und zahlreiche Funktionen der Kamera zugreifen können. So verwenden Sie den Touch Screen: • Tippen Sie auf dem Touch Screen (wie dargestellt) auf eine Schaltfläche mit abgerundeten Ecken oder einen Menüpunkt.
  • Seite 92: Aufnehmen Von Bildern Und Videoclips

    Bildanzeige der Kamera. Aufnehmen eines Videoclips Sie können einen Videoclip aufnehmen, wenn sich die Kamera im Modus Video aufnehmen befindet. 1. Bringen Sie den Schalter in die Position 2. Erfassen Sie das Motiv mit der Bildanzeige. HP Photosmart R930 Digitalkameraserie...
  • Seite 93 3. Drücken Sie den Auslöser zur Hälfte herunter, um den Fokus und die Belichtung zu messen. Die Fokusklammern in der Bildanzeige werden grün angezeigt, sobald der Fokus gesperrt ist. 4. Drücken Sie den Auslöser ganz herunter, und lassen Sie diesen wieder los, um mit der Videoaufnahme zu beginnen.
  • Seite 94: Betrachten Und Löschen Von Bildern Und Videoclips Betrachten Von Bildern Und Videoclips

    1. Bringen Sie den Schalter in die Position 2. Tippen Sie auf oder , um ein Bild oder einen Videoclip auszuwählen. 3. Tippen Sie auf , um das Menü Löschen aufzurufen. 4. Tippen Sie auf Dieses Bild. HP Photosmart R930 Digitalkameraserie...
  • Seite 95: Übertragen Und Drucken Von Bildern Übertragen Von Bildern

    Kamera mit dem Computer verbunden ist, befolgen Sie die Anweisungen auf dem Computerbildschirm, um die Bilder zu übertragen. Wenn die HP Photosmart-Software installiert ist und Sie weitere Informationen benötigen, lesen Sie die Informationen in der Hilfe der HP Photosmart- Software.
  • Seite 96: Drucken Von Bildern Von Der Kamera Aus

    7. Trennen Sie die Kamera nach Drucken des Bilds vom Drucker. Weitere Informationen zu den Druckoptionen finden Sie im elektronischen Benutzerhandbuch. Sie können dazu aber auch auf der Bildanzeige der Kamera auf tippen. HP Photosmart R930 Digitalkameraserie...
  • Seite 97: Kurzreferenz Für Kamerafunktionen

    6 Kurzreferenz für Kamerafunktionen Das folgende Kapitel dient als Kurzreferenz für die Kamerafunktionen. Weitere Informationen zu diesen Kamerafunktionen finden Sie im elektronischen Benutzerhandbuch oder in der Onlinehilfe der Kamera. Bildaufnahme, Videoaufnahme und Wiedergabe • Im Modus Bild aufnehmen können Sie Bilder mit der Bildanzeige erfassen und aufnehmen.
  • Seite 98 Panorama Rechts, Panorama Links, Landschaft, Portrait, Action, Nachtportrait, Strand, Schnee, Sonnenuntergang) • Blitzeinstellung • Selbstauslöser • Stabile Aufnahme • Adaptive Beleuchtung • Bildqualität • Burst • Kennung • Datums-/Zeitstempel • Belichtungskompensation • Belichtungsbereich • Weißabgleich • ISO-Empfindlichkeit HP Photosmart R930 Digitalkameraserie...
  • Seite 99 • AE-Belichtungsmessung • Kameraeinstellungen Menü Video aufnehmen - Dient zum Anpassen der Kameraeinstellungen, die sich auf die Eigenschaften von Videoclips auswirken, die später mit Ihrer Kamera aufgenommen werden. Greifen Sie auf dieses Menü zu, indem Sie den Schalter in die Position bringen.
  • Seite 100 Menü auf und dann auf Weitere Themen tippen. Sie können eine der folgenden Optionen auswählen: • Top Ten-Tipps • Kamerazubehör • Kameratasten • Touch Screen ausrichten • Aufnahmemodi verwenden • Design-Galerie verwenden • Photosmart Express verwenden HP Photosmart R930 Digitalkameraserie...
  • Seite 101 • Bilder drucken • Videoclips aufnehmen • Bilder und Video anzeigen • Bilder kennzeichnen • Bilder löschen • Bilder übertragen • Batterie-Management • Unterstützung • Kamerafunktionen kennen lernen • Kamera-Kurztasten • Info Kurzreferenz für Kamerafunktionen...
  • Seite 102 HP Photosmart R930 Digitalkameraserie...
  • Seite 103 Cámara digital HP Photosmart serie R930...
  • Seite 104 © Copyright 2007 Hewlett-Packard Development Company, L.P. La información que aparece en este documento está sujeta a cambios sin previo aviso. Las únicas garantías de los productos y servicios de HP se detallan en las declaraciones de garantía expresa que acompañan a dichos productos y servicios.
  • Seite 105 Contenido Procedimientos iniciales Acceso a la Guía del usuario electrónica....5 Parte superior, lateral y posterior de la cámara ..............6 Parte frontal e inferior de la cámara......7 Instalación de la cámara Instalación de la pila..........9 Carga de la pila............9 Encendido de la cámara.........10 Elección del idioma..........10 Selección de la región..........10 Ajuste de la fecha y la hora........11...
  • Seite 106: Procedimientos Iniciales

    • Prolongación de la duración de la pila • Una descripción de los iconos del indicador de alimentación • Resolución de problemas • Obtención de asistencia de HP • Especificaciones de la cámara Cámara digital HP Photosmart serie R930...
  • Seite 107: Acceso A La Guía Del Usuario Electrónica

    La Guía del usuario electrónica está en el disco HP Photosmart Software CD. Para ver la Guía del usuario: 1. Introduzca el HP Photosmart Software CD en la unidad de CD-ROM del equipo. 2. Haga clic en Ver Guía del usuario en la página principal de la pantalla de instalación.
  • Seite 108: Parte Superior, Lateral Y Posterior De La Cámara

    Grabación de vídeo y Reproducción (consulte Captura de imágenes, Grabación de vídeo y Reproducción en la página 20). Botón del Disparador Palanca de Zoom: para acceder a / Zoom desde el modo Captura de imágenes o Cámara digital HP Photosmart serie R930...
  • Seite 109: Parte Frontal E Inferior De La Cámara

    Grabación de vídeo; para acceder a Viñetas y Ampliar desde el menú Reproducción. Conector USB. Indicador luminoso de carga de las pilas. Botón Información: para activar y desactivar la información de la pantalla de imagen de la pantalla táctil (consulte Uso de la interfaz de pantalla táctil en la página 14).
  • Seite 110 Flash. Indicador luminoso de temporizador automático/ ayuda de enfoque. Micrófono. Puerta de la pila/tarjeta de memoria. Soporte para trípode. Cámara digital HP Photosmart serie R930...
  • Seite 111: Instalación De La Cámara Instalación De La Pila

    Puede cargar la pila en la cámara con el cable USB y el adaptador de corriente. Nota La cámara funciona con una pila de ion de litio recargable HP Photosmart R07 (L1812A/L1812B). No inserte ninguna otra pila en la cámara o en un cargador rápido opcional. Instalación de la cámara...
  • Seite 112: Encendido De La Cámara

    Junto con el Idioma, el ajuste Región determina el formato de fecha predeterminado. 1. Toque la región que desee. 2. Toque Siguiente para confirmar la opción elegida y mostrar la pantalla Fecha y hora. Cámara digital HP Photosmart serie R930...
  • Seite 113: Ajuste De La Fecha Y La Hora

    Ajuste de la fecha y la hora El ajuste preciso de la fecha y la hora le ayudará a localizar las imágenes una vez que las haya cargado en el equipo, y le garantizará que éstas queden marcadas con precisión si utiliza la función para estampar la fecha y la hora.
  • Seite 114: Instalación Del Software

    (suprimir ojos rojos, rotar, recortar, redimensionar, etc.) Para instalar el software HP Photosmart, su equipo debe cumplir los requisitos del sistema tal y como se indica en el envoltorio de la cámara. Para averiguar si su cámara...
  • Seite 115: Windows

    1. Cierre todos los programas y deshabilite temporalmente todo el software de protección contra virus. 2. Inserte HP Photosmart Software CD en la unidad de CD y siga las instrucciones en pantalla. Si no se abre la pantalla de instalación, en el menú Inicio, haga clic en Ejecutar y escriba D:\Setup.exe, donde D es la...
  • Seite 116: Uso De La Interfaz De Pantalla Táctil

    Para evitar las manchas y reducir al mínimo el riesgo de arañar la pantalla táctil, utilice el lápiz óptico que se incluye con la cámara. Para obtener información y consejos adicionales sobre la pantalla táctil, consulte la Guía del usuario electrónica. Cámara digital HP Photosmart serie R930...
  • Seite 117: Toma De Imágenes Y Grabación De Videoclips

    3 Toma de imágenes y grabación de videoclips Deslice para tomar fotografías o a para grabar videoclips. Captura de una imagen Puede tomar una fotografía mientras está seleccionado el modo Captura de imágenes. 1. Deslice 2. Encuadre en la pantalla de imagen el sujeto que desee fotografiar.
  • Seite 118 5. Para detener la grabación del vídeo, presione y suelte el botón del Disparador nuevamente. Después de grabar un videoclip, la cámara lo muestra brevemente en la pantalla de imagen. Cámara digital HP Photosmart serie R930...
  • Seite 119: Revisión Y Eliminación De Imágenes Y Videoclips Revisión De Imágenes Y Videoclips

    4 Revisión y eliminación de imágenes y videoclips Revisión de imágenes y videoclips Puede examinar imágenes y videoclips en el modo de Reproducción. 1. Deslice 2. Toque para desplazarse por las imágenes y videoclips. Para reproducir un videoclip, toque el centro del fotograma de vídeo mostrado. Eliminación de una imagen Puede eliminar imágenes individuales durante la Reproducción:...
  • Seite 120: Transferencia E Impresión De Imágenes Transferencia De Imágenes

    Si ha instalado el software HP Photosmart y necesita más información, consulte la Ayuda del software HP Photosmart. Impresión de imágenes desde la cámara Puede conectar la cámara a cualquier...
  • Seite 121 2. Apague la cámara y conéctela a la impresora mediante el cable USB incluido con la cámara. 3. Encienda la cámara. 4. La pantalla de imagen mostrará una imagen cuando la cámara esté conectada a la impresora. Utilice para seleccionar la imagen que desea imprimir. 5.
  • Seite 122: Referencia Rápida De La Cámara

    , indica que el menú ofrece más opciones. Toque para ver los demás elementos. • Para guardar los cambios y salir del menú, toque el botón situado en la esquina inferior derecha de la pantalla táctil (por ejemplo, Guardar). Cámara digital HP Photosmart serie R930...
  • Seite 123 • Para acceder a la ayuda de la cámara, toque • Para cancelar o salir de un menú, toque cualquier momento. Menú Captura de imágenes: le permite seleccionar ajustes de la cámara que afectan a las características de las futuras imágenes que capte con la cámara. Para acceder a este menú, deslice y después, toque Menú.
  • Seite 124 Para acceder a este menú, toque Menú en el modo después, toque Configuración de la cámara. Puede seleccionar las siguientes opciones: • Brillo de pantalla • Sonidos de cámara Cámara digital HP Photosmart serie R930...
  • Seite 125 • Mostrar tiempo de espera • Alineación de la pantalla táctil • Zoom digital • Ajustes recordados • Fecha y hora • Configuración USB • Idioma Menú Ayuda de la cámara: ofrece descripciones de las funciones de la cámara y sugerencias para tomar imágenes.
  • Seite 126 • Explicación de las funciones de la cámara • Métodos abreviados cámara • About (Acerca de) Cámara digital HP Photosmart serie R930...
  • Seite 127 HP Photosmart R930 series digitale camera...
  • Seite 128 © Copyright 2007 Hewlett-Packard Development Company, L.P. De informatie in dit document kan zonder voorafgaande kennisgeving worden gewijzigd. De enige garanties die gelden voor HP producten en diensten zijn de garanties die worden beschreven in de garantievoorwaarden behorende bij deze producten en diensten. Geen enkel onderdeel van dit document mag als extra garantie worden opgevat.
  • Seite 129 Inhoudsopgave Aan de slag De elektronische gebruikershandleiding raadplegen...............5 Bovenkant, zijkant en achterkant van de camera..............6 Voorkant en onderkant van de camera....7 De camera instellen De batterij plaatsen..........9 De batterij opladen...........9 De camera aanzetten..........10 De taal kiezen............10 De regio instellen............11 Datum en tijd instellen..........11 Een optionele geheugenkaart installeren en formatteren.............11 De software installeren...........13...
  • Seite 130: Aan De Slag

    • Vertrouwd raken met de belangrijkste • De werkingsduur functies van de camera van batterijen verlengen • Een beschrijving van de batterijstatus- indicators • Problemen oplossen • Hulp en ondersteuning van HP • Cameraspecificaties HP Photosmart R930 series digitale camera...
  • Seite 131: De Elektronische Gebruikershandleiding Raadplegen

    U vindt de elektronische gebruikershandleiding op de HP Photosmart Software CD. Zo kunt u de gebruikershandleiding bekijken: 1. Plaats de HP Photosmart Software CD in het cd-rom- station van uw computer. 2. Klik op Gebruikershandleiding bekijken op de hoofdpagina van het installatiescherm.
  • Seite 132: Bovenkant, Zijkant En Achterkant Van De Camera

    Luidspreker. -knop. Aan/uit-lampje. Schakelaar —Schakelt tussen Foto- opname, Video-opname en Weergave (zie Foto-opname, Video-opname en Weergave op pagina 21). Sluiterknop. Knop In-/Uitzoomen—Geeft toegang tot / In-/ Uitzoomen vanuit Foto-opname of Video- HP Photosmart R930 series digitale camera...
  • Seite 133: Voorkant En Onderkant Van De Camera

    opname; geeft toegang tot Miniaturen en Vergroten vanuit Weergave. USB-aansluiting. Batterijoplaadindicator. Knop Overlay—Schakelt de touchscreen- overlay op het LCD-scherm in of uit (zie Het touchscreen gebruiken op pagina 14). 10 Pen (zie Het touchscreen gebruiken op pagina 14). 11 LCD-scherm met touchscreen-functie—Kadert het beeld in vanuit Foto-opname of Video-...
  • Seite 134 Lampje van zelfontspanner/focushulp. Microfoon. Klepje van vak voor batterij/geheugenkaart. Bevestigingspunt voor statief. HP Photosmart R930 series digitale camera...
  • Seite 135: De Camera Instellen De Batterij Plaatsen

    U kunt de batterij in de camera opladen met de USB-kabel en de netvoedingsadapter. Opmerking De camera gebruikt een oplaadbare HP Photosmart R07 lithium-ion batterij (L1812A/ L1812B). Gebruik de camera of de optionele snellader niet voor het opladen van andere batterijen. De camera instellen...
  • Seite 136: De Camera Aanzetten

    -knop te drukken. De taal kiezen 1. Tik met uw vinger of met de pen op de gewenste taal. 2. Tik op Volgende om uw keuze te bevestigen en het scherm Regio weer te geven. HP Photosmart R930 series digitale camera...
  • Seite 137: De Regio Instellen

    De regio instellen De instellingen voor taal en regio bepalen samen de standaardinstelling voor de weergave van tijden en datums. 1. Tik op de gewenste regio. 2. Tik op Volgende om uw keuze te bevestigen en het scherm Datum & tijd weer te geven. Datum en tijd instellen Als u de juiste datum en tijd instelt, kunt u afbeeldingen die u naar de computer hebt geüpload gemakkelijker...
  • Seite 138 Kaart formatteren. 4. Tik op Ja om het formatteren te starten. Wanneer u een geheugenkaart hebt geïnstalleerd, worden alle nieuwe foto's en videoclips op de kaart opgeslagen in plaats van in het interne geheugen. HP Photosmart R930 series digitale camera...
  • Seite 139: De Software Installeren

    Windows 1. Sluit alle programma's en schakel eventuele antivirussoftware tijdelijk uit. 2. Plaats de HP Photosmart Software CD in het cd-rom- station en volg de aanwijzingen op het scherm. Als het installatievenster niet verschijnt, doet u het volgende: klik op Start en op Uitvoeren, typ D:\Setup.exe, waarbij D staat voor de letter van het cd-rom-station, en klik op OK.
  • Seite 140: Macintosh

    Macintosh 1. Plaats de HP Photosmart Software CD in het cd-rom- station. 2. Dubbelklik op het pictogram van het cd-rom-station op het bureaublad van de computer. 3. Dubbelklik op het pictogram van het installatieprogramma en volg de instructies op het scherm.
  • Seite 141 • Wanneer u een foto of videoclip inkadert om een opname te maken, kunt u de overlay van het touchscreen uitschakelen om een duidelijker beeld te krijgen. Druk op om de overlay met de aanraakknoppen uit te schakelen. Druk nogmaals op als u de aanraakknoppen opnieuw wilt weergeven.
  • Seite 142: Foto's Maken En Videoclips Opnemen

    Nadat u een foto hebt gemaakt, wordt deze kort weergegeven op het LCD-scherm. Een videoclip opnemen U kunt een video maken als de camera zich in de modus Video-opname bevindt. 1. Schuif naar 2. Kader het onderwerp in op het LCD-scherm. HP Photosmart R930 series digitale camera...
  • Seite 143 3. Druk de sluiterknop half in om de focus en belichting te meten. Het scherpstellingskader op het LCD- scherm wordt groen als de brandpuntsafstand is vergrendeld. 4. Druk de sluiterknop helemaal in en laat de knop vervolgens los om een video-opname te starten. 5.
  • Seite 144: Foto's En Videoclips Bekijken En Verwijderen Foto's En Videoclips Bekijken

    U kunt afzonderlijke opnames verwijderen in Weergave: 1. Schuif naar 2. Tik op of op om een foto of videoclip te selecteren. 3. Tik op om het menu Verwijderen weer te geven. 4. Tik op Deze opname. HP Photosmart R930 series digitale camera...
  • Seite 145: Opnames Overbrengen En Afdrukken Opnames Overbrengen

    Als u de HP Photosmart-software hebt geïnstalleerd en u hebt meer informatie nodig, raadpleegt u de Help bij de HP Photosmart-software. Opnames afdrukken vanaf de...
  • Seite 146 7. Koppel de camera los van de computer als de opname is afgedrukt. Informatie over andere afdrukopties vindt u in de elektronische gebruikershandleiding. U kunt ook op het touchscreen van de camera op tikken voor meer informatie. HP Photosmart R930 series digitale camera...
  • Seite 147: Beknopt Overzicht Van De Camera

    6 Beknopt overzicht van de camera In dit hoofdstuk kunt u in één oogopslag zien welke mogelijkheden u met de camera hebt. Meer informatie over deze functies vindt u in de elektronische gebruikershandleiding of in de Help op de camera. Foto-opname, Video-opname en Weergave •...
  • Seite 148 • ISO-snelheid • AE-meting • Camera instellen Menu Video-opname—Hiermee wijzigt u de camera- instellingen voor de videoclips die u in het vervolg met de camera opneemt. Als u dit menu wilt openen, schuift u HP Photosmart R930 series digitale camera...
  • Seite 149 naar en tikt u op Menu. U kunt kiezen uit de volgende opties: • Videokwaliteit • Zelfontspanner • Labels • Belichtingscompensatie • Witbalans • AE-meting • Camera instellen Menu Weergave—Hiermee kunt u opnames weergeven en bewerken. Als u dit menu wilt openen, schuift u naar en tikt u op Menu.
  • Seite 150 Opnamemodi gebruiken • Ontwerpgalerie gebruiken • Photosmart Express gebruiken • Foto's afdrukken • Videoclips opnemen • Foto's en video bekijken • Opnames labelen • Opnames verwijderen • Opnames overbrengen • Batterijbeheer • Hulp en ondersteuning HP Photosmart R930 series digitale camera...
  • Seite 151 • Overzicht camerafuncties • Camerasneltoetsen • Info Beknopt overzicht van de camera...
  • Seite 152 HP Photosmart R930 series digitale camera...
  • Seite 153 Câmera digital HP Photosmart série R930...
  • Seite 154 © Copyright 2007 Hewlett-Packard Development Company, L.P. As informações aqui contidas estão sujeitas a alterações sem aviso prévio. As únicas garantias para produtos e serviços da HP são as estabelecidas nas declarações de garantia expressa que acompanham tais produtos e serviços. Nenhuma informação aqui contida pode ser considerada como uma garantia adicional.
  • Seite 155 Conteúdo Primeiros passos Acessar a versão eletrônica do Guia do Usuário..............4 Partes superior, lateral e traseira da câmera...6 Partes frontal e inferior da câmera......7 Preparar a câmera Instalar a bateria............9 Carregar a bateria............9 Ligar a câmera............10 Escolher o idioma...........10 Definir a região............10 Configurar data e hora...........11 Instalar e formatar cartão de memória opcional..............11...
  • Seite 156: Primeiros Passos

    Solução de problemas • Com obter assistência da HP • Especificações da câmera Acessar a versão eletrônica do Guia do Usuário A versão eletrônica do Guia do Usuário está no HP Photosmart Software CD. Câmera digital HP Photosmart série R930...
  • Seite 157 Para visualizar o Guia do Usuário: 1. Insira o HP Photosmart Software CD na unidade de CD do computador. 2. Clique em Ver o Guia do Usuário na página principal da tela de instalação. A versão eletrônica do Guia do Usuário também é...
  • Seite 158: Partes Superior, Lateral E Traseira Da Câmera

    — Alterna entre Capturar imagens, Gravar vídeo, e Reproduzir (veja Capturar imagens, Gravar vídeo e Reproduzir na página 20). Botão Obturador. Controle de zoom — Acessa / Zoom enquanto Capturar imagens ou Gravar vídeo; Câmera digital HP Photosmart série R930...
  • Seite 159: Partes Frontal E Inferior Da Câmera

    acessa Miniaturas e Ampliar enquanto em Reproduzir. Conector USB Luz de carregamento das baterias Botão Sobreposição — Ativa e desativa as sobreposições no Visor de imagens da tela sensível ao toque (consulte Usar a interface da tela sensível ao toque na página 14). 10 Caneta (consulte Usar a interface da tela sensível ao toque na página 14).
  • Seite 160 Luz do Timer interno/Auxiliar de foco Microfone Tampa da bateria/cartão de memória Encaixe para tripé Câmera digital HP Photosmart série R930...
  • Seite 161: Preparar A Câmera Instalar A Bateria

    Você pode carregar a bateria na câmera, utilizando o cabo USB e o adaptador de alimentação. Nota A câmera usa uma bateria recarregável de lítio HP Photosmart R07 (L1812A/L1812B). Não carregue nenhuma outra bateria na câmera, nem no recarregador rápido opcional. Preparar a câmera...
  • Seite 162: Ligar A Câmera

    Definir a região As configurações Idioma e Região determinam o formato padrão da data. 1. Toque na região desejada. 2. Toque em Próximo para confirmar a sua opção e exibir a tela Data e hora. Câmera digital HP Photosmart série R930...
  • Seite 163: Configurar Data E Hora

    Configurar data e hora A configuração correta da data e da hora irá ajudá-lo a localizar as imagens depois que elas forem transferidas para o computador, e irá assegurar que as imagens sejam marcadas de maneira precisa se você usar o recurso de gravação de data e hora.
  • Seite 164: Instalar O Software

    (corrigir olhos vermelhos, girar, cortar, redimensionar e muito mais). Para instalar o software HP Photosmart, o computador deve atender aos requisitos de sistema descritos na embalagem da câmera. Para saber mais sobre o suporte...
  • Seite 165: Windows

    1. Feche todos os programas e desabilite, temporariamente, qualquer software antivírus. 2. Insira o HP Photosmart Software CD na unidade de CD e siga as instruções da tela. Se a janela de instalação não for exibida, clique em Iniciar, a seguir, em Executar, digite D:\Setup.exe, em que D é...
  • Seite 166: Usar A Interface Da Tela Sensível Ao Toque

    Para reduzir os borrões e o risco de arranhões na tela sensível ao toque, use a caneta fornecida com a câmera. Para obter dicas e informações adicionais sobre a tela sensível ao toque, consulte a versão eletrônica do Guia do Usuário. Câmera digital HP Photosmart série R930...
  • Seite 167: Tirar Fotos E Gravar Clipes De Vídeo Tirar Fotos

    3 Tirar fotos e gravar clipes de vídeo Deslize para para tirar fotos ou para para gravar clipes de vídeo. Tirar fotos Você poderá tirar fotos quando estiver Capturar imagens. 1. Deslize para 2. Enquadre a pessoa/objeto no Visor de imagens. 3.
  • Seite 168 5. Para interromper a gravação do vídeo, pressione e solte o botão Obturador novamente. Depois de gravado, o clipe de vídeo aparece rapidamente no Visor de imagens. Câmera digital HP Photosmart série R930...
  • Seite 169: Rever E Excluir Imagens E Clipes De Vídeo Rever Imagens E Clipes De Vídeo

    4 Rever e excluir imagens e clipes de vídeo Rever imagens e clipes de vídeo É possível examinar imagens e clipes de vídeo em Reproduzir. 1. Deslize para 2. Toque em para percorrer imagens e clipes de vídeo. Para reproduzir um clipe de vídeo, toque em no centro do quadro de vídeo exibido.
  • Seite 170: Transferir E Imprimir Imagens Transferir Imagens

    Se você tiver instalado o software HP Photosmart e precisar de mais informações, consulte o recurso da Ajuda no software HP Photosmart. Imprimir imagens diretamente da câmera...
  • Seite 171 impressora. 2. Desligue a câmera e conecte-a à impressora usando o cabo USB fornecido. 3. Ligue a câmera. 4. Quando a câmera estiver conectada à impressora, o Visor de imagens exibirá uma imagem. Use para selecionar a imagem a ser impressa. 5.
  • Seite 172: Referência Rápida Da Câmera

    Para acessar a Ajuda da câmera, toque em • Para cancelar ou sair de um menu, toque em qualquer momento. Menu Capturar imagens — Permite ajustar as configurações da câmera que afetam as características Câmera digital HP Photosmart série R930...
  • Seite 173 das imagens que serão capturadas com a câmera. Para acessar esse menu, deslize para e toque em Menu. É possível selecionar as seguintes opções: • Modo Fotografia (Modo automático, Close-up, Teatro, Panorama direita, Panorama esquerda, Paisagem, Retrato, Ação, Retrato noturno, Praia, Neve e Pôr-do-sol).
  • Seite 174 • Brilho do visor • Sons da câmera • Tempo de espera do visor • Alinhamento da tela sensível ao toque • Zoom digital • Configurações armazenadas • Data e hora • Configuração USB Câmera digital HP Photosmart série R930...
  • Seite 175 • Idioma Menu Ajuda — fornece descrições dos recursos da câmera e dicas de fotografia. Para acessar esse menu, toque em em qualquer menu, depois toque em Mais tópicos. É possível selecionar as seguintes opções: • Dez melhores dicas • Acessórios da câmera •...
  • Seite 176 Câmera digital HP Photosmart série R930...
  • Seite 178 ‫תמונות‬ ‫מחיקת‬ Transferring Images • ‫תמונות‬ ‫העברת‬ Managing Batteries • ‫בסוללות‬ ‫טיפול‬ Getting Assistance • ‫סיוע‬ ‫קבלת‬ Tour Camera Features • ‫המצלמה‬ ‫מאפייני‬ ‫הכרת‬ Camera Shortcuts • ‫המצלמה‬ ‫של‬ ‫דרך‬ ‫קיצורי‬ About • ‫אודות‬ HP Photosmart R930 ‫מסדרת‬ ‫דיגיטלית‬ ‫מצלמה‬...
  • Seite 179 Exposure Compensation • ‫חשיפה‬ ‫פיצוי‬ White Balance • ‫לבן‬ ‫איזון‬ AE Metering • ‫אוטומטית‬ ‫חשיפה‬ ‫מדידת‬ Camera Setup • ‫מצלמה‬ ‫הגדרות‬ Playback Menu —( ‫לך‬ ‫מאפשר‬ ‫חוזרת‬ ‫הקרנה‬ ‫תפריט‬ ‫- ל‬ ‫את‬ ‫הסט‬ ‫זה‬ ‫לתפריט‬ ‫לגשת‬ ‫כדי‬ ‫תמונות‬ ‫עם‬ ‫לעבוד‬ Menu ‫לבחור‬...
  • Seite 180 ‫לגשת‬ ‫כדי‬ ‫המצלמה‬ ‫בעזרת‬ ‫שתקליט‬ ‫עתידיים‬ ‫וידאו‬ Menu ‫- ל‬ ‫באפשרות‬ ‫גע‬ ‫מכן‬ ‫ולאחר‬ ‫את‬ ‫הסט‬ ‫הבאות‬ ‫האפשרויות‬ ‫מתוך‬ ‫לבחור‬ ‫באפשרותך‬ ‫תפריט‬ Video Quality • ‫וידאו‬ ‫איכות‬ Self-Timer • ‫עצמי‬ ‫זמן‬ ‫קוצב‬ • ‫סימון‬ HP Photosmart R930 ‫מסדרת‬ ‫דיגיטלית‬ ‫מצלמה‬...
  • Seite 181 ‫למצלמה‬ ‫מהיר‬ ‫עזר‬ ‫מדריך‬ ‫לקבלת‬ ‫המצלמה‬ ‫למאפייני‬ ‫מהיר‬ ‫עזר‬ ‫כמדריך‬ ‫זה‬ ‫בפרק‬ ‫היעזר‬ ‫לקטרוני‬ ‫הא‬ ‫במדריך‬ ‫עיין‬ ‫לה‬ ‫א‬ ‫מצלמה‬ ‫מאפייני‬ ‫אודות‬ ‫נוסף‬ ‫מידע‬ ‫שבמצלמה‬ ‫בעזרה‬ ‫או‬ ‫למשתמש‬ ‫חוזרת‬ ‫והקרנה‬ ‫וידאו‬ ‫הקלטת‬ ‫תמונה‬ ‫לכידת‬ Picture Capture • ‫לך‬ ‫מאפשר‬ ‫תמונה‬ ‫לכידת‬...
  • Seite 182 ‫הכיתוב‬ ‫בהדפסה‬ ‫נמצאת‬ ‫שהתמונה‬ ‫העובדה‬ ‫לציון‬ ‫התמונות‬ ‫בתצוגת‬ ‫מהמדפסת‬ ‫המצלמה‬ ‫את‬ ‫נתק‬ ‫התמונה‬ ‫הדפסת‬ ‫לאחר‬ ‫במדריך‬ ‫עיין‬ ‫נוספות‬ ‫הדפסה‬ ‫אפשרויות‬ ‫אודות‬ ‫מידע‬ ‫לקבלת‬ ‫- ב‬ ‫המצלמה‬ ‫של‬ ‫התמונות‬ ‫בתצוגת‬ ‫גע‬ ‫או‬ ‫למשתמש‬ ‫לקטרוני‬ ‫הא‬ HP Photosmart R930 ‫מסדרת‬ ‫דיגיטלית‬ ‫מצלמה‬...
  • Seite 183 ‫הפעל‬ ‫שהמצלמה‬ ‫מציינת‬ ‫התמונות‬ ‫בהתאם‬ ‫פעל‬ ‫למחשב‬ ‫מחוברת‬ ‫המחשב‬ ‫מסך‬ ‫גבי‬ ‫שעל‬ ‫להוראות‬ ‫את‬ ‫התקנת‬ ‫אם‬ ‫התמונות‬ ‫להעברת‬ HP Photosmart Software ‫נוסף‬ ‫מידע‬ ‫לך‬ ‫ונחוץ‬ ‫התוכנה‬ HP Photosmart Help ‫בתוכנה‬ ‫עזרה‬ ‫במאפיין‬ ‫עיין‬ Software ‫מהמצלמה‬ ‫תמונות‬ ‫הדפסת‬ ‫מדפסת‬ ‫לכל‬ ‫המצלמה‬...
  • Seite 184 ‫למחוק‬ ‫באפשרותך‬ ‫חוזרת‬ ‫הקרנה‬ ‫- ל‬ ‫את‬ ‫הסט‬ ‫- ב‬ ‫וידאו‬ ‫קטע‬ ‫או‬ ‫תמונה‬ ‫לבחור‬ ‫כדי‬ ‫או‬ ‫גע‬ Delete ‫- ב‬ ‫מחיקה‬ ‫התפריט‬ ‫את‬ ‫להציג‬ ‫כדי‬ ‫גע‬ ‫( זו‬ This Image ‫תמונה‬ ‫באפשרות‬ ‫גע‬ HP Photosmart R930 ‫מסדרת‬ ‫דיגיטלית‬ ‫מצלמה‬...
  • Seite 185 ‫להתחיל‬ ‫כדי‬ ‫אותו‬ ‫ושחרר‬ ‫התריס‬ ‫לחצן‬ ‫על‬ ‫מלאה‬ ‫לחיצה‬ ‫לחץ‬ ‫בהקלטה‬ ‫התריס‬ ‫לחצן‬ ‫על‬ ‫שוב‬ ‫לחץ‬ ‫הווידאו‬ ‫הקלטת‬ ‫את‬ ‫לעצור‬ ‫כדי‬ ‫אותו‬ ‫ושחרר‬ ‫פרק‬ ‫למשך‬ ‫הקטע‬ ‫את‬ ‫מציגה‬ ‫המצלמה‬ ‫וידאו‬ ‫קטע‬ ‫הקלטת‬ ‫לאחר‬ ‫התמונות‬ ‫בתצוגת‬ ‫קצר‬ ‫זמן‬ ‫וידאו‬ ‫קטעי‬ ‫והקלטת‬ ‫תמונות‬...
  • Seite 186 ‫במצב‬ ‫נמצאת‬ ‫וידאו‬ ‫- ל‬ ‫את‬ ‫הסט‬ ‫בתצוגת‬ ‫הצילום‬ ‫נושא‬ ‫את‬ ‫תחום‬ ‫התמונות‬ ‫המיקוד‬ ‫את‬ ‫למדוד‬ ‫כדי‬ ‫התריס‬ ‫לחצן‬ ‫על‬ ‫חלקית‬ ‫לחיצה‬ ‫לחץ‬ ‫רציף‬ ‫בירוק‬ ‫יופיעו‬ ‫התמונות‬ ‫בתצוגת‬ ‫המיקוד‬ ‫תוחמי‬ ‫והחשיפה‬ ‫ננעל‬ ‫המיקוד‬ ‫כאשר‬ HP Photosmart R930 ‫מסדרת‬ ‫דיגיטלית‬ ‫מצלמה‬...
  • Seite 187 • ‫את‬ ‫לכבות‬ ‫באפשרותך‬ ‫וידאו‬ ‫קטע‬ ‫או‬ ‫תמונה‬ ‫של‬ ‫מסגור‬ ‫בעת‬ ‫על‬ ‫לחץ‬ ‫יותר‬ ‫ברור‬ ‫באופן‬ ‫התצוגה‬ ‫להצגת‬ ‫המגע‬ ‫מסך‬ ‫שכבת‬ ‫להפעלת‬ ‫נוספת‬ ‫פעם‬ ‫על‬ ‫לחץ‬ ‫המגע‬ ‫לחצני‬ ‫לכיבוי‬ ‫המגע‬ ‫לחצני‬ ‫לפעולה‬ ‫בהתאם‬ ‫משתנים‬ ‫המגע‬ ‫במסך‬ ‫השכבות‬ ‫פריטי‬ ‫הערה‬ ‫מבצע‬ ‫שאתה‬...
  • Seite 188 HP Photosmart Software CD ‫לכונן‬ ‫התקליטור‬ ‫את‬ ‫הכנס‬ ‫המסך‬ ‫גבי‬ ‫שעל‬ ‫ההוראות‬ ‫לפי‬ ‫ופעל‬ ‫המחשב‬ ‫של‬ ‫התקליטורים‬ Start ‫על‬ ‫לחץ‬ ‫התחל‬ ‫על‬ ‫לחץ‬ ‫מופיע‬ ‫אינו‬ ‫ההתקנה‬ ‫חלון‬ ‫אם‬ D:\Setup.exe ‫אות‬ ‫הוא‬ ‫כאשר‬ ‫הקלד‬ ‫הפעלה‬ ‫אישור‬ ‫על‬ ‫לחץ‬ ‫מכן‬ ‫ולאחר‬ ‫התקליטורים‬...
  • Seite 189 ‫ולהציג‬ ‫הפנימי‬ ‫בזיכרון‬ ‫להשתמש‬ ‫מנת‬ ‫על‬ ‫כרטיס‬ ‫את‬ ‫הסר‬ ‫מכן‬ ‫ולאחר‬ ‫המצלמה‬ ‫את‬ ‫כבה‬ ‫בו‬ ‫המאוחסנות‬ ‫הזיכרון‬ ‫התוכנה‬ ‫התקנת‬ HP Photosmart Software ‫להעברת‬ ‫מאפיינים‬ ‫מספקת‬ ‫תוכנת‬ ‫תמונות‬ ‫לשיפור‬ ‫מאפיינים‬ ‫גם‬ ‫כמו‬ ‫למחשב‬ ‫וידאו‬ ‫וקטעי‬ ‫תמונות‬ ‫ועוד‬ ‫גודל‬ ‫שינוי‬ ‫חיתוך‬ ‫סיבוב‬...
  • Seite 190 ‫המצלמה‬ ‫את‬ ‫מפעיל‬ ‫אתה‬ ‫כאשר‬ ‫הערה‬ ‫שבאפשרותך‬ ‫התמונות‬ ‫מספר‬ ‫את‬ ‫מציינת‬ ‫המצלמה‬ ‫מותקן‬ Image Quality ‫להגדרת‬ ‫בהתאם‬ ‫הזיכרון‬ ‫בכרטיס‬ ‫לשמור‬ 1,999 ‫של‬ ‫באחסון‬ ‫תומכת‬ ‫זו‬ ‫מצלמה‬ ‫הנוכחית‬ ‫תמונה‬ ‫איכות‬ ‫זיכרון‬ ‫בכרטיס‬ ‫היותר‬ ‫לכל‬ ‫תמונות‬ HP Photosmart R930 ‫מסדרת‬ ‫דיגיטלית‬ ‫מצלמה‬...
  • Seite 191 ‫- ה‬ ‫הקצה‬ ‫ואת‬ ‫למצלמה‬ ‫כבל‬ ‫של‬ ‫הקטן‬ ‫הקצה‬ ‫את‬ ‫חבר‬ ‫באיור‬ ‫כמוצג‬ ‫המתח‬ ‫למתאם‬ ‫הגדול‬ ‫חשמל‬ ‫לשקע‬ ‫המתח‬ ‫מתאם‬ ‫את‬ ‫חבר‬ ‫שהסוללה‬ ‫מציינת‬ ‫המצלמה‬ ‫של‬ ‫המהבהבת‬ ‫הסוללה‬ ‫טעינת‬ ‫נורית‬ ‫במלואה‬ ‫טעונה‬ ‫הסוללה‬ ‫רציף‬ ‫באור‬ ‫דולקת‬ ‫הנורית‬ ‫כאשר‬ ‫בטעינה‬ ) ‫כ‬ ‫שעות‬...
  • Seite 192 ‫- ה‬ ‫כבל‬ ‫בעזרת‬ ‫במצלמה‬ ‫הסוללה‬ ‫את‬ ‫לטעון‬ ‫באפשרותך‬ ‫המתח‬ ‫ומתאם‬ ‫סוללת‬ ‫עם‬ ‫פועלת‬ ‫שברשותך‬ ‫המצלמה‬ ‫הערה‬ L1812A/ HP Photosmart R07 Lithium Ion ‫נטענת‬ L1812B ‫במטען‬ ‫או‬ ‫במצלמה‬ ‫אחרת‬ ‫סוללה‬ ‫אף‬ ‫תטען‬ ‫אל‬ ‫האופציונלי‬ ‫המהיר‬ HP Photosmart R930 ‫מסדרת‬ ‫דיגיטלית‬ ‫מצלמה‬...
  • Seite 193 ‫מיקרופון‬ ‫זיכרון‬ ‫כרטיס‬ ‫סוללה‬ ‫דלת‬ ‫חצובה‬ ‫תושבת‬ ‫העבודה‬ ‫תחילת‬...
  • Seite 194 ‫וידאו‬ ‫הקלטת‬ Playback ‫המגע‬ ‫מסך‬ ‫ממשק‬ ‫ולהצגת‬ ‫חוזרת‬ ‫הקרנה‬ " ‫של‬ ‫בממשק‬ ‫שימוש‬ ‫בסעיף‬ ‫עיין‬ ‫המצלמה‬ ‫פעולות‬ ‫עבור‬ " ‫בעמוד‬ ‫המגע‬ ‫מסך‬ ‫המצלמה‬ ‫של‬ ‫והתחתון‬ ‫הקדמי‬ ‫חלקה‬ ‫מבזק‬ ‫למיקוד‬ ‫עזרה‬ ‫העצמי‬ ‫הזמן‬ ‫קוצב‬ ‫נורית‬ HP Photosmart R930 ‫מסדרת‬ ‫דיגיטלית‬ ‫מצלמה‬...
  • Seite 195 ‫של‬ ‫והאחורי‬ ‫הצדדי‬ ‫העליון‬ ‫חלקה‬ ‫המצלמה‬ ‫רמקול‬ ‫כיבוי‬ ‫הפעלה‬ ‫לחצן‬ ‫הפעלה‬ ‫נורית‬ Picture Capture — ‫בין‬ ‫למעבר‬ ‫בורר‬ ( ‫ו‬ Video Record ‫וידאו‬ ‫הקלטת‬ ‫תמונה‬ ‫לכידת‬ " Playback ‫תמונה‬ ‫לכידת‬ ‫בסעיף‬ ‫עיין‬ ‫חוזרת‬ ‫הקרנה‬ " ‫בעמוד‬ ‫חוזרת‬ ‫והקרנה‬ ‫וידאו‬ ‫הקלטת‬ ‫תריס‬...
  • Seite 196: Hp Photosmart Software

    ‫התקנת‬ ‫עם‬ ‫גם‬ ‫למחשבך‬ ‫יועתק‬ ‫למשתמש‬ ‫האלקטרוני‬ ‫המדריך‬ HP Photosmart Software ‫המדריך‬ ‫את‬ ‫להציג‬ ‫כדי‬ ‫התוכנה‬ ‫במחשב‬ ‫שהותקן‬ ‫לאחר‬ ‫למשתמש‬ HP Solution Center Windows • ‫את‬ ‫פתח‬ ‫במערכת‬ Help ‫עזרה‬ ‫על‬ ‫ולחץ‬ ‫של‬ ‫הפתרונות‬ ‫מרכז‬ HP Device Manager Macintosh •...
  • Seite 197 ‫עזרה‬ ‫קבלת‬ • ‫המצלמה‬ ‫מפרטי‬ ‫למשתמש‬ ‫האלקטרוני‬ ‫למדריך‬ ‫גישה‬ ‫התקליטור‬ ‫גבי‬ ‫על‬ ‫נמצא‬ ‫למשתמש‬ ‫האלקטרוני‬ ‫המדריך‬ HP Photosmart Software CD ‫למשתמש‬ ‫המדריך‬ ‫להצגת‬ HP Photosmart Software CD ‫לכונן‬ ‫התקליטור‬ ‫את‬ ‫הכנס‬ ‫המחשב‬ ‫של‬ ‫התקליטורים‬ View User Guide ‫למשתמש‬ ‫המדריך‬ ‫את‬...
  • Seite 198 ............‫וידאו‬ ‫קטע‬ ‫הקלטת‬ ‫וידאו‬ ‫וקטעי‬ ‫תמונות‬ ‫של‬ ‫ומחיקה‬ ‫סקירה‬ ........... ‫וידאו‬ ‫וקטעי‬ ‫תמונות‬ ‫סקירת‬ ............‫תמונה‬ ‫מחיקת‬ ‫תמונות‬ ‫של‬ ‫והדפסה‬ ‫העברה‬ ............‫תמונות‬ ‫העברת‬ ........... ‫מהמצלמה‬ ‫תמונות‬ ‫הדפסת‬ ........... ‫למצלמה‬ ‫מהיר‬ ‫עזר‬ ‫מדריך‬ HP Photosmart R930 ‫מסדרת‬ ‫דיגיטלית‬ ‫מצלמה‬...
  • Seite 199 ‫והודעות‬ ‫משפטי‬ ‫מידע‬ © Copyright 2007 Hewlett-Packard Development Company, L.P. ‫הבלעדית‬ ‫האחריות‬ ‫מוקדמת‬ ‫הודעה‬ ‫ללא‬ ‫לשינויים‬ ‫נתון‬ ‫זה‬ ‫במסמך‬ ‫הכלול‬ ‫המידע‬ ‫לאותם‬ ‫הנלווית‬ ‫המפורשת‬ ‫האחריות‬ ‫בהצהרת‬ ‫מפורטת‬ ‫של‬ ‫ולשירותים‬ ‫למוצרים‬ ‫נוספת‬ ‫אחריות‬ ‫כהענקת‬ ‫זה‬ ‫במסמך‬ ‫האמור‬ ‫מן‬ ‫דבר‬ ‫לפרש‬ ‫אין‬ ‫ושירותים‬...
  • Seite 200 ‫מסדרת‬ ‫דיגיטלית‬ ‫מצלמה‬ HP Photosmart R930...

Inhaltsverzeichnis