Inhaltsverzeichnis
Werbung
Verfügbare Sprachen
Verfügbare Sprachen
Quicklinks
Werbung
Kapitel
Inhaltsverzeichnis

Verwandte Anleitungen für urmet 1093/184M11


Inhaltszusammenfassung für urmet 1093/184M11
- Seite 1 DS1093-106A...
-
Seite 2: Inhaltsverzeichnis
1.3.1 Contenuto della confezione ........................4 Installazione ............................5 Installazione Sch. 1093/184M11 – Sch. 1093/184M12 ............5 Descrizione delle parti Sch.1093/184M11 – Sch.1093/184M12 ..........5 Descrizione delle parti Sch.1093/184M14 ................6 ... -
Seite 3: Informazioni Generali
La ringraziamo dell’acquisto di questo prodotto. Il presente documento vuole essere una semplice guida rapida che Le permetterà una rapida messa in funzione dei seguenti modelli di unità di ripresa IP di URMET S.p.A:. Sch. 1093/184M11 - Sch. 1093/184M12 – Sch. 1093/184M14 - Sch. -
Seite 4: Certificazioni
Aggiornamento firmware Si consiglia di consultare periodicamente l’Area Tecnica Servizio Clienti di URMET SpA al fine di verificare la disponibilità di eventuali aggiornamenti firmware. Configurazione di rete La telecamera è impostata in modalità DHCP. Se la rete in cui va installata non supporta l’indirizzamento dinamico (DHCP), la telecamera attiva automaticamente l’indirizzo IP di fabbrica 192.168.1.200. -
Seite 5: Installazione
INSTALLAZIONE INSTALLAZIONE SCH. 1093/184M11 – SCH. 1093/184M12 Per un’installazione semplice e rapida, seguire i seguenti passi: • Prelevare la staffa della telecamera dalla confezione • Separare la testa rotante dal corpo della staffa (è sufficiente svitarla finché non si stacca) •... -
Seite 6: Descrizione Delle Parti Sch.1093/184M11 - Sch.1093/184M12
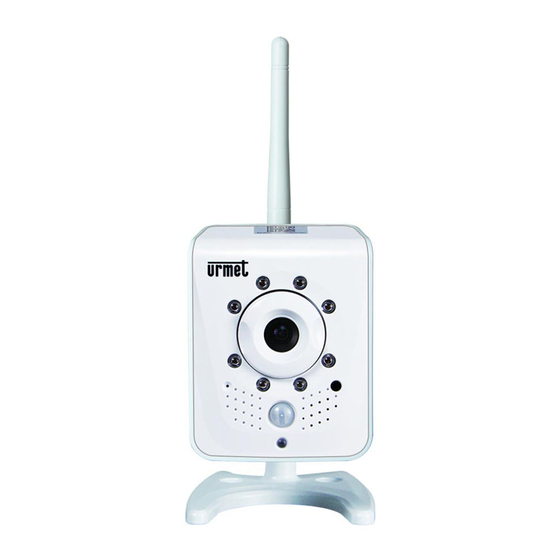
DESCRIZIONE DELLE PARTI SCH.1093/184M11 – SCH.1093/184M12 1 Lente 5 Microfono 9 porta Ethernet 13 Reset 2 LED di stato 6 LED infrarosso 10 alimentazione 14 In/Out 3 Focus ring 7 Antenna 11 foro per staffa 15 bottone WPS 4 altoparlante... -
Seite 7: Descrizione Delle Parti Sch.1093/184M15 - Sch.1093/184M16
DESCRIZIONE DELLE PARTI SCH.1093/184M15 – SCH.1093/184M16 1 Lente 5 Foro per staffa 9 Alimentazione 2 Antenna 6 Ingresso microfono (rosa) 10 Connettore Ethernet 3 LED infrarossi 7 Uscita audio (verde) 11 Blocco Morsetti 4 Sensore luce 8 Uscita video 12 Slot micro-SD DS1093-106A... -
Seite 8: Regolazione Della Messa A Fuoco Dell'obiettivo
2.4.1 REGOLAZIONE DELLA MESSA A FUOCO DELL'OBIETTIVO Per i modelli Sch.1093/184M11 e Sch.1093/184M12 è necessario ruotare l'anello di messa a fuoco in senso orario per ottenere l'immagine appropriata. Per i modelli Sch.1093/184M15 e Sch.1093/184M16 è necessario svitare la calotta anteriore e procedere alla regolazione di fuoco e zoom agendo sulle due levette poste sull’ottica. -
Seite 9: Installazione Da App Urmet Cloud Ios
3.1.1 INSTALLAZIONE DA APP URMET CLOUD IOS Scaricare e installare Urmet Cloud da App Store. Con smartphone connesso a internet, lanciare la App e creare il proprio account personale Urmet Cloud. Wi-Fi Cablata Attivare Wi-Fi del telefono e selezionare l’SSID Wi-Fi o rete della tlc (URM_...) nell’elenco Wi-Fi per stabilire... -
Seite 10: Installazione Da App Urmet Cloud Android
3.1.2 INSTALLAZIONE DA APP URMET CLOUD ANDROID Scaricare e installare APP Urmet Cloud da Play Store. Con smartphone connesso a internet, lanciare la App e creare il proprio account personale Urmet Cloud. Con telefono connesso a internet (WiFi o Wi-Fi Cablata 3G), lanciare l’App Urmet Cloud ed accedere... -
Seite 11: Configurazione Unità Di Ripresa Su Rete Ip Cablata Senza Dhcp
3.2.2 UTILIZZO DEL TOOL SOFTWARE IP DISCOVERY Dopo aver effettuato l’installazione, lanciare il tool IP Discovery: la telecamera Urmet Cloud verrà visualizzata nell’elenco di telecamere Cloud rilevate in rete. Per cambiare le impostazioni di rete della telecamera, selezionarla con un click dall’elenco e premere il pulsante “Setup”: comparirà... -
Seite 12: Accesso Alla Telecamera Ip Tramite Interfaccia Web
PC (tale installazione è richiesta solo alla prima connessione da PC a telecamera). Qualora il sistema operativo del PC dovesse inibire l’installazione dell’ActiveX Urmet SpA, si consiglia di seguire i seguenti step: aggiungere l’indirizzo IP della telecamera all’elenco di siti attendibili dal seguente menù di Internet Explorer: Strumenti ->... - Seite 13 DS1093-106A...
- Seite 14 Installation ............................. 17 Installation of Ref. 1093/184M11 - Ref. 1093/184M12 ............17 Description of the parts Ref. 1093/184M11 - Ref. 1093/184M12 ......... 18 Description of the parts Ref. 1093/184M14 ................18 Description of the parts Ref. 1093/184M15 - Ref. 1093/184M16 ......... 19 ...
-
Seite 15: General Information
Dear Customer, Thank you for purchasing this product. This quick start guide was written to help you set up the following URMET IP cameras rapidly and easily: Ref. 1093/184M11 - Ref. 1093/184M12 - Ref. 1093/184M14 - Ref. 1093/184M15 - Ref. 1093/184M16. -
Seite 16: Certifications
URMET S.p.A. is not in any way responsible for the loss of recorded data. Video recording This device is not designed as a burglar system but mainly to transmit and record video images. URMET S.p.A. is not in any way responsible for loss or damages of the user consequent to theft. -
Seite 17: Installation
INSTALLATION INSTALLATION OF REF. 1093/184M11 - REF. 1093/184M12 Proceed as follows for quick and easy installation: • Take the camera bracket from the box • Separate the revolving head from the body of the bracket (simply unscrew it until it comes detached) •... -
Seite 18: Description Of The Parts Ref. 1093/184M11 - Ref. 1093/184M12
DESCRIPTION OF THE PARTS REF. 1093/184M11 - REF. 1093/184M12 1 Lens 5 Microphone 9 Ethernet port 13 Reset 2 State LED 6 Infrared LED 10 Power 14 In/Out 3 Focus ring 7 Aerial 11 Hole for bracket 15 WPS button... -
Seite 19: Description Of The Parts Ref. 1093/184M15 - Ref. 1093/184M16
DESCRIPTION OF THE PARTS REF. 1093/184M15 - REF. 1093/184M16 1 Lens 5 Hole for bracket 9 Power 2 Aerial 6 Microphone input (pink) 10 Ethernet connector 3 Infrared LEDs 7 Audio output (green) 11 Terminal block 4 Light sensor 8 Video output 12 Micro-SD slot DS1093-106A... -
Seite 20: How To Adjust Focus
IMPORTANT NOTE For more information on how to configure the camera using iOS/Android terminals, see the Urmet Cloud App Quick Start Guide in the app itself or the complete Urmet Cloud App instruction manual on the CD provided with the product. -
Seite 21: Installation From Urmet Cloud Ios App
3.1.1 INSTALLATION FROM URMET CLOUD IOS APP Download and install Urmet Cloud from the App Store. With a smartphone connected to the Internet, launch the app and create your Urmet Cloud personal account. WiFi Wired Activate smartphone WiFi and select the camera Wire the camera to SSID (URM_...) from the WiFi list to establish a... -
Seite 22: Installation From Urmet Cloud Android App
3.1.2 INSTALLATION FROM URMET CLOUD ANDROID APP Download and install the Urmet Cloud app from Play Store. With a smartphone connected to the Internet, launch the app and create your Urmet Cloud personal account. Make sure the smartphone has internet... -
Seite 23: Camera Configuration On Wired Ip Network Without Dhcp
3.2.2 HOW TO USE THE IP DISCOVERY TOOL Start the IP Discovery tool after completing installation: the Urmet Cloud camera will appear in the list of Cloud cameras detected on the network. To change the camera settings, select it with the click from the list and press “Setup”: the configuration window will appear. -
Seite 24: How To Access The Ip Camera Via Web Interface
Double-click on a camera in the IP Discovery tool list to open the direct connection of the camera to the Internet Explorer browser web page automatically. Enter username (default: admin) and password (default: admin) and install ActiveX Urmet SpA of the camera on the PC (this step is only required for connecting the first PC-camera connection). - Seite 25 DS1093-106A...
- Seite 26 Contenu de la boîte ..........................29 Installation ............................. 30 Installation des matériels Réf. 1093/184M11 – Réf. 1093/184M12 ........30 Description des matériels Réf. 1093/184m11 – Réf. 1093/184m12 ........31 Description du matériel Réf.1093/184M14 ................31 ...
-
Seite 27: Généralités
Merci d’avoir fait l’acquisition de ce produit. Ce guide de démarrage rapide a été rédigé afin de vous aider à installer rapidement et aisément les caméras IP URMET suivantes : Réf. 1093/184M11 – Réf.1093/184M12 – Réf.1093/184M14 – Réf.1093/184M15 – Réf.1093/184M16. -
Seite 28: 1.2. Certifications
1.2. Certifications Par la présente, Urmet S.p.A. déclare que les caméras vidéo sans fil de la gamme Urmet Cloud mod. 1093/184M11, 1093/184M12, 1093/184M14, 1093/184M15 et 1093/184M16 sont conformes aux exigences essentielles et aux autres dispositions pertinentes de la Directive 1999/5/CE. -
Seite 29: 1.3. Ouverture Du Carton
1.3.1 Contenu de la boîte 1 caméra IP 1 antenne (1093/184M11, 1093/184M12, 1093/184M15 et 1093/184M16 seulement) 1 support (1093/184M11, 1093/184M12, 1093/184M15 et 1093/184M16 seulement) 1 bloc d’alimentation 1 câble réseau 1 CD qui contient toute la documentation 1 feuillet A5 qui contient les ID univoques du matériel : l’UID et l’adresse MAC... -
Seite 30: Installation
Installation Installation des matériels Réf. 1093/184M11 – Réf. 1093/184M12 Opérer de la façon suivante pour une installation rapide et aisée : • Sortir le support de la caméra de la boîte • Séparer la tête articulée du corps du support (la dévisser simplement jusqu'à ce qu'elle s’en détache) •... -
Seite 31: Description Des Matériels Réf. 1093/184M11 - Réf. 1093/184M12
Description des matériels Réf. 1093/184m11 – Réf. 1093/184m12 1 Objectif 5 Microphone 9 Port Ethernet 13 Réinitialisation 2 LED d’état 6 LED infrarouges 10 Alimentation 14 Entrées /sorties 3 Bague de 7 Antenne 11 Trou pour le support 15 Bouton WPS... -
Seite 32: Description Des Matériels Réf. 1093/184M15 - Réf. 1093/184M16
Description des matériels Réf. 1093/184M15 – Réf. 1093/184M16 1 Objectif 5 Trou pour le support 9 Alimentation 2 Antenne 6 Entrée Microphone (rose) 10 Connecteur Ethernet 3 LED infrarouges 7 Sortie audio (verte) 11 Connecteur 4 Capteur de lumière 8 Sortie vidéo 12 Fente d’insertion d’une carte micro SD DS1093-106A... - Seite 33 Tableau de description des broches du connecteur des matériels Réf. 1093/184M14, Réf. 1093/184M15 et Réf. 1093/184M16 Défaut = broche de réinitialisation matérielle GND = masse GND = masse DIN = broche d’entrée d’alarme DOUT = broche de sortie d’alarme COM = commun Connecter les actionneurs d'alarme (par exemple des sirènes) aux broches DOUT et COM Connecter les détecteurs d'alarme aux broches DIN et GND Mettre à...
-
Seite 34: Réglage De La Focalisation
2.4.1 Réglage de la focalisation Modèles Réf. 1093/184M11 et Réf. 1093/184M12 : tourner la bague de focalisation dans le sens des aiguilles d'une montre pour obtenir l'image requise. Pour les modèles Réf. 1093/184M15 et Réf. 1093/184M16 : desserrer le dôme avant et régler la focalisation et le zoom à... -
Seite 35: Installation À Partir De L'application Ios Urmet Cloud App
3.1.1 Installation à partir de l’application iOS URMET CLOUD APP Téléchargez et installez Urmet Cloud à partir de App Store. Le smartphone étant connecté à Internet, lancez l'application et créez votre compte personnel Urmet Cloud WiFi Câblé Activez le WiFi du smartphone et sélectionnez le SSID Câbler la caméra au... -
Seite 36: Installation À Partir De L'application Android Urmet Cloud App
3.1.2 Installation à partir de l’application Android URMET CLOUD APP Téléchargez et installez Urmet Cloud à partir de Play Store. Le smartphone étant connecté à internet, lancez l'application et créez votre compte personnel Urmet Cloud Le smartphone étant connecté à internet (WiFi ou Wifi Câblé... -
Seite 37: Configuration D'une Caméra Sur Un Réseau Ip Câblé Sans Dhcp
3.2.2 Utilisation de l’outil « IP Discovery » Lancer l'outil « IP Discovery » une fois l'installation achevée : la caméra Urmet Cloud apparaîtra dans la liste des caméras Cloud détectées sur le réseau. Pour modifier la configuration de la caméra, la sélectionner en cliquant sur celle-ci dans la liste et cliquer sur le bouton «... -
Seite 38: Comment Accéder À La Caméra Ip Par L'intermédiaire De L'interface Web
Web du navigateur Internet Explorer. Entrer le nom d’utilisateur (par défaut : admin) et le mot de passe (par défaut : admin) et installer ActiveX Urmet S.p.A. de la caméra dans le PC (cette étape est seulement nécessaire pour établir la première connexion entre le PC et la caméra). - Seite 39 DS1093-106A...
- Seite 40 Installation ............................. 44 Installation Typ 1093/184M11 – Typ 1093/184M12 ............44 Beschreibung der Teile -Typ 1093/184M11 – Typ 1093/184M12 ........45 Beschreibung der Teile - Typ1093/184M14 ................. 45 Beschreibung der Teile - Typ1093/184M16 ................. 46 ...
-
Seite 41: Generelle Informationen
Das vorliegende Dokument ist eine Schnellanleitung, die es ermöglicht die folgenden IP Kameras des Unternehmens URMET S.p.A:. Typ 1093/184M11 - Typ 1093/184M12 – Typ1 093/184M14 - Typ 1093/184M16 unter Funktion zu stellen. Bitte lesen Sie sich vor Inbetriebnahme des Geräts die vorliegende Gebrauchsanleitung durch. Sie beschreibt den sachgemäßen und sicheren Betrieb des Geräts. -
Seite 42: Zertifizierungen
DHCP fähig ist, startet die Kamera automatisch mit der IP-Adresse IP 192.168.1.200. Mit Hilfe der Software Urmet " IP- Discovery " kann die Kamera im Netzwerk erfasst und danach konfiguriert werden. Sobald die Kamera korrekt angeschlossen ist und für das IP-Netzwerk konfiguriert wurde, können Sie das Livebild ansehen und die Konfigurationen vom PC oder Smartphone starten. -
Seite 43: Öffnen Der Verpackung
Fällen nicht das Gerät in Betrieb zu nehmen. Sollte das Gerät an den Lieferanten zurückgeschickt werden müssen, vergewissern Sie sich bitte, dass dies in der Originalverpackung erfolgt. INHALT DER VERPACKUNG IP-Kamera Antenne (nur 1093/184M11, 1093/184M12, 1093/184M15 und 1093/184M16) Halterung (nur 1093/184M11, 1093/184M12, 1093/184M15 und 1093/184M16) Netzteil Netzwerk Kabel CD, mit kompletter Dokumentation Ein A5 Blatt mit den Identifizierungsdaten Univoice des Gerätes: UID und MAC Adresse... -
Seite 44: Installation
INSTALLATION INSTALLATION TYP 1093/184M11 – TYP 1093/184M12 Für eine schnelle und einfache Installation, folgen Sie bitte den nächsten Schritten: • Nehmen Sie den Kamerahalter aus dem Paket. • Trennen Sie den drehbaren Kopf von der Halterung. • Schrauben Sie zuerst den drehbaren Kopf an die Kamera und danach die Antenne. -
Seite 45: Beschreibung Der Teile -Typ 1093/184M11 - Typ 1093/184M12
BESCHREIBUNG DER TEILE -TYP 1093/184M11 – TYP 1093/184M12 1 Objektiv 5 Mikrofon 9 Port Ethernet 13 Reset 2 Status LED 6 IR LED 10 Versorgung 14 In/Out 3 Scharfeinstellring 7 Antenne 11 Befestigung Halter 15 WPS-Taste 4 Lautsprecher 8 PIR Bewegungssensor... -
Seite 46: Beschreibung Der Teile - Typ1093/184M16
BESCHREIBUNG DER TEILE - TYP1093/184M16 1 Objektiv 5 Loch für Halterung 9 Versorgung 2 Antenne 6 Mikrofoneingang (rosa) 10 Ethernet Verbindung 3 IR LED 7 Audio Ausgang (grün) 11 Klemmleiste 4 Lichtsensor 8 Video Ausgang 12 Steckplatz Micro-SD Tabelle der Klemmleisteanschlüsse an Typ 1093/184M14 und 1093/184M16 DEFAULT = Klemme Rücksetzen GND = Erdungsklemme GND = Erdungsklemme... -
Seite 47: Mikro-Sd-Karte
Android (Version 4.0.x oder neulich mit Display von wenigstens 4”). HINWEIS Weitere Informationen zur Konfiguration der Kamera über die Klemmen ios/Android, finden Sie in den Quick Guide App Urmet Cloud innerhalb der app selbst, oder die manuelle Anweisungen komplett App Urmet Cloud vorhanden auf der CD beigefügten Unterlagen an. -
Seite 48: Zugriff Auf Die Kamera Über Den Web-Browser
Bitte die Felder "User name" (Standard: admin) und "Password" (Standard: admin) ausfüllen und die IP-Adresse, Netzmaske anpassen . Dann die Schaltfläche " Aktualisieren " anklicken um die Änderungen zu speichern. Im Software- Gateway Tool " IP-Discovery ", die Schaltfläche " Aktualisieren " anklicken, um eine neue Kamerasuche auszuführen, sind die Einstellungen ordnungsgemäß... -
Seite 49: Installation Der App „Urmet Cloud" Für Ios
(URM_……..). im Netzwerk Netzwerk? Öffnen Sie die App Urmet Cloud und loggen sich in Ihr Konto ein. Auswahl ‘’Lokale Überwachungskamera”, die Kamera wird in der Liste in grauer Farbe dargestellt. Anklicken der Schaltfläche „Einstellungen(Zahnrad)“ und füllen die Felder, Name, Beschreibung, Position und Mit dem LAN verbundenen PC Passwort (Standard: admin) aus. -
Seite 50: Installation Der App „Urmet Cloud" Für Android
INSTALLATION DER APP „URMET CLOUD” FÜR ANDROID Installieren Sie die App Urmet Cloud aus Play Store. Mit dem Internet verbundenen Smartphone ein persönliches Konto in der Urmet Cloud erstellen. Stellen Sie sicher, dass das Smartphone auf das Wi-Fi Kabel Internet zugreifen kann, öffnen Sie die App Urmet Cloud und loggen sich in Ihr Konto ein. - Seite 51 DS1093-106A...
- Seite 52 3.1.1 Instalación desde la aplicación Urmet Cloud iOS ................59 3.1.2 Instalación desde la aplicación Urmet Cloud Android ................ 60 Configuración de la cámara en una red IP por cable sin DHCP .......... 61 ...
-
Seite 53: Información General
Estimado cliente: Le agradecemos que haya comprado este producto. Esta guía rápida le ayudará a configurar las siguientes cámaras IP de URMET de una forma rápida y fácil: 1093/184M11, 1093/184M12, 1093/184M14, 1093/184M15 y 1093/184M16. Antes de usar este dispositivo, lea con atención esta guía rápida, ya que contiene información sobre el uso correcto y seguro de los dispositivos. -
Seite 54: Certificaciones
Urmet S.p.A. declara que las cámaras de vigilancia modelos 1093/184M11, 1093/184M12, 1093/184M14, 1093/184M15 y 1093/184M16 cumplen con los requisitos esenciales y otras provisiones relevantes de la directiva 1999/5/EC. La declaración de conformidad puede ser descargada desde la página web www.urmet.com o bien solicitada al servicio de atención al cliente de Urmet. -
Seite 55: Instalación
INSTALACIÓN INSTALACIÓN DE 1093/184M11 Y 1093/184M12 Siga los siguientes pasos para instalar el equipo de manera fácil y rápida: • Saque el soporte de la cámara del paquete • Separe la pieza giratoria del soporte (desenrósquela hasta que se separe) •... -
Seite 56: Componentes De 1093/184M11 Y 1093/184M12
COMPONENTES DE 1093/184M11 Y 1093/184M12 1 Óptica 5 Micrófono 9 Conector Ethernet 13 Reset 2 LED de estado 6 LED de infrarrojos 10 Toma de alimentación eléctrica 14 Terminales de E/S 3 Anillo de enfoque 7 Antena 11 Orificio del soporte 15 Botón WPS... -
Seite 57: Componentes De 1093/184M15 Y 1093/184M16
COMPONENTES DE 1093/184M15 Y 1093/184M16 1 Óptica 5 Orificio del soporte 9 Toma de alimentación eléctrica 2 Antena 6 Entrada de micrófono (rosa) 10 Conector Ethernet 3 LEDs de infrarrojos 7 Salida de audio (verde) 11 Bloque de terminales 4 Sensor luminoso 8 Salida de vídeo 12 Ranura Micro SD DS1093-106A... -
Seite 58: Ajuste Del Enfoque
Si necesita más información para configurar la cámara mediante móviles iOS/Android, consulte la guía rápida dentro de la misma aplicación Urmet Cloud, o bien el manual de instrucciones completo de la aplicación Urmet Cloud incluido en el CD suministrado con el producto. -
Seite 59: Instalación Desde La Aplicación Urmet Cloud Ios
3.1.1 INSTALACIÓN DESDE LA APLICACIÓN URMET CLOUD IOS Descargue e instale Urmet Cloud desde App Store. Con el móvil conectado a internet, lance la aplicación y cree su cuenta personal Urmet Cloud. Cable Wi-Fi Active Wi-Fi en el móvil y seleccione el SSID de la ¿Red Wi-Fi o... -
Seite 60: Instalación Desde La Aplicación Urmet Cloud Android
3.1.2 INSTALACIÓN DESDE LA APLICACIÓN URMET CLOUD ANDROID Descargue e instale Urmet Cloud desde Play Store. Con el móvil conectado a internet, lance la aplicación y cree su cuenta personal Urmet Cloud. Asegúrese de que el móvil puede acceder a... -
Seite 61: Configuración De La Cámara En Una Red Ip Por Cable Sin Dhcp
3.2.2 CÓMO USAR LA HERRAMIENTA IP DISCOVERY Después de instalar la herramienta IP Discovery, ejecútela: la cámara Urmet Cloud se mostrará en la lista de cámaras detectadas en la red. Para cambiar la configuración de la cámara, selecciónela de la lista y pulse Setup (Configurar): Aparecerá la siguiente pantalla de configuración:... -
Seite 62: Cómo Acceder A La Cámara Ip A Través De La Interfaz Web
Internet Explorer. Escriba el nombre de usuario (por defecto: admin) y la contraseña (por defecto: admin) e instale ActiveX Urmet SpA de la cámara en el PC (este paso solo es necesario para realizar la primera conexión PC-cámara).