HP LaserJet 3050 Leitfaden Zur Inbetriebnahme

Verwandte Anleitungen für HP LaserJet 3050


Inhaltszusammenfassung für HP LaserJet 3050
- Seite 1 HP LaserJet 3050 Getting Started Guide Guide de démarrage Leitfaden zur Inbetriebnahme Guida introduttiva Guía de instalación inicial Starthandleiding Guia de Introdução Lea Esto Primero...
- Seite 2 The information contained in this document is subject to change without notice. See the electronic User Guide for more regulatory information. The only warranties for HP products and services are set forth in the Trademark Credits express warranty statements accompanying such products and services.
- Seite 3 Prepare the location. Place the all-in-one on a sturdy, level surface Regulate the environment. Do not place the all-in-one in direct in a well-ventilated area. Make sure that the air vents are not blocked sunlight or in an area that has abrupt temperature and humidity and all doors can open freely.
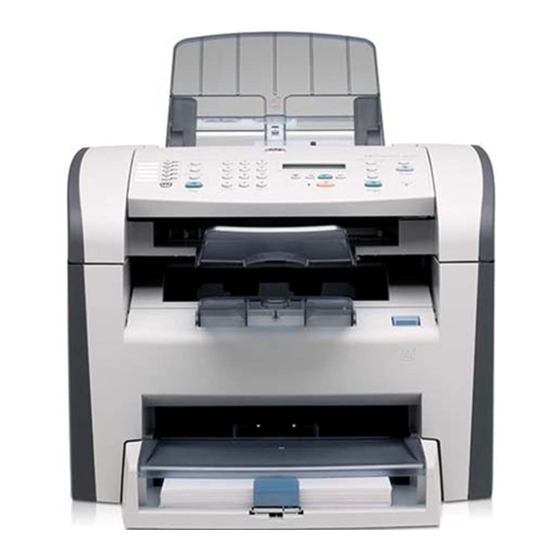
- Seite 5 Locate the all-in-one parts. 1) tray 1; 2) priority input slot; 3) output bin; 4) automatic document feeder (ADF) output bin; 5) automatic document feeder (ADF) input tray; 6) control panel; 7) cartridge-door release Localiser les pièces du multifonction. 1) bac 1; 2) fente d'alimentation prioritaire ;...
- Seite 6 Install the control-panel overlay (if not already installed). 1) Remove 3) Press the overlay from the bottom up toward the top until it is the adhesive backing from the overlay. 2) Align the bottom of the completely attached to the all-in-one. Note: Make sure that the overlay overlay with the bottom of the control panel, and make sure that the is aligned correctly and is not pressing any buttons.
- Seite 7 The control panel includes the following areas: 1) fax controls; 2) alphanumeric buttons; 3) display and menu controls; 4) copy controls; 5) scan controls. Le panneau de commande inclut les zones suivantes : 1) commandes de télécopie ; 2) touches alphanumériques ; 3) commandes d'affichage et de menu ;...
- Seite 8 3) Open the top of the media input tray. 4) Slide out the media guides. 6) Place the media in the tray, and then adjust the media guides until 5) Pull out the long-media support. they are flush with the media. Note: Do not fan the media before placing it in the tray.
- Seite 9 Install the output bin support. Insert the pin on one side of the support Install the automatic document feeder (ADF) input tray. 1) Align the into the hole in the all-in-one. Flex the pin on the other side inward, two tabs on the input tray with the two grooves in the ADF lid. 2) Slide and insert it into the hole.
- Seite 10 Install the ADF output support. Insert the pin on one side of the Install the print cartridge. 1) Press the cartridge-door release to open support into the hole in the all-in-one. Flex the pin on the other side the print-cartridge door. inward, and insert it into the hole.
- Seite 11 2) Remove the print cartridge from its packaging, and then rock the 5) Hold the print cartridge by the handle and insert it into the all-in-one. cartridge gently five or six times. 3) Bend the plastic tab at the end of 6) Close the print-cartridge door.
- Seite 12 HP, qu'il s'agisse de cartouches neuves ou reconditionnées. risquent d'incruster l'encre dans le tissu. En effet, comme il ne s'agit pas de produits HP, HP n'a aucun contrôle sur leur conception ou leur qualité. ACHTUNG: Wenn Ihre Kleidung mit Toner in Berührung kommt, Hinweis: Hewlett-Packard Company kann die Verwendung von wischen Sie den Toner zuerst mit einem sauberen Tuch ab.
- Seite 13 Connect the power cord. 1) Connect the power cord to the power connector on the back of the all-in-one. 2) Connect the other end of the power cord to a grounded alternating current (AC) outlet. Note: Use only the power cord that came with the all-in-one. Connexion du cordon d'alimentation.
- Seite 14 Note: Do not connect the cable to a computer at this time. Remarque : Ne connectez pas le câble à un ordinateur à ce moment précis. Hinweis: Schließen Sie das Kabel zu diesem Zeitpunkt noch nicht an einen Computer an. Nota: non collegare per il momento il cavo a un computer.
- Seite 15 Turn on the all-in-one. Press the power switch on the back of the all- Tip: If the all-in-one has no power and no lights are lit on the control in-one. panel, make sure that the power cord is attached securely to both the all-in-one and a power outlet.
- Seite 16 Set the control-panel-display language and location (if necessary). If Test the hardware setup by printing a configuration report. prompted by the control panel, select your language and location. 1) Press . 2) Use the < or the > button to select Reports, and then Follow the instructions on the control panel.
- Seite 17 Tip: If the page that prints is totally blank, remove the print cartridge, Test the copier by using the automatic document feeder (ADF). make sure that the sealing tape is removed (see step 10), reinstall the 1) Load the configuration report that you just printed print-side down print cartridge, and then try printing the page again.
- Seite 18 Tip: If the copy job produces a blank page, make sure that the original Complete the hardware setup. If you are using the all-in-one as a is loaded print-side up and that no jams exist in the ADF and paper standalone copier, the setup is complete.
- Seite 19 Windows Windows Connect to a Windows computer. The all-in-one software supports a 1) Close all programs that are running on the computer. 2) Insert the full-featured installation for Windows 2000 and XP. Only print and scan software CD-ROM into the CD drive. If the installation program does functions are supported for Windows 98, Me, and Server 2003.
- Seite 20 5) El software le indica que conecte el equipo multifuncional a un software para Windows XP o Windows 2000. 3) Seleccione Instalar el ordenador. software de HP LaserJet. 4) En el Asistente de conexión de la impresora, seleccione un tipo de conexión. Opmerking: u moet beheerdersrechten hebben om de software te 5) U wordt gevraagd de all-in-one op een computer aan te sluiten.
- Seite 21 1) Connect the USB cable (A/B) to the Macintosh. 2) Close all of the programs that are running on the computer. 3) Insert the software CD- ROM into the CD drive. 4) In the CD folder, double-click the HP All-in- One Installer icon.
- Seite 22 Macintosh 5) Follow the onscreen instructions, and then click Install. 6) When Fax setup. If you installed the all-in-one software, the HP LaserJet prompted, restart the computer. 7) When the HP All-in-One Setup Fax Setup Utility (Windows) or Setup Assistant (Mac) automatically Assistant starts, follow the instructions.
- Seite 23 Tip: If the utility does not run automatically, access it in the program If you are using the all-in-one as a standalone fax, complete the group. following steps: 1) Press . 2) Use the < or the > button to select System Setup, and then press Conseil : Si l'utilitaire ne s'exécute pas automatiquement, accédez-y Si vous utilisez le multifonction comme télécopieur autonome,...
- Seite 24 6) Complete one of the following: a) For the 12-hour clock, use the < 3) Use the < or the > button to select Time/Date. Press . 4) Use or the > button to move past the fourth character. Select for a.m.
- Seite 25 7) Use the alphanumeric buttons to enter the current date. Use two 8) Use the < or the > button to select Fax setup, then press . 9) Use digits to specify the month, day, and year. Press < or the >...
- Seite 26 10) Use the alphanumeric buttons to enter your fax number and your Note: For complete information about using the fax features, including how to set up fax features to work with telephone services such as company name or header, and then press .
- Seite 27 HP all-in-one. Compruebe la instalación del software. Imprima una página desde Registro del dispositivo multifuncional Regístrese en cualquier programa para asegurarse de que el software se ha http://www.register.hp.com...
- Seite 28 4) Seleccione Permitirme escanear pulsando el botón Escanear a en SCANEAR A programas o en Programas y, a continuación, haga clic en HP. Haga el dispositivo multifuncional..5) Mueva los destinos de la ventana clic en HP LaserJet 3050/3052/3055/3090 multifuncional y después PC a la ventana Dispositivo multifuncional.
- Seite 30 Congratulations! The all-in-one is ready to use. See the online User support/lj3050, or see the support flyer for more information. Guide or use the HP ToolboxFX software (Windows 2000 or XP only) to solve problems. The following sections provide tips for using the all- in-one.
- Seite 31 Preventing streaks and spots on scans and copies. 1) Unplug the all- Clearing print jams. 1) Unplug the all-in-one. 2) Remove the print in-one. 2) Tilt the control panel forward. 3) Clean the glass strip and cartridge. 3) Remove all media from tray 1. 4) Remove all jammed white platen with a soft sponge or cloth that has been moistened with media.
- Seite 32 © 2005 Hewlett-Packard Development Company, L.P. www.hp.com *Q6504-90902* *Q6504-90902* Q6504-90902...