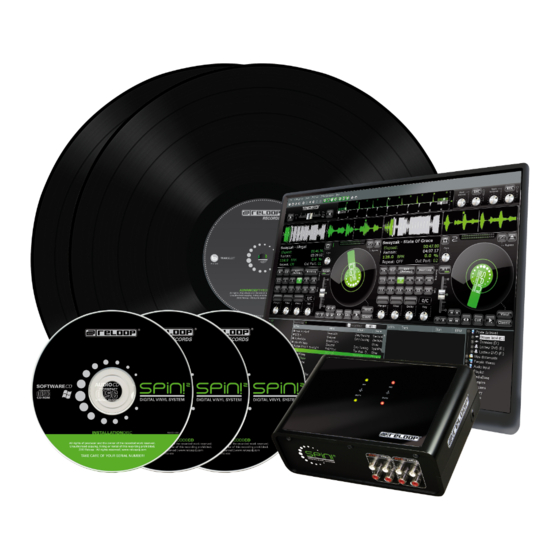
Reloop Spin!2+ Bedienungsanleitungen
Digital vinyl system
Quelle: reloop.com
Inhaltsverzeichnis
Verfügbare Sprachen
Verfügbare Sprachen
Quicklinks
Spin!2+
Digital Vinyl System
Bedienungsanleitung
ACHTUNG!
Lesen Sie sich vor der ersten Inbetriebnahme zur eigenen Sicherheit diese
Bedienungsanleitung sorgfältig durch! Alle Personen, die mit der Aufstel-
lung, Inbetriebnahme, Bedienung, Wartung und Instandhaltung dieses Gerä-
tes zu tun haben, müssen entsprechend qualifiziert sein und diese Betriebs-
anleitung genau beachten. Dieses Produkt erfüllt die Anforderungen der
geltenden europäischen und nationalen Richtlinien, die Konformität wurde
nachgewiesen, die entsprechenden Erklärungen und Unterlagen sind beim
Hersteller hinterlegt.
Instruction Manual
CAUTION!
For your own safety, please read this operation manual carefully before ini-
tial operation! All persons involved in the installation, setting-up, operation,
maintenance and service of this device must be appropriately qualified and
observe this operation manual in detail. This product complies with the requi-
rements of the applicable European and national regulations. Conformity has
been proven. The respective statements and documents are deposited at the
manufacturer.
Mode d'emploi
ATTENTION!
Pour votre propre sécurité, veuillez lire attentivement ce mode d'emploi
avant la première utilisation ! Toutes les personnes chargées de l'installation,
de la mise en service, de l'utilisation, de l'entretien et la maintenance de
cet appareil doivent posséder les qualifications nécessaires et respecter les
instructions de ce mode d'emploi. Ce produit est conforme aux directives
européennes et nationales, la conformité a été certifiée et les déclarations
et documents sont en possession du fabricant.
DEUTSCH ............................. 2-49
ENGLISH ............................50-97
FRANÇAIS ....................... 98-145
WARNUNG!
Um Feuer oder einen elektrischen Schock zu
vermeiden, setzen Sie dieses Gerät nicht Was-
ser oder Flüssigkeiten aus! Öffnen Sie niemals
das Gehäuse!
WARNING!
To prevent fire or avoid an electric shock
do not expose the device to water or fluids!
Never open the housing!
ATTENTION !
Afin d'éviter un incendie ou une décharge
électrique, veillez à tenir cet appareil à l'écart
des liquides et de l'humidité ! N´ouvrez jamais
le boîtier !
Für weiteren Gebrauch aufbewahren!
Keep information for further reference!
Gardez ces instructions pour des utilisa-
tions ultérieurs!
www.reloop-spin.de
Reloop Trademark
Global Distribution GmbH
Schuckertstr. 28
48153 Muenster / Germany
© 2009
Nachdruck verboten!
1
Kapitel
Inhaltsverzeichnis

Verwandte Anleitungen für Reloop Spin!2+


Inhaltszusammenfassung für Reloop Spin!2+
- Seite 1 ! N´ouvrez jamais le boîtier ! Für weiteren Gebrauch aufbewahren! Keep information for further reference! Gardez ces instructions pour des utilisa- tions ultérieurs! www.reloop-spin.de Reloop Trademark Global Distribution GmbH Schuckertstr. 28 48153 Muenster / Germany © 2009 Nachdruck verboten!
- Seite 2 INHALTSVERZEICHNIS RELOOP SPIN! 2+ Mindeste Systemanforderungen ........S. 6 Reloop Spin! Menüführung ........S. 28 Anschluss & Softwareinstallation .......S. 6 Menüpunkt File ..............S. 28 Anschluss ................S. 6 3.1.1 Options ................S. 28 Spin! 2 Softwareinstallation .........S. 9 3.1.2 Learning ................S. 28 ASIO-Treiber Installation ..........S. 11 3.1.3 Quit Spinning ..............S.
-
Seite 3: Inhaltsverzeichnis
Einstellungen ............S. 30 Options ................S. 30 4.1.1 System ................S. 30 4.1.2 BPM and Tools ..............S. 31 4.1.3 Audio Devices ..............S. 32 4.1.4 Timecode ................. S. 33 4.1.4 Workspace ............... S. 35 4.1.6 Shortcuts ................. S. 36 4.1.7 MIDI Controller ............... S. 37 Auto Search ..............S. -
Seite 4: Sicherheitshinweise
Richtlinien, die Konformität wurde nachgewiesen, die entsprechenden Erklärungen und Unterlagen sind beim Hersteller hinterlegt. Wir gratulieren Ihnen zum Kauf des Reloop Spin! 2+ Systems. Vielen Dank, dass Sie unserer Diskjo- ckey-Technologie Ihr Vertrauen schenken. Vor Inbetriebnahme bitten wir Sie, alle Anweisungen sorg- fältig zu studieren und zu befolgen. -
Seite 5: Bestimmungsgemässe Verwendung
- Es ist anzunehmen, dass ein gefahrloser Betrieb nicht mehr möglich ist, wenn das Gerät sichtbare Beschädigungen aufweist, das Gerät nicht mehr funktioniert, nach längerer Lagerung unter un- günstigen Verhältnissen oder nach schweren Transportbeanspruchungen. - Dieses Handbuch, Video-Tutorials, Tipps & Tricks und weitere Downloads können Sie unter folgen- der Webseite finden: www.reloop-spin.de... -
Seite 6: Mindeste Systemanforderungen
MINDESTE SYSTEMANFORDERUNGEN: • aktueller Prozessor (empfohlen wird mindestens Pentium III, 1 GHz) • Windows XP (SP2 oder höher) Vista (SP1 oder höher) Betriebssystem • freier USB-Port • 1 GB RAM • ausreichend Festplattenspeicher für Musikdateien 1. ANSCHLUSS UND SOFTWAREINSTALLATION 1.1 Anschluss... - Seite 7 Vorverstärker -2-. Stellen Sie die Signal-Eingangslautstärke mit dem Input Gain-Drehregler -6- ein. Diese Einstellung kann, je nach angeschlossenem Medium, variieren. b) Verbinden Sie die Line-Ausgänge -9- des Reloop Spin! 2+ Interfaces mit den Line Eingängen Ihres Mixers. Um ein reguläres Vinylsignal durchschleifen zu können, verbinden Sie die Through-Ausgänge -10- mit den Phono-Eingängen Ihres Mischpultes.
-
Seite 8: Anschlussübersicht
Nun sollten folgende Meldungen, im Beispiel XP, auf Ihrem Monitor erscheinen: Neue Hardware gefunden – Reloop Spin! 2 Interface Neue Hardware gefunden – USB Audiogerät Neue Hardware gefunden – Die Hardware wurde installiert und kann jetzt verwendet werden. HINWEIS! Die Grundinstallation Ihres Spin! 2+ Interfaces erfolgt unter Windows XP & Vista nach dem Plug ‚N‘... - Seite 9 1.2 SPIN! 2 SOFTWAREINSTALLATION Nachdem Sie das Hardware-Setup vorgenommen haben, kommen wir nun zur Software- und ASIO Treiber Installation. Legen Sie dazu die Spin! 2 Installations-CD in das CD-ROM Laufwerk Ihres Com- puters. Sollte das Setup nicht automatisch starten, führen Sie bitte die Datei „Install_reloop.exe“...
- Seite 10 Nun müssen Sie Ihren Namen, ggf. Firma, E-Mail Adresse (notwendig) und die Seriennummer einge- ben. Die Seriennummer finden Sie auf der Rückseite der Spin! 2 Installations-CD-Hülle. Bestätigen Sie Ihre Eingabe mit „weiter“. Wählen Sie dann das Installationsverzeichnis in der Ihre Spin! 2 Software installiert werden soll, oder verwenden Sie das Standardverzeichnis (empfohlen).
-
Seite 11: Asio-Treiber Installation
1.3 ASIO-TREIBER INSTALLATION Nachdem das ASIO Setup-Menü erscheint, wählen Sie zuerst Ihre Sprache aus. Im nächsten Schritt klicken Sie auf „Treiber installieren“. Falls Ihr Spin! 2+ Interface noch nicht angeschlossen ist, werden Sie, wie unten abgebildet, dazu aufgefordert dies nun zu tun. Nun werden die USB ASIO-Treiber installiert. Möglicherweise werden Sie gebeten, das USB-Kabel vom Interface zu trennen und erneut zu verbin- den. -
Seite 12: Easy Setup
Support und Updates Überprüfen Sie regelmäßig www.reloop-spin.de auf neue Updates. 1.4 EASY SETUP Beim ersten Start von Reloop Spin! 2 startet das Easy Setup automatisch. HINWEIS! Das Easy Setup kann auch manuell unter dem Menüpunkt > Help > Easy Setup! ausgeführt werden. - Seite 13 3. Kalibirierungsergebnis für Eingang 1 Nach erfolgreicher Kalibrierung sollte die Meldung „Spin! 2 has been calibrated successfully“ er- scheinen. HINWEIS! Sollte die Meldung „Spin! 2 has not been installed properly“ erscheinen, überprüfen Sie Ihre An- schlüsse oder wechseln Sie die Nadeln an Ihrem Plattenspieler aus. 4.
- Seite 14 5. Kalibrierungsergebnis Eingang 2 Auch hier sollte eine erfolgreiche Kalibrierungs-Meldung erscheinen. HINWEIS! Die Kalibrierung ist nur für Plattenspieler notwendig. Beim Anschluss von CD-Playern wird dieser Punkt übersprungen. 6. Bei erfolgreichem Setup werden Ihre Einstellungen bestätigt. Beenden Sie das Schnellsetup durch Betätigen der „Fertig stellen“-Taste. HINWEIS! Im abschließenden Installations-Schritt haben Sie noch drei Möglichkeiten um Spin! 2 zu optimieren:...
- Seite 15 1. Sound Before Graphic Priority Ist diese Option aktiviert, so wird die Systemleistung vorrangig der Musikleistung als der Grafikleis- tung zugeordnet. Dies ist bei älteren oder leistungsschwächeren Rechneren von Vorteil (wenn es beispielsweise zu Aussetzern kommt). 2. Tick Scrolling Die Wellenform bleibt stehen. Der Strich (entspricht der Position der Nadel) bewegt sich. 3.
-
Seite 16: Softwareübersicht
Spin! Mode zu wechseln, halten Sie Shift -33- und drehen den Spin! Mode Drehregler -21-. Sie können den Pitch Mode wechseln, indem Sie Shift -33- halten und den Pitch Mode Drehregler -22- drehen. Aktivieren Sie die Reloop-Funktion durch Halten der Shift-Taste -33- und Betätigen des Reloop Reglers -23-. - Seite 17 1. Shortcut: New Spin! Library Hiermit wird eine neue, leere Library erstellt, die Sie nach Bedarf mit Audio-Dateien füllen können. 2. Shortcut: Open Spin! Library Hiermit öffnen Sie eine vorhandene Library. 3. Shortcut: Auto Search Zum Massenimport von Musik-Dateien können Sie mit dieser Funktion komfortabel Ihre Fest- platte oder gegebenenfalls gezielt einzelne Ordner durchsuchen.
- Seite 18 21. Beat Match View Die Beat Match-Ansicht zeigt Ihnen die Peaks beider Tracks - die beiden Ansichten stehen sich dabei gegenüber. Hier kann schnell erkannt werden, ob beispielsweise die Bassdrums oder Snares übereinander laufen. So können Sie schnell und einfach, sofern beide Tracks vom Tempo angeglichen wurden, die Stücke synchronisieren.
- Seite 19 Gehen Sie dazu wie folgt vor: Sample Aufnahme • Ziehen Sie den Eingang „0: Reloop Spin!-Interface 1“ unter Audio Input (Music Explorer) per Drag & Drop in einen der Player. • Stellen Sie den Pegel mit dem Mic Lautstärkeregler ein.
- Seite 20 27. Bypass-Funktion Ist die Bypass-Funktion aktiviert, so wird das Eingangssignal vom Spin! 2+ Interface direkt durch die Software geschleift. Deaktivieren Sie die Bypass-Funktion für den normalen Timecode-Gebrauch. 28. Label Monitor Der Label Monitor ist eine Art virtuelle Platte, die sich entsprechend der Timecode-Platte mitbe- wegt.
- Seite 21 31. Pitchfader Der Pitchfader stellt einen herkömmlichen Pitchfader eines Plattenspielers bzw. CD-Players dar. Im Timecode Vinyl Modus -32- bewegt sich der Fader synchron zu den am Plattenspieler ausgeführten Bewegungen. Dieser ist abhängig vom eingestellten Pitch-Modus (siehe Punkt 30). Im deaktivierten Timecode Modus kann der Pitchfader auch mit der Maus bewegt werden.
- Seite 22 35. Cue-Taste Durch Betätigen dieser Tasten gelangen Sie in den Cue-Modus. Um einen Cue-Punkt zu setzen haben Sie zwei Möglichkeiten. a) Cue-Pause Im Wiedergabe-Modus drücken Sie die Play/Pause-Taste -34-, um in den Pause-Modus zu gelan- gen. Drücken Sie nun die Cue-Taste um den Cue-Punkt zu setzen. b) Loop In Während der Wiedergabe oder im Pause-Modus können Sie die Loop In-Taste betätigen um einen Cue-Punkt zu setzen.
- Seite 23 40. Spin! Library In diesem Browser finden Sie alle wichtigen Informationen zu den Tracks Ihrer Spin! Library. Um einen Track direkt aus der Library auszuwählen, klicken Sie diesen an und bewegen ihn per Drag & Drop auf den gewünschten Player. Alternativ können Sie auch direkt über die Time Code-Platte die Track-Select- Funktion auswählen (siehe Kapitel 1.5, Punkt b).
- Seite 24 Beats zu schwach vom Rest des Tracks abheben, um als Rhythmuselement identifiziert zu werden. Beats im 4/4 Takt sind ideal für die Reloop Spin! 2 Software. 41. Flanger-Effekt Drücken Sie zuerst die Effektaktivierungstaste über dem Flanger-Drehregler. Der Flanger-Effekt ist nun aktiviert.
-
Seite 25: Funktion
Tonlagen harmonisch mixen. 45. Beat Loop/Auto Loop-Funktion Ihre Reloop Spin! 2 Software besitzt eine intelligente Beat Loop-Funktion. Mit dieser können Sie mit einem Knopfdruck automatisch, abhängig vom eingestellten Takt, Beat-genaue Loops erstellen. Es ist somit nicht mehr nötig die In- und Out-Punkte manuell zu setzen. Wählen Sie den gewünschten Takt mit den Beat Loop Takt-Tasten aus (1/2 –... - Seite 26 49. Beat Match-Funktion Die Beat Match-Funktion ist eine praktische Hilfe um schnell per Knopfdruck die Tempi zweier verschie- dener Tracks anzugleichen. So kann entweder der linke dem rechten Player angeglichen werden, oder der rechte dem linken Player. Beatmatch Schnelltaste Player 1 Player 2 50.
- Seite 27 52. Category View Die Category View ist eine Art Schnellauswahl-Filter für die Spin! Library. In dieser können Sie bei- spielsweise nach Alphabet, Jahr oder BPM-Geschwindigkeit die Spin! Library View anzeigen lassen. Unter dem Punkt „Groups“ können Sie eigene Playlists bzw. Sortierungen vornehmen. Um eine neue Gruppe zu erstellen, drücken Sie mit Rechtsklick in der Category View auf den Punkt „Add Group“.
-
Seite 28: Track Menü
Rest des Tracks abheben, um Hiermit können Sie Dateien importieren. [ iTunes als Rhythmuselement identifiziert zu werden. (*.xml) / m3u Files (*.m3u)] Beats im 4/4 Takt sind ideal für die Reloop Spin! 2 Software. 3.2.6 Export: Hiermit können Sie Dateien exportieren. [m3u HINWEIS! Files (*.m3u)]... - Seite 29 3.5.1 Workspace Arrangeable: 3.6.3 www.reloop-spin.com Ist dies aktiviert, können einzelne Fensterele- Hiermit rufen Sie die Internetseite www.reloop- mente neu arrangiert und geschlossen werden. spin.com auf. Besuchen Sie diese Seite in re- gelmäßigen Abständen um aktuelle Downloads 3.5.2 Tool Tips oder Infos zu erhalten.
-
Seite 30: Einstellungen
Hier können Sie den prozentualen Bereich einstellen, in dem die Tonhöhe gepitcht werden soll (siehe auch Kapitel 6. Software Multi Open 2, Punkt 30). Ist diese Funktion aktiviert, so kann Reloop Spin! mehr- mals geöffnet werden (nicht empfehlenswert / ASIO- abhängig). -
Seite 31: Bpm And Tools
4.1.2 BPM and Tools 1. BPM Range 6. First Cue Point Search Hier können Sie die BPM-Spanne, in der die Hiermit können Sie den Zeitrahmen in Sekunden Software kalkulieren soll, einstellen. Je kleiner setzen, bis wann der erste Cue-Punkt gesucht die Differenz, desto schneller und präziser kann werden soll. -
Seite 32: Audio Devices
4.1.3 Audio Devices 1. Output Device Hier wird das Reloop Spin! 2+ Interface ausgewählt und sollte dort angezeigt werden. 2. Out Ports Hier wird die Anzahl der Ausgänge definiert. Es sollte eine „2“ eingestellt werden. 3. Setup Hier können die einzelnen Ausgänge für die linke und rechte Seite eingestellt werden. Auch kann mit der Schaltfläche „Control Panel“... -
Seite 33: Timecode
4. Audio Source Hier werden die entsprechenden Anschlüsse des Spin! 2+ Interfaces zugewiesen. Voreingestellt sind: • Player 1: 0: Reloop Spin!-Interface 1 – Reloop Spin!-Interface 2 • Player 2: 2: Reloop Spin!-Interface 3 – Reloop Spin!-Interface 4 5. Timecode Quality Hier wird prozentual die Signalqualität des Timecodes angezeigt. -
Seite 34: Noise Filter
7. Direct Phono Input Hier kann definiert werden ob ein Plattenspieler direkt am Rechner angeschlossen wurde. In Ver- wendung mit dem Spin! 2+ Interface (Line Output) muss hier „No“ stehen. 8. 45 RPM Hier kann eingestellt werden, ob die Timecode-Platte mit 45 RPM (Rounds Per Minute = Umdrehun- gen pro Minute) abgespielt werden soll. -
Seite 35: Workspace
4.1.5 Workspace 1. Resolution Selection Hier werden die vorhandenen Auflösungen aufgelistet. Wählen Sie hier die entsprechende Auflösung für Ihren Bildschirm. 2. Apply Übernehmen Sie die Einstellungen mit dem Apply-Button. HINWEIS! Performance Skin In der Resolution Auswahl können Sie auch für Ihre Auflösung enstsprechend eine kompakte Per- formance Skin wählen. -
Seite 36: Shortcuts
4.1.6 Shortcuts 1. Shortcut Setting File Hier können Sie das Schnelltasten-Layout für Ihre Tastatur auswählen. Zur Auswahl stehen: • Spin_keyboardQWERTZ (Deutschland, Österreich, Schweiz, Ungarn) • Spin_keyboardQWERTY (Amerika, England, Niederlande, Italien, Skandinavien, Polen, Spanien, Portugal) • Spin_keyboardAZERTY (Frankreich, Belgien) 2. Layout Preview Hier wird die Tastaturbelegung in einer Vorschau dargestellt. -
Seite 37: Midi Controller
Hier werden kompatible MIDI-Controller aufgelistet, z.B. Reloop Digital Jockey (www.digital-jockey.dj). 3. MIDI Setup File Hier werden die vorkonfigurierten MIDI-Konfigurations-Dateien aufgelistet. 4. Omni Mode Ist diese Option aktiviert, empfängt Spin! auf allen MIDI-Kanälen. HINWEIS! Bitte überprüfen Sie regelmäßig Spin! auf Updates unter www.reloop-spin.de um beispielsweise neue MIDI-Mappings herunterzuladen. -
Seite 38: Auto Search
4.2 Auto Search Mit der Auto Search-Funktion können Sie ganz einfach Musikdateien auf Ihrer Festplatte lokalisieren und Ihrer Spin! Library hinzufügen lassen. 1. Pfad Hier wird der aktuell ausgewählte Pfad angezeigt. 2. Select Directory Hiermit können Sie einzelne Ordner auswählen. 3. -
Seite 39: Track Preferences
4.3 Track Preferences In den Track Preferences können Sie diese Einstellungen und Daten eines Tracks aktivieren. Sie er- reichen die Track Preferences entweder unter dem Menüpunkt: > Track > Track Preferences oder auch durch Rechtsklick auf den Track selber in der Spin! Library. 4.3.1 Infos Hier können Sie diverse Informationen, wie z.B. -
Seite 40: Track Settings
4.3.3 Track Settings Hier können Sie diverse Einstellungen, wie Start- und Endpunkt, Loops oder Tempo einsehen und editieren. 4.3.4 Volume Hier können Sie Gain, Pan oder Fade In/Out auf Wunsch für den Track voreinstellen. -
Seite 41: Lyrics
4.3.5 Lyrics Hier können gegebenenfalls Songtexte eingetragen und eingesehen werden. 4.3.6 Cover Hier kann ein Cover Artwork zum Track geladen und angezeigt werden. -
Seite 42: Equalization
4.3.7 Equalization Hier können Sie EQ-Einstellungen vornehmen. 4.3.8 Cue Points Hier können gegebenenfalls bis zu 10 Cue-Punkte vordefiniert werden. -
Seite 43: Loop
4.3.9 Loop Hier können gegebenenfalls bis zu 10 Loops vordefiniert werden. 4.4 MIDI Learning Mit der Free MIDI Learning Funktion können Sie einzelne Software-Elemente nach Wunsch mit MIDI- Befehlen zuweisen. Aktivieren Sie dazu die Free MIDI Learning Funktion durch Drücken der Schalt- fläche in der Shortcut View oder unter File >Learning >Enable. -
Seite 44: Midi Mapping
5. MIDI MAPPING 21(15H) 01(01H) 02(02H) 24(18H) 85(55H) 65(41H) 66(42H) 86(58H) 22(16H) 05(05H) 14(0DH) 06(06H) 25(19H) 86(56H) 69(45H) 77(4DH) 70(46H) 87(59H) 27(1BH) 89(5BH) 23(17H) 09(09H) 10(0AH) 26(1AH) 04(04H) 87(57H) 73(49H) 74(4AH) 88(5AH) 03(03H) 07(07H) 11(0BH) 08(08H) 13(0CH) 16(10H) 67(43H) 71(47H) 75(4BH) 72(48H) 76(4CH) -
Seite 45: Faq
Nadel unter einer Headshell – die sehr hohe Ausgangspannung von 8mV garantiert ein „kräfti- ges“, wenig störungsanfälliges Timecodesignal. Generell ist jeder Plattenspieler mit Spin! 2 kompatibel. Je besser der Plattenspieler (z.B. Reloop RP-6000 MK6), desto besser die Resultate (Scratch-Verhalten, Gleichlaufschwankungen). -
Seite 46: Ist Es Möglich Statt Mit 33 Rpm Mit 45 Rpm Aufzulegen
6.7 Ist es möglich statt mit 33 RPM mit 45 RPM aufzulegen? Ja. unter „File -> Options -> Timecode“ das Häkchen im Kasten „45 RPM“ aktivieren und Spin! neu kalibrieren (dabei darauf achten, dass der Pitchfader am Plattenspieler bei 0% steht). 6.8 Warum werden beide Tracks auf dem gleichen Kanal abgespielt? Beide Player haben den gleichen OUT PORT zugewiesen. -
Seite 47: Wie Optimiere Ich Meinen Computer Für Spin
6.9.6 Wie optimiere ich meinen Computer für Spin! ? Ein gut und stabil laufender Computer ist eine wichtige Voraussetzung, um mit Spin! zuverlässig arbeiten zu können. Es gibt ein paar Kniffe den Rechner zu optimieren: • In der Systemsteuerung unter „System -> Erweitert“ die Einstellungen zur Systemleistung öffnen- Hier die Einstellung „Für optimale Leistung anpassen“...