Herunterladen Diese Seite drucken

Werbung

Verfügbare Sprachen
  • DE

Verfügbare Sprachen

  • DEUTSCH, seite 1
PAW GmbH & Co. KG
Böcklerstr. 11, D-31789 Hameln
Tel.: +49-5151-9856-0, Fax: +49-5151-9856-98
E-mail: info@paw.eu, Web: www.paw.eu
2018/01
Montage- und Bedienungsanleitung
Einbaustrecke für Wärmemengenzähler
in direkten Heizkreisen
Installation and Operation Instructions
Fitting for heat flowmeter
in direct heating circuits
Notice de montage et d'utilisation
Tube ajusté pour calorimètre pour le montage
dans des circuits de chauffage directs
Manual de instrucciones para el montaje y manejo
Tramo para calorímetro en
circuitos de calefacción directos
Istruzioni per il montaggio e per l'uso
Dima per l'installazione del contatore di calore
nei circuiti di riscaldamento diretti
993x453-mub-ml – V02
DN 25 / DN 32
DN 25 / DN 32
DN 25 / DN 32
DN 25 / DN 32
DN 25 / DN 32
A-1

Werbung

loading

Inhaltszusammenfassung für PAW DN 25

  • Seite 1 Tel.: +49-5151-9856-0, Fax: +49-5151-9856-98 E-mail: info@paw.eu, Web: www.paw.eu Montage- und Bedienungsanleitung Einbaustrecke für Wärmemengenzähler in direkten Heizkreisen DN 25 / DN 32 Installation and Operation Instructions Fitting for heat flowmeter in direct heating circuits DN 25 / DN 32 Notice de montage et d'utilisation Tube ajusté...
  • Seite 2: Inhaltsverzeichnis

    Technische Daten ......................8 Art. Nr. 993x453-mub-ml – Version V02 – Stand 2018/01 Original-Anleitung PAW GmbH & Co. KG Technische Änderungen vorbehalten! Böcklerstraße 11 Printed in Germany – Copyright by PAW GmbH & Co. KG D - 31789 Hameln 993x453-mub-ml – V02 2018/01...
  • Seite 3: Allgemeines

    Geltungsbereich der Anleitung Diese Anleitung beschreibt die Funktion und Installation der Einbaustrecke für Wärmemengenzähler in direkten Heizkreisen DN 25 und DN 32. Für andere Komponenten der Anlage, wie z. B. die Pumpe oder den Heizkreis, beachten Sie bitte die Anleitungen des jeweiligen Herstellers. Die mit [Fachmann] bezeichneten Kapitel richten sich ausschließlich an den Fachhandwerker.
  • Seite 4: Sicherheitshinweise

    Unfallverhütungsvorschriften der Berufsgenossenschaft • Anweisungen und Sicherheitshinweise dieser Anleitung • ACHTUNG Die PAW-Einbaustrecke ist nur geeignet für den Einsatz in Heizungskreisen mit Heizungswasser gemäß VDI 2035 / Ö-Norm H 5195-1. Die Einbaustrecke darf nicht in Trinkwasseranwendungen eingesetzt werden. ACHTUNG Sachschaden durch Mineralöle! Mineralölprodukte beschädigen die EPDM-Dichtungselemente nachhaltig, wodurch die Dicht-...
  • Seite 5: Produktbeschreibung

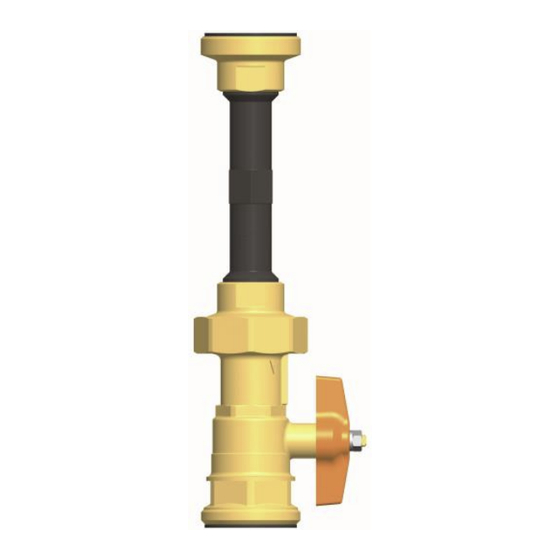
    Die Einbaustrecke ermöglicht die einfache Montage eines Wärmemengenzählers (WMZ) in den Rücklauf direkter Heizkreise. Die Einbaustrecke ist universell einsetzbar für alle Wärmemengenzähler mit den Anschlussmaßen ¾" x 110 mm und 1" x 130 mm (DN 25) bzw. 1" x 130 mm (DN 32).
  • Seite 6: Montage Und Installation [Fachmann]

    4 Montage und Installation [Fachmann] 4 Montage und Installation [Fachmann] ACHTUNG Sachschaden! Um Schäden an der Anlage zu verhindern, muss der Montageort trocken, tragsicher und frostfrei sein. Die Montage der Einbaustrecke erfolgt in den Heizungsrücklauf. Der Vorlauffühler für die Wärme- mengenzählung kann mit einem der beigefügten Reduzierstücke in den Vorlauf-Thermo-Kugelhahn [A-2] oder in...
  • Seite 7: Montage Des Wärmemengenzählers

    4 Montage und Installation [Fachmann] Montage des Wärmemengenzählers 1. Demontieren Sie zunächst die Übergangsstücke vom Passrohr und montieren Sie diese an den Wärmemengenzähler. 2. Montieren Sie den Wärmemengenzähler mit den Übergangsverschraubungen in den Rücklauf des Heizkreises. 3. Die Griffe der Pumpenkugelhähne müssen nach innen gedreht werden, damit die vordere Isolierung geschlossen werden kann (siehe Abbildung links).
  • Seite 8: Technische Daten

    5 Technische Daten 5 Technische Daten Wärmemengenzähler DN 25 (1") DN 32 (1¼") Gesamteinbaulänge 1½" AG x 262 mm 2" AG x 292 mm Abmessungen ¾" AG x 110 mm / Anschlussmaß für WMZ 1" AG x 130 mm 1" AG x 130 mm Technische Daten Öffnungsdruck Schwerkraftbremse...
  • Seite 9 Translation of the original instructions PAW GmbH & Co. KG We reserve the right to make technical changes without notice! Böcklerstraße 11 Printed in Germany – Copyright by PAW GmbH & Co. KG D - 31789 Hameln, Germany 993x453-mub-ml – V02 2018/01...
  • Seite 10: General Information

    The fitting for heat flowmeter must not be used in domestic hot water applications. Improper usage of the fitting for heat flowmeter excludes any liability claims. Only use PAW accessories with the fitting for heat flowmeter. The wrapping materials are made of recyclable materials and can be disposed of with recyclable materials.
  • Seite 11: Safety Instructions

    • NOTICE The PAW fitting for heat flowmeter must only be used in heating circuits filled with heating water according to VDI 2035 / Ö-Norm H 5195-1. The fitting for heat flowmeter must not be used in domestic hot water applications.
  • Seite 12: Product Description

    The fitting can be used for all heat flowmeters with the connecting dimensions ¾" x 110 mm and 1" x 130 mm (DN 25) or 1" x 130 mm (DN 25). The scope of delivery includes the required flat-sealing adapter pieces, an adapter pipe, a pump ball valve with check valve and union nut, 2 different reducers to mount the flow sensor in the thermometer ball valve as well as gaskets.
  • Seite 13: Assembly And Installation [Specialist]

    4 Assembly and installation [specialist] 4 Assembly and installation [specialist] NOTICE Damage to property! The location of installation must be dry, load-carrying and frost-proof to prevent material damage to the installation. The fitting for heat flow meter is mounted in the return line of the heating circuit. The flow sensor for the heat quantity measurement can be mounted in the flow thermometer ball valve [A-2] or in connections...
  • Seite 14: Installation Of The Heat Flowmeter

    4 Assembly and installation [specialist] Installation of the heat flowmeter 1. Dismount the adapter pieces of the adapter pipe first and mount them on the heat flowmeter. 2. Mount the heat flowmeter with the transition thread connections in the return of the heating circuit.
  • Seite 15: Technical Data

    5 Technical data 5 Technical data Heat flowmeter DN 25 (1") DN 32 (1¼") Total installation length 1½" ext. thread x 262 mm 2" ext. thread x 292 mm Dimensions ¾" ext. thread x 110 mm / Connections for heat flowmeter 1"...
  • Seite 16 N° d'art. 993x453-mub-ml – Version V02 – Date 2018/01 Traduction de la notice originale PAW GmbH & Co. KG Sous réserve de modifications techniques ! Böcklerstraße 11 Printed in Germany – Copyright by PAW GmbH & Co. KG D - 31789 Hameln, Allemagne 993x453-mub-ml – V02 2018/01...
  • Seite 17: Informations Générales

    Champ d'application de la présente notice La présente notice décrit le fonctionnement et l'installation du tube ajusté pour calorimètre dans les circuits de chauffage directs DN 25 et DN 32. Quant aux autres composants de l'installation, comme p. ex. la pompe ou le circuit de chauffage, veuillez vous reporter aux notices d’utilisation des fabricants respectifs.
  • Seite 18: Consignes De Sécurité

    • AVIS Le tube ajusté de PAW doit exclusivement être utilisé dans les circuits de chauffage contenant de l'eau de chauffage conforme aux normes VDI 2035 / Ö-Norm H 5195-1. Il est interdit d'utiliser le tube ajusté dans les applications pour eau potable.
  • Seite 19: Description Du Produit

    Le tube ajusté peut être utilisé pour tous les calorimètres avec les dimensions de raccordement ¾" x 110 mm und 1" x 130 mm (DN 25) ou 1" x 130 mm (DN 32). Le volume de livraison comprend les pièces de transition requises à joint plat, un tube adaptateur, une vanne à...
  • Seite 20: Montage Et Installation [Expert]

    4 Montage et installation [Expert] 4 Montage et installation [Expert] AVIS Dommages matériels ! Afin d'éviter l'endommagement de l'installation, le lieu de montage doit être sec, stable et résistant au gel. Le tube ajusté est monté dans le retour du circuit de chauffage. La sonde de départ pour la calorimétrie peut être montée dans le départ de la vanne à...
  • Seite 21: Montage Du Calorimètre

    4 Montage et installation [Expert] Montage du calorimètre 1. Démontez d'abord les pièces de transition du tube adaptateur et montez-les au calorimètre. 2. Montez le calorimètre avec les raccords filetés de transition dans le retour du circuit de chauffage. 3. Les poignées des vannes à sphère pour pompes doivent être tournées vers l'intérieur pour que l'isolation avant puisse être fermée (voir figure à...
  • Seite 22: Données Techniques

    5 Données techniques 5 Données techniques Calorimètre DN 25 (1") DN 32 (1¼") Longueur d'installation totale Fil. ext. 1½" x 262 mm Fil. ext. 2" x 292 mm Dimensions Dimensions de raccordement pour Fil. ext. ¾" x 110 mm / Fil.
  • Seite 23 N° de art. 993x453-mub-ml – Versión V02 – Fecha 2018/01 Traducción del manual original PAW GmbH & Co. KG ¡Sujeto a modificaciones técnicas! Böcklerstraße 11 Printed in Germany – Copyright by PAW GmbH & Co. KG D-31789 Hameln, Alemania 993x453-mub-ml – V02 2018/01...
  • Seite 24: Información General

    Un empleo no conforme a lo previsto del tramo lleva a la exclusión de cualquier derecho a hacer efectiva una responsabilidad en contra del fabricante o proveedor. Emplee únicamente accesorios de PAW junto con el tramo. Los elementos de embalaje se componen de materiales reciclables que pueden reincorporarse al ciclo normal de materiales industriales.
  • Seite 25: Indicaciones De Seguridad

    • ATENCIÓN El tramo de PAW es apto únicamente para aplicaciones en sistemas de calefacción con agua de calefacción según VDI 2035 / Ö-Norm H 5195-1. El tramo no puede emplear en aplicaciones de agua caliente sanitaria.
  • Seite 26: Descripción Del Producto

    El tramo puede utilizarse de forma universal para todos los calorímetros con medidas de conexión de ¾" x 110 mm y 1" x 130 mm (DN 25) o 1" x 130 mm (DN 32). Parte de entrega forman las piezas de unión con junta plana requeridas, un tubo de ajuste, una llave esférica para bomba con válvula de retención y tuerca rosca, 2 reductores diferentes...
  • Seite 27: Montaje E Instalación [Técnico]

    4 Montaje e instalación [técnico] 4 Montaje e instalación [técnico] ATENCIÓN ¡Daños materiales! Para impedir daños de la instalación, el lugar de montaje debe estar seco, tener suficiente capacidad de carga y estar protegido contra las heladas. El tramo se monta en el retorno del circuito de calefacción.
  • Seite 28: Montaje Del Calorímetro

    4 Montaje e instalación [técnico] Montaje del calorímetro 1. Primero desmonte las piezas de unión del tubo de ajuste e instale estos al calorímetro. 2. Instale el calorímetro con las piezas de unión en el retorno del circuito de calefacción. 3.
  • Seite 29: Datos Técnicos

    5 Datos técnicos 5 Datos técnicos Calorímetro DN 25 (1") DN 32 (1¼") Longitud de montaje total 1½" rosca ext. x 262 mm 2" rosca ext. x 292 mm Dimensiones Medida de conexión para ¾" rosca ext. x 110 mm / 1"...
  • Seite 30 Cod. art. 993x453-mub-ml – versione V02 – stato al 2018/01 Traduzione delle istruzioni originali PAW GmbH & Co. KG Con riserva di modifiche tecniche. Böcklerstraße 11 Printed in Germany – Copyright by PAW GmbH & Co. KG D - 31789 Hameln, Germania 993x453-mub-ml – V02 2018/01...
  • Seite 31: Informazioni Generali

    Campo di applicazione delle istruzioni Questo manuale descrive la funzione e installazione della dima per l'installazione del contatore di calore in circuiti di riscaldamento diretti DN 25 e DN 32. Per gli altri componenti dell'impianto, come ad es. la pompa o il regolatore, osservare le istruzioni dei rispettivi costruttori.
  • Seite 32: Avvertenze Per La Sicurezza

    Indicazioni e avvertenze per la sicurezza delle presenti istruzioni per l'uso • AVVISO La dima PAW è solo adatta per l'impiego in circuiti di riscaldamento con acqua di riscaldamento in conformità con VDI 2035 / Ö-Norm H 5195-1. La dima non è adatta per gli utilizzi con acqua potabile.
  • Seite 33: Descrizione Del Prodotto

    La dima di installazione viene impiegata universalmente per tutti i contatori di calore con misure di attacco di ¾" x 110 mm e 1" x 130 mm (DN 25) o 1" x 130 mm (DN 32).
  • Seite 34: Montaggio E Installazione [Esperto]

    4 Montaggio e installazione [esperto] 4 Montaggio e installazione [esperto] AVVISO Danni materiali! Per il montaggio sicuro dell'impianto, il luogo di montaggio deve essere asciutto, protetto dal gelo e stabile. Il montaggio della dima di installazione viene effettuato nel ritorno del circuito di riscaldamento.
  • Seite 35: Montaggio Del Contatore Di Calore

    4 Montaggio e installazione [esperto] Montaggio del contatore di calore 1. Smontare prima i giunti dal tubo di raccordo e montarli al contatore di calore. 2. Montare il contatore di calore con i giunti nel ritorno del circuito di riscaldamento. 3.
  • Seite 36: Dati Tecnici

    5 Dati tecnici 5 Dati tecnici Contatore di calore DN 25 (1") DN 32 (1¼") Lunghezza di ingombro totale 1½" fil. maschio x 262 mm 2" fil. maschio x 292 mm Dimensioni ¾" fil. maschio x 110 mm / Misura di attacco per calorimetro 1"...
  • Seite 37 Scope of delivery [specialist] Lieferumfang [Fachmann] / Entrega [técnico] Volume de livraison [Expert] / / Fornitura [esperto] DN 25 DN 32 993x453-mub-ml – V02 2018/01...
  • Seite 38 993x453-mub-ml – V02 2018/01...
  • Seite 39 993x453-mub-ml – V02 2018/01...
  • Seite 40 PAW GmbH & Co. KG www.paw.eu Böcklerstraße 11 Phone: +49 (0) 5151 9856 - 0 D - 31789 Hameln, Germany Fax: +49 (0) 5151 9856 - 98 993x453-mub-ml – V02 2018/01...

Diese Anleitung auch für:

Dn 32