Herunterladen Inhalt Inhalt Diese Seite drucken
Klarstein Luminance Prime Bedienungsanleitung
Vorschau ausblenden Andere Handbücher für Luminance Prime:

Werbung

Verfügbare Sprachen
  • DE

Verfügbare Sprachen

  • DEUTSCH, seite 1
Luminance Prime
Mikrowelle
Microwave
Microondas
Micro-onde
Microonde
10012351

Werbung

Inhaltsverzeichnis
loading

Inhaltszusammenfassung für Klarstein Luminance Prime

  • Seite 1 Luminance Prime Mikrowelle Microwave Microondas Micro-onde Microonde 10012351...
  • Seite 3: Inhaltsverzeichnis

    Sehr geehrter Kunde, wir gratulieren Ihnen zum Erwerb Ihres Gerätes. Lesen Sie die folgenden Hinweise sorgfältig durch und befolgen Sie diese, um möglichen Schäden vorzubeugen. Für Schäden, die durch Missachtung der Hinweise und unsachgemäßen Gebrauch entstehen, übernehmen wir keine Haftung. Scannen Sie den folgenden QR-Code, um Zugriff auf die aktuellste Bedienungsanleitung und weitere Informationen rund um das Produkt zu erhalten:...
  • Seite 4: Sicherheitshinweise

    SICHERHEITSHINWEISE Lesen Sie sich alle Hinweise sorgfältig durch und bewahren Sie die Bedienungsanleitung zum Nachschlagen gut auf. Um die Gefahr eines Stromschlags bei einer Störung oder Fehlfunktion zu verringern, muss das Gerät an eine geerdete Steckdose angeschlossen werden. Schließen Sie das Gerät nur an Steckdosen an, die der angegeben Spannung des Geräts entsprechen.
  • Seite 5 Um den Drehteller vor Glasbruch zu schützen: • Lassen Sie den Drehteller abkühlen, bevor Sie ihn reinigen. • Stellen Sie kein heißes Essen oder heiße Behälter auf den kalten Drehteller. • Stellen Sie kein gefrorenes Essen oder gefrorene Behälter auf den heißen Drehteller. Allgemeine Sicherheitshinweise •...
  • Seite 6: Geräteübersicht

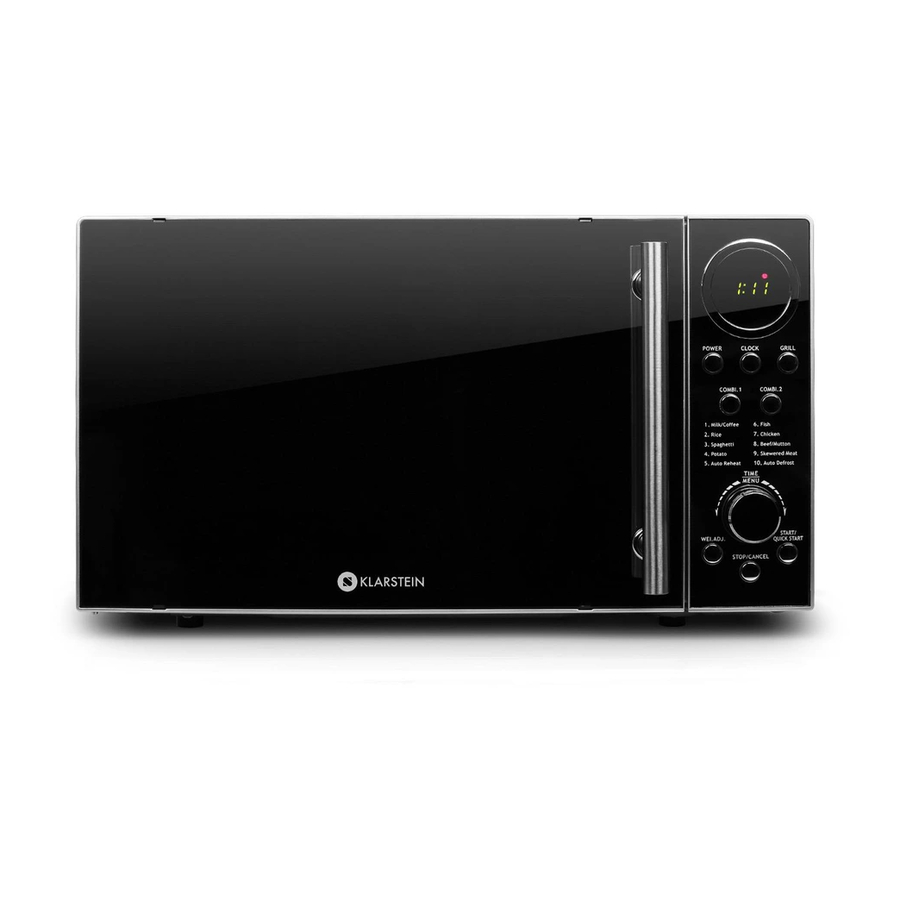
    GERÄTEÜBERSICHT Mikrowelle Türverriegelung Fenster Antrieb Drehring Bedienfeld Wellenleiter Glasteller Grillheizung Grillrost Bedienfeld • Display: Menü- und Betriebsanzeige. Garzeit, Leistung, Betrieb, und Uhrzeit werden angezeigt. • Power: Die gewünschte Leistung der Mikrowelle einstellen. • Clock: Einstellung der Uhr. Zum Beenden abermals drücken. •...
  • Seite 7: Hinweise Zum Kochgeschirr

    HINWEISE ZUM KOCHGESCHIRR Wir raten Ihnen, nur Behälter zu benutzen, die für die Mikrowelle geeignet sind. Dazu zählen Behälter aus hitzebeständiger Keramik, Glas und mikrowellentaugliche Plastikbehälter. Benutzen Sie zum Garen und Grillen keine Metallbehälter, da sie Funken schlagen können. Halten Sie sich beim Geschirr an die folgende Tabelle. Material Mikro Grill...
  • Seite 8: Bedienung

    BEDIENUNG Hinweis: Jedes Mal wenn ein Knopf gedrückt wird, ertönt ein Piep-Ton um die Eingabe zu bestätigen. Die Uhr einstellen Die Uhrzeit wird entweder im 12- oder 24-Stunden-Modus angezeigt. Drücken Sie zur Auswahl einfach die CLOCK-Taste. Um die Uhr beispielsweise auf 8:30 zu stellen, müssen sie folgende Schritte ausführen: Drücken Sie im Standby-Modus die CLOCK-Taste ein oder zwei Mal, um den 12- oder 24-Stunden-Modus auszuwählen.
  • Seite 9 Um beispielsweise eine Minute bei 60 % Mikrowellen-Leistung zu garen, müssen Sie folgende Schritte ausführen: Drücken Sie im Standby-Modus wiederholt die POWER LEVEL-Taste, um die Mikrowellen-Leistung auszuwählen. Drehen Sie den MENU/TIME-Regler auf 1:00. Drücken Sie die START/QUICK START-Taste. Hinweis: Sie können die eingestellte Mikrowellen-Leistung während des Garens überprüfen indem Sie die POWER LEVEL-Taste drücken.
  • Seite 10 Quick Start Der Ofen wird beim Quick Start auf 100 % der Leistung betrieben. Die längste Garzeit beträgt 10 Minuten. Drücken Sie im Standby-Modus die START/QUICK START-Taste einige Male, um die Garzeit einzustellen. Der Ofen startet automatisch bei voller Leistung. Auftauen Der Ofen kann zum Auftauen von Speisen verwendet werden.
  • Seite 11: Auto Cook Modus

    AUTO COOK MODUS Für die folgenden Speisen brauchen Sie keine Leistungsstufe oder Garzeit einzustellen. Konzentrieren Sie sich ganz darauf, was sie erhitzen möchten und geben Sie an, wie viel die Speisen wiegen. Drehen Sie im Standby-Modus den MENU/TIME-Regler gegen den Uhrzeigersinn, um die der Speise entsprechende Nummer einzugeben.
  • Seite 12: Reinigung Und Pflege

    REINIGUNG UND PFLEGE Reinigen Sie das Gerät regelmäßig und entfernen Sie alle Essensrückstände. • Ziehen Sie vor der Reinigung immer den Stecker aus der Steckdose. • Tauchen Sie das Gerät nie komplett in Wasser oder andere Flüssigkeiten. • Unregelmäßiges Reinigen führt zu Verschleiß und einer verkürzter Lebensdauer des Geräts.
  • Seite 13: Hinweise Zur Entsorgung

    HINWEISE ZUR ENTSORGUNG Befindet sich die linke Abbildung (durchgestrichene Mülltonne auf Rädern) auf dem Produkt, gilt die Europäische Richtlinie 2012/19/EU. Diese Produkte dürfen nicht mit dem normalen Hausmüll entsorgt werden. Informieren Sie sich über die örtlichen Regelungen zur getrennten Sammlung elektrischer und elektronischer Gerätschaften.
  • Seite 15: Technical Data

    Dear Customer, Congratulations on purchasing this equipment. Please read this manual carefully and take care of the following hints to avoid damages. Any failure caused by ignoring the items and cautions mentioned in the instruction manual is not covered by our warranty and any liability. Scan the QR code to get access to the latest user manual and other information about the product: CONTENT...
  • Seite 16: Safety Instructions

    SAFETY INSTRUCTIONS Read all the safety and operating instructions carefully and retain them for future reference. Make sure the voltage in your living area corresponding to the one shown on the rating label of the appliance. And the wall socket is properly grounded. To reduce the risk of fire in the oven cavity: •...
  • Seite 17 To prevent the turntable from breaking: • Let the turntable cool down before cleaning. • Do not place hot foods or utensils on the cold turntable. • Do not place frozen foods or utensils on the hot turntable. General Instructions •...
  • Seite 18: Product Description

    PRODUCT DESCRIPTION Mikrowave Door Safety Lock System Oven Window Shaft Roller Ring Control Panel Wave Guide Glass Tray Grill Heater Metal Rack Control Panel • Menu Action Screen: Cooking time, power, action indicators, and clock time are displayed. • Level: Touch this button a number of times to set microwave cooking power level.
  • Seite 19: Utensils Guideline

    UTENSILS GUIDELINE It is strongly recommended to use the containers which are suitable and safe for microwave cooking. Generally speaking, the containers which are made of heat- resistant ceramic, glass or plastic are suitable for microwave cooking. Never use the metal containers for microwave cooking and combination cooking as spark is likely to occur.
  • Seite 20: Operation

    OPERATION Note: Each time a button is touched, a beep will sound to acknowledge the touch. Setting Clock Time The clock works in 12- or 24-hour cycle, just press the CLOCK button to select. Suppose you want to set the oven clock time to 8:30. In standby mode, press CLOCK button once or twice to set the clock in 12- or 24- hour cycle.
  • Seite 21 For example, suppose you want to cook for 1 minute at 60 % of microwave power. In standby mode, press the POWER LEVEL button repeatedly to select cooking power. Turn the MENU/TIME dial to 1:00. Press START/QUICK START button. Note: You can check the cooking power during cooking by pressing the POWER LEVEL button.
  • Seite 22 Quick Start The oven will operate at 100 % power output for Quick Start program. The longest cooking time is 10 minutes. In standby mode, press the START/QUICK START button a number of times to set cooking time, the oven starts working automatically at full power. Auto Defrost The oven can be used to defrost food based on the weight you entered.
  • Seite 23: Auto Cook Mode

    AUTO COOK MODE For the following foods or cooking operation, you do not need to input cooking power and time. Try to focus on telling the oven what you want to cook and how much the food weighs. Steps: In standby mode, turn the MENU/TIME dial counterclockwise to select food code. Press the WEIGHT ADJUST button a number of times to indicate food weight or number of servings.
  • Seite 24: Care And Cleaning

    CARE AND CLEANING • The oven should be cleaned regularly and any food deposits removed. • Remove the power cord from the wall outlet before cleaning. Don‘t immerse the appliance in water or other fluids when cleaning. • Failure to maintain the oven in a clean condition could lead to deterioration of the surface that could adversely affect the life of the appliance and possibly result in a hazardous situation •...
  • Seite 25: Hints On Disposal

    HINTS ON DISPOSAL According to the European waste regulation 2012/19/ EU this symbol on the product or on its packaging indicates that this product may not be treated as household waste. Instead it should be taken to the appropriate collection point for the recycling of electrical and electronic equipment.
  • Seite 27: Datos Técnicos

    Estimado cliente, Le felicitamos por la adquisición de este producto. Lea atentamente las siguientes instrucciones y sígalas para evitar posibles daños. No asumimos ninguna responsabilidad por los daños causados por el incumplimiento de las instrucciones y el uso inadecuado. Escanee el siguiente código QR para obtener acceso a la última guía del usuario y más información sobre el producto: ÍNDICE...
  • Seite 28: Indicaciones De Seguridad

    INDICACIONES DE SEGURIDAD Lea atentamente todas las indicaciones y conserve este manual para consultas posteriores. Para reducir el riesgo de una descarga eléctrica producido por una avería o un fallo en el funcionamiento, el aparato deberá conectarse a una toma de corriente con toma de tierra.
  • Seite 29 Para proteger el plato giratorio de roturas: • Deje que el plato giratorio se enfríe por completo antes de limpiarlo. • No coloque alimentos o recipientes muy calientes sobre el plato giratorio frío. • No coloque comida o recipientes congelados sobre el plato giratorio caliente. Advertencias generales de seguridad •...
  • Seite 30: Descripción Del Aparato

    DESCRIPCIÓN DEL APARATO Microondas Cierre de la puerta Ventana Motor Anilla giratoria Panel de control Guía de ondas Plato de cristal Resistencia del grill Parrilla para el grill Panel de control • Display: Indicador de menú y funcionamiento. Aparece el tiempo de cocción, la potencia, el tipo de funcionamiento y la hora.
  • Seite 31: Indicaciones Sobre La Batería De Cocina

    INDICACIONES SOBRE LA BATERÍA DE COCINA Le recomendamos utilizar solo recipientes aptos para microondas. Entre ellos, se encuentran los recipientes de cerámica resistente al calor, cristal y plástico apto para microondas. No utilice recipientes metálicos para calentar y para el grill, podrían provocar chispas.
  • Seite 32: Utilización

    UTILIZACIÓN Nota: Cada vez que se pulse un botón, suena un pitido de confirmación para confirmar los datos. Configurar la hora La hora puede mostrarse en el modo de 12 o de 24 horas. Pulse el botón CLOCK para la selección. Para ajustar por ejemplo la hora para las 8:30, debe seguir estos pasos: Pulse el botón CLOCK en el modo standby una o dos veces para elegir entre el formato de 12 o de 24 horas.
  • Seite 33 Para, por ejemplo, cocinar un minuto a 60 % de potencia, siga estos pasos: Pulse el botón POWER LEVEL varias veces con el aparato en modo standby para seleccionar la potencia del microondas. Gire el regulador MENU/TIME hasta 1:00. Pulse el botón START/QUICK START. Nota: Puede comprobar la potencia seleccionada del microondas durante la cocción pulsando el botón POWER LEVEL.
  • Seite 34 Inicio rápido El microondas funciona al 100 % de potencia con el inicio rápido. El tiempo máximo de cocción ajustable es de 10 minutos. Pulse el botón START/QUICK START en modo standby varias veces para ajustar el tiempo de cocción. El microondas se inicia automáticamente a plena potencia.
  • Seite 35: Modo Auto Cook

    MODO AUTO COOK Para los siguientes alimentos no necesitará indicar el nivel de potencia o tiempo de cocción. Concéntrese solamente en lo que desea calentar e introduzca el peso del alimento. Gire el regulador MENU/TIME con el aparato en modo standby en el sentido contrario de las agujas del reloj para añadir el peso correspondiente del alimento.
  • Seite 36: Limpieza Y Cuidado

    LIMPIEZA Y CUIDADO Limpie el aparato regularmente y retire todos los restos de comida. • Desconecte el enchufe antes de limpiar el aparato. • No sumerja el aparato completamente en agua u otro líquido para limpiarlo. • Una limpieza irregular conlleva el desgaste y la reducción de la vida útil del aparato.
  • Seite 37: Retirada Del Aparato

    RETIRADA DEL APARATO Si el aparato lleva adherida la ilustración de la izquierda (el contenedor de basura tachado) entonces rige la normativa europea, directiva 2012/19/UE. Este producto no debe arrojarse a un contenedor de basura común. Infórmese sobre las leyes territoriales que regulan la recogida separada de aparatos eléctricos y electrónicos.
  • Seite 39: Fiche Technique

    Chère cliente, cher client, Toutes nos félicitations pour l’acquisition de ce nouvel appareil. Veuillez lire attentivement et respecter les instructions de ce mode d’emploi afin d’éviter d’éventuels dommages. Nous ne saurions être tenus pour responsables des dommages dus au non-respect des consignes et à...
  • Seite 40: Consignes De Sécurité

    CONSIGNES DE SÉCURITÉ Lisez attentivement toutes les instructions et conservez le mode d‘emploi pour référence ultérieure. Pour réduire les risques d‘électrocution en cas de panne ou de dysfonctionnement, l‘appareil doit être branché sur une prise de courant mise à la terre. Ne branchez l‘appareil que sur des prises correspondant à...
  • Seite 41 Pour protéger le plateau de verre tournant contre la casse : • Laissez refroidir le plateau tournant avant de le nettoyer. • Ne placez pas d‘aliments chauds ou de récipients chauds sur le plateau tournant froid. • Ne placez pas d‘aliments congelés ou de récipients congelés sur le plateau tournant chaud.
  • Seite 42: Aperçu De L'appareil

    APERÇU DE L‘APPAREIL Micro-ondes Verrouillage de porte Vitre Moteur Anneau tournant Panneau de commande Plaque mica micro-ondes Plateau de verre Gril Grille de cuisson Panneau de commande • Ecran : Menu et témoin de fonctionnement. Le temps de cuisson, la puissance, le fonctionnement et l‘heure sont affichés.
  • Seite 43: Remarques Sur Les Ustensiles De Cuisson

    REMARQUES SUR LES USTENSILES DE CUISSON Nous vous conseillons d‘utiliser uniquement des récipients adaptés au micro-ondes. En font partie les récipients en céramique, en verre résistant à la chaleur et en plastique allant au micro-ondes. N‘utilisez pas de récipients en métal pour la cuisson et les grillades car ils pourraient provoquer des étincelles.
  • Seite 44: Utilisation

    UTILISATION Remarque : Chaque fois que vous appuyez sur un bouton, un bip retentit pour confirmer la saisie. Réglage de l‘heure L‘heure est affichée en mode 12 heures ou 24 heures. Appuyez simplement sur la touche CLOCK pour sélectionner. Par exemple, pour régler l’horloge à 8h30, vous devez procéder comme suit : En mode veille, appuyez une ou deux fois sur la touche CLOCK pour sélectionner le mode 12 ou 24 heures.
  • Seite 45 Par exemple, pour cuire une minute à 60 % de la puissance du micro-ondes, procédez comme suit : En mode veille, appuyez plusieurs fois sur la touche POWER LEVEL pour sélectionner la puissance du micro-ondes. Tournez le bouton MENU / TIME sur 1:00. Appuyez sur le bouton START / QUICK START.
  • Seite 46: Verrouillage Parental

    Démarrage rapide (quick start) En démarrage rapide, le four fonctionne à 100 %. Le temps de cuisson le plus long est de 10 minutes. En mode veille, appuyez plusieurs fois sur la touche START / QUICK START pour régler le temps de cuisson. Le four démarre automatiquement à pleine puissance.
  • Seite 47: Mode Auto Cook

    MODE AUTO COOK Il n‘est pas nécessaire de définir un niveau de puissance ou un temps de cuisson pour les plats suivants. Concentrez-vous sur ce que vous voulez chauffer et entrez simplement le poids de l‘aliment. En mode veille, tournez le bouton de réglage MENU / TIME dans le sens inverse des aiguilles d‘une montre pour entrer le numéro correspondant à...
  • Seite 48: Nettoyage Et Entretien

    NETTOYAGE ET ENTRETIEN Nettoyez l‘appareil régulièrement et éliminez tout résidu d‘aliments. • Retirez toujours la fiche de la prise avant le nettoyage. • Ne plongez jamais l‘appareil complètement dans de l‘eau ou dans d‘autres liquides. • Un nettoyage irrégulier favorise l‘usure et réduit la durée de vie de l‘appareil. •...
  • Seite 49: Informations Sur Le Recyclage

    INFORMATIONS SUR LE RECYCLAGE Vous trouverez sur le produit l’image ci-contre (une poubelle sur roues, barrée d‘une croix), ce qui indique que le produit se trouve soumis à la directive européenne 2012/19/ UE. Renseignez-vous sur les dispositions en vigueur dans votre région concernant la collecte séparée des appareils électriques et électroniques.
  • Seite 51: Dati Tecnici

    Gentile cliente, La ringraziamo per aver acquistato il dispositivo. La preghiamo di leggere attentamente le seguenti istruzioni per l’uso e di seguirle per evitare possibili danni. Non ci assumiamo alcuna responsabilità per danni scaturiti da una mancata osservazione delle avvertenze di sicurezza e da un uso improprio del dispositivo.
  • Seite 52: Avvertenze Di Sicurezza

    AVVERTENZE DI SICUREZZA Leggere attentamente tutte le avvertenze e conservare il manuale per future consultazioni. Per ridurre il rischio di folgorazioni dovuto a guasti o malfunzionamenti, la spina deve essere collegata a una presa elettrica con messa a terra. Collegare il dispositivo solo a prese elettriche con tensione corrispondente a quella del dispositivo.
  • Seite 53 Per evitare che il piatto girevole si rompa: • Lasciare raffreddare il piatto prima di pulirlo. • Non mettere cibo o contenitori bollenti sul piatto freddo. • Non mettere cibo o contenitori congelati sul piatto caldo. Avvertenze di sicurezza generiche: •...
  • Seite 54: Descrizione Del Dispositivo

    DESCRIZIONE DEL DISPOSITIVO Microonde Blocco sportello Finestrella Trazione Anello rotante Pannello di controllo Conduttore delle onde Piatto in vetro Griglia di riscaldamento Griglia Pannello di controllo • Display: indicazione menu e funzionamento. Mostra tempo di cottura, potenza e ora. • Power: impostare la potenza desiderata. •...
  • Seite 55: Indicazioni Sulle Stoviglie

    INDICAZIONI SULLE STOVIGLIE Consigliamo di utilizzare solo stoviglie adatte a forni a microonde. Tra queste: ceramica termoresistente, vetro e plastica adatta al microonde. Non utilizzare contenitori metallici per cuocere e grigliare, in quanto possono generare scintille. Rispettare le indicazioni relative alle stoviglie contenute nella seguente tabella. Materiale Microonde Grill...
  • Seite 56: Utilizzo

    UTILIZZO Nota: ogni volta che si preme un tasto, viene emesso un segnale acustico per confermare l’immissione. Impostare l’orologio L’ora viene mostrata in modalità 12 o 24 ore. Premere CLOCK per selezionare. Per impostare l’ora ad es. su 8:30, procedere in questo modo: Premere CLOCK in standby una o due volte per selezionare la modalità...
  • Seite 57 Ad esempio, per cuocere per un minuto al 60 % della potenza, procedere in questo modo: Premere più volte POWER LEVEL in modalità standby per selezionare la potenza del microonde. Ruotare la manopola MENU/TIME su 1:00. Premere START/QUICK START. Nota: è possibile controllare la potenza impostata durante la cottura premendo POWER LEVEL.
  • Seite 58 Quick Start Con Quick Start, il forno funziona con potenza al 100 %. La durata massima di cottura è di 10 minuti. Premere diverse volte START/QUICK START in standby per impostare la durata. Il forno si avvia automaticamente alla massima potenza. Scongelare Il forno può...
  • Seite 59: Modalità Auto Cook

    MODALITÀ AUTO COOK Per le seguenti pietanze non è necessario impostare potenza o durata di cottura. Concentrarsi solo su ciò che si desidera scaldare e inserire il peso delle pietanze. In standby, ruotare MENU/TIME in senso antiorario per inserire il numero corrispondente della pietanza.
  • Seite 60: Pulizia E Manutenzione

    PULIZIA E MANUTENZIONE Pulire regolarmente il dispositivo e rimuovere i residui di alimenti. • Staccare sempre la spina prima della pulizia. • Non immergere mai il dispositivo completamente in acqua o altri liquidi. • Una pulizia non regolare comporta usura e accorcia la vita utile del dispositivo. •...
  • Seite 61: Smaltimento

    SMALTIMENTO Se sul prodotto è presente la figura a sinistra (il cassonetto mobile sbarrato), si applica la direttiva europea 2012/19/ UE. Questi prodotti non possono essere smaltiti con i rifiuti normali. Informarsi sulle disposizioni vigenti sulla raccolta separata di dispositivi elettrici ed elettronici. Non smaltire i vecchi dispositivi con i rifiuti domestici.

Inhaltsverzeichnis