Herunterladen Inhalt Inhalt Diese Seite drucken

Werbung

Verfügbare Sprachen
  • DE

Verfügbare Sprachen

  • DEUTSCH, seite 16
Rugged Handheld Computer
- PA692A -
User's Manual
Version 1.1
© 2016 unitech Electronics Co., Ltd. All rights reserved.
unitech is a registered trademark of unitech Electronics Co., Ltd.

Werbung

Inhaltsverzeichnis
loading

Inhaltszusammenfassung für Unitech PA692A

  • Seite 1 Rugged Handheld Computer - PA692A - User's Manual Version 1.1 © 2016 unitech Electronics Co., Ltd. All rights reserved. unitech is a registered trademark of unitech Electronics Co., Ltd.
  • Seite 2 Table of Contents...
  • Seite 3 1. Package Please make sure the following contents are in the PA692A gift box. If something is missing or damaged, please contact your unitech representative. The standard package contents PA692A Terminal Battery Plugs + Power Adapter Hand Strap USB cable...
  • Seite 4 2. Product Detail PA692A Front and Rear View LED indicators 8 Battery cover 2 LCD touch screen 9 Antenna 3 Keypads 10 Speaker 4 Receiver 11 5 megapixel / AF camera 12 LED flash light 5 Universal connector 6 Barcode scanner window...
  • Seite 5 PA692A Left and Right View 4 Camera mode 1 Scanner trigger button 2 Volume up/down MicroSD card slot 3 Vibration/Mute mode...
  • Seite 6: Getting Started

    3. Getting Started Installing the Battery A backup battery cell is embedded into your device to prevent data loss when the main battery pack is removed or completely discharged. This backup battery will keep the data and system setting for up to 2 hours if the main battery is removed.
  • Seite 7 NOTE: Make sure the battery cover is securely closed, or you may be unable to turn ON the terminal. NOTE: To enable the backup battery cell to provide backup power supply, charge your device with the main battery pack for at least 24 hours. NOTE: To power on the device properly, make sure to replace the battery cover after installing the battery.
  • Seite 8: Charging The Battery

    Press and hold the release button on both sides of the USB charging cable and connect it to the PA692A Plug the AC adapter cable into the power jack of the USB charging cable Plug the AC adapter cord into an electrical outlet.
  • Seite 9 Turning on the terminal for the first time After you have initially charged your device for about 24 hours, the device is ready to be used. You can now start up your device. You can then set up the languages, WiFi setting and date and time. Power-On Button Turn ON your device by pressing the power button on the front panel.
  • Seite 10: Inserting A Memory Card

    Using the MicroSD Memory Card The PA692A has an expansion slot compatible with a range of MicroSD memory cards, which are primarily used to back up or transfer files and data. Inserting a Memory Card Remove the two screws on the MicroSD slot shield and remove the shield.
  • Seite 11 Using the SIM Card The PA692A has a slot for a GPRS SIM card inside the battery compartment. Inserting the SIM card Remove the battery cover and the main battery. Slide the cover of the SIM card slot to the right to release the latch.
  • Seite 12 4. Keypads and Function Buttons Numeric Keypad Qwerty Keypad For Numeric Keypad Description Description Description Power key Back key Up cursor key Right cursor Enter key Backspace key Down cursor TAB key Function key Alpha key, toggle Left cursor between numeric and Home key alphabetic entry modes Programmable...
  • Seite 13: Using Function Keys

    Using Function keys Press the key once, it will appear a blue symbol in the status bar at the top of the screen. Then you can refer to the following table to execute the desired function or input. Function key definition For Numeric Keypad Description Description...
  • Seite 14 The following table indicates how to quickly execute useful functions using numeric keypad combination. Press and hold the key, and then press the corresponding key to execute the desired function. Numeric Keypad Combination For Numeric Keypad Description Description Screen backlight Task manager execution toggling Keypad backlight...
  • Seite 15 Then you can refer to the following table to execute the desired function or input. When the PA692A turns on, the numeric mode is on by default. When you toggle to alpha mode, the CAPS mode is off by default. Use the Alpha key to toggle to CAPS.
  • Seite 16: Der Standard Lieferumfang

    1. Paket Bitte stellen Sie sicher, dass die folgenden Inhalte im PA692A Geschenkpaket enthalten sind. Wenn etwas fehlt oder beschädigt ist, kontaktieren Sie bitte Ihren unitech Vertreter. Der Standard Lieferumfang PA692A Gerät Akku Stecker+ Netzteil Handschlaufe USB kabel Erklärungen zur Zulassungskonformität Optionales Zubehör:...
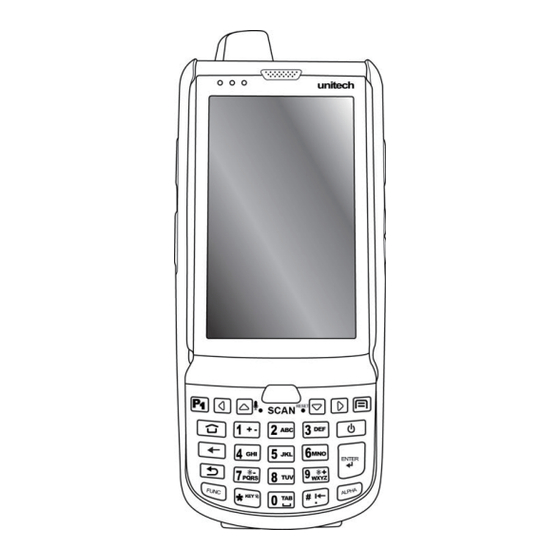
  • Seite 17: Pa692A Vorder- Und Rückseite

    2. Produktdetails PA692A Vorder- und Rückseite 1 LED-Anzeigen 8 Batteriefachabdeckung 2 LCD Touchscreen 9 Antenne 3 Tastenfeld 10 Lautsprecher 4 Empfänger 11 5-Megapixel / AF-Kamera LED Blitzlicht 5 Universalanschluss 6 Barcodescanner Fenster 13 Batteriefachaussparung 7 Kopfhörerbuchse...
  • Seite 18: Pa692A Linke Und Rechte Seite

    PA692A Linke und Rechte Seite Kameramodus 1 Scanner Auslösetaste 2 Lautstärketaste oben/unten 5 MicroSD-Kartensteckplatz 3 Vibration/Stumm Modus...
  • Seite 19: Erste Schritte

    3. Erste Schritte Einsetzen der Batterie Eine Backup-Batterie ist in Ihrem Gerät integriert, um einen Datenverlust zu verhindern, wenn die Hauptbatterie entfernt wird oder vollständig entladen ist. Diese Backup-Batterie wird die Daten und die Systemeinstellungen bis zu 2 Stunden lang beibehalten, wenn die Hauptbatterie entfernt wird. Öffnen Sie die Abdeckung der Batterieabdeckung, indem Sie die Verriegelungen an beiden Seiten in...
  • Seite 20 HINWEIS: Stellen Sie sicher, dass die Abdeckung des Batteriefachs fest verschlossen ist. Anderenfalls lässt sich das Gerät vielleicht nicht EIN schalten. HINWEIS: Laden Sie das Gerät mit der Hauptbatterie mindestens 24 Stunden lang auf, damit die Backup-Batterie eine Reservestromversorgung bieten kann. HINWEIS: Schließen Sie die Abdeckung des Batteriefaches nach dem Einsetzen der Batterie, um zu gewährleisten, dass das Gerät ordnungsgemäß...
  • Seite 21: Aufladen Der Batteriev

    Kapazität hat. Laden Sie das Gerät mit dem USB-Ladekabel oder der Dockingstation wieder auf. Drücken und halten Sie die Freigabetasten an beiden Seiten des USB Ladekabels gedrückt und verbinden Sie es mit dem PA692A Stecken Sie das AC Adapterkabel in den Stromanschluss des USB Ladekabels Verbinden Sie das AC Adapterkabel mit einer Steckdose.
  • Seite 22: Das Terminal Erstmalig Einschalten

    Das Terminal erstmalig einschalten Nachdem das Gerät zunächst etwa 24 Stunden lang aufgeladen wurde, steht es Ihnen zur Nutzung zur Verfügung. Sie können das Gerät jetzt einschalten und die Sprachen, WLAN-Einstellung sowie Datum und Uhrzeit einrichten. Ein/Aus-Taste Schalten Sie Ihr Gerät durch Drücken der Einschalttaste an der Vorderseite ein.
  • Seite 23: Benutzung Der Microsd Speicherkarte

    Benutzung der MicroSD Speicherkarte Der PA692A verfügt über einen Erweiterungsschacht, der mit einer Vielzahl von MicroSD-Speicherkarten kompatibel ist, welche vorwiegend zur Sicherung oder Übertragung von Dateien und Daten verwendet werden. Einlegen einer Speicherkarte Entfernen Sie die beiden Schrauben an der Abdeckung des MicroSD-Speicherkartenplatzes und entfernen Sie die Abdeckung.
  • Seite 24: Benutzung Der Sim-Karte

    Benutzung der SIM-Karte Der PA692A besitzt einen Steckplatz für eine GPRS SIM-Karte innerhalb des Batteriefachs. Einsetzen der SIM-Karte Entfernen Sie die Batteriefachabdeckung und die Hauptbatterie. Schieben Sie die Abdeckung des SIM-Karten Steckplatzes nach rechts, um die Verriegelung freizugeben. Ziehen Sie die Abdeckung mit dem Daumen ab, um sie zu öffnen.
  • Seite 25: Tastenfeld Und Funktionstasten

    4. Tastenfeld und Funktionstasten Numerisches Tastenfeld Qwerty Tastenfeld Für numerisches Tastenfeld Taste Beschreibung Taste Beschreibung Taste Beschreibung Nach Oben Einschalttaste Zurück-Taste Cursor-Taste Rechte Eingabetaste Löschtaste Cursor-Taste Nach Unten TAB-Taste Funktionstaste Cursor-Taste Alphataste, zwischen numerischem und alphabetischem Startseitentaste Linke Cursor-Taste Eingabemodus wechseln Programmierbare Alphanumerische Tasten...
  • Seite 26: Verwendung Der Funktionstasten

    Verwendung der Funktionstasten Drücken Sie ein Mal auf die Taste. Ein blaues Symbol wird in der Statusleiste oben angezeigt. Sie können anschließend anhand der folgenden Tabelle die gewünschte Funktion oder Eingabe ausführen. Funktionstastenbeschreibung Für numerisches Tastenfeld Taste Beschreibung Taste Beschreibung Verringern der Zurück TAB Bildschirmhelligkeit...
  • Seite 27 Die folgende Tabelle zeigt die schnelle Ausführung von nützlichen Funktionen mit einer numerischen Tastenfeldkombination. Halten Sie die Taste gedrückt und drücken Sie anschließend auf die entsprechende Taste, um die gewünschte Funktion auszuführen. Numerische Tastenfeldkombination Für numerisches Tastenfeld Taste Beschreibung Taste Beschreibung Bildschirm Task Manager ausführen...
  • Seite 28: Verwendung Der Alphatasten

    Sie können anschließend anhand der folgenden Tabelle die gewünschte Funktion oder Eingabe ausführen. Wenn der PA692A eingeschaltet wird, ist der numerische Modus standardmäßig aktiviert. Wenn Sie in den Buchstabenmodus wechseln, ist der CAPS Modus standardmäßig deaktiviert. Verwenden Sie die Alpha-Taste, um CAPS zu aktivieren.
  • Seite 29 1. Paquete Asegúrese de que los siguientes contenidos estén en el interior de la caja de regalo PA692A. Si faltase algo o estuviese dañado, póngase en contacto con su representante de Unitech. Contenidos del paquete estándar Terminal PA692A Batería Conexiones + Adaptador de Corriente...
  • Seite 30 2. Detalle del producto Vista Posterior y Frontal del PA692A 1 Indicadores LED 8 Carcasa de la batería 2 Pantalla LCD Táctil 9 Antena 3 Teclados 10 Parlante 4 Receptor 11 Cámara 5 Megapíxeles / AF Linterna de LED 5 Conector universal 6 Ventana del escáner de código de...
  • Seite 31 Vista Lateral Izquierda y Frontal del PA692A Modo de cámara 1 Botón de activación de escáner 2 Subir / Bajar Volumen 5 Ranura de la tarjeta MicroSD 3 Modo Vibración / Silencio...
  • Seite 32: Primeros Pasos

    3. Primeros pasos Instalando la Batería Se integra una batería de seguridad en su dispositivo para evitar la pérdida de datos cuando la batería principal sea extraída o no tenga potencia. Este batería de seguridad mantendrá los datos y los ajustes del sistema durante 2 horas si se ha extraído la batería.
  • Seite 33 Asegure que la tapa de la batería esté firmemente cerrada, ya que de lo contrario no NOTA: podrá ENCENDER la terminal. Para activar la batería de seguridad y ofrecer un suministro de potencia de seguridad, NOTA: cargue su dispositivo con el pack principal de batería durante al menos 24 horas. Para encender su dispositivo correctamente, asegúrese de volver a colocar la carcasa NOTA: de la batería tras la instalación de la misma.
  • Seite 34 USB de carga o la estación de carga. Mantenga pulsado el botón de liberación ubicado en ambos lados del cable de carga USB y conéctelo al PA692A Enchufe el cable de adaptador AC dentro de la clavija del cable de...
  • Seite 35 Encendido del terminal por primera vez Una vez que haya cargado inicialmente su dispositivo durante 24 horas, el dispositivo estará listo para ser utilizado. Ya puede inicializar el dispositivo para calibrar la pantalla. Puede configurar los idiomas, los ajustes WiFi, la fecha y la hora.
  • Seite 36 Usando la tarjeta de memoria MicroSD El PA692A tiene una ranura de expansión compatible con un rango de tarjetas de memoria MicroSD, que son usadas principalmente para realizar la copia de seguridad o transferir archivos y datos. Inserte una tarjeta de memoria Extraiga los dos tornillos de la protección de la ranura MicroSD y...
  • Seite 37 Usando la tarjeta SIM El PA692A tiene una ranura para una tarjeta GPRS SIM dentro del compartimiento de la batería. Inserte la tarjeta SIM Remueva la carcasa de la batería y la batería principal. Deslice la tapa de la ranura de la tarjeta SIM hacia la derecha para soltar el seguro.
  • Seite 38 4. Teclados y Botones de Función Teclado numérico Teclado Qwerty Para el teclado numérico Tecla Descripción Tecla Descripción Tecla Descripción Tecla Arriba Tecla Encendido Tecla Borrado del cursor Tecla Tecla de Tecla Enter derecha del Retroceso cursor Tecla de Tecla Abajo Tecla de Tabular función del cursor...
  • Seite 39 Utilizando teclas de Función Pulse la tecla una vez, aparecerá el símbolo azul en la barra de estado en la parte superior de la pantalla. Puede consultar la siguiente tabla para ejecutar la función o inserción deseada. Definición de la tecla de función Para el teclado numérico Tecla Descripción...
  • Seite 40 La siguiente tabla indica cómo ejecutar rápidamente funciones útiles usando una combinación numérica del teclado. Mantenga pulsada la tecla y pulse la tecla correspondiente para ejecutar la función deseada. Combinación numérica del teclado Para el teclado numérico Tecla Descripción Tecla Descripción Iluminación Ejecución del gestor de...
  • Seite 41 Puede consultar la siguiente tabla para ejecutar la función o inserción deseada. Cuando se enciende el PA692A, el modo numérico está activado de forma predeterminada. Cuando pasa al modo alpha, el modo CAPS está desactivado de forma predeterminada. Use la tecla Alpha para pasar a CAPS.
  • Seite 42: Accessoires En Option

    1. Contenu Veuillez s'il vous plaît vous assurez que les contenus suivants sont dans la boîte PA692A. Si quelque chose est manquant ou endommagé, veuillez s'il vous plaît contacter votre représentant unitech. Contenu standard Terminal PA692A Batterie Adaptateur de prise + Adaptateur secteur Dragonne câble USB...
  • Seite 43: Détail Du Produit

    2. Détail du produit PA692A Vue de face et de côté 1 Indicateurs à DEL 8 Couvercle de le batterie 2 Ecran tactile LCD 9 Antenne 3 Clavier 10 Haut-parleur 4 Récepteur 11 caméra 5 mégapixels / AF Eclair DEL 5 Connecteur universel 6 Fenêtre Code à...
  • Seite 44 PA692A Vue du côté gauche et du côté droit 1 Touche de déclenchement du Mode caméra scanner 2 Volume +/- 5 Logement pour carte MicroSD 3 Mode vibreur/silence...
  • Seite 45: Installer La Pile

    3. Commencer Installer la pile Une cellule de batterie de secours est intégrée dans votre appareil pour éviter la perte de données lorsque la batterie principale est retirée ou complètement déchargée. Cette batterie de secours permet de garder le réglage de données et un système pour un maximum de 2 heures si la batterie principale est retirée.
  • Seite 46 NOTE: Vérifier que le couvercle du compartiment de la batterie est bien fermé, sinon vous seriez incapable d’allumer le terminal. NOTE: Pour activer la cellule de batterie de secours pour fournir une alimentation de secours, chargez votre appareil avec la batterie principale pendant au moins 24 heures. NOTE: Pour allumer l'appareil correctement, assurez-vous de remplacer le couvercle du compartiment de la batterie après l'installation de la pile.
  • Seite 47: Chargement De La Pile

    USB ou la station d'accueil. Presser et maintenir la touche de déverrouillage sur chaque côté du câble de chargement USB et le brancher sur le PA692A Brancher le fil d’adaptateur AC au jack d’énergie du fil de chargement Brancher le cordon d’adaptateur AC à...
  • Seite 48 Mettre en marche pour la première fois Après la charge initiale de 24 heures, l’appareil est prêt à être utilisé. Vous pouvez maintenant le démarrer. Puis vous pouvez calibrer l'écran et régler la langue, le WiFi, la date et l'heure. Touche de mise sous tension/mise en marche Allumer votre appareil en appuyant la touche de démarrage sur le...
  • Seite 49: Insérer Une Carte Mémoire

    Utiliser la carte de mémoire MicroSD Le PA692A dispose d'un slot d'extension compatible avec une les cartes mémoire microSD, qui sont principalement utilisés pour sauvegarder ou transférer des fichiers et des données. Insérer une carte mémoire Enlevez les 2 vis du cache du port pour carte MicroSD et enlevez le cache.
  • Seite 50 Utiliser la carte SIM PA692A a un espace pour la carte GPRS SIM à l’intérieur du compartiment de pile. Insérer la carte SIM Enlever le capot de la batterie et la batterie principale. Glisser la couverture de la carte SIM vers la droite et relâcher le verrouillage.
  • Seite 51 4. Le clavier et la fonction des touches Clavier numérique Clavier Qwerty Pour le clavier numérique Touche Description Touche Description Touche Description Touche de curseur Touche marche/arrêt Touche Retour vers le haut Touche Touche de curseur Touche pour valider effacement arrière droite Touche de Touche de curseur...
  • Seite 52 Util ser les to ches foncti n uyez su r la touche une fois, un symbole bleu apparaît dans la barre d'état en haut de l'écran. Ensuite, vous pouvez vous référer à la table suivante pour exécuter la fonction souhaitée ou d'entrée. Définition des touches de fonction Pour le clavier numérique Touche...
  • Seite 53 Le tableau suivant indique comment exécut er rapidement des fonctions utiles en utilisant la combinaison de clavier numérique. Appuyez et maintenez la touche , puis appuyez sur la touche correspondante pour exécute la fonction souhaitée. Combinaison de clavier numérique Pour le clavier numérique Touche Description Touche...
  • Seite 54 Ensuite, vous pouvez vous référer à la table suivante pour exécuter la fonction souhaitée ou d'entrée. Lorsque le PA692A est activé, le mode numérique est activé par défaut. Lorsque vous basculez en mode alpha, le mode CAPS est désactivé par défaut.
  • Seite 55 1. Paket Lütfen PA692A hediye kutusunda a a dakiiçeri in bulundu unu kontroledin. Eksik ya da hasarl bir ö e varsa lütfen unitech temsilciniz eba vurun. Standart paket içeri i PA692A Terminal Fi ler + Güç Adaptörü El ask s USB kablosu Düzenleyici Uyumluluk Beyanlar...
  • Seite 56 2. Ürün Ayr nt lar PA692A Ön ve Arkadan Görünüm 1 LED göstergeleri 8 Pil kapa 2 LCD dokunma tikekran 9 Anten 3 Tu tak mlar 10 Hoparlör 4 Al c 11 5 megapiksel / AF kamera LED fener 5 Evrensel ba lay c...
  • Seite 57 PA692A Soldan ve Sa dan Görünüm Kamera modu 1 Taray c tetik dü mesi 2 Ses art rma/azaltma 5 MicroSD kart yuvas 3 Titre im/Sessiz modu...
  • Seite 58 3. Ba larken Pilin Tak lmas Ana batarya ç kar ld nda ya da tamamen bo ald nda very kayb n önlemek için cihaz n za yerle tirilmi bir yedek pil mevcuttur. Bu yedek pil sayesinde, ana pilin ç kart lmas durumunda veri lerve sistemayarlar 2 saate kadar korunur.
  • Seite 59 NOT: Pil kapa n ndüzgüncekapand ndaneminolun; aksitakdirde, terminali AÇIK konumagetiremeyebilirsiniz. NOT: Yedek güç kayna sa lamak, en az 24 saat boyunca ana pil paketi ile cihaz n z etmek için yedek pil hücresi etkinle tirin. NOT: Düzgün cihaz üzerinde iktidara Pili takt ktan sonra pil kapa n yerine emin olun. UYARI! Orada yang n riski ve pil paketi yanl kullan ld nda ise yakar.
  • Seite 60 Bas n ve arj kablosu, USB her iki taraf nda serbest b rakma dü mesini bas l tutun ve PA692A ba lay n AC adaptor kablosunu USB arj kablosunun güç jak n n içine tak n AC adaptor kablosunu bir prize tak n.
  • Seite 61 Terminalin ilk defa aç lmas Cihaz n ilk arj n yakla k 24 saatsüreylegerçekle tirdiktensonracihazkullan mahaz rd r. Art kcihaz n z kullanmayaba layabilirsiniz. Dil, Wi-Fi, tarihvesaatayarlar n yapabilirsiniz. Güç Açma Dü mesi Ön paneldeki güç dü mesine basarak cihaz n z aç n. LED Durumunun Kontrolü...
  • Seite 62 MicroSD Bellek Kart n n Kullan lmas PA692A öncelikle yedeklemek veya dosya ve veri aktar m için kullan lan MicroSD haf za kartlar , bir dizi ile uyumlu bir geni letme yuvas vard r. Bellek Kart n n Tak lmas...
  • Seite 63 SIM Kart n n Kullan lmas PA692A cihaz n n pil bölmesinde GPRS SIM kart yuvas mevcuttur. SIM Kart n Tak lmas Pil kapa n ve ana pili ç kar n. Mandal serbest b rakmak için SIM kart yuvas kapa n sa a kayd r n.
  • Seite 64 4. Tu Tak mlar ve lev Dü meleri Say sal Tu Tak m Qwerty Klavye Say sal Tu Tak m için Aç klama Aç klama Aç klama Yukar Güç tu u Geri tu u imleçtu u Sa imleç Enter tu u Geri silmetu u tu u imleç...
  • Seite 65 lev tu lar n n kullan m tu unabirdefa bas n; ekran nenüstündeki durum çubu undamavi simgesigörünür. Ard ndan, istedi inizi levya da giri iyürütmekiçina a dak itabloyaba vurabilirsiniz. lev tu u tan m Say sal Tu Tak m için Aç...
  • Seite 66 A a daki tablo h zla say sal tu tak m kombinasyonunu kullanarak kullan l i levleri yürütmek nas l gösterir. Bas n tu unu bas l tutun ve ard ndan istenen i levi yürütmek için, ilgili tu a bas n ve. Say sal Tu Tak m Kombinasyonu Say sal Tu Tak m için Aç...
  • Seite 67 çubu undak rm z birsembolgörünür. Ard ndan, istedi inizi levya da giri iyürütmekiçina a dak itabloyaba vur abilirsiniz. PA692A cihaz n ngücüaç ld ndasay sal mod varsay lanolarakaç kt r. Alfa modageçi yapt n zda CAPS (büyükharf) moduvarsay lanolarakaç...
  • Seite 68 PA692A Unitech PA692A RS232...
  • Seite 69 PA692A 1 LED 2 LCD 11 5 12 LED...
  • Seite 70 PA692A 5 MicroSD...
  • Seite 73 PA692A...
  • Seite 74 WiFi...
  • Seite 75 PA692A MicroSD MicroSD MicroSD MicroSD MicroSD MicroSD...
  • Seite 76 PA692A GPRS SIM...
  • Seite 77 Qwerty TAB ( Qwerty TAB (...
  • Seite 78 TAB ( Qwerty 0 ~ 9 “ ‘ &...
  • Seite 79 ScanService ( Qwerty ScanService (...
  • Seite 80 PA692A CAPS CAPS CAPS CAPS Space @ $ “ 0 Space @ $ “ 0 +, -, \, %, 1 +, -, \, %, 1 a, b, c, 2 A, B, C, 2 d, e, f, 3 D, E, F, 3...
  • Seite 83 MicroSD...
  • Seite 93 1. PA692A unitech PA692A PA692A Regulatory Compliance Statements RS232...
  • Seite 94 2. PA692A 11 5 12 LED - 92 -...
  • Seite 95 PA692A MicroSD...
  • Seite 96 PA692A - 94 -...
  • Seite 97 PA692A...
  • Seite 98 WiFi - 96 -...
  • Seite 99 MicroSD MicroSD MicroSD MicroSD MicroSD MicroSD MicroSD MicroSD...
  • Seite 100 PA692A GPRS SIM - 98 -...
  • Seite 101 QWERTY Alpha QWERTY...
  • Seite 102 QWERTY Description “ ‘ & - 100 -...
  • Seite 103 QWERTY...
  • Seite 104 Alpha PA692A Alpha Alpha (CAPS Mode) Alpha Alpha CAPS CAPS Space, @, $, “, 0 Space, @, $, “, 0 +, -, \, %, 1 +, -, \, %, 1 a, b, c, 2 A, B, C, 2 d, e, f, 3...

Inhaltsverzeichnis