Mitsubishi Electric CITY MULTI PLFY-P25VBM-E Bedienungshandbuch
Vorschau ausblenden
Andere Handbücher für CITY MULTI PLFY-P25VBM-E:
- Handbuch (28 Seiten) ,
- Bedienungshandbuch (148 Seiten)
Inhaltsverzeichnis
Werbung
Verfügbare Sprachen
Verfügbare Sprachen
Quicklinks
Air-Conditioners For Building Application
INDOOR UNIT
PLFY-P·VBM-E
OPERATION MANUAL
For safe and correct use, please read this operation manual thoroughly before operating the air-conditioner unit.
BEDIENUNGSHANDBUCH
Zum sicheren und einwandfreien Gebrauch der Klimaanlage dieses Bedienungshandbuch vor Inbetriebnahme
gründlich durchlesen.
MANUEL D'UTILISATION
Pour une utilisation correcte sans risques, veuillez lire le manuel d'utilisation en entier avant de vous servir du
climatiseur.
BEDIENINGSHANDLEIDING
Voor een veilig en juist gebruik moet u deze bedieningshandleiding grondig doorlezen voordat u de aircondi-
tioner gebruikt.
MANUAL DE INSTRUCCIONES
Lea este manual de instrucciones hasta el final antes de poner en marcha la unidad de aire acondicionado
para garantizar un uso seguro y correcto.
ISTRUZIONI DI FUNZIONAMENTO
Leggere attentamente questi istruzioni di funzionamento prima di avviare l'unità, per un uso corretto e
sicuro della stessa.
ΕΓΧΕΙΡΙΔΙΟ ΟΔΗΓΙΩΝ ΧΡΗΣΕΩΣ
Για ασφάλεια και σωστή χρήση, παρακαλείστε διαβάσετε προσεχτικά αυτό το εγχειρίδιο χρήσεως πριν
θέσετε σε λειτουργία τη μονάδα κλιματισμού.
MANUAL DE OPERAÇÃO
Para segurança e utilização correctas, leia atentamente o manual de operação antes de pôr a funcionar a
unidade de ar condicionado.
Işletme Elkitabı
Emniyetli ve doğru biçimde nasıl kullanılacağını öğrenmek için lütfen klima cihazını işletmeden önce bu
elkitabını dikkatle okuyunuz.
РУКОВОДСТВО ПО ЭКСПЛУАТАЦИИ
Для обеспечения правильного и безопасного использования следует ознакомиться с инструкциями,
указанными в данном руководстве по эксплуатации, тщательным образом до того, как приступать к
использованию кондиционера.
FOR USER
FÜR BENUTZER
POUR L'UTILISATEUR
VOOR DE GEBRUIKER
PARA EL USUARIO
PER L'UTENTE
ΓΙΑ ΤΟΝ ΧΡΗΣΤΗ
PARA O UTILIZADOR
KULLANICI İÇİN
ДЛЯ ПОЛЬЗОВАТЕЛЯ
English (GB)
Deutsch (D)
Français (F)
Nederlands (NL)
Español (E)
Italiano (I)
Ελληνικά (GR)
Português (P)
Türkçe (TR)
Русский (RU)
Werbung
Kapitel
Inhaltsverzeichnis
Fehlerbehebung

Verwandte Anleitungen für Mitsubishi Electric CITY MULTI PLFY-P25VBM-E


Inhaltszusammenfassung für Mitsubishi Electric CITY MULTI PLFY-P25VBM-E
- Seite 1 Air-Conditioners For Building Application INDOOR UNIT PLFY-P·VBM-E OPERATION MANUAL FOR USER English (GB) For safe and correct use, please read this operation manual thoroughly before operating the air-conditioner unit. BEDIENUNGSHANDBUCH FÜR BENUTZER Deutsch (D) Zum sicheren und einwandfreien Gebrauch der Klimaanlage dieses Bedienungshandbuch vor Inbetriebnahme gründlich durchlesen.
-
Seite 2: Inhaltsverzeichnis
2006/66/EC Article 20 Information for end-users and Annex II. Your MITSUBISHI ELECTRIC product is designed and manufactured with high quality materials and components which can be recycled and/or reused. This symbol means that electrical and electronic equipment, batteries and accumulators, at their end-of- life, should be disposed of separately from your household waste. -
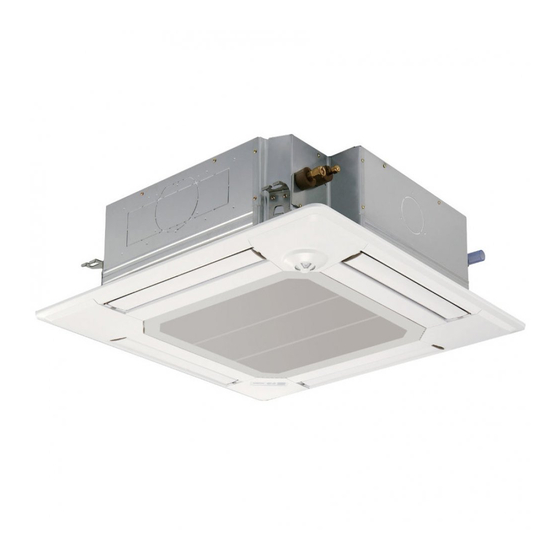
Seite 3: Parts Names
2. Parts Names Indoor Unit PLFY-P . VBM-E Filter Fan steps 4 steps Air outlet Vane Auto with swing Louver – Filter Long-life Filter cleaning indication 2,500 hr Vane Air intake ■ Wired Remote Controller Controller interface The functions of the function buttons change depending on the screen. -
Seite 4: Operation Mode
2. Parts Names Display The main display can be displayed in two different modes: “Full” and “Basic”. The factory setting is “Full”. To switch to the “Basic” mode, change the setting on the Main display setting. (Refer to operation manual included with remote controller.) <Full mode>... -
Seite 5: Operation
3. Operation ■ About the operation method, refer to the operation manual that comes with each remote controller. 3.1. Turning ON/OFF [ON] [OFF] Press the [ON/OFF] button. Press the [ON/OFF] button again. The ON/OFF lamp will light up in The ON/OFF lamp will come off, green, and the operation will start. -
Seite 6: Navigating Through The Main Menu
3. Operation Note: The number of available fan speeds depends on the type of unit connected. Note also that some units do not provide an “Auto” setting. Preset temperature In the following cases, the actual fan speed generated by the unit will differ for cooling from the speed shown the remote controller display. - Seite 7 3. Operation <Exiting the Main menu screen> <Vent. setting> Press the [F3] button to go through Press the [RETURN] button to exit the ventilation setting options in the the Main menu and return to the order of "Off", "Low", and "High". Main display.
-
Seite 8: Timer
The vane of only the target indoor unit is pointing downward. After pressing the [F4] button, Manual vane angle wait approximately 15 seconds, MITSUBISHI ELECTRIC M-NET address and then check the current state LABEL The air conditioner with the of the air conditioner. -
Seite 9: Care And Cleaning
5. Care and Cleaning ■ Filter information If two or more indoor units are connected, filter cleaning timing for each unit may be different, depending on the filter type. will appear on the Main display in the Full mode when it is time to The icon will appear when the filter on the main unit is due for Room... -
Seite 10: Troubleshooting
6. Troubleshooting Having trouble? Here is the solution. (Unit is operating normally.) Air conditioner does not heat or cool well. Clean the filter. (Airflow is reduced when the filter is dirty or clogged.) Check the temperature adjustment and adjust the set temperature. Make sure that there is plenty of space around the outdoor unit. -
Seite 11: Specifications
6. Troubleshooting Having trouble? Here is the solution. (Unit is operating normally.) Noise is louder than specifications. The indoor operation sound level is affected by the acoustics of the particular room as shown in the following table and will be higher than the noise specification, which was measured in an echo-free room. -
Seite 12: Sicherheitsvorkehrungen
Richtlinie 2006/66/EG Artikel 20 Information für die Endnutzer und Anhang II. Ihr MITSUBISHI ELECTRIC-Produkt wurde unter Einsatz von qualitativ hochwertigen Materialien und Komponenten konstruiert und gefertigt, die für Recycling und/oder Wiederverwendung geeignet sind. Dieses Symbol bedeutet, dass elektrische und elektronische Geräte sowie Batterien und Akkus am Ende ihrer Nutzungsdauer von Hausmüll getrennt zu entsorgen sind. -
Seite 13: Bezeichnungen Der Teile
2. Bezeichnungen der Teile ■ Inneneinheit PLFY-P . VBM-E Filter Luftauslaß Lüfterstufen 4 Stufen Klappe Auto mit Schwingen Luftklappe – Langlebig Filter Reinigungsempfehlung für Filter 2.500 Std. Klappe Lufteinlass ■ Kabelfernbedienung Steuerungseinheit Die Funktionen der Funktionsknöpfe ändern sich je nach Anzeige. Details finden Sie in der Funktionshilfe für Knöpfe, welche für die Funktion der aktuellen Anzeige am unteren Teil des LCD erscheint. - Seite 14 2. Bezeichnungen der Teile Anzeige Die Hauptanzeige kann auf zwei verschiedene Arten angezeigt werden „Komplett“ und „Einfach.“ Werkseinstellung ist „Komplett“ Um die Anzeige auf „Einfach“ umzustellen, muss die Einstellung im Hauptdisplay geändert werden. (Wenden Sie sich an die mit der Fernbedienung mitgelieferte Bedienungsanleitung.) <Komplett Modus>...
-
Seite 15: Bedienung
3. Bedienung ■ Zu den Bedienungsmethoden beachten Sie die Bedienungsanleitung, die mit der jeweiligen Fernbedienung geliefert wird. 3.1. Ein- und Ausschalten [EIN] [AUS] Drücken Sie den [EIN/AUS] Knopf. Drücken Sie den [EIN/AUS] Knopf Die EIN/AUS-Lampe leuchtet Grün erneut. wenn der Betrieb startet. Die EIN/AUS-Lampe leuchtet nicht mehr wenn der Betrieb stoppt. -
Seite 16: Einstellung Der Luftstromrichtung
3. Bedienung Hinweis: Die Anzahl der verfügbaren Lüftergeschwindigkeiten hängt von der Art des angeschlossenen Geräts ab. Beachten Sie außerdem, dass Voreingestellte einige Geräte die Einstellung „Auto“ nicht haben. Kühltemperatur In den folgenden Fällen unterscheidet sich die vom Gerät erzeugte Voreingestellte tatsächliche Lüftergeschwindigkeit von der auf der Fernbedie- Heiztemperatur nungsanzeige angezeigten Geschwindigkeit:... - Seite 17 3. Bedienung <Hauptmenüanzeige verlassen> <Ventilationseinstellung> Drücken Sie [F3], um durch die Drücken Sie [ZURÜCK], um das Ventilationseinstellungen in der Rei- Hauptmenü zu verlassen und zur henfolge „Off“ (Aus), „Low“ (Lo) und Hauptanzeige zurück zu kehren. Room „High“ (Hoch) zu blättern. Cool Set temp.
-
Seite 18: Timer
Nur der Flügel des Ziel-Innengeräts weist nach unten. Warten Sie nach dem Drücken von Manual vane angle [F4] etwa 15 Sekunden, und prüfen MITSUBISHI ELECTRIC- M-NET address Sie dann den aktuellen Zustand des AUFKLEBER The air conditioner with the Klimageräts. -
Seite 19: Pflege Und Reinigung
5. Pflege und Reinigung ■ Filterinformationen Wenn zwei oder mehr Innenanlagen angeschlossen sind, kann die Filter- erscheint auf der Hauptanzeige reinigungsperiode unterschiedlich sein, abhängig vom Filtertyp. im „Komplett“ Modus, wenn der Fil- Das Symbol erscheint, wenn der Filter der Hauptanlage gereinigt Room ter gereinigt werden muss. -
Seite 20: Fehlerbehebung
6. Fehlerbehebung Probleme? Hier ist die Lösung. (Gerät arbeitet normal.) Klimaanlage heizt bzw. kühlt schlecht. Reinigen Sie den Filter. (Bei verschmutztem oder blockiertem Filter wird der Luftstrom behindert.) Prüfen Sie die Temperaturanpassung und passen Sie die eingestellte Temperatur an. Stellen Sie sicher, dass um das Außengerät herum genügend Freiraum ist. -
Seite 21: Technische Daten
6. Fehlerbehebung Probleme? Hier ist die Lösung. (Gerät arbeitet normal.) Es wird mehr Lärm erzeugt als in den technischen Daten angegeben. Der Schallpegel des Innenraumbetriebs wird durch die Akustik des betreffenden Raums beeinflusst, wie aus der nachstehenden Tabelle ersichtlich ist, und liegt über dem Lärmpegel, der in einem schalltoten Raum gemessen wurde. -
Seite 22: Consignes De Sécurité
2006/66/CE Article 20 Information de l’utilisateur final et Annexe II. Votre produit Mitsubishi Electric est conçu et fabriqué avec des matériels et des composants de qualité supérieure qui peuvent être recyclés et/ou réutilisés. Ce symbole signifie que les équipements électriques et électroniques, les batteries et les accumulateurs, à... - Seite 23 2. Nomenclature Unité interne PLFY-P . VBM-E Filtre Modes du ventilateur 4 modes Grille de refoulement d’air Ailette Auto avec variation Louvre – Longue durée Filtre Témoin de nettoyage du 2.500 heures filtre Ailette Admission d’air ■ Télécommande filaire Interface de la télécommande Les fonctions réalisées par les touches varient en fonction de l’écran.
-
Seite 24: Mode De Fonctionnement
2. Nomenclature Afficheur L’écran principal peut être affiché dans deux modes différents : “complet” et “basic”. Le réglage usine est “complet”. Pour passer au mode “basic”, changez-le dans l’écran principal. (Reportez-vous au manuel d’utilisation inclus avec la télécommande.) <Mode complet> <Mode basic>... -
Seite 25: Sélection Du Mode
3. Fonctionnement ■ Concernant le mode de fonctionnement, reportez-vous au manuel d’utilisation fourni avec chaque télécommande. 3.1. Marche/arrêt [MARCHE] [ARRÊT] Pressez la touche [MARCHE / ARRÊT]. Pressez à nouveau la touche [MARCHE / La lampe Marche / Arrêt s’allume en ARRÊT]. -
Seite 26: Réglage De La Direction Du Débit D'air
3. Fonctionnement Remarque : Le nombre de ventilateurs disponible dépend du type d’unité connectée. Température Notez aussi que certaines unités ne permettent que le réglage “Auto”. programmée pour Dans les cas suivants, la vitesse de ventilation actuelle générée par l’unité rafraîchir différera de la vitesse indiquée au niveau de la commande à... - Seite 27 3. Fonctionnement <Fermer le Menu général> <Réglage de la ventilation> Pressez [F3] pour choisir l’option de Pressez la touche [RETOUR] pour ventilation parmi : “Off” (OFF), “Low” sortir du Menu général, et retourner (Ptit) et “High” (Gd). sur l’écran principal. Room * Réglable seulement lorsque le Cool...
- Seite 28 3. Fonctionnement ■ Sélectionnez, à l’aide de la touche Procédure de vérification Manual vane angle [F2] ou [F3], la “M-NET address” M-NET address Sélectionnez, à l’aide de la touche Manual vane angle (adresse M-NET) pour les unités [F2] ou [F3], la “M-NET address” M-NET address dont les ailettes doivent être (adresse M-NET) pour les unités...
-
Seite 29: Entretien Et Nettoyage
5. Entretien et nettoyage ■ Information filtre Si deux ou plusieurs appareils intérieurs sont connectés, la fréquence de nettoyage du filtre de chaque appareil peut être différent, en fonc- apparaît sur l’écran principal tion du le type de filtre. dans en mode complet quand les L’icône s’affiche lorsque le filtre de l’appareil principale doit être Room... -
Seite 30: Guide De Dépannage
6. Guide de dépannage En cas de problème : Voici la solution. (L’appareil fonctionne normalement.) Le climatiseur ne chauffe ni ne refroidit correctement. Nettoyez le filtre. (Le débit d’air est réduit lorsque le filtre est sale ou colmaté.) Contrôlez la température et ajustez la température définie en conséquence. Assurez-vous qu’il y a suffisamment d’espace autour de l’appareil extérieur. -
Seite 31: Spécifications Techniques
6. Guide de dépannage En cas de problème: Voici la solution. (L’appareil fonctionne normalement.) Le bruit perçu est supérieur aux caractéristiques sonores. Le niveau sonore du fonctionnement en intérieur est affecté par l’acoustique de la pièce en question, comme indiqué dans le tableau ci-dessous. Il sera plus élevé que les caractéristiques sonores nominales, car ces dernières sont mesurées dans une pièce sans écho. -
Seite 32: Veiligheidsvoorschriften
2006/66/EG artikel 20 Informatie voor eindgebruikers en Bijlage II. Mitsubishi Electric producten zijn ontwikkeld en gefabriceerd uit eerste kwaliteit materialen. De onderdelen kunnen worden gerecycled en/of worden hergebruikt. Het symbool betekent dat de elektrische en elektronische onderdelen, batterijen en accu’s op het einde van de gebruiksduur gescheiden van het huishoudelijk afval moeten worden ingezameld. -
Seite 33: Onderdelen
2. Onderdelen ■ Binnenunit PLFY-P . VBM-E Filter Luchtuitlaat Ventilatorstappen 4 stappen Klep Auto, zwenkend Lamellen – Filter Met lange levensduur Indicatie filter reinigen 2.500 uur Klep Luchtinlaat ■ Snoerafstandsbediening Controller-interface De functie van de functietoetsen is afhankelijk van het scherm. In de gids voor de functie van toetsen die onderaan het LCD-scherm wordt weergegeven, ziet u welke functie de toetsen hebben in een bepaald scherm. - Seite 34 2. Onderdelen Display Het hoofddisplay kan worden weergegeven in twee verschillende standen: “Full” (Volledig) en “Basic” (Eenvoudig). De instelling af/fabriek is “Full” (Vol- ledig). U kunt overschakelen naar de stand “Basic” (Eenvoudig) door de instelling te wijzigen in het Hoofddisplay. (Raadpleeg de bedieningshandleiding die met de afstandsbediening is meegeleverd.) <Volledige stand>...
-
Seite 35: Gebruik
3. Gebruik ■ Raadpleeg de handleiding van de afstandsbediening voor informatie over het gebruik ervan. 3.1. Aan- en uitzetten [AAN] [UIT] Druk op de [AAN/UIT] -toets. Druk weer op de [AAN/UIT] -toets. Het AAN/UIT-lampje gaat groen branden Het AAN/UIT-lampje gaat uit en het en het systeem wordt ingeschakeld. - Seite 36 3. Gebruik Opmerking: Het aantal ventilatorsnelheden is afhankelijk van het type unit dat Vooraf ingestelde is aangesloten. Sommige units bevatten geen instelling “Auto”. temperatuur voor In de volgende gevallen verschilt de daadwerkelijke ventilatorsnel- het koelen heid van de snelheid die op het display van de afstandsbediening Vooraf ingestelde wordt aangegeven.
- Seite 37 3. Gebruik <Het scherm van het Main menu (Hoofdmenu) verlaten> <Vent.-instelling> Druk op de functietoets [F3] als u de Druk op de [TERUG] -toets als u opties voor de ventilatie-instelling wilt het Main menu (Hoofdmenu) wilt doorlopen in de volgorde “Off” (Uit), verlaten en wilt terugkeren naar het Room “Low”...
-
Seite 38: Timer
3. Gebruik ■ Selecteer met de toets [F2] of [F3] Controleprocedure Manual vane angle het “M-NET address” (M-NET- M-NET address Selecteer met de toets [F2] of [F3] Manual vane angle adres) voor de units waarvan de het “M-NET address” (M-NET- M-NET address schoepen worden vastgezet en adres) voor de units waarvan de... -
Seite 39: Onderhoud En Schoonmaken
5. Onderhoud en schoonmaken ■ Filter information (Filterinformatie) Als twee of meer binnenunits zijn aangesloten, kan ,afhankelijk van het type filter, de timing voor het reinigen van het filter voor de beide units verschillen. verschijnt in het Hoofddisplay in de stand Volledig wanneer het tijd is Het pictogram verschijnt wanneer de filter op de hoofdunit moet Room... -
Seite 40: Problemen En Oplossingen
6. Problemen en oplossingen Heeft u een probleem? Hier is de oplossing. (Het apparaat functioneert normaal.) De airconditioner verwarmt of koelt niet goed. Reinig het filter. (De luchtstroom wordt verminderd als het filter vuil of verstopt is.) Controleer de temperatuurafstelling en stel de temperatuur in. Let erop dat er rond het buitenapparaat voldoende ruimte is. -
Seite 41: Specificaties
6. Problemen en oplossingen Heeft u een probleem? Hier is de oplossing. (Het apparaat functioneert normaal.) Het geluid is harder dan vermeld in de specificaties. Het geluidsniveau van een werkend apparaat binnenshuis wordt bepaald door de akoestiek van een bepaald vertrek, zoals u in de volgende tabel kunt zien, en zal hoger zijn dan de geluidsspecificatie, die gemeten is een akoestisch dood vertrek. -
Seite 42: Medidas De Seguridad
Artículo 20 y el Anexo II de la Directiva 2006/66/EC Información para usuarios finales. Su producto MITSUBISHI ELECTRIC está diseñado y fabricado con materiales y componentes de alta calidad que pueden ser reciclados y/o reutilizados. Este símbolo significa que el aparato eléctrico y electrónico, las pilas, baterías y los acumuladores, al final de su ciclo de vida, se deben tirar separadamente del resto de sus residuos domésticos. -
Seite 43: Nombres De Las Piezas
2. Nombres de las piezas ■ Unidad interior PLFY-P . VBM-E Filtro Pasos del ventilador 4 pasos Salida de aire Deflector Automático oscilante Rejilla – Filtro Larga duración Indicación de limpieza de 2.500 horas filtro Deflector Entrada de aire ■ Controlador remoto cableado Interfaz del controlador Las funciones de los botones de función cambian dependiendo de... -
Seite 44: Modo De Operación
2. Nombres de las piezas Pantalla La pantalla principal se puede visualizar en dos modos diferentes: “Completo” y “Básico”. Por defecto, viene configurada a “Completo”. Para cambiar al modo “Básico”, cambie la configuración en la configuración de la pantalla principal. (Consulte el manual de instrucciones incluido con el controlador remoto.) <Modo completo>... -
Seite 45: Ajuste De La Temperatura
3. Manejo ■ Para obtener información sobre el método de funcionamiento, consulte el manual de instrucciones suministrado con cada controlador remoto. 3.1. Encendido/Apagado del sistema [ENCENDER] [APAGAR] Presione el botón [ENCENDIDO/APA- Presione de nuevo el botón de GADO]. [ENCENDIDO/APAGADO]. La lámpara de ENCENDIDO/APAGA- La lámpara de ENCENDIDO/APA- DO se iluminará... -
Seite 46: Ajuste De La Dirección Del Flujo De Aire
3. Manejo Nota: El número de velocidades del ventilador disponibles depende del tipo de unidad conectada. Recuerde, además, que algunas unidades no ofrecen Temperatura preestablecida ajuste “Automático”. de enfriamiento En los siguientes casos, la velocidad real del ventilador generada por la unidad Temperatura preestablecida diferirá... - Seite 47 3. Manejo <Salir de la pantalla del Menú principal> <Configuración de la ventilación> Presione el botón [F3] para pasar por Presione el botón [VOLVER] para las opciones de configuración de la salir del Menú principal y volver a la ventilación en el siguiente orden: “Off”, pantalla principal.
- Seite 48 3. Manejo ■ Procedimiento de confirmación Seleccione “M-NET address” (di- Manual vane angle rección M-NET) para las unidades Seleccione “M-NET address” (di- M-NET address Manual vane angle cuyos álabes haya que fijar, con rección M-NET) para las unidades M-NET address los botones [F2] o [F3], y presione cuyos álabes haya que fijar, con los Identify unit Check button...
-
Seite 49: Mantenimiento Y Limpieza
5. Mantenimiento y limpieza ■ Información Filtros Si hay dos o más unidades interiores conectadas, el momento de aparecerá en la pantalla princi- cambiar el filtro para cada unidad puede ser diferente, dependiendo pal en modo Completo cuando llegue del tipo de filtro. Room el momento de limpiar los filtros. -
Seite 50: Localización De Fallos
6. Localización de fallos ¿Problemas? Aquí tiene la solución. (La unidad funciona normalmente). El acondicionador de aire no calienta o refrigera bien. Limpie el filtro (el flujo de aire se reduce cuando el filtro está sucio o atascado). Compruebe el ajuste de temperatura y modifique la temperatura ajusta- Asegúrese de que hay espacio suficiente alrededor de la unidad exterior. - Seite 51 6. Localización de fallos ¿Problemas? Aquí tiene la solución. (La unidad funciona normalmente). El ruido es mayor de lo indicado en las especificaciones. El nivel de ruido de servicio en interiores se ve afectado por la acústica de acuerdo con la siguiente tabla y será superior a la especificación de ruido, la cual fue medida en una sala sin eco.
-
Seite 52: Misure Di Sicurezza
2006/66/CE, Articolo 20 Informazioni per gli utilizzatori finali e Allegato II. Questo prodotto MITSUBISHI ELECTRIC è stato progettato e fabbricato con materiali e componenti di alta qualità, che possono essere riciclati e/o riutilizzati. Questo simbolo significa che i prodotti elettrici ed elettronici, le batterie e gli accumulatori, devono es- sere smaltiti separatamente dai rifiuti casalinghi alla fine della loro vita di servizio. -
Seite 53: Nomenclatura Delle Parti
2. Nomenclatura delle parti Unità interna Filtro PLFY-P·VBM-E Uscita d’aria Livello ventilatore 4 livelli Deflettore Auto con oscillazione Aletta – Filtro Lunga durata Indicazione di pulizia filtro 2.500 ore Deflettore Ingresso aria ■ Telecomando con filo Interfaccia dell’unità di controllo Le funzioni dei pulsanti funzione variano secondo la schermata. -
Seite 54: Modo Operativo
2. Nomenclatura delle parti Schermata La schermata principale può essere visualizzata in due modi: “Completo” e “Base”. L’impostazione predefinita di fabbrica è “Completo”. Per passare alla modalità “Base”, cambiare l’impostazione nella schermata principale (Fare riferimento al manuale d’uso incluso con il regolatore a distanza senza fili.). <Modalità... -
Seite 55: Selezione Delle Modalità
3. Funzionamento ■ Per informazioni sul metodo di funzionamento, fare riferimento al manuale d’uso in dotazione con ogni telecomando. 3.1. Accensione/Spegnimento [ON] [OFF] Premere il pulsante [ON/OFF]. Premere di nuovo il pulsante [ON/OFF]. La luce ON/OFF sarà verde e si avvierà La luce ON/OFF si spegne e si arresta il il funzionamento. -
Seite 56: Navigazione All'interno Del Menu Principale
3. Funzionamento Nota: Il numero di velocità ventola disponibili dipende dal tipo di unità collegata. Tenere presente anche che su alcune unità non è disponibile l’impostazione “Auto”. Temperatura di preselezio- Nei seguenti casi, la velocità effettiva della ventola generata dall’unità ne per il raffreddamento sarà... - Seite 57 3. Funzionamento <Uscire dalla schermata Menu principale> <Impostazione Vent.> Premere il pulsante [F3] per scorrere Premere in pulsante [INDIETRO] le opzioni di impostazione della ven- per uscire dal Menu principale e tor- tilazione tra “Off”, “Low” e “High”. nare alla schermata principale. Room * Configurabile solo quando l’unità...
- Seite 58 Una volta premuto il pulsante [F4], Manual vane angle attendere circa 15 secondi, quindi ETICHETTA M-NET address verificare lo stato corrente del con- MITSUBISHI ELECTRIC The air conditioner with the dizionatore d’aria. vane pointing downward is Appare l’impostazione deflettore Manual vane angle the target air conditioner.
-
Seite 59: Cura E Pulizia
5. Cura e pulizia ■ Informazione filtro aria Se due o più unità interne sono collegate, la durata della pulizia del filtro appare sulla schermata princi- per ogni unità può essere differente, secondo il tipo di filtro. pale in modalità Completo quando è L’icona appare quando il filtro nell’unità... -
Seite 60: Ricerca Dei Guasti
6. Ricerca dei guasti Problemi? Ecco la soluzione (l’unità funziona normalmente) Il condizionatore d’aria non riscalda o non raffredda molto bene. Pulire il filtro (quando il filtro è sporco o ostruito, il flusso d’aria viene ridotto). Verificare la regolazione della temperatura ed eventualmente modificarla. Assicurarsi che vi sia sufficiente spazio libero attorno all’unità... -
Seite 61: Specifiche Tecniche
6. Ricerca dei guasti Problemi? Ecco la soluzione (l’unità funziona normalmente) Il rumore emesso è superiore a quanto indicato nelle specifiche Il livello di rumorosità del funzionamento all’interno è influenzato dall’acustica del lo- tecniche. cale in questione, come indicato nella seguente tabella, e risulta superiore a quanto indicato nelle specifiche perché... -
Seite 62: Προφυλακτικά Μέτρα Ασφαλείας
ή/και με το Άρθρο 20 της οδηγίας 2006/66/EC Πληροφορίες για τους τελικούς χρήστες και το Παράρτημα II. Το προϊόν MITSUBISHI ELECTRIC που διαθέτετε είναι σχεδιασμένο και κατασκευασμένο από υλικά και εξαρτήματα υψηλής ποιότητας, τα οποία μπορούν να ανακυκλωθούν ή/και να χρησιμοποιηθούν ξανά. Το σύμβολο αυτό σημαίνει ότι ο ηλεκτρικός και ηλεκτρονικός... -
Seite 63: Ονόματα Μερών
2. Ονόματα μερών Εσωτερική μονάδα PLFY-P . VBM-E Φίλτρο Στόμιο εξόδου Βαθμίδες λειτουργίας ανεμιστήρα 4 βαθμίδες αέρος Πτερύγιο Αυτόματο με αιώρηση Κινητή γρίλια – Φίλτρο Μεγάλη διάρκεια ζωής Ένδειξη καθαρισμού φίλτρου 2.500 hr Πτερύγιο Είσοδος αέρα ■ Ενσύρματο τηλεχειριστήριο Διασύνδεση τηλεχειριστηρίου Οι... - Seite 64 2. Ονόματα μερών Οθόνη Η βασική οθόνη μπορεί να προβάλλεται με δύο διαφορετικούς τρόπους: "Full" (Πλήρης) και "Basic" (Βασικός). Η εργοστασιακή ρύθμιση είναι "Full" (Πλήρης). Για να γυρίσετε στον τρόπο "Basic" (Βασικός), αλλάξτε τη ρύθμιση στη ρύθμιση Βασικής οθόνης. (Ανατρέξτε στο εγχειρίδιο λειτουργίας που...
-
Seite 65: Λειτουργία
3. Λειτουργία ■ Για πληροφορίες σχετικά με τη μέθοδο λειτουργίας, ανατρέξτε στο εγχειρίδιο λειτουργίας που παρέχεται με κάθε τηλεχειριστήριο. 3.1. Ενεργοποίηση/απενεργοποίηση (ON/OFF) [ON] [OFF] Πιέστε το κουμπί [ON/OFF]. Πιέστε εκ νέου το κουμπί [ON/OFF]. Η λυχνία ON/OFF θα ανάψει πράσινη Η... -
Seite 66: Ρύθμιση Της Κατεύθυνσης Ροής Αέρα
3. Λειτουργία Παρατήρηση: Ο αριθμός των διαθέσιμων ταχυτήτων ανεμιστήρα εξαρτάται από το είδος της μονάδας που είναι συνδεδεμένη. Σημειώσατε επίσης ότι μερικές μονάδες Προ-ρυθμισμένη θερμοκρασία για δεν διαθέτουν ρύθμιση αυτόματης λειτουργίας. ψύξη Η πραγματική ταχύτητα ανεμιστήρα που παράγεται από τη μονάδα Προ-ρυθμισμένη... - Seite 67 3. Λειτουργία <Αποχώρηση από την οθόνη Main menu (Βασικό μενού)> <Ρύθμιση εξαερισμού> Πιέστε το κουμπί [F3] για να περά- Πιέστε το κουμπί [ΕΠΙΣΤΡΟΦΗ] για σετε από όλες τις επιλογές ρύθμισης να αποχωρήσετε από το Βασικό με- εξαερισμού με σειρά “Off”, “Low” νού...
- Seite 68 3. Λειτουργία ■ Επιλέξτε την “M-NET address” Διαδικασία επιβεβαίωσης Manual vane angle (Διεύθυνση M-NET) για τις μονάδες M-NET address Επιλέξτε την “M-NET address” Manual vane angle στις οποίες πρόκειται να σταθερο- (Διεύθυνση M-NET) για τις μονάδες M-NET address ποιηθούν τα πτερύγια φτερωτής, στις...
-
Seite 69: Φροντίδα Και Καθάρισμα
5. Φροντίδα και καθάρισμα ■ Filter information (Πληροφορίες φίλτρου) Εάν έχουν συνδεθεί δύο ή περισσότερες εσωτερικές μονάδες, ο χρόνος καθαρισμού φίλτρου για κάθε μονάδα μπορεί να είναι διαφορετικός, θα εμφανιστεί στην Βασική οθό- ανάλογα με τον τύπο φίλτρου. νη στη λειτουργία Full όταν πρέπει Room Το... -
Seite 70: Εντοπισμός Βλαβών
6. Εντοπισμός βλαβών Αντιμετωπίζετε προβλήματα; Λύση. (Η μονάδα λειτουργεί κανονικά). Το κλιματιστικό δεν ψύχει ή δεν θερμαίνει καλά. Καθαρίστε το φίλτρο. (Η ροή αέρα μειώνεται όταν το φίλτρο είναι ακά- θαρτο ή έχει βουλώσει.) Ελέγξτε τη ρύθμιση της θερμοκρασίας και ρυθμίστε την καθορισμένη θερμοκρασία. Φροντίστε... - Seite 71 6. Εντοπισμός βλαβών Αντιμετωπίζετε προβλήματα Λύση. (Η μονάδα λειτουργεί κανονικά). Η στάθμη θορύβου υπερβαίνει τις προδιαγραφές. Τα επίπεδα θορύβου λειτουργίας της εσωτερικής μονάδας επηρεάζονται από την ακουστική του δωματίου, όπως φαίνεται στον ακόλουθο πίνακα και θα είναι υψηλότερα από τις προδιαγραφές, οι οποίες βασίζονται σε μετρήσεις που...
-
Seite 72: Precauções De Segurança
CE e/ou com o Artigo 20.º de Informação para utilizadores finais e com o Anexo II da Directiva 2006/66/CE. O seu produto MITSUBISHI ELECTRIC foi concebido e produzido com materiais e componentes de alta qualidade que podem ser re- ciclados e/ou reutilizados. Este símbolo significa que o equipamento eléctrico e electrónico, as baterias e os acumuladores, no final da sua vida útil, devem ser deitados fora separadamente do lixo doméstico.Se houver um símbolo químico impresso por baixo do símbolo... -
Seite 73: Nomes Das Peças
2. Nomes das peças ■ Unidade Interior PLFY-P·VBM-E Filtro Saída de ar Etapas da ventoinha 4 etapas Lâmina Automático com “Swing” Aleta – Filtro Longa duração Indicação de limpeza do filtro 2.500 hr Lâmina Entrada de ar ■ Controlo remoto com fios Interface do controlador As funções dos botões de função mudam consoante o ecrã. - Seite 74 2. Nomes das peças Visor O visor principal pode ser apresentado de dois modos diferentes: “Completo” e “Básico”. A predefinição é “Completo”. Para mudar para o modo “Básico”, mude a definição no Visor principal. (Consulte o manual de funcionamento que está fornecido com o controlo remoto.) <Modo Completo>...
-
Seite 75: Selecção Do Modo
3. Funcionamento ■ Acerca do método de funcionamento, consulte o manual de funcionamento fornecido com cada controlo remoto. 3.1. Ligar/Desligar [ON] [OFF] Prima o botão [ON/OFF]. Prima novamente o botão [ON/OFF]. A lâmpada ON/OFF fica acesa a ver- A lâmpada ON/OFF irá apagar e o de e a operação será... -
Seite 76: Navegar No Menu Principal
3. Funcionamento Nota: O número de velocidades de ventoinha disponíveis depende do tipo de uni- Temperatura prede- dade a que o equipamento estiver associado. Note, no entanto, que algumas finida para o arrefe- unidades não possuem a configuração “Auto”. cimento Nos seguintes casos, a velocidade da ventoinha na unidade será... - Seite 77 3. Funcionamento <Sair do ecrã do Menu principal> <Definição de vent.> Prima o botão [F3] para percorrer Prima o botão [VOLTAR] para sair as opções de definição de ventila- do Menu principal e voltar ao Visor ção pela ordem “Off”, “Low” (Min) e principal.
- Seite 78 3. Funcionamento ■ Seleccione “M-NET address” (En- Procedimento de confirmação Manual vane angle dereço M-NET) para as unidades M-NET address Seleccione “M-NET address” (En- Manual vane angle cujas “vanes” serão fixadas, com o dereço M-NET) para as unidades M-NET address botão [F2] ou [F3], e prima o botão cujas “vanes”...
-
Seite 79: Cuidados E Limpeza
5. Cuidados e limpeza ■ Informação de filtro Se duas ou mais unidades internas estiverem ligadas, o tempo de limpeza do filtro para cada unidade poderá ser diferente, dependendo irá aparecer no Visor principal do tipo de filtro. no modo Completo quando tiver de Room limpar os filtros. - Seite 80 6. Avarias Está a ter algum problema? Aqui está a solução. (A unidade está a funcionar correctamente.) O aparelho de ar condicionado não aquece ou não arrefece bem. Limpe o filtro. (O fluxo de ar é menor quando o filtro está sujo ou entupido.) Verifique a regulação da temperatura e regule a temperatura definida.
- Seite 81 6. Avarias Está a ter algum problema? Aqui está a solução. (A unidade está a funcionar correctamente.) O ruído é superior ao indicado nas especificações. O nível sonoro produzido pelo funcionamento da unidade interior é afec- tado pela acústica da divisão em particular, conforme indicado no qua- dro a seguir, e será...
- Seite 82 Cihazınızın bakım, onarım ve yedek parça ihtiyaçları için klimanızı satın aldığınız yetkili satıcıya veya yukarıda belirtilen merkez servisimize veya şubemize başvurunuz. Ünitenin ihtiyaç duyacağı bakım ve onarım parçaları 10 yıl boyunca üretilecektir. Mitsubishi Electric Europe B.V. Centro Direzionale Colleoni, Palazzo Sirio, ingresso n. 1, Viale Colleoni, 7 20041 Agrate Brianza (Milano), Italia Telefon: + 39-039-60531 Faks: + 39-039-6057694 E-mail: info@IT.MEE.COM...
-
Seite 83: Güvenlik Önlemleri
İçindekiler 1. Güvenlik Önlemleri ...............83 5. Bakım ve Temizleme ............90 2. Parça adları ................84 6. Arızanın bulunması ve giderilmesi ........91 3. Çalışma ................86 7. Spesifikasyonları ..............92 4. Zamanlayıcı ................89 Not: Bu kullanım kılavuzundaki “Kablolu uzaktan kumada” ifadesi sadece PAR-31MAA içindir. Diğer uzaktan kumanda ile ilgili bilgiye ihtiyaç... -
Seite 84: Parça Adları
2. Parça adları ■ İç Ünite PLFY-P . VBM-E Filtre Hava çıkışı Fan aşamaları 4 basamak Pervane Salınımlı otomatik Izgara – Filtre Uzun ömür Filtre temizleme göstergesi 2.500 Saat Pervane Hava girişi ■ Kablolu Uzaktan Kumanda Kumanda arayüzü Düğmelerin işlevleri ekrana bağlı olarak değişiklik gösterir. Söz konusu ekranda hangi işlevi gerçekleştirdiklerini öğrenmek için LDC'nin altında görünen düğme işlev kılavuzuna bakın. - Seite 85 2. Parça adları Ekran Ana ekran iki farklı modda görüntülenebilir: “Full” (Tam) ve “Basic” (Temel) Fabrika ayarı “Full” (Tam) olarak yapılmıştır. “Basic” (Temel) moda geçmek için, bu ayarı Ana ekran ayarından değiştirin. (Uzaktan kumanda ile birlikte verilen kullanım kılavuzuna bakın.) <Tam mod>...
-
Seite 86: Mod Seçimi
3. Çalışma ■ Çalıştırma yöntemi konusunda, uzaktan kumandanın yanında gönderilen çalıştırma kılavuzuna bakın. 3.1. AÇMA/KAPATMA [AÇIK] [KAPALI] [AÇMA/KAPATMA] düğmesine basın. [AÇMA/KAPATMA] düğmesine AÇMA/KAPATMA lambası yeşil renkte tekrar basın. yanar ve çalışma başlar. AÇMA/KAPATMA lambası söner ve çalışma durur. Not: Devam etmekte olan işlemi kapattıktan hemen sonra ON/OFF (AÇ/KAPAT) düğmesine bastığınızda, klima yaklaşık 3 dakika boyunca çalıştırılamayacaktır. Bunun nedeni iç... - Seite 87 3. Çalışma Not: Uygulanabilir fan hızı bağlanmış olan üniteye bağlıdır. Bazı ünitelerde “Oto- matik” ayarı bulunmadığını da unutmayınız. Soğutma için ön Aşağıdaki durumlarda, ünitenin gerçek fan hızı uzaktan kumanda gösterge- ayar sıcaklığı sinde görünen hızdan farklı olur. Isıtma için ön ayar sıcaklığı...
- Seite 88 3. Çalışma <Main menu (Ana menü) ekranına geçme> <Havalandırma ayarı> Havalandırma ayarı seçenekleri ara- Main menu (Ana menüye) geçmek sında “Off” (Kapalı), “Low” (Düşük), ve Ana ekrana geri dönmek için ve “High” (Yüksek), sırasıyla gezin- [GERİ DÖN] düğmesine basın. Room mek için [F3] düğmesine basın.
- Seite 89 Cur. Address Check Hedef iç ünitenin kanadı aşağıyı işaret ediyor. [F4] düğmesine bastıktan sonra Manual vane angle MITSUBISHI ELECTRIC yaklaşık 15 saniye bekleyin, ar- M-NET address ETIKETI dından klimanın mevcut durumunu The air conditioner with the Geçerli kanat ayarı görüntülenir.
-
Seite 90: Bakım Ve Temizleme
5. Bakım ve Temizleme ■ Filter information (Filtre bilgileri) filtrelerin temizlenme zamanı İki veya daha fazla iç ünite bağlıysa, filtre türüne bağlı olarak, her ünite için filtre temizleme zamanı farklı olabilir. geldiğinde Tam modda Ana ekranda Room görüntülenir. Ana ünitedeki filtrenin temizlenme zamanı gelmişse simgesi gö- Cool Set temp. -
Seite 91: Arızanın Bulunması Ve Giderilmesi
6. Arızanın bulunması ve giderilmesi Sorununuz mu var? İşte çözüm. (Ünite normal bir şekilde çalışıyor.) Klima iyi soğutmuyor veya iyi ısıtmıyor. Filtreyi temizleyin. (Filtre kirli veya tıkalı olduğunda hava akımı düşer.) Sıcaklık ayarını kontrol edin ve ayarlı sıcaklığı ayarlayın. Dış mekan ünitesinin etrafında bolca alan bulunmasını temin edin. İç mekan ünitesi hava girişi veya çıkışı... - Seite 92 6. Arızanın bulunması ve giderilmesi Sorununuz mu var? İşte çözüm. (Ünite normal bir şekilde çalışıyor.) Gürültü belirtilenden daha çok. Bina içi işletme gürültüsü seviyesi aşağıdaki tabloda gösterildiği gibi odanın akustiğinden etkilenebilir ve ekosuz odada ölçülen gürültü seviyelerinin üzerine çıkabilir. Ses emişi yüksek Ses emişi düşük Normal odalar olan odalar...
-
Seite 93: Меры Предосторожности
Содержание 1. Меры предосторожности ....... . . 93 5. Эксплуатация ......... 100 2. -
Seite 94: Наименование Деталей
2. Наименование деталей ■ Внутренний прибор PLFY-P . VBM-E Фильтр Выходные воздушные Шаги вентилятора 4 шага отверстия Лопатка Автоматически с качанием Жалюзи – Фильтр Долговечный Индикация очистки фильтра 2.500 часов Лопатка Впуск воздуха ■ Проводной пульт дистанционного управления Интерфейс контроллера Функции... -
Seite 95: Режим Работы
2. Наименование деталей Индикация Главное окно может отображаться в двух разных режимах: “полный” и “Базовый”. Заводской настройкой по умолчанию являются “полный” режим отображения. Чтобы переключиться в “Базовый” режим, измените параметр в настройке главного окна. См. руководство по эксплуа- тации, входящее в комплект поставки пульта дистанционного управления. <Полный... -
Seite 96: Эксплуатация
3. Эксплуатация ■ Описание порядка пользования см. в руководстве пользователя, прилагаемом к каждому пульту дистанционного управления. 3.1. Включение/выключение [ВКЛ] [ВЫКЛ] Нажмите кнопку [ВКЛ/ВЫКЛ]. Нажмите кнопку [ВКЛ/ВЫКЛ] Индикатор ВКЛ/ВЫКЛ будет гореть снова. зеленым цветом, начнется работа. Индикатор ВКЛ/ВЫКЛ будет пога- шен, работа будет остановлена. Примечание: Даже... - Seite 97 3. Эксплуатация Примечание: Число доступных скоростей вращения вентилятора зависит от типа под- ключенного устройства. Некоторые устройства не имеют возможности Заданная температура для настройки параметра “Auto” (Авто). охлаждения В следующих случаях действительная скорость вентилятора устройства Заданная температура для будет отличаться от скорости, отображаемой на пульте дистанционного нагрева...
- Seite 98 3. Эксплуатация <Выход из окна главного меню> <Настройка вентилятора> Нажмите кнопку [F3] для перехода между вари- Нажмите кнопку [ВОЗВРАТ] для антами настройки вентиляции в следующем по- выхода из главного меню и воз- рядке: “Off” (Выкл), “Low” (Низ.) и “High” (Выс.). врата...
-
Seite 99: Таймер
3. Эксплуатация ■ Выберите “M-NET address” (адрес Процедура подтверждения Manual vane angle M-NET) для блоков, чьи дефлекто- M-NET address Выберите “M-NET address” (адрес Manual vane angle ры должны быть зафиксированы в M-NET) для блоков, чьи дефлекто- M-NET address неподвижном состоянии, с помощью ры... -
Seite 100: Эксплуатация
5. Эксплуатация ■ Информация о фильтре Если подключены два или больше внутренних блока, время очистки фильтра для каждого блока может быть разным, в зависимости от типа фильтра. будет отображаться в главном окне в режиме “полный”, когда на- Значок будет отображаться, когда необходимо выполнить очис- Room тку... -
Seite 101: Исправление Неполадок
6. Исправление неполадок Возникла проблема? Вот решение. (Прибор работает нормально.) Кондиционер не обеспечивает должный обогрев или охлаждение. Очистите фильтр. (При загрязнении или закупорке фильтра поток воздуха уменьшается.) Проверьте регулировку температуры и отрегулируйте заданную температуру. Убедитесь, что вокруг наружного прибора достаточно места. Не заблокированли... -
Seite 102: Технические Характеристики
6. Исправление неполадок Возникла проблема? Вот решение. (Прибор работает нормально.) ■ Уровень шума превышает уровень, указанный в технических харак- Уровень шума работающего кондиционера зависит от акустики теристиках. конкретного помещения (см. таблицу ниже). Он может быть выше, чем указано в спецификации, поскольку тестовый замер проводил- ся... - Seite 105 MITSUBISHI ELECTRIC AIR CONDITIONING SYSTEMS EUROPE LTD. NETTLEHILL ROAD, HOUSTOUN INDUSTRIAL ESTATE, LIVINGSTON, EH54 5EQ, SCOTLAND, UNITED KINGDOM PLFY-P20VBM-E*, PLFY-P25VBM-E*, PLFY-P32VBM-E*, PLFY-P40VBM-E*, PLFY-P50VBM-E*, PLFY-P63VBM-E*, PLFY-P80VBM-E*, PLFY-P100VBM-E*, PLFY-P125VBM-E* * : , , 1, 2, 3, · · · , 9 2006/95/EC: Low Voltage...
- Seite 106 <ENGLISH> <PORTUGUÊS> English is original. The other languages versions are translation of the original. O idioma original é o inglês. As versões em outros idiomas são traduções do idio- ma original. CAUTION CUIDADO • Refrigerant leakage may cause suffocation. Provide ventilation in accordance with EN378-1. •...
- Seite 108 This product is designed and intended for use in the residential, commercial and light-industrial environment. Please be sure to put the contact address/telephone number on this manual before handing it to the customer. HEAD OFFICE: TOKYO BLDG., 2-7-3, MARUNOUCHI, CHIYODA-KU, TOKYO 100-8310, JAPAN RG79D836H02 Printed in UNITED KINGDOM...