Inhaltsverzeichnis
Werbung
Verfügbare Sprachen
Verfügbare Sprachen
Werbung
Inhaltsverzeichnis

Verwandte Anleitungen für Aukey DR01


Inhaltszusammenfassung für Aukey DR01
- Seite 1 User Manual Dashboard Camera...
- Seite 2 Contents English 01 - 06 07 - 12 Deutsch 13 - 18 Français 19 - 24 Español Italiano 25 - 30 31 - 36 日本語...
-
Seite 3: Package Contents
Warranty Card Optional Accessory: The AUKEY External GPS Antenna provides accurate position and speed data to the DR01 that is saved and displayed on recorded videos. This extended information may support your case in any driving disputes or incidents. Note: Please use a Class 10 micro SD memory card (Max 128GB) for reliable recording and performance. -
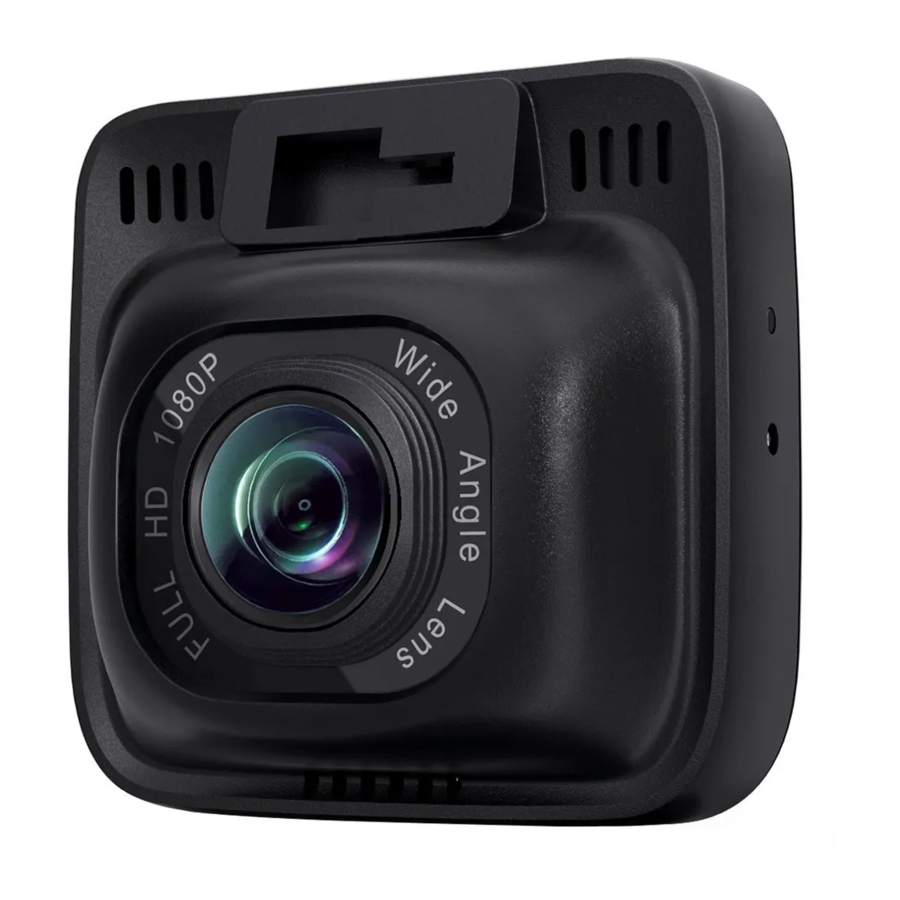
Seite 4: Specifications
Specifications Model DR01 Sony Exmor IMX323 Image Sensor 2.19 Megapixel CMOS Sensor NT96655 Screen 2.0” LCD Wide-Angle Lens 170° Material PC + ABS, 6 Layer-Glass 1080p (30fps), 720p (60fps), Recording Resolutions 720p (30fps), WVGA, VGA Image Format JPEG Sound Recording... -
Seite 5: Control Buttons
● In Playback Mode: Play, Pause, Stop, Rewind, and Fast-Forward are video playback controls. Installation & Powering On/Off For optimal performance, install the AUKEY DR01 in the top-center of your windshield, facing directly ahead. Use the cable clips to help fix the power cable conveniently and safely like in the picture below. -
Seite 6: Video Recording
To power on, insert the car charger into your car’s 12V socket, then connect the included cable to the car charger and to the Mini USB port of the DR01. Insert a Micro SD Card into the Micro SD card slot and format it using the ‘Format’ option in Dash Camera ‘Setup.’ After powering on each time, the system will start recording automatically. -
Seite 7: Viewing Photos And Videos
2. Insert the Micro SD Card into a computer Micro SD card slot or reader and your computer will automatically detect the Micro SD Card. 3. Find the video recording files located in the \AUKEY\MOVIE folder (or \AUKEY\PHOTO for snapshots). - Seite 8 Amazon CA orders: support.ca@aukey.com Amazon JP orders: support.jp@aukey.com *Please note, AUKEY can only provide after sales service for products purchased directly from AUKEY. If you have purchased from a different seller, please contact them directly for service or warranty issues.
- Seite 9 Vielen Dank für Ihren Kauf von AUKEY DR01 Dashcam. Lesen Sie bitte diese Bedienungsanleitung sorgfältig durch und bewahren Sie sie für zukünftige Referenz auf. Sollten Sie jegliche Unterstützung brauchen, kontaktieren Sie bitte unser Support-Team mit Ihrer Produktmodellnummer und Amazon-Bestellnummer. Lieferumfang...
-
Seite 10: Spezifikationen
Spezifikationen Modell DR01 Sony Exmor IMX323 Bildsensor 2,19 Megapixel CMOS Sensor NT96655 Display 2,0” LCD Weitwinkel-Objektiv 170° Material PC + ABS, 6-Schicht-Glas 1080p (30fps), 720p (60fps), 720p (30fps), Aufnahme-Auflösungen WVGA, VGA Bildformat JPEG Sound-Aufnahme Ein / Aus Sensitivität des G-Sensors Niedrig / Mittel / Höhe... -
Seite 11: Installation & Ein/Ausschalten
● Im Wiedergabe-Modus: Play/Pause, Stop, Rücklauf, und Schnell-Vorlauf sind Steuertasten für Video-Wiedergabe. Installation & Ein/Ausschalten Für optimale Leistung, installieren das AUKEY DR01 in der oberen Mitte Ihrer Windschutzscheibe, und direkt nach vorne. Befestigen das Stromkabel mithilfe von Kabelklemmen bequem und sicher, wie in der folgenden Abbildung. -
Seite 12: Video Aufnehmen
Zum Einschalten, stecken das Kfz-Ladegerät in die 12V-Buchse Ihres Fahrzeugs ein, dann schließen das mitgelieferte Kabel an das Kfz-Ladegerät und den Mini-USB-Port von DR01 an. Stecken die MicroSD-Karte in das MicroSD-Karte-Slot ein. Formatieren die Karte mithilfe von “Format” Option in “Setup” der Dashcam. Nach jedem Einschalten wird das System sich die Aufnahme automatisch starten. -
Seite 13: Audio Aufnehmen
USB-Mini-B Kabel (das mitgelieferte Kabel ist nur für Aufladung). Es wird als ein abnehmbares Gerät erkannt (mit einem USB-Anschlussbild auf dem Bildschirm angezeigt). 2. Finden die Videoaufnahme-Daten, die befinden sich im Ordner \AUKEY\MOVIE (oder \ AUKEY\PHOTO für Snapshots). 3. Kopieren die Daten auf Ihren Computer. -
Seite 14: Garantie & Kundenservice
Produktmodellnummer an. Bestellungen über Amazon Europa: support.eu@aukey.com * Wichtiger Hinweis: AUKEY bietet nur für die Produkte einen Kundenservice an, die direkt bei AUKEY erworben wurden. Sollten Sie Ihr Produkt bei einem anderen Händler gekauft haben, kontaktieren Sie bitte dessen Kundendienst bezüglich Fragen oder Garantieansprüchen. -
Seite 15: Contenu De L'emballage
Accessoire Optionnel: AUKEY Antenne GPS externe fournit une position précise et des données de vitesse au DR01 qui est sauvegardé et affiché sur les vidéos enregistrées. Cette information étendue peut prendre en charge votre cas dans les conflits de conduite ou les incidents. -
Seite 16: Spécifications
Spécifications Modèle DR01 Sony Exmor IMX323 Capteur d’Image 2,19 Capteur Megapixel CMOS NT96655 Écran 2,0” LCD Objectif Grand angle 170° Matériaux PC + ABS, 6 Calques de Lunette 1080p (30fps), 720p (60fps), 720p (30fps), Résolution d’Enregistrement WVGA, VGA Format d’Image... - Seite 17 Récupération. Installation & Allumer/ Éteindre Pour la performance optimale, veuillez installer le AUKEY DR01 dans le centre en haut de votre pare-brise. Utilisez les clips de câble pour aider à fixer le câble d'alimentation commodément et en toute sécurité, comme l'image ci-dessous.
-
Seite 18: Enregistrement Vidéo
Pour allumer, insérez le chargeur de voiture dans la prise 12V de votre voiture, puis connectez le câble inclus au chargeur et au Mini Port USB du DR01. Insérez une Carte Micro SD dans la fente de Carte Micro SD, et formatez-le en utilisant l'option “Format” dans la caméra “Configuration”. -
Seite 19: Enregistrement Audio
Il devrait être reconnu comme un périphérique amovible (avec une image de connecteur USB affichée à l'écran). 2. Trouvez les fichiers d'enregistrement vidéo qui sont situés dans le dossier \ AUKEY \ MOVIE (ou \ AUKEY \ PHOTO pour instantanés). -
Seite 20: Garantie & Service Client
Amazon et le numéro de modèle du produit. Amazon EU commandes: support.eu@aukey.com *Veuillez noter que, AUKEY ne peut fournir le service après-vente que pour les produits achetés directement chez AUKEY. Si vous avez acheté auprès d'un vendeur différent, veuillez le contacter pour tous services et garanties. -
Seite 21: Contenidos Del Paquete
Accesorio Opcional: La AUKEY GPS antena externa proporciona una posición y los datos de velocidad a DR01 que se guarda y se muestra en los videos grabados. Esta información ampliada puede apoyar su caso en cualquier disputa de conducción o incidentes. -
Seite 22: Especificaciones
Especificaciones Modelo DR01 Sony Exmor IMX323 Sensor de Imagen 2,19 Megapíxeles Sensor CMOS NT96655 Pantalla 2,0” LCD Lente Gran Angular 170° Material PC + ABS, 6 Vidrios de Capa 1080p (30fps), 720p (60fps), 720p (30fps), Resoluciones de Grabación WVGA, VGA ... -
Seite 23: Botones De Control
Instalación & Encender / Apagar Para obtener un rendimiento óptimo, instale AUKEY DR01 en el centro superior de su parabrisas, mirando hacia adelante. Utilice los clips para cable para ayudar a fijar el cable de alimentación convenientemente y seguramente como la imagen debajo. -
Seite 24: Grabación De Vídeo
Para encender, inserte el cargador de coche en la toma de 12V de su vehículo, a continuación, conecte el cable incluido al cargador de coche y al puerto Mini USB de DR01. Inserte una Tarjeta Micro SD en la ranura para tarjeta Micro SD y formatee la tarjeta usando la opción ‘Format’... -
Seite 25: Grabación De Audio
USB mini-B (el cable incluido sólo es para alimentación). Debe reconocerse como un dispositivo extraíble (con una imagen de conector USB mostrándose en la pantalla). 2. Busque los archivos de grabación de vídeo ubicados en la carpeta de \ AUKEY \ MOVIE (o \ AUKEY \ PHOTO para instantáneas). -
Seite 26: Cuidado Del Producto
Amazon y su número de modelo del producto. Amazon EU pedidos: support.eu@aukey.com *Por favor, tenga en cuenta que AUKEY sólo puede ofrecer servicio postventa a los productos comprados directamente de AUKEY. Si usted ha comprado del vendedor diferente, por favor, póngase en contacto con ellos directamente sobre la garantía o los problemas de servicio. -
Seite 27: Diagramma Del Prodotto
Due Adesivi di 3M Certificato di Garanzia AUKEY GPS Antenna Esterna fornisce la posizione esatta ed i dati ad alta velocità al DR01 che viene salvato e visualizzato sui video registrati. Queste informazioni estese possono supportare il tuo caso in qualsiasi controversia o incidenti di guida. -
Seite 28: Specificazioni
Specificazioni Modello DR01 Sony Exmor IMX323 Sensore d’Immagine 2,19 Megapixel CMOS Sensore NT96655 Schermo 2,0” LCD Lente Grandangolare 170° Materiali PC + ABS, 6 Strati di Vetri 1080p (30fps), 720p (60fps), 720p (30fps), Risoluzioni di Registrazione WVGA, VGA Formato d’Immagine... -
Seite 29: Pulsanti Di Controllo
Installazione & Acceso / Spento Per l’ottima prestazione, installare l’AUKEY DR01 in alto al centro del Suo parabrezza, di fronte direttamente avanti. Usare i fermagli di cavo per aiutare a fissare il cavo d’alimentazione convenientemente e sicuramente come mostra nell’immagine di sotto. -
Seite 30: Registrazione Di Video
Per accenderlo, inserire il caricatore da auto nella presa di 12V della Sua auto, poi collegare il cavo incluso al caricatore da auto e alla porta Mini USB del DR01. Inserire una Scheda Micro SD nella fessura e formattarla utilizzando l’opzione ‘Format’ in ‘Setup’ della Videocamera da Auto. - Seite 31 USB (cavo incluso è solo per alimentazione). Dovrebbe essere riconosciuto come un dispositivo rimovibile (con un'immagine di connettore USB mostra sullo schermo). 2. Trovare i fili della registrazione di video nella cartella \AUKEY\MOVIE (o \AUKEY\PHOTO per istantanee). 3. Copiare i fili al Suo computer.
-
Seite 32: Cura Del Prodotto
Ordini di Amazon EU: support.eu@aukey.com *Si prega di notare che AUKEY può offrire solo il servizio di post-vendita per i prodotti acquistati direttamente da AUKEY. Se ha acquistato da un venditore diverso, si prega di contattarlo direttamente per problemi di servizio o di garanzia. - Seite 33 この度は、 AUKEY DR01 1080Pドライブレコーダーをご購入頂き、 誠にありがとうございます ! ご使用の前 に、 必ず取扱説明書をよくお読みいただき、 正しくお使いください。 何の問題 ・ 質問がございましたら、 品 番とAmazon注文番号を記入した上、 お気軽に当社のお客様サービスセンターにお問い合わせくださ い。 パッケージ内容 1080Pドライブレコーダー 粘着マウント ケーブルクリップ6個 2ポートUSBカーチャージャー 吸盤マウント 取扱説明書 Mini USBケーブル 3Mステッカー2枚 保証カード オプシ ョンのアクセサリー : AUKEY外付けGPSアンテナは、 記録されたビデオを保存されてDR01に正 確な位置と速度のデータを提供します。 この情報は運転中の紛争や事故においてお客様のケースを サポートできます。 ( 注 : 本製品にはGPSアンテナを付属しておりません、 別途に購入してください。 )...
- Seite 34 製品仕様 型番 DR01 センサー Sony Exmor IMX323 2.19 Megapixel CMOS センサー NT96655 スクリーン 2.0 LCD 広角レンズ 170° 材質 PC + ABS、 6層ガラス 解像度 1080p (30fps), 720p (60fps), 720p (30fps), WVGA, VGA イメージフォーマッ ト JPEG 音声録音 オン/オフ Gセンサー (内蔵) 低/中/高 感度 録画モード...
- Seite 35 音声録音オン/オフ(長押し) 設定メニューに入る(短押し) 下向き ロック&ロック解除/早送り スナップショッ トを撮る(長押し) 一時停止/再開 スクリーンをオン /オフする 確認 リセッ ト 短押して、 デバイスをリーセッ トする ● 再生モードで再生、 一時停止、 停止、 巻き戻し、 および早送りは録画再生設定です。 取付&電源ON/OFF 最適なパフォーマンスを得るために、 フロントガラスの中央部にAUKEY DR01を取り付けてください。 下の写真のように、 便利かつ安全に電源ケーブルを固定するために付属のケーブルクリップを使用し てください。 ご注意 : デバイスまたはそのケーブルの誤った 最高の設置位置 フロントガラス 取付によってエアバッグに生じるいかな る損害に責任を負いません。 カーチャージャー と接続 - 33 -...
- Seite 36 電源オンは、 同梱品のカーチャージャーを車両のジガーライターソケッ トに差し込んで、 ケーブルで DR01のmini USBに接続します。 ご使用の前に、 SDカードが挿入されていることを確認ください。 また、 本製品設定の 「フォーマッ ト」 でSDカードをフォーマッ トしてください。 電源を入れる後に、 システムは 自動的に録画を開始します。 Mini USBケーブルを外し、 電源オフになります。 動画録画 ● 常時録画 : SDカードが挿入されている場合に、 電源投入後に自動的に録画開始します。 各記録され たファイルは最大10分間です。 マイクロSDカード容量の上限に達すると、 古い常時録画を上書きし、 録画を続けます。 ● モーション検知録画 : 設定の 「動体検知」 をオンにしたら、 本製品の前に動きを検出した時に、 ビデ オの録画を開始します。 動きを検出できない時に、 ビデオの録画を停止します。...
- Seite 37 USB接続でファイルを移動する 1. お使いのUSB mini-Bデータケーブル (付属のケーブルは電源用) を使用して、 ドライブレコーダー (SDカードは本体に挿している場合) をコンピュータに接続します。 リムーバブルデバイスとして認 識する、 或いはデスク トップ上に 「No Name」 アイコンとして表示されます。 2. ビデオファイルがフォルダの\AUKEY\MOVIE(スナップシ ョ ッ トの場合はフォルダの \AUKEY \PHOTOに あります)にあります。 3. ファイルをパソコンにコピーします。 SDカードからファイルを移動する 1. デバイスをオフして、 Micro SD カードを取り外します。 2. カードリーダーにマイクロSDカードを挿入し、 コンピュータが自動的にSDカードを検出します。 3. ビデオファイルがフォルダの\AUKEY\MOVIEにあります。 (スナップショッ トの場合はフォルダの \ AUKEY\PHOTOにあります。...
- Seite 38 ● 液体、 高温、 強磁場から遠ざけてください。 ● 使用温度は-30℃-75℃ですので、 ご注意ください。 ● ご使用の前に、 microSDカードをフォーマッ トしてください。 ● レンズ表面に触れないようにしてください。 綿棒やレンズクリーニングペーパーで拭いてください。 汚れを除去することは難しいである場合、 研磨剤なしクリーナーを利用して、 腐食性がある物を使 用しないでください。 保証期間とお客様サポート 何かご問題 ・ ご質問などがございましたら、 品番とAmazon注文番号を記入した上で、 下記のメールア ドレスまでお問い合わせください。 最も早い営業日にご返信を差し上げます。 Amazon JP orders: support.jp@aukey.com *当社は、 AUKEY公式ショップ、 または当社が認める小売業者から購入された製品に対してのみ、 アフターサービスと製品保証 を提供しております。 他の小売業者から購入された製品の交換、 返品、 返金に関しましては購入先へお問い合わせ下さい。 - 36 -...
- Seite 39 Model: DR01 AUKEY International Ltd. www.aukey.com | support@aukey.com No.102, Building P09, Electronics Trade Center Huanan City, Pinghu Town, Longgang District Shenzhen, Guangdong, 518111, CN Made in China...