Herunterladen Inhalt Inhalt Diese Seite drucken
BEHAbelt HP01 Bedienungsanleitung

BEHAbelt HP01 Bedienungsanleitung

Heißpresse
Vorschau ausblenden Andere Handbücher für HP01:
Inhaltsverzeichnis

Werbung

Verfügbare Sprachen

Verfügbare Sprachen

HP01
Heißpresse · Hotpress
BEDIENUNGSANLEITUNG · INSTRUCTION MANUAL
MODE D'EMPLOI · MANUAL DE INSTRUCCIONES

Werbung

Inhaltsverzeichnis
loading

Inhaltszusammenfassung für BEHAbelt HP01

  • Seite 1 HP01 Heißpresse · Hotpress BEDIENUNGSANLEITUNG · INSTRUCTION MANUAL MODE D'EMPLOI · MANUAL DE INSTRUCCIONES...
  • Seite 2: Empfohlene Schweißparameter

    HP01 Empfohlene Schweißparameter Temperatur (ca.) (±10°C) Haltezeit (ca.) (±50 sec.) Polyurethan (PU) Rundriemen PU 75 A 180°C 352°F Durchmesser mm) PU (sec.) TPE (sec.) PU 85 A 190°C 374°F PU 90 A 200°C 392°F PU 95 A 205°C 401°F Polyurethane (PU) FDA PU 75 A 155°C...
  • Seite 3: Inhaltsverzeichnis

    Vorbereitungen ..........................13 Profil in den Formschuh einlegen ....................13 Formschuh einsetzen ........................14 Gerät schließen und Presskraft einstellen ..................15 Heizvorgang vom HP01 PPuls Controller starten ................15 Haltezeit ............................16 Kühlung ............................16 Abbruch des Kühlvorgangs bzw. Schweißung ohne aktive Kühlung ..........16 Schweißarbeiten beendet ......................17 6.0 Bedienung Heißpresse HP01 Überlappschweißung ..................17...
  • Seite 4: Vorwort

    Lesen Sie die Betriebsanweisung bitte sorgfältig und beachten Sie diese. Ausfallzeiten und Beschädigungen des Gerätes können durch sorgsamen Umgang vermieden werden. Die HP01 Heißpresse ist speziell für die Anforderungen in den verschiedensten Ausfüh- rungen und Typen konzipiert. Alle Rechte vorbehalten. Kein Teil dieser Anleitung darf in irgendeiner Form (Druck, Fotokopie, Mikrofilm oder ein anderes Verfahren) ohne die schriftliche Genehmigung reproduziert oder unter Verwendung elektronischer Systeme verarbeitet, vervielfältigt...
  • Seite 5: Organisatorische Maßnahmen

    2.1.3 Das Gerät ist ausschließlich zum Verbinden von Transportbändern und Riemen aus PU und Polyester bestimmt. Eine andere oder darüber hinausgehende Verwendung gilt als nicht bestimmungsgemäß. Für hieraus entstehende Schäden haftet der Hersteller nicht. – Das Risiko trägt allein der Anwender. Zur bestim- mungsgemäßen Verwendung gehört auch das Beachten der Betriebsanweisung und die Einhaltung der Inspektions- und Wartungsbedingungen.
  • Seite 6: Personalauswahl Und -Qualifikation

    Personalauswahl und -qualifikation 2.3.1 Arbeiten mit dem Gerät dürfen nur von zuverlässigem Fachpersonal durchgeführt werden. Gesetzliches Mindestalter beachten! 2.3.2 Nur geschultes oder unterwiesenes Personal einsetzen. 2.3.3 Sicherstellen, dass nur dazu beauftragtes Personal mit dem Gerät tätig wird. Sicherheitshinweise zu bestimmten Betriebsphasen 2.4.1 Maßnahmen treffen, damit das Gerät nur in sicherem und funktionsfähigem Zustand betrieben wird! Gerät nur betreiben, wenn alle Schutzeinrichtungen und...
  • Seite 7: Weitere Sicherheitshinweise

    Weitere Sicherheitshinweise 2.6.1 Not-Aus Schalter sind nicht vorhanden. Im Not-Aus Fall den Netzstecker ziehen. 2.6.2 Das Gerät darf nur von unterwiesenen Fachkräften unter Einhaltung der einschlä- gigen Unfallverhütungsvorschriften bedient werden. 2.6.3 Das Öffnen des Gerätes, Entfernen von Abdeckungen oder Teilen von sicherheits- relevanten Bauteilen kann die Unfallgefahr erhöhen.
  • Seite 8: Eg-Konformitätserklärung

    Sicherheits- und Gesundheitsanforderungen der EG-Maschinenrichtlinie entspricht. Bei einer nicht mit uns abgestimmten Änderung des Gerätes verliert diese Erklärung ihre Gültigkeit. Bezeichnung des Gerätes: Heißpresse Gerät Typ: HP01 für PU und Polyester Profile Einschlägige EG-Richtlinien Maschinenrichtlinie 98/37 Niederspannungsrichtlinie EG 95/2006 EMV-Richtlinie EG 108/2004...
  • Seite 9: Technische Daten

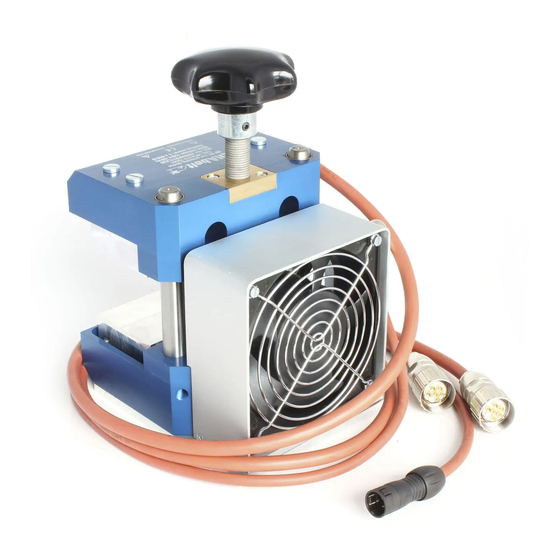
    3.0 Technische Daten HP01 Heißpresse mit PPuls Controller (vollautomatischer Schweißprozess) Handliche, beidseitig beheizte Heißpresse zum Verbinden von Profi len aus PU und Po- lyester. Die Heißpresse eignet sich hervorragend zum fl uchtgenauen Verbinden von einzelnen schmalen Profi len. Durch die geringe Baugröße eignet sich das Gerät auch für den Einsatz bei beengten Platzverhältnissen.
  • Seite 10: Lieferumfang

    1 St. Wasserfass mit Pumpe 2 St. Kühlschlauch lang 1 St. Kühlschlauch kurz (1) 1 St. Haltegriff und Ringöse (2) 1 St. PPuls Controller HP01 (3) 1 St. Seitenschneider SE02 (4) 1 St. Schraubendreher (5) 1 St. Schere AS04 Empfohlenes Zubehör (nicht im Lieferumfang): (6) Profi l-Formschuh (Best.-Nr.
  • Seite 11: Profil-Formschuh

    Profi l-Formschuh Höchste Präzision der Schweißverbindung durch den Profi l-Formschuh. Jede Profi lform benötigt ihren eigenen Formschuh. Diverse Formschuhe in den gängigen Größen lieferbar. Hochwertige Formschuhe sind die Voraussetzung für jede Verbindung. Die Formschuhe sind aus dauerhaft temperatur- und formbeständigen Aluminium gefertigt und antihaftbeschichtet.
  • Seite 12: Inbetriebnahme Der Heißpresse Vor Schweißungen

    4.0 Inbetriebnahme der Heißpresse vor Schweißungen Luftkühlung: Anschluss der Pressenkabel am Controller Anschluss Heizplatte unten Anschluss Kühlung Anschluss Heizplatte oben Wasserkühlung: Anschluss der Pressenkabel am Controller Anschluss Heizplatte unten Anschluss Heizplatte Anschluss Kühlung oben (von Wasserfass)
  • Seite 13: Wasserkühlung: Anschluss Wasserschläuche An Heißpresse Und Wasserfass

    Wasser durch das Schwerkraftprinzip erhitzt! Wasser nach jedem zweiten aufeinanderfolgenden Schweiß vorgang mit kaltem Wasser ersetzen! Lange Wasserschläuche Kurzer Wasserschlauch 5.0 Bedienung Heißpresse HP01 Stoßschweißung Gehrungsschnitt Vorbereitungen Riemenlänge bestimmen, Riemenenden mittels gerader Schnitt Gehrungsschnitt oder geradem Schnitt plan abschneiden.
  • Seite 14: Profil In Den Formschuh Einlegen

    Profil in den Formschuh einlegen • Das Profil und der Formschuh müssen passend sein. • Das Oberteil abnehmen und das Profil in das Unterteil einlegen. • Die beiden Enden mittig Stoß an Stoß einlegen und seitlich mit den Klemmschrauben befestigen. •...
  • Seite 15: Gerät Schließen Und Presskraft Einstellen

    Formschuh mit Spannhebel (Stumpfschweißung), Spann- hebel auslösen, damit Material nachgeschoben werden kann. 5.5 Heizvorgang vom HP01 PPuls Controller starten Den Netzstecker des PPuls Controllers am Netz anstecken und den PPuls Controller einschalten. Wahl der Schweißparameter durch Direkteingabe oder Auswahl gespeicherter Rezepte.
  • Seite 16: Haltezeit

    5.6 Haltezeit Die vorgegebene Haltezeit startet automatisch, sobald die obere und untere Heizplatte die zuvor programmierte Temperatur erreicht hat. 5.7 Kühlung (Wasser/Luft) Vorsicht: Während des Schweißprozesses erhitzen sich die Pressenbauteile und Formschuh. Hitzeschutzmaßnahmen ergreifen! Vorsicht: Die Wasserschläuche dürfen während des Vorgangs nicht entfernt wer- den.
  • Seite 17: Schweißarbeiten Beendet

    Schweißarbeiten beendet Den Aus-Schalter am PPuls Controller betätigen oder Netzstecker vom Netz trennen. 60mm 6.0 Bedienung Heißpresse HP01 Überlappschweißung 60mm = 2mm Restmaterial 60mm Vorbereitungen = 2mm Restmaterial Riemenlänge bestimmen, dabei einmal die Überlapp länge zur Gesamtlänge dazu addie- 60mm ren.
  • Seite 18: Profil In Den Formschuh Einlegen

    6.2 Profil in den Formschuh einlegen Das Profil und der Formschuh müssen vom gleichen Typ sein. Das Oberteil abnehmen und das Profil in das Unterteil einlegen. Die beiden Enden mittig einlegen und seitlich mit den Klemmschrauben befestigen. Die beschnitte- nen Riemenenden liegen dabei bündig überlap- pend übereinander.
  • Seite 19: Heizvorgang Vom Ppuls Controller Starten

    Heizvorgang vom PPuls Controller starten Den Netzstecker des PPuls Controllers am Netz anstecken und den PPuls Controller einschalten. Wahl der Schweißparameter durch Direkteingabe oder Auswahl gespeicherter Rezepte. 4.5.1 Direkteingabe der Schweißparameter Taste drücken: -> Lang, um aktuelle Einstellwerte zu ändern Werte ändern durch Eingeben der Nummer über Zahlenfeld, bestätigen mit und lö- schen/abrechen mit...
  • Seite 20: Abbruch Des Kühlvorgangs Bzw. Schweißung Ohne Aktive Kühlung

    Vorsicht: Beim Starten des Kühlvorgangs wird kurzzeitig Wasserdampf in das Wasserfass eingeleitet. Hitzeschutzmaßnahmen ergreifen! Nach Ablauf der vorgegebenen Haltezeit startet die Kühlung automatisch. Sobald die ein- gestellte Entnahmetemperatur erreicht ist, stellt die Wasserpumpe bzw. Ventilator ab und der PPuls Controller zeigt im Display „Vorgang beendet“. (Voreinstellung 40°C) Danach kann der Formschuh nebst Profi l mit Handschuhen entnommen werden.
  • Seite 21: Ppuls Controller Schnellanleitung

    PPuls Controller Schnellanleitung Bevor Sie das Gerät verwenden oder in Betrieb nehmen unbedingt die beigelegte Bedienungsanleitung sorgfältig lesen. Die Bedienungsanleitung enthält wichtige Informationen und Hinweise die für die sichere Verwendung und Nutzung des Geräts erforderlich sind. Bevor Sie das Gerät nutzen ist die Bedienungsanleitung sorgfältig zu lesen und in allen Belangen zu befolgen.
  • Seite 22 HP01 Recommended welding parameters Temperature (approx.) (±10°C) Hold time (approx) (±50 sec.) Polyurethane (PU) Round belts PU 75 A 180°C 352°F Durchmesser mm) PU (sec.) TPE (sec.) PU 85 A 190°C 374°F PU 90 A 200°C 392°F PU 95 A 205°C...
  • Seite 23 HP01 Hotpress INSTRUCTION MANUAL...
  • Seite 24 Insert profile within the mould.....................38 Insertion of the mould .........................39 Closing of the maschine and selection of the press capacity ............39 Beginning of the heating process of the HP01 PPuls controller ..........40 Exposure time..........................40 Cooling (water/blast) ........................40 Discontinuation of cooling process respectively without active cooling ........41 Termination of the welding process .....................41...
  • Seite 25: Preamble

    Please read this instruction manual carefully and use the device as directed. Downtimes and breakdowns of the machine can be avoided easily trough a careful handling. The hotpress HP01 was specially created for varying applications and many different types of belts.
  • Seite 26: Organisational Measures

    device. The manufacturer is not liable for any resultant damages. For resultant damages of unintended use, the user bares all liability. The intended use also includes the consideration of the instructional manual and adherence to inspection and attendance loads. Organisational measures 2.2.1 Always keep the instructional manual ready to hand at the site of use/ application!
  • Seite 27: Security Advices At Certain Operating Stages

    Security advices at certain operating stages 2.4.1 Undertake measures so that the machine is only operated in safe and workable conditions! Only operate the machine if all protection devices and security-related equipments are available and workable! 2.4.2 Tighten all screws after maintenance and attendance work! Be sure to secure all safety devices again! Indication of particular types of risk 2.5.1...
  • Seite 28 2.6.6 Only the operational person is allowed to remain within the area of operation. Other persons are not allowed to remain within the area of operation. 2.6.7 Never deposit combustible objects on the heater 2.6.8 Do not touch hot components of the machine e.g. the heater! 2.6.9 This machine does not have explosion protection.
  • Seite 29: Ec-Declaration Of Conformity

    When unauthorised changes are made to the machine, it renders the Declaration of Conformity invalid Product name: Hotpress Product type: HP01 for PU and Polyester profiles Appropriate EC Directive Machine Directive 98/37 Low Voltage Directive EC 95/2006 EMC Directive EC 108/2004...
  • Seite 30: Technical Data

    3.0 Technical Data Hotpress HP01 with programmable controller The handy and double-sided heated hotpress HP01 with controller is especially suitable for precise joining of PU and Polyester belts. The hotpress is perfectly suited for the accurate welding of small profi les.
  • Seite 31: Scope Of Delivery

    Scope of delivery 1 pc HP01 with water cooling 1 pc HP01 with air cooling 1 pc Water tank with pump 2 pcs long cooling hose 1 pc short cooling hose (1) 1 pc Hand grip and ring eyelet (2) 1 pc PPuls Controller HP01...
  • Seite 32: Mould

    Highest welding accuracy of the splice trough the innovative mould Every type of profi le needs its own mould! The mould for the hotpress HP01 is available in many varied and well-established sizes. Moulds of high quality are the requirements for every good weld.
  • Seite 33: Preparing The Hot Press For Welding

    4.0 Preparing the hot press for welding Air cooling: Connecting the press cables on the controller Connection heating plate bottom Connection cooling Connection heating plate Water cooling: Connecting the press cables on the controller Connection heating plate bottom Connection heating plate Connection cooling (from water tank)
  • Seite 34: Water Cooling: Connection Of Cooling Hoses To Hot Press And Water Tank

    After every second consecutive welding replace water with cold water! Long cooling hoses Short cooling hose 5.0 Operation HP01 butt splice miter cut Preparation vertical cut Determine belt length, cut both belt ends of the profile bevel and vertical to the desired length.
  • Seite 35: Insert Profile Within The Mould

    Insert profile within the mould • Insert the belt ends central in the lower part of the mould and hold them in place with the hold down bars. • The bolt lever must then to be tightened. • Bear in mind that the belt profile and mould must be of the same type. •...
  • Seite 36: Closing Of The Machine And Selection Of The Press Capacity

    Release bolt lever so that mate- rial can be compressed. Beginning of the heating process of the HP01 Controller Connect PPuls Controller with the power line and switch on the controller. Selection of welding parameters through di- rect entry or selection of stored recipes.
  • Seite 37: Cooling (Water/Air)

    Cooling (water/air) Caution: During the welding process, the pressing components and mould hea- ting. Take heat protection measures! Caution: The water hoses must not be removed during the operation. Take heat protection measures! Caution: By starting the cooling process, for a short time hot steam will fl ow in the water tank.
  • Seite 38: Operation Of Hp01 Overlap Welding

    60mm/2inch 60mm/2inch 6.0 Operation of HP01 overlap welding = 2mm / 0,08 inch remaining material 60mm/2inch Preparation = 2mm / 0,08 inch remaining material 60mm/2inch Determine the belt length and add one time the overlap length. Cut belt ends for overlap welding above the reinforcement.
  • Seite 39: Insertion Of The Mould

    To close the upper part precisely installed on the lower part between the guide webs. During overlap welding the upper part and the lower part initially not touch. The material has yet to be displaced during the welding process or during the holding time.
  • Seite 40: Beginning Of The Heating Process Of The Hp01 Ppuls Controller

    Beginning of the heating process of the HP01 Controller Connect PPuls Controller with the power line and switch on the controller. Selection of welding parameters through di- rect entry or selection of stored recipes. 5.5.1 Direct entry of welding parameters Press Long to change current setting.
  • Seite 41: Discontinuation Of Cooling Process Respectively Without Active Cooling

    Caution: By starting the cooling process, for a short time hot steam will fl ow in the water tank. Take heat protection measures! After the exposure time is fi nished, the cooling process will start automatically. The wa- ter pump stops as soon as the desired end-temperature is achieved (minimum 40°C / 104°F).
  • Seite 42: Ppuls Quick Reference

    PPuls Quick Reference This is not an operation manual! Before using the unit refer to operation manual! The operating instructions contain information and references required for safe operation and use of the instrument. Before using the instrument, read the operating manual instructions carefully and follow them in all respects.
  • Seite 43 HP01 Presse à chaud · Hotpress MODE D'EMPLOI...
  • Seite 44 HP01 Paramètres de soudure recommandés Température (approx.) (±10 °C) Temps de maintien (approx.) (±50 sec.) Polyuréthane (PU) Courroie ronde PU 75 A 180°C 352°F Diamètre (mm) PU (sec.) TPE (sec.) PU 85 A 190°C 374°F PU 90 A 200°C 392°F PU 95 A 205°C...
  • Seite 45 Refroidissement (eau/air) ......................58 Interruption du refroidissement ou de la soudure sans refroidissement actif ......58 Travaux de soudure terminé ......................59 6.0 Commande de la presse à chaud HP01, soudure par chevauchement .............59 Préparatifs ...........................59 Placer le profil dans l’empreinte ....................60 Installer l’empreinte ........................60 Fermer l’appareil et régler la compression ...................60...
  • Seite 46: Avant-Propos

    Veuillez lire le mode d'emploi avec attention et l'observer. Les immobilisations et endom- magements de l'appareil peuvent être évités en le manipulant avec soin. La presse à chaud HP01 est spécialement conçue pour répondre aux exigences des exé- cutions et types les plus variés.
  • Seite 47: Mesures Organisationnelles

    2.1.3 L'appareil est exclusivement destiné à l'assemblage de bandes de transport et de courroies en PU et polyester. Toute utilisation autre ou allant au-delà est consi- dérée comme non conforme. Le constructeur ne peut être tenu pour responsable de tous les dommages résultant d'une telle utilisation. – Dans ce cas, l'utilisateur est seul responsable.
  • Seite 48: Sélection Et Qualification Du Personnel

    Sélection et qualification du personnel 2.3.1 Les travaux avec l'appareil sont réservés au personnel spécialisé et fiable. Tenir compte de l'âge légal minimum ! 2.3.2 Ne faire intervenir que du personnel formé, ou du moins instruit. 2.3.3 S'assurer que seul du personnel chargé de cette tâche travaille avec l'appareil. Consignes de sécurité...
  • Seite 49: Autres Consignes De Sécurité

    Autres consignes de sécurité 2.6.1 Il n'y a pas d'interrupteurs d'arrêt d'urgence. En cas d'arrêt d'urgence, débran- cher la prise secteur. 2.6.2 L'utilisation de l'appareil est réservée au personnel spécialisé instruit en respec- tant les consignes de prévention des accidents en vigueur. 2.6.3 L'ouverture de l'appareil, le retrait de capots ou de parties de composants rele- vant de la sécurité...
  • Seite 50: Déclaration Ce De Conformité

    En cas de modification sans concertation de l'appareil, la déclaration devient caduque. Désignation de l'appareil : Presse à chaud Type d'appareil : HP01 pour profils en PU et polyester Directives CE en vigueur Directive Machines 98/37 Directive Basse tension CE 95/2006 Directive CEM CE 108/2004 Normes et spécifications techniques appliquées...
  • Seite 51: Caractéristiques Techniques

    3.0 Caractéristiques techniques HP01 Presse à chaud avec contrôleur PPuls (processus de soudure entière- ment automatisé) Presse à chaud compacte, chauffée des deux côtés pour l'assemblage de profi ls en PU et polyester. La presse à chaud convient parfaitement pour l'assemblage aligné de profi ls fi ns indi- viduels.
  • Seite 52: Contenu De La Livraison

    Contenu de la livraison 1 x HP01 avec refroidissement à eau 1 x HP01 avec refroidissement à air 1 x citerne d'eau avec pompe 2 x fl exibles de refroidissement longs 1 x fl exible de refroidissement court (1) 1 x poignée et œillet à anneau (2) 1 x contrôleur PPuls HP01...
  • Seite 53: Empreinte De Profil

    Empreinte de profi l Précision extrême de l'assemblage thermocollé par l'empreinte de profi l. Chaque forme de profi l nécessite sa propre empreinte. Diverses empreintes avec les tailles les plus courantes sont disponibles. Des empreintes de qualité sont une condition indispensable au bon assemblage. Les empreintes sont fabriquées à...
  • Seite 54: Mise En Service De La Presse À Chaud Avant La Soudure

    4.0 Mise en service de la presse à chaud avant la soudure Refroidissement à l'air : raccordement du câble de presse sur le contrôleur Raccordement plaque chauffante inférieure Raccordement plaque Raccordement chauffante supérieure refroidissement Refroidissement à l'eau : raccordement du câble de presse sur le contrôleur Raccordement plaque chauffante inférieure Raccordement...
  • Seite 55: Refroidissement À L'eau : Raccordement Des Flexibles D'eau Sur La Presse À Chaud Et La Citerne D'eau

    Remplacer l'eau par de l'eau froide toutes les deux opérations de soudure consécutives ! Flexibles d'eau longs Flexible d'eau court 5.0 Commande de la presse à chaud HP01 soudure Coupe en biais bout-à-bout Préparatifs Coupe droite Déterminer la longueur de la courroie, couper l'extrémité...
  • Seite 56: Placer Le Profil Dans L'empreinte

    Placer le profil dans l'empreinte • Le profil et l'empreinte doivent être assortis. • Retirer la partie supérieure et installer le profil dans la partie inférieure. • Installer les deux extrémités bout-à-bout au centre et les fixer sur le côté avec les vis de serrage.
  • Seite 57: Fermer L'appareil Et Régler La Compression

    5.5 Démarrer le chauffage depuis le contrôleur HP01 PPuls Brancher la fiche secteur du contrôleur PPuls dans la prise mu- rale et allumer le contrôleur PPuls. Sélection des paramètres de soudure par saisie directe ou sélection de recettes mémorisées.
  • Seite 58: Temps De Maintien

    5.6 Temps de maintien Le temps de maintien prescrit démarre automatiquement dès que les plaques chauffante supérieure et inférieure ont atteint la température préalablement programmée. 5.7 Refroidissement (eau/air) Attention : pendant la soudure, les composants de la presse et l'empreinte chauf- fent.
  • Seite 59: Travaux De Soudure Terminé

    Travaux de soudure terminés Actionner l'interrupteur Arrêt sur le contrôleur PPuls ou débrancher la fi che de la prise secteur. 6.0 Commande de la presse à chaud HP01, soudure 60mm par chevauchement 60mm Préparatifs = 2mm Restmaterial 60mm Déterminer la longueur de la courroie tout en ajoutant la longueur du chevauchement à...
  • Seite 60: Placer Le Profil Dans L'empreinte

    Placer le profil dans l'empreinte Le profil et l'empreinte doivent être du même type. Retirer la partie supérieure et installer le profil dans la partie inférieure. Installer les deux extrémités au centre et les fixer sur le côté avec les vis de serrage. Les extrémités coupées des courroies doivent se chevaucher et être alignées l'une sur l'autre.
  • Seite 61: Démarrer Le Chauffage Depuis Le Contrôleur Ppuls

    Appuyer sur la touche , la soudure est automatique. Voir également les paramètres de soudure recommandés par BEHAbelt en page 2. 6.5.2 Sélection de recettes mémorisées Appuyez sur , sélectionnez la recette souhaitée avec les touches fléchées (touches «...
  • Seite 62: Interruption Du Refroidissement Ou De La Soudure Sans Refroidissement Actif

    Attention : Lors du démarrage du refroidissement, de la vapeur d'eau est injectée pendant un court instant dans la citerne d'eau. Prendre des mesures de protection thermique ! Le refroidissement démarre automatiquement après écoulement du temps de maintien pres- crit. Dès que la température de retrait réglée est atteinte, la pompe à eau ou le ventilateur s'ar- rête et le contrôleur PPuls affi che «...
  • Seite 63: Notice Rapide Contrôleur Ppuls

    Notice rapide contrôleur PPuls Avant d'utiliser ou de mettre en service l'appareil, lisez impérativement le mode d'emploi joint. Le mode d'emploi contient des informations et consignes importantes, nécessaires à une utilisation et un usage sûrs de l'appareil. Avant d'utiliser l'appareil, lire le mode d'emploi attentivement et l'observer en tous points.
  • Seite 65 HP01 Prensa térmica · Hotpress MANUAL DE INSTRUCCIONES...
  • Seite 66 HP01 Parámetros de soldadura recomendados Temperatura (aprox.) (±10 °C) Tiempo de permanencia (aprox.) (± 50 s) Poliuretano (PU) Correa redonda PU 75 A 180°C 352°F Diámetro (mm) PU (s) TPE (s) PU 85 A 190°C 374°F PU 90 A 200°C 392°F...
  • Seite 67 Refrigeración por agua: Conexión de los tubos flexibles de agua a la prensa térmica y al depósito de agua .....................77 5.0 Manejo de la prensa térmica HP01 de soldadura a tope ................77 Preparativos ..........................77 Insertar el perfil en el molde ......................78 Introducir el molde ........................78...
  • Seite 68: Prólogo

    Lea atentamente y observe las instrucciones de funcionamiento. Los tiempos de inactivi- dad y los daños del aparato pueden evitarse mediante un uso cuidadoso. La prensa térmica HP01 ha sido diseñada especialmente para cumplir los requisitos de los distintos modelos y tipos.
  • Seite 69: Medidas Organizativas

    2.1.3 El aparato está previsto exclusivamente para la unión de correas de transporte y de correas de PU y de poliéster. Cualquier otro uso distinto al descrito se consi- derará como uso inapropiado. El fabricante no se responsabilizará por los daños que se produzcan como consecuencia.
  • Seite 70: Selección Y Cualificación Del Personal

    Selección y cualificación del personal 2.3.1 Los trabajos con el aparato solo deben realizarse por personal especializado fiable. Debe tenerse en cuenta la edad mínima legal. 2.3.2 Solo debe emplearse personal formado o instruido. 2.3.3 Asegúrese de que el aparato solo utilizado por personal asignado para ello. Indicaciones de seguridad para determinadas fases de funcionamiento 2.4.1 Aplique las medidas para que el aparato se utilice solo en un estado seguro y...
  • Seite 71: Otras Indicaciones De Seguridad

    Otras indicaciones de seguridad 2.6.1 No hay interruptores de parada de emergencia disponibles. En caso de una para- da de emergencia, retire el enchufe de red. 2.6.2 El aparato solo debe manejarse por expertos instruidos respetando las prescripciones de prevención de accidentes aplicables. 2.6.3 La apertura del aparato, la retirada de las cubiertas o de piezas de componentes relevantes para la seguridad puede aumentar el peligro de accidente.
  • Seite 72: Declaración De Conformidad Ce

    Esta declaración perderá su validez en caso de que se realice una modificación del apara- to que no haya sido acordada con nosotros. Denominación del aparato: Prensa térmica Tipo de aparato: HP01 para perfiles de PU y de poliéster Directivas CE aplicables Directiva para máquinas 98/37 Directiva de baja tensión CE 95/2006...
  • Seite 73: Datos Técnicos

    3.0 Datos técnicos Prensa térmica HP01 con controlador PPuls (proceso de soldadura completa- mente automático) Prensa térmica de fácil manejo con calentamiento en ambos lados para la unión de per- fi les de PU y de poliéster. La prensa térmica es excelente para la unión perfectamente alineada de perfi les estrechos individuales.
  • Seite 74: Volumen De Suministro

    Volumen de suministro 1 ud. HP01 con refrigeración por agua 1 ud. HP01 con refrigeración por aire 1 ud. depósito de agua con bomba 2 uds. tubo fl exible de refrigeración largo 1 ud. tubo fl exible de refrigeración corto (1) 1 ud.
  • Seite 75: Molde Del Perfil

    Molde del perfi l Máxima precisión de la unión soldada mediante el molde del perfi l. Cada forma de perfi l necesita su propio molde. Se encuentran disponibles diferentes moldes en los tamaños más usuales. El uso de moldes de alta calidad es un requisito importante para cada unión. Los moldes están fabricados en aluminio resistente de forma duradera a la temperatura y a la deformación y cuentan con un revestimiento antiadherente.
  • Seite 76: Puesta En Funcionamiento De La Prensa Térmica Antes De Las Soldaduras

    4.0 Puesta en funcionamiento de la prensa térmica antes de las soldaduras Refrigeración por aire: Conexión de los cables de la prensa al controlador Conexión de la placa calentadora inferior Conexión de la placa Conexión de calentadora superior refrigeración Refrigeración por agua: Conexión de los cables de la prensa al controlador Conexión de la placa calentadora inferior Conexión de la placa...
  • Seite 77: Refrigeración Por Agua: Conexión De Los Tubos Flexibles De Agua A La Prensa

    Sustituya el agua con agua fría después de cada segundo proceso de soldadura consecutivo. Tubos flexibles de agua largos Tubo flexible de agua corto 5.0 Manejo de la prensa térmica HP01 de soldadura a tope Corte de inglete Preparativos Determine la longitud de la correa, corte los extremos...
  • Seite 78: Insertar El Perfil En El Molde

    5.2 Insertar el perfil en el molde • El perfil y el molde deberán ser adecuados. • Retire la parte superior e inserte el perfil en la parte inferior. • Inserte los dos extremos en el centro junta contra junta y fíjelos lateralmente con los tornillos de apriete.
  • Seite 79: Cerrar El Aparato Y Ajustar La Fuerza De Prensado

    (soldadura a tope), suelte la palanca de sujeción para que el material pueda desplazarse. 5.5 Iniciar el proceso de calentamiento del controlador PPuls HP01 Conecte el enchufe de red del controlador PPuls a la red y conec- te el controlador PPuls.
  • Seite 80: Tiempo De Permanencia

    5.6 Tiempo de permanencia El tiempo de permanencia especificado se inicia automáticamente cuando la placa calen- tadora superior e inferior han alcanzado la temperatura programada previamente. 5.7 Refrigeración (agua/aire) Atención: Durante el proceso de soldadura se calientan los componentes de la prensa y el molde.
  • Seite 81: Trabajos De Soldadura Finalizados

    Trabajos de soldadura fi nalizados Accione el interruptor de desconexión en el controla- dor PPuls o retire el enchufe de red de la red. 6.0 Manejo de la prensa térmica HP01 de soldadura 60mm solapada 60mm Preparativos = 2mm Restmaterial...
  • Seite 82: Insertar El Perfil En El Molde

    6.2 Insertar el perfil en el molde El perfil y el molde deben ser del mismo tipo. Retire la parte superior e inserte el perfil en la parte inferior. Inserte los dos extremos en el centro y fíjelos late- ralmente con los tornillos de apriete. Los extremos de la correa están colocados uno sobre otro a ras y solapados.
  • Seite 83: Iniciar El Proceso De Calentamiento Del Controlador Ppuls

    Pulse la tecla y el proceso de soldadura se desarrollará de forma totalmente auto- mática. Véanse también los parámetros de soldadura recomendados de BEHAbelt en la página 2. 6.5.2 Selección de las fórmulas guardadas Pulse , con las teclas de flecha (campo numérico tecla "2"...
  • Seite 84: Cancelación Del Proceso De Refrigeración O De La Soldadura Sin Refrigeración Activa

    Atención: Durante el inicio del proceso de refrigeración se introduce brevemente vapor de agua en el depósito de agua. Aplique las medidas correspondientes para la protección contra el calor. Tras fi nalizar el tiempo de permanencia especifi cado, se inicia automáticamente la refri- geración.
  • Seite 85: Instrucciones Rápidas Del Controlador Ppuls

    Instrucciones rápidas del controlador PPuls Antes de utilizar el aparato o de ponerlo en funcionamiento, es imprescindible que se lea atentamente el manual de instrucciones adjunto. El manual de instrucciones contiene informaciones e indicaciones importantes que son necesarias para el uso seguro del aparato. Antes de la utilización del aparato, debe leerse atentamente el manual de instruc- ciones y tiene que respetarse en todos sus puntos.
  • Seite 86 Subject to changes without notice. Änderungen und Irrtümer vorbehalten. ® BEHA Innovation GmbH In den Engematten 16 D-79286 Glottertal Phone: +49 (0) 7684 / 907-0 Fax: +49 (0) 7684 / 907-101 E-Mail: info@behabelt.com Internet: www.behabelt.com Version: 02.2017 · PBMHP01V001...

Inhaltsverzeichnis