Herunterladen Inhalt Inhalt Diese Seite drucken
Inhaltsverzeichnis

Werbung

Verfügbare Sprachen
  • DE

Verfügbare Sprachen

  • DEUTSCH, seite 20
No reproduction in any form of this manual, in
whole or in part (except for brief quotation in critical
articles or reviews), may be made without written
authorization from NIKON CORPORATION.
N
使用説明書の内容が破損などによって判読できなくなったときは、
当社サービス機関にて新しい使用説明書をお求めください。 (有償)
NIKON CORPORATION
FUJI BLDG., 2-3, MARUNOUCHI 3-CHOME, CHIYODA-KU,
TOKYO 100-8331, JAPAN
Printed in Japan K9L0200201 (K736) 80
N
P P C C M M i i c c r r o o - - N N i i k k k k o o r r
8 8 5 5
f f / / 2 2 . . 8 8 D D
m m m m
使用説明書
INSTRUCTION MANUAL
GEBRAUCHSANWEISUNG
MANUEL D'ULITISATION
MANUAL DE INSTRUCCIONES
MANUALE DI INSTRUZIONI
はじめに
このたびは、PCマイクロニッコール85mm f/2.8Dをお買い上げいただきありがとうございます。PC
とはPerspective Controlの略で、遠近感の補正や強調ができることをあらわします。シフトやテ
ィルトと呼ばれるあおり操作により、主要被写体のカメラアングルによる歪みを修正したり、奥行
きのある主要被写体の手前から奧まで全体にピントを合わせたりすることができます。このレンズ
は、自然な色表現と美しいボケ味を持つ中望遠マイクロレンズで、料理やアクセサリーなどの商品
撮影から、優れた携帯性を生かした屋外での撮影、ポートレート撮影などの広い用途にご活用いた
だけます。また、被写体までの距離情報をカメラボディ側に伝達する機能を備え、3D 測光機能を
持ったカメラとの組み合わせ時により的確な露出制御を実現する3D-マルチパターン測光・3D-マル
チBL調光を可能とします(ただしあおり操作なしで、かつ開放絞りのときのみ) 。日本語の説明は
P.8〜P.15、P.72〜P.89となります。
Thank you for purchasing the Nikon PC Micro-Nikkor 85mm f/2.8D lens. This is a retrofocus-type perspective control
(PC) lens that lets you emphasize or correct far and near perspective, or control depth of field. It also lets you correct
distortion caused by the camera angle. Moreover, you can use the lens' tilt and shift mechanism to achieve focus of the
entire subject plane when it is not parallel to the film plane.
This medium telephoto micro lens produces natural-looking colors and out-of focus elements, and is suited for wide
variety of photographic applications including portraits. It is ideal for commercial tabletop photography such as for
product catalogs that feature subjects like food or accessories. Of course, the lens can be used outdoors to photograph
subjects such as plants and animals too. Distance information used for 3D Matrix Metering or the 3D Multi-Sensor
Balanced Fill-Flash will be transmitted instantly from the lens to the camera body (only when tilt and/or shift is not used
and aperture is set to maximum).
See pages 16 to 23 and 72 to 89 for English instructions.
Wir danken Ihnen für das Vertrauen, das Sie uns mit dem Kauf des PC Micro-Nikkors 85 mm/2.8 D erwiesen haben.
Das Retrofokus-Objektiv dient sowohl der Perspektivekorrektur (PC) als auch der Steuerung der Schärfentiefe. So
gestattet es zum Beispiel die Ausschaltung perspektivischer Verzerrung und die Scharfabbildung diagonal durchs Bild
laufender Strukturen.
Das kleine Tele mit Makro-Einstellung zeichnet sich durch besonders natürliche Farbwiedergabe und harmonische
Darstellung im Unschärfenbereich aus. Es eignet sich für eine Vielfalt fotografischer Aufgaben, einschließlich Porträts.
Ideal ist es für Sachaufnahmen im Nahbereich, zum Beispiel für Prospekte über Lebensmittel und ähnliches. Natürlich
eignet es sich ebensogut für Außenaufnahmen von Pflanzen oder Tieren. Das Objektiv übermittelt der Kamera die für
die 3D-Matrixmessung bzw. 3D-Multi-Sensor-Aufhellblitz erforderliche Abstandsinformation (jedoch nur in
Grundstellung der Optik und bei voller Öffnung).
Die deutsche Anleitung finden Sie auf den Seiten 24 bis 31 und 71 bis 89.
J
Nous vous remercions d'avoir porté votre choix sur cet objectif Nikon PC Micro-Nikkor 85 mm f/2,8D. C'est un objectif
à rétrofoyer et correction de perspective (PC) qui vous permet d'accentuer ou de corriger la perspective proche ou
E
éloignée, ou de contrôler la profondeur de champ. Il vous permet aussi de corriger la distorsion provoquée par l'angle
G
de l'appareil. Vous pouvez également utiliser le mécanisme d'inclinaison-décentrement de cet objectif pour la mise au
point de tout le plan sujet quand il n'est pas parallèle au plan film.
F
Cet objectif micro téléobjectif moyen, qui offre des couleurs semblant très naturelles et des éléments flous, est adapté
à une grande variété d'applications photographiques incluant les portraits. Il est idéal pour la photographie
S
commerciale sur bureau, par exemple de catalogues de produits, représentant des produits alimentaires ou des
I
accessoires. Cet objectif peut bien sûr aussi s'utiliser à l'extérieur pour photographier des sujets tels que plantes et
animaux. L'information de distance utilisée pour la mesure matricielle 3D ou le dosage auto flash ambiance par multi-
Ch
capteur 3D sera instantanément transmise de l'objectif à l'appareil (seulement quand l'inclinaison et/ou décentrement
Ck
n'est pas utilisé et que l'ouverture est réglée au maximum.)
Voir les pages 32 à 39 et 72 à 89 pour le manuel d'utilisation en français.
2
Muchas gracias por su compra del objetivo Nikon PC Micro-Nikkor 85 mm f/2,8D. Es un objetivo con control de
perspectiva (PC) del tipo retrofoco que permite dar énfasis o corregir la perceptiva lejana o cercana o el control de
profundidad de campo. También permite corregir la distorsión provocada por el ángulo de la cámara. Además puede
utilizar el mecanismo de inclinación y desplazamiento del objetivo para lograr un enfoque de todo el plano del sujeto
aunque no esté paralelo al plano de la película.
Este microlente de teleobjetivo medio produce colores naturales y elementos fuera de foco y es apropiado para una
variedad de aplicaciones fotográficas incluso los retratos. Es ideal para la fotografía de decoraciones comerciales de
mesa, por ejemplo para catálogo de productos que tienen como objeto comidas o accesorios. Por supuesto el
objetivo puede utilizarse en exteriores para fotografía de objetos tales como plantas y animales. La información de
distancia utilizada por la medición matriacial de 3D o el sensor múltiple de 3D para el flash de relleno balanceado se
transmiten instantáneamente del objetivo a la cámara (sólo cuando no se utiliza la inclinación y/o desplazamiento y
la apertura está en su máximo.
Consulte las páginas 40 a 47 y 72 a 89 para las instrucciones en inglés.
Vi ringraziamo per l'acquisto dell'obiettivo Nikon PC Micro-Nikkor 85 mm f/2,8D. Quest'obiettivo è del tipo a messa a
fuoco posteriore, con controllo prospettico, che permette di accentuare o correggere la prospettiva lontana e vicina o
di controllare la profondità del campo. Permette inoltre di correggere la distorsione provocata dall'angolo della
fotocamera. Potrete usare il meccanismo d'inclinazione e orientamento anche per ottenere la messa a fuoco di tutto
il piano del soggetto, quanto questo non è parallelo al piano della pellicola.
La micro lente del teleobiettivo intermedio produce colori naturali ed elementi fuori della messa a fuoco ed è adatto
per una vasta gamma d'applicazioni fotografiche, compresi i ritratti. E' particolarmente adatto per la fotografia
commerciale da tavolo, come quella per i cataloghi dei prodotti che rappresentano soggetti quali cibo o accessori.
Naturalmente, l'obiettivo può essere usato anche all'esterno, per fotografare soggetti come piante ed animali. Le
informazioni sulla distanza usate per il 3D Matrix Metering (la Misurazione della Matrice 3D) o per il 3D Multi-Sensor
Balanced Fill-Flash (Flash d'ambiente equilibrato a multisensore 3D) sono trasmesse istantaneamente dall'obiettivo
alla macchina (solo quando non si usa il meccanismo d'inclinazione ed orientamento e l'apertura è impostata sul
massimo valore).
Vedere le pagine da 48 a 55 e da 72 a 89 per la versione italiana.
3

Werbung

Inhaltsverzeichnis
loading

Inhaltszusammenfassung für Nikon PC Micro-Nikkor 85mm f/2.8D

  • Seite 1 はじめに Muchas gracias por su compra del objetivo Nikon PC Micro-Nikkor 85 mm f/2,8D. Es un objetivo con control de perspectiva (PC) del tipo retrofoco que permite dar énfasis o corregir la perceptiva lejana o cercana o el control de whole or in part (except for brief quotation in critical このたびは、PCマイクロニッコール85mm f/2.8Dをお買い上げいただきありがとうございます。PC...
  • Seite 2: デジタルカメラとの組み合わせ

    When used with the D1, the diagonal picture angle becomes 18°50' (equivalent to approximately 127.5mm focal length in 35mm film format). This lens can also be used with the Nikon E2/E3-series digital cameras but the tilt and/or shift cannot be used. With the Nikon E2/E3-series cameras, the diagonal picture angle does not change.
  • Seite 3: Combinación Con Cámara Digital

    127,5 mm en el formato de película de 35 mm). Este objetivo puede utilizarse también con las cámaras digitales Nikon de las series E2/E3 pero no puede utilizar la inclinación y/o desplazamiento. Con las cámaras Nikon de las series E2/E3, el ángulo de imagen digital no cambia.
  • Seite 4: Inhaltsverzeichnis

    日本語 各部の名称 1 距離リング 8 被写界深度目盛 !r 着脱指標 2 絞り目盛 9 距離目盛 !t CPU信号接点 3 絞りリング !p 絞り指標 !y シフトロックノブ 4 絞り込みボタン !q ティルトノブ !u レンズ鏡筒 5 シフトノブ !w ティルト目盛 !i ティルトロックノブ 6 シフト目盛 !e レボルビング指標 !o レボルビングレバー 7 距離目盛指標 目次...
  • Seite 5: レンズのつけ方・外し方

    レンズのつけ方、外し方 ※ このレンズはオートフォーカスレンズではありませんので、AFカメラ使用時はフォーカスモードをM (マニュアル)にセットしてください。これによりフォーカスエイドが可能となります。 ● シフト状態でのレンズの装着は、レンズとカメラボディのグリップ部の間に指をはさむことがありま すのでご注意ください。 [レンズのつけ方] 1. シフトノブとティルトノブを回して、あらかじめシフト量とティルト量を0にセットします。 2. カメラの電源スイッチをOFFにし、カメラとレンズの着脱指標を合わせて、レンズを矢印方向にカチッ と音がするまで回します(レンズ取り外しボタンは押さないでください) 。 [レンズの外し方] 1. シフトノブとティルトノブを回して、あらかじめシフト量とティルト量を0にセットします。 2. カメラの電源スイッチをOFFにし、レンズ取り外しボタンを押しながら、レンズを矢印方向に回して外 します。...
  • Seite 6: 絞りについて

    絞りについて このレンズの絞りはプリセット絞りとなっています。プリセット絞りとは、あらかじめ撮影する絞り値 をセットし、撮影時にセットした絞り値まで絞り込む方式です。特にこのレンズでは、絞り込みボタン を押すごとにセットしてある絞り値までの絞り込みと絞りの開放が行えます。ただし、絞りが開放の状 態でもカメラボディには、プリセットの絞り値が表示されますのでご注意ください。 絞りが開放状態 絞りが絞り込み状態 ピントの合わせ方 1. シフトノブとティルトノブを回して、あらかじめシフト量とティルト量を0にセットします。 2. 絞りが絞り込み状態のときは絞り込みボタンを操作して絞りを開放の状態にします。 3. 距離リングを回してピントを合わせます。 ・ あおり操作中にフォーカスエイドによるピント合わせを行った場合、合焦表示●が正確に表示されま せんので、ファインダースクリーンでピントを合わせてください。ただし、あおり操作を行っていな い場合は、ファインダー内の合焦表示●を確認しながらピントを合わせることもできます。 ・ ピントを合わせた後にあおり操作を行った場合、再度ファインダースクリーンでピントを合わせてく ださい。 ・ セットしてある絞りの被写界深度(ピントの合う前後の範囲)の確認は、レンズ鏡筒に表記されてい る被写界深度目盛を参考にするか、P.84の「被写界深度表」をご覧ください。ただし、近距離ではズ レが生じるため被写界深度目盛はご使用になれません。 ・ ティルト操作を行った場合は被写界深度目盛や距離目盛は使用できません(シフト操作のみを行った 場合は使用できます) 。 ・ 距離リングを操作すると、絞りリングでセットした絞り値とカメラの表示パネルやファインダー内液 晶部に表示される絞り値が異なってくる場合がありますが、カメラ側に表示される絞り値が有効F値 です。...
  • Seite 7: 露出の決め方

    露出の決め方(カメラに内蔵されている露出計を使用する場合) 1. カメラの露出モードをM(マニュアル)にセットします。 ・ レンズはシフトノブとティルトノブを回して、あらかじめシフト量とティルト量を0にセットします。 2. 絞り込みボタンを操作して絞りを開放の状態にし、絞りリングも開放(2.8)にセットして、適正露出 となるようにシャッタースピードをきめます。 ・ 絞りリングを開放(2.8)以外にセットしたときや、あおり操作を行ったときは、正しい測光やス ピードライトの調光が行われません。 3. 絞りリングを回して希望する絞りをセットして、絞りリングを回した段数と同じだけシャッタースピ ードもシフトさせます。 4. あおり操作(P.12)を行って、絞り込みボタンを操作して絞りを絞り込み、撮影を行います。 ・ シフト操作とティルト操作を最大まで行った場合、+1段程度の露出補正が必要となります。 ・ あおり操作を行った場合の露出決定にはある程度の経験が必要です。あらかじめテスト撮影を行う ことをおすすめします。 ・ コマンドダイヤルで絞りをセットするカメラでも、レンズの絞りリングで絞りをセットしてくださ い。また、カスタムセッティング機能に「レンズの絞りリングによる絞りのセット」のあるカメラ では、その機能を設定する必要はありません。 ※ M以外の露出モードでは表示パネルやファインダー内表示に誤ったシャッタースピードおよび絞り値が 表示される場合等があります。 露出の決め方(単体露出計を使用する場合) 1. カメラの露出モードをM(マニュアル)にセットします。 2. あおり操作を行います。 3. 絞りリングを希望の位置にセットし、ボディの表示パネルのF値を読みとり、単体露出計にそのF値を セットして露出をきめ、撮影を行います。 ・ シフト操作とティルト操作を最大まで行った場合、+1段程度の露出補正が必要となります。 ・ 撮影時は絞りを絞り込み状態にしてください。 ・...
  • Seite 8: あおり撮影-シフト

    あおり撮影―シフト シフト操作とは、カメラに対してレンズ部分を左右、または上下(レボルビングを併用)に平行移動さ せることをいいます。この操作により、カメラ位置を固定したまま構図を変えることができるので、被 写体の歪みを補正して撮影したり、撮影画面内の主要被写体の手前にある不要な物を避けて撮影するこ とが可能です。シフト操作による作例や応用例はP.72をご覧ください。 1. カメラを三脚などに固定し、シフトロックノブを回してロックを解除します。 2. ファインダーをのぞきながら、シフトノブを回してレンズをシフトさせます。 3. 希望する位置までレンズをシフトさせたら、シフトロックノブを回してロックします。 ・ シフト量が増えると周辺光量が低下する場合がありますので、できるだけ絞りを絞り込んで(大きい 数値にして)撮影を行ってください。 ・シフト操作を行う場合、レンズとカメラボディのグリップ部の間に指をはさむことがありますのでご 注意ください。 ・ あおり量が大きくなると、わずかにケラレが生じますが、1mより至近側ではケラレは生じません。 あおり撮影―ティルト ティルト操作とは、カメラに対してレンズ部分を上下、または左右(レボルビングを併用)に振って角 度をつけることをいいます。この操作により、カメラに対して平行でない被写体面の手前から奥までピ ントを合わせたりすることができます。ティルト操作による作例や応用例はP.78をご覧ください。 1. カメラを三脚などに固定し、ティルトロックノブを回してロックを解除します。 2. ファインダーをのぞきながら、ティルトノブを回してレンズをティルトさせます。 ・ ティルト操作を行った場合はファインダー内の構図も若干変化しますので、ご注意ください。 3. 希望する位置までレンズをティルトさせたら、ティルトロックノブを回してロックします。 ・ ティルト操作を行った場合はレンズ鏡筒の被写界深度目盛や距離目盛は使用できません。 ・ あおり量が大きくなると、わずかにケラレが生じますが、1mより至近側ではケラレは生じません。...
  • Seite 9: レボルビング操作

    レボルビング操作 レボルビング操作とは、カメラに対してレンズ部分を回転させることをいいます。この操作により通常 は左右方向のシフトを上下方向のシフトに、上下方向のティルトを左右方向のティルトに変化させるこ とができます。レボルビング操作は、カメラに装着した状態で左右に最大90゜まで回転させることがで 1. カメラを三脚などに固定して、レボルビングレバーをスライドさせながらレンズを回転させます。 ・ レンズはシフトノブとティルトノブを回して、あらかじめシフト量とティルト量を0にセットします。 2. 希望する位置までレンズを回転させ、レボルビングレバーから指を離します。 ・ レボルビングには左右とも30゜ごとにクリックがあります。 ・ シフトさせた状態でレボルビング操作を行う場合、レンズとカメラボディのグリップ部の間に指をは さむことがありますのでご注意ください。 ・ あおり量が大きくなると、わずかにケラレが生じますが、1mより至近側ではケラレは生じません。 シフトロックノブとティルトロックノブについて このレンズはシフトノブとティルトノブであおり操作が行えますが、それぞれのロックノブであお りをロックするとき、レンズの機構上完全には固定されないようになっています(故障ではありま せん) 。したがって、シフトロックノブとティルトロックノブを無理に締めつけたり、ロックした 状態で無理にあおり操作を行ったりすると故障の原因となりますのでご注意ください。...
  • Seite 10: レンズの取り扱い上の注意

    レンズの取り扱い上のご注意 ● このレンズは可動部分が多く、ゴミやホコリの影響を受けやすいため、使わないときはシフト量及び ティルト量とも“0”にしてください。 ● レンズの清掃は、むやみに拭かないで、ホコリを払う程度にしてください。万一指紋がついたときは、 柔らかい清潔な木綿の布に市販のレンズクリーナーを少量湿らせ、中心から外側へ渦巻状に、拭きム ラ、拭き残りのないように注意して、軽く拭いてください。 ● シンナーやベンジンなどの有機溶剤は絶対に使用しないでください。 ● レンズ表面の汚れや傷を防ぐために、L37Cフィルターの使用をおすすめします。レンズの保護には、 フードも役立ちます。 ● レンズをご使用にならないときは、レンズの前後に必ず付属のレンズキャップをしておいてください。 ● 長期間レンズをお使いにならないときや保管の際は、カビまたはサビを防ぐため、高温多湿の所や直 射日光のあたる所、またナフタリンや樟脳のある所は避けて、風通しのよい場所に保管してください。 ● レンズを水に落としたり濡らしたりすると部品がサビつくなどして故障の原因となります。当社サー ビス機関に点検、修理を依頼してください。 アクセサリー 付属 別売り ハードケースCL-75 77mmねじ込み式フィルター 77mmレンズキャップ 77mmバヨネット式フードHB-22 裏ぶたLF-1 三脚アダプターAH-5 * * このレンズが三脚と接触するときにご使用をおす すめします。 ・ ファインダースクリーンが交換できるカメラに装着してご使用になる場合は、あおりの確認に便利な 方眼線の入ったE型スクリーン(別売)のご使用をおすすめします(ただし、デジタルカメラD1にはこ のスクリーンはご使用になれません) 。 ・ このレンズは、アクションファインダーDA-30付ニコンF5、F2フォトミック、F3AFには接触するため装 着できません。...
  • Seite 11 仕様 焦点距離:85mm 最大口径比:1:2.8 レンズ構成:5群6枚 画角:対角線28゜ 30′垂直16゜水平23゜ 50′ 最大撮影倍率:1/2(倍) 距離目盛:∞〜0.39m、1 ft(併記) 距離情報:カメラボディへの撮影距離情報出力可能 絞り目盛:2.8、4、5.6、8、11、16、22、32、45 絞り方式:プリセット絞り あおり機構:シフト、ティルト直交式(平行式に変更する改造を有料にて引き受けます。詳しくは当社 サービス機関にお問い合わせください。 ) シフト量:±12.4mm ティルト量:±8.3゜ イメージサークル径:68mm 包括角度43゜ 40′ レボルビング機構:左右に90゜ (30゜ ごとにクリックあり) マウント:ニコンFマウント アタッチメントサイズ:77mm(P=0.75) 大きさ:約83.5mm(最大径)×109.5mm(長さ:バヨネット基準面からレンズ先端まで) 、 全長約118mm 重量:約775g...
  • Seite 12: Nomenclature

    English Nomenclature 1 Focusing ring 7 Distance index !r Mounting index 2 Aperture scale 8 Depth of field scale !t CPU contacts 3 Aperture ring 9 Distance scale !y Shift lock release knob 4 Aperture stop-down !p Aperture index !u Lens barrel button !q Tilt knob !i Tilt lock release knob...
  • Seite 13: Mounting/Detaching Lens

    Mounting/Detaching Lens * This lens is not an AF (autofocus) lens. When this lens is used with an AF camera, set the focus mode to M (manual) on the camera body. Manual focus with electronic rangefinder is possible. • When mounting the lens after it has been shifted, be careful not to pinch your fingers between the lens and the camera body.
  • Seite 14: Aperture

    Aperture This lens operates via a preset aperture method. With this method, you must first set the aperture value via the aperture ring. Then, just prior to shooting, you must stop down the lens to the preset aperture using the aperture stop-down button. With this lens, the maximum aperture can be switched to a selected aperture via mechanical push-button operation.
  • Seite 15: Determining Exposure

    Determining exposure (using the camera’s built-in exposure meter) 1. Set the camera’s exposure mode to M (manual). • Set the shift and tilt amount to 0 by rotating the shift and tilt knobs. 2. Press the aperture stop-down button to set the aperture to its maximum value. Set the aperture ring to the maximum value (f/2.8) as well, and set the shutter speed for correct exposure.
  • Seite 16: The Shift Function

    The Shift Function In this operation, the lens is shifted horizontally (or vertically, when the lens is revolved) parallel to the film plane. By shifting, you can recompose the frame of the shot without moving the camera. This lets you correct the perspective distortion of the subject or exclude unwanted objects from appearing in front of the main subject.
  • Seite 17: Revolving

    Revolving This operation rotates the lens. By revolving the lens, the shift function can be changed to operate vertically, and the tilt function can be changed to operate horizontally. The lens can be revolved up to 90° right or left. 1.
  • Seite 18: Lens Care

    E-type focusing screen with grids. (E-type focusing screen cannot be used with the Nikon Professional Digital SLR D1.) • This lens cannot be attached to the Nikon F5 with AE Action Finder DA-30 attached, F2 Photomic and F3AF camera body since they interfere with the lens.
  • Seite 19: Specifications

    Image circle: 68mm diameter, Overall picture angle: 43°40' Lens rotation: 90° right and left (click-stop in each 30° steps) Mount: Nikon bayonet mount Attachment size: 77mm (P=0.75mm) Dimensions: Approx. 83.5mm (3.3 in.) dia. x 109.5mm (4.3 in.) extension from the camera’s lens mounting flange;...
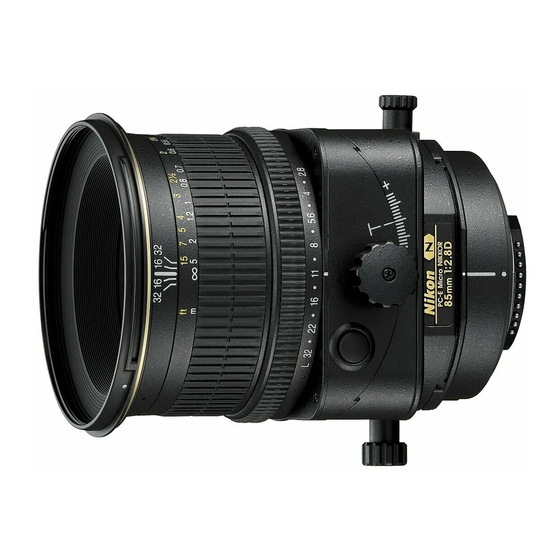
  • Seite 20: Teilebezeichnungen

    Deutsch Teilebezeichnungen 1 Entfernungsring 8 Schärfentiefenskala !t CPU-Kontakte 2 Blendenskala 9 Entfernungsskala !y Klemmschraube für 3 Blendenring !p Blendenindex Dezentrierbewegung 4 Abblendtaste !q Verschwenkungsknopf !u Objektivtubus 5 Dezentrierknopf !w Verschwenkungsskala !i Klemmschraube für 6 Dezentrierskala !e Drehender Index Schwenkbewegung 7 Entfernungsindex !r Index zum Ansetzen !o Drehhebel Inhalt...
  • Seite 21: Ansetzen Und Abnehmen Des Objektivs

    Ansetzen und Abnehmen des Objektivs * Das Objektiv ist nicht für automatische Scharfeinstellung geeignet. Eine AF-Kamera muß deshalb auf M (manuelle Fokussierung) eingestellt werden. Manuelle Fokussierung mit der elektronischen Einstellhilfe ist jedoch möglich. • Achten Sie beim Ansetzen des verstellten Objektivs darauf, sich nicht die Finger einzuklemmen. Ansetzen des Objektivs 1.
  • Seite 22: Die Blende

    Die Blende Das Objektiv arbeitet mit Blendenvorwahl. Dabei wird zunächst die gewünschte Arbeitsblende am Blendenring eingestellt. Unmittelbar vor der Aufnahme wird die Blende dann durch Druck auf die Abblendtaste auf die vorgewählte Öffnung geschlossen. Die Abblendung bleibt wirksam, bis die Abblendtaste erneut gedrückt wird.
  • Seite 23: Belichtungsmessung

    Belichtungsmessung mit dem Meßsystem der Kamera 1. Schalten Sie die Kamera auf manuelle Belichtungseinstellung (M). • Stellen Sie die Dezentrier- und Schwenkbewegungen mit den betreffenden Knöpfen auf Null. 2. Sollte die Abblendtaste eingerastet sein, drücken Sie sie zur Einstellung der größten Öffnung. Stellen Sie auch den Blendenring auf größte Öffnung (Blende 2,8), und stellen Sie die gewünschte Verschlußzeit ein.
  • Seite 24: Dezentrierung Des Optischen Systems

    Dezentrierung des optischen Systems Hierbei wird das optische System des Objektivs horizontal (bzw., bei Drehung, vertikal) parallel zur Filmebene verschoben. Damit ist eine Ausschnittsänderung ohne Bewegung der Kamera möglich, und es lassen sich sowohl perspektivische Verzerrungen neutralisieren wie eventuelle Hindernisse vor dem Hauptobjekt umgehen.
  • Seite 25: Drehung Des Optischen Systems

    Drehung des optischen Systems Die Drehung des Systems um 90° nach rechts oder links gestattet den Einsatz der Dezentrier- und Schwenkbewegungen sowohl horizontal als auch vertikal. 1. Stellen Sie die Kamera auf ein Stativ, und drehen Sie das Objektiv mit Hilfe des entsprechenden Hebels.
  • Seite 26: Objektivpflege

    Verwendung einer Gitterscheibe E. (Die Einstellscheibe E ist für die professionelle Digitalkamera Nikon D1 ungeeignet.) • Das Objektiv kann aus mechanischen Gründen nicht an der Nikon F5 mit Action-Sucher DA-30, F2 Photomic und F3AF verwendet werden. • Dieses Objectiv kann an der PRONEA S nicht verwendet werden, da die PRONEA S nicht über...
  • Seite 27: Technische Daten

    Bildkreisdurchmesser: 68 mm; Bildwinkel über diesen Durchmesser 43°40’ Objektivdrehung: 90° rechts und links (Raststellungen in Abständen von 30°) Objektivanschluß: Nikon F-Bajonett Filtergewinde: 77 mm x 0,75 mm Abmessungen: 85,3 mm ø x 109,5 mm ab Kamera-Auflage; Gesamtlänge ca. 118 mm...
  • Seite 28: Nomenclature

    Français NOMENCLATURE 1 Bague de mise au point 8 Echelle de profondeur de !t Contacts CPU 2 Echelle des ouvertures champ !y Molette de libération du 3 Bague des ouvertures 9 Echelle des distances verrouillage de 4 Bouton de fermeture du !p Index des ouvertures décentrement diaphragme...
  • Seite 29: Montage/Démontage De L'objectif

    Montage/démontage de l’objectif * Cet objectif n’est pas un objectif AF (autofocus). Quand il est utilisé avec un appareil AF, réglez le mode de mise au point à M (manuel) sur l’appareil. La mise au point manuelle avec télémètre électronique est possible. •...
  • Seite 30: Ouverture

    Ouverture Cet objectif fonctionne par présélection d’ouverture. Pour cela, il vous faut d’abord régler l’ouverture avec la bague des ouvertures. Puis, juste avant de déclencher, vous devez fermer le diaphragme à la valeur d’ouverture présélectionnée avec le bouton de fermeture du diaphragme. Avec cet objectif, l’ouverture maximale peut être commutée à...
  • Seite 31: Détermination De L'ouverture

    Détermination de l’ouverture (avec le posemètre intégré) 1. Réglez le mode d’ouverture de l’appareil à M (manuel). • Réglez le décentrement et l’inclinaison à 0 en tournant les molettes de décentrement et d’inclinaison. 2. Appuyez sur le bouton de fermeture du diaphragme pour régler à l’ouverture maximale. Réglez aussi la bague des ouvertures à...
  • Seite 32: Fonction De Décentrement

    Fonction de décentrement Dans cette opération, l’objectif est décentré à l’horizontale (ou à la verticale, à la rotation de l’objectif) parallèlement au plan film. En décentrant, vous pouvez recomposer l’image de la photo sans déplacer l’appareil. Cela vous permet de corriger la déformation de perspective du sujet ou exclure des objets non souhaités apparaissant devant le sujet principal.
  • Seite 33: Rotation

    Rotation Cette opération tourne l’objectif. En faisant tourner l’objectif, la fonction de décentrement peut être modifiée pour opérer verticalement, et la fonction d’inclinaison pour opérer horizontalement. L’objectif peut se tourner de 90˚ vers la droite et la gauche. 1. Placez l’appareil sur un pied et faites glisser le levier de rotation pour tourner l’objectif. •...
  • Seite 34: Entretien De L'objectif

    E avec grille en option. (Un écran de visée de type E est inutilisable avec le Nikon Professional Digital SLR D1.) • Cet objectif ne peut pas être monté sur un Nikon F5 avec viseur action AE DA-30 attaché, un appareil F2 Photomic ou un appareil F3AF parce qu’ils gênent l’objectif.
  • Seite 35: Spécifications

    Cercle de l’image: Diamètre 68 mm, angle d’image total: 43˚40’ Rotation de l’objectif: 90˚ vers la droite et la gauche (positions crantées tous les 30˚) Monture: Baïonnette Nikon Taille des accessoires: 77 mm (P = 0,75 mm) Dimensions: env. 83,5 dia. x 109,5 mm d’extension de l’embase; longueur totale d’env. 118 mm...
  • Seite 36: Nombres

    Español Nombres 1 Aro de enfoque 8 Escala de profundidad de !t Contactos de CPU 2 Escala de aberturas campo !y Perilla de liberación del 3 Aro de aberturas 9 Escala de distancias seguro de desplazamiento 4 Botón de reducción de !p Indice de abertura !u Cilindro del objetivo abertura...
  • Seite 37: Montura/Desmontaje Del Objetivo

    Montura/desmontaje del objetivo * Este objetivo no es AF (autofoco). Cuando se instale este objetivo en una cámara AF, mueva el modo de enfoque a M (manual) en la cámara. Es posible un enfoque manual con visor electrónico. • Cuando monte el objetivo después de desplazarlo, tenga cuidado de no atrapar sus dedos entre el objetivo y la cámara.
  • Seite 38: Abertura

    Abertura Este objetivo funciona mediante un método de abertura prefijada. Con este método es necesario fijar primero el valor de abertura mediante el aro de aberturas. Luego, justo antes de hacer la toma, debe reducir la abertura del objetivo a la prefijada utilizando el botón de reducción de abertura. Con este objetivo, puede seleccionarse la abertura máxima mediante botón pulsador mecánico.
  • Seite 39: Determinación De Exposición

    Determinación de la exposición (utilizando el medidor de exposición integrado en la cámara) 1. Ajuste el modo de exposición de la cámara a M (manual). • Ajuste la cantidad de desplazamiento e inclinación a 0 girando la perillas de desplazamiento e inclinación.
  • Seite 40: Función De Desplazamiento

    Función de desplazamiento En esta operación, el objetivo se desplaza horizontalmente (o verticalmente cuando se hace una revolución del objetivo) paralelo al plano de la película. Mediante el desplazamiento se puede recomponer el marco de la fotografía sin mover la cámara. Permite corregir la distorsión de perspectiva del objetivo o eliminar los objetos no deseados que aparecen delante del objeto principal.
  • Seite 41: Revolución

    Revolución Esta operación gira el objetivo. Mediante una revolución del objetivo, la función de desplazamiento puede cambiarse para que actúe verticalment y la función de inclinación puede cambiarse para que actúe horizontalmente. El objetivo puede tener una revolución de hasta 90º a la derecha o izquierda.
  • Seite 42: Cuidados De Objetivo

    E con la Nikon Profesional Digital SLR D1.) • Este objetivo no puede instalarse en el Nikon F5 con visor de acción AE DA-30 instalado, ni las cámara F2 Photomic ni F3AF porque interfieren con el objetivo.
  • Seite 43: Especificaciones

    Círculo de imagen: diámetro de 68 mm, Angulo de imagen general: 43º40’ Revolución del objetivo: 90º derecha e izquierda (intervalo cada 30º) Montura: Montura de bayoneta Nikon Tamaño de accesorios: 77 mm (P=0,75 mm) Dimensiones: Aprox. 83,5 mm de diám. x 109,5 mm de extensión de la montura del objetivo en la cámara brida de montaje: longitud general aproximada de 118 mm...
  • Seite 44: Nomenclatura

    Italiano Nomenclatura 1 Anello di messa a fuoco 8 Scala della profondità del !t Contatti CPU 2 Scala di apertura campo !y Manopola di sblocco 3 Anello di apertura 9 Scala delle distanze dell’orientamento 4 Tasto per la riduzione !p Indice d’apertura !u Tubo portaobiettivo dell’apertura dell’obiettivo !q Manopola d’orientamento...
  • Seite 45: Innesto/Stacco Dell'obiettivo

    Innesto/stacco dell’obiettivo * Quest’obiettivo non è del tipo a messa a fuoco automatica AF. Quando lo si usa con le fotocamere AF, regolare il modo di messa a fuoco sulla fotocamera su M (manuale). E’ possibile usare la messa a fuoco manuale con il telemetro elettronico. •...
  • Seite 46: Apertura

    Apertura Quest’obiettivo funziona con un metodo d’apertura prestabilita. Con questo metodo occorre regolare, innanzi tutto, il valore dell’apertura usando l’anello d’apertura. In seguito, subito prima di scattare la foto, occorre ridurre l’apertura dell’obiettivo fino a raggiungere il valore prestabilito, usando il tasto per la riduzione dell’apertura dell’obiettivo. Quest’obiettivo permette di regolare l’apertura massima su un’apertura selezionata usando un tasto meccanico.
  • Seite 47: Determinazione Dell'esposizione

    Determinazione dell’esposizione (usando l’esposimetro incorporato nella fotocamera) 1. Regolare il modo d’esposizione della fotocamera su M (manuale). • Regolare il valore d’orientamento e d’inclinazione su 0 ruotando le manopole d’orientamento e d’inclinazione. 2. Premere il tasto per la riduzione dell’apertura dell’obiettivo per regolare l’apertura sul valore massimo.
  • Seite 48: La Funzione Orientamento

    La funzione orientamento Quest’operazione permette d’orientare l’obiettivo orizzontalmente (o verticalmente, quando l’obiettivo è ruotato) ed in modo parallelo al piano della pellicola. L’orientamento permette di ricomporre il fotogramma senza muovere la fotocamera. Questo consente di correggere la distorsione prospettica del soggetto o di escludere la comparsa di oggetti indesiderati davanti al soggetto principale. Vedere pagine 72 a 76 per esempi di fotografie scattate con la funzione orientamento.
  • Seite 49: Rotazione

    Rotazione Quest’operazione permette di far ruotare l’obiettivo. Ruotando l’obiettivo, la funzione orientamento può essere modificata per operare verticalmente mentre la funzione inclinazione può essere modificata per operare orizzontalmente. L’obiettivo può essere ruotato fino a 90° verso destra o verso sinistra. 1.
  • Seite 50: Manutenzione Dell'obiettivo

    • Quando si usa una fotocamera dotata di schermo di messa a fuoco intercambiabile, è consigliabile usare uno schermo di messa a fuoco opzionale del tipo E con griglia. (Lo schermo di messa a fuoco del tipo E non può essere utilizzato con la fotocamera Nikon Professional Digital SLR D1.) •...
  • Seite 51: Caratteristiche Tecniche

    Cerchio d’inquadratura: diametro 68mm, angolo globale d’inquadratura: 43°40’ Rotazione dell’obiettivo: 90° a destra e a sinistra (arresto degli scatti per passi di 30°) Innesto: Innesto Nikon a baionetta Dimensioni accessorio in dotazione: 77mm (P=0,75mm) Dimensioni: diametro circa 83,5mm x 109,5mm estensione dalla flangia di montaggio dell’obiettivo della fotocamera;...
  • Seite 52: Using The Shift Function

    シフト操作でこんな撮影が行えます Using the Shift Function Die Dezentrierung in der Praxis Emploi de la fonction de décentrement Uso de la función de desplazamiento Uso della funzione orientamento 作例A 作例B /Photo A/Bild A/Photo A/ /Photo B/Bild B/Photo B/ 作例A 作例A 作例B 作例B Foto A/Foto A/ Foto B/Foto B/ 1.シフト操作により被写体の歪みを修正する...
  • Seite 53 1. Korrektur perspektivischer Verzerrung Bei Aufnahmen von einem erhöhten Standpunkt, wie es in der Produktfotografie oft erforderlich ist, blickt die Kamera unweigerlich nach unten. Normalerweise wird dadurch der untere Teil des Bildes verzerrt wiedergegeben (Bild A). Dies ist die Folge des unterschiedlichen Abstandes vom Objektiv zur Oberkante bzw.
  • Seite 54 作例A 作例B /Photo A/Bild A/Photo A/ /Photo B/Bild B/Photo B/ 作例A 作例A 作例B 作例B Foto A/Foto A/ Foto B/Foto B/ 2.シフト操作により撮影者やカメラの被写体への写り込みを防止する 鏡やガラスなどの撮影を行う場合、撮影者やカメラが被写体に写り込んでしまう場合があります(作例A) 。この ような場合、鏡やガラスなどに写り込まない位置にカメラを三脚などで固定し、シフトノブを回してレンズを左 または右にシフトさせると、被写体の鏡やガラスなどに撮影者やカメラが写り込まないように撮影が行えます (作例B) 。 2. Excluding unwanted reflections When shooting a reflective surface such as a mirror or windowpane, the photographer’s or the camera’s reflection may appear in the frame (Photo A).
  • Seite 55 2. Exclusion des réflexions indésirables En prenant une surface réfléchissante, par exemple un miroir ou une vitre, le photographe ou l’appareil peut être réfléchi sur l’image (Photo A). Pour éviter cela, placez l’appareil sur un pied dans une position où il n’est pas réfléchi, puis décentrez l’objectif vers la droite ou la gauche en tournant la molette de décentrement.
  • Seite 56 作例A 作例B /Photo A/Bild A/Photo A/ /Photo B/Bild B/Photo B/ 作例A 作例A 作例B 作例B Foto A/Foto A/ Foto B/Foto B/ 3.シフト操作により撮影画面内の被写体の前にある不要物を避ける 撮影したい構図であるにもかかわらず、撮影画面内の被写体の前に不要物がある場合があります(作例A) 。この ような場合、不要物が撮影画面内に入らない位置にカメラを平行移動して三脚などで固定し、シフトノブを回し てレンズを左または右にシフトさせると、撮影したい構図で障害物が写らないように撮影が行えます(作例B) 。 3. Excluding unwanted objects from in front of the main subject Sometimes, after you’ve placed the camera in a desired position for a specific composition, unwanted objects appear in front of the main subject, obscuring the shot (Photo A).
  • Seite 57 3. Exclusion d’objets indésirables devant du sujet principal Parfois, après avoir placé l’appareil à l’emplacement souhaité pour une composition spécifique, des objets indésirables apparaissent devant le sujet principal, gênant la prise de vues (Photo A). Pour exclure de tels objets gênant la scène, déplacez l’appareil horizontalement et placez-le sur un pied dans une position où...
  • Seite 58: Using The Tilt Function

    ティルト操作でこんな撮影が行えます Using the Tilt Function Die Verschwenkung in der Praxis Utilisation de la fonction d’inclinaison Uso de la función de inclinación Uso della funzione inclinazione 作例A 作例B /Photo A/Bild A/Photo A/ /Photo B/Bild B/Photo B/ 作例A 作例A 作例B 作例B Foto A/Foto A/ Foto B/Foto B/ 1.ティルト操作により被写体面の手前から奥までピントを合わせる...
  • Seite 59 1. Achieving focus on the entire subject plane when it is not parallel to the film plane When the subject plane is not parallel to the film plane, focus cannot be achieved throughout the entire subject plane unless you close the lens’ aperture (select a large f-number) and attain a large depth of field (Photo A).
  • Seite 60 作例A 作例B /Photo A/Bild A/Photo A/ /Photo B/Bild B/Photo B/ 作例A 作例A 作例B 作例B Foto A/Foto A/ Foto B/Foto B/ 2.ティルト操作により被写体の一部分にピントを合わせる 被写体の一部分にピントを合わせて撮影する場合、レンズの絞りを開いて(小さい数値にして)被写界深度(ピ ントの合う前後の範囲)を浅くしないと被写体の一部分にピントを合わせることはできません(作例A) 。このよ うな場合、カメラを三脚などで固定し、ティルトノブを回してレンズを左または右(上または下)にティルトさ せると、被写体の一部分がカメラのフィルム面で像を結ぶことになり、レンズの絞りを開いて被写界深度を浅く しなくても、被写体面の一部分にピントの合った撮影が行えます(作例B) 。 2. Achieving focus on a specific part of the subject Generally, in order to achieve focus on a specific part of the subject, you must open the lens’ aperture (select a small f-number) to attain a shallow depth of field (Photo A).
  • Seite 61 2. Punktschärfe auf einem Motivdetail Normalerweise muß zur Erzielung von Punktschärfe auf einem bestimmten Motivdetail weit aufgeblendet werden (Einstellung einer niedrigen Blendenzahl) (Bild A). Mit dem PC Micro-Nikkor läßt sich derselbe Effekt jedoch auch ohne Aufblendung erzielen: Die Kamera wird auf ein Stativ gestellt und das Objektiv mit dem Verschwenkungsknopf nach rechts, links, oben oder unten geneigt (Bild B).
  • Seite 62: Using The Shift And Tilt Functions Simultaneously

    シフトとティルトを併用した撮影 Using the Shift and Tilt Functions Simultaneously Kombinierter Einsatz von Dezentrierung und Verschwenkung Utilisation simultanée des fonctions de décentrement et d’inclinaison Uso simultáneo de las funciones de desplazamiento e inclinación Uso simultaneo della funzione d’orientamento e d’inclinazione 作例A 作例B /Photo A/Bild A/Photo A/ /Photo B/Bild B/Photo B/ 作例A...
  • Seite 63 Die Dezentrier- und Schwenkbewegungen können auch zusammen eingesetzt werden, um die perspektivische Verzerrung eines Objekts zu beseitigen und gleichzeitig das gesamte Objekt scharf zu erfassen. 1. Wie Bild A zeigt, ist das Motiv verzerrt und nur teilweise scharf. 2. Die perspektivische Verzerrung kann mit der Dezentrierbewegung beseitigt werden (Bild B). 3.
  • Seite 64: Depth Of Field And Other Data For Shooting

    被写界深度表等撮影用データ一覧 Depth of Field and Other Data for Shooting Schärfentiefe und andere Aufnahmedaten Profondeur de champ et autres données pour la prise de vues Profundidad de campo y otros datos para la fotografía Profondità di campo ed altri dati per scattare le foto 撮影距離...
  • Seite 65 Depth of field (ft./in.) Repro- Open Focused Exposure duction aperture distance factor ratio value f/2.8 f/5.6 f/11 f/16 f/22 f/32 f/45 "- 1'5 "- 1'5 "- "- "- "- "- "- "- 1:2.92 1.80 1'6" 1'6" 1'6" " " " "...
  • Seite 66: Recommended Focusing Screens

    Schermi di messa a fuoco raccomandati Vari schermi di messa a fuoco sono a disposizione per le fotocamere Nikon per far fronte ad ogni situazione di presa. Si danno in lista quelli raccomandati per il Vostro obiettivo.
  • Seite 67 ■構図の決定やピント合わせの目的には T: 好適です。 空欄:使用不適当です。ただし、Mスクリーンの場合、撮影倍率1/1倍以上の近接撮影に用いられるため、 この限りではありません。 F5、F4、F3シリーズ以外のカメラをご使用の場合、K2、B2、E2スクリーンはそれぞれK、B、Eスクリーン の欄をご覧ください。 T= Excellent focusing Blank box means not applicable. Since type M screen can be used for both macrophotography at a 1:1 magnification ratio and for photomicrography, it has different applications than other screens. For the K2, B2 and E2 focusing screens, refer to the columns on the K, B and E screens, respectively.
  • Seite 68: シフト操作でこんな撮影が行えます

    接写表/Photographic Range with Close-Up Attachment Einstellbereiche mit Nahzubehör Rapports obtenus en proxiphotographie et photomacrographie Rangos fotograficos con accesorios de acercamiento Fotografia con dispositivi per riprese Close-up cm (inch) レンズ正方向 Lens in normal position Objektiv in Normalstellung Objectif en position normale 使用器具...
  • Seite 69 * PKリングのはじめの数値はPK-11Aリング1個使用のとき、あとの数値はPK-11A〜PK-13リング、PK-11〜PK-13リ ングまたはPK-1〜PK-3リングを連結したときのものです。ただし、PK-11リングおよびPK-1リングはこのレンズ に直接取り付けることはできませんのでご注意ください。 ** 複写装置PF-4はレンズ単体で用いたとき、複写台の載物面上の撮影可能範囲を示します。 * The first values are for the PK-11A ring used alone and the other ones for the PK-11A — PK-13, PK-11 — PK-13 or PK-1 — PK-3 rings used together. However, the PK-11 and PK-1 rings cannot be attached directly to the lens.

Inhaltsverzeichnis