Herunterladen Inhalt Inhalt Diese Seite drucken
Bresser MOTION Bedienungsanleitung
Vorschau ausblenden Andere Handbücher für MOTION:

Werbung

Verfügbare Sprachen

Verfügbare Sprachen

MOTION
Action Camera
12 MP
1080p Full HD
DE
Bedienungsanleitung
EN
Operating instructions
Instrucciones de uso
ES
Art.No. 96-83000

Werbung

Inhaltsverzeichnis
loading

Inhaltszusammenfassung für Bresser MOTION

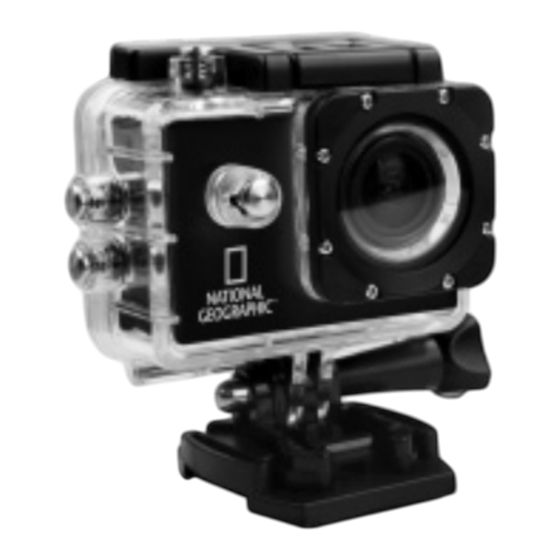
  • Seite 1 MOTION Action Camera 12 MP 1080p Full HD Bedienungsanleitung Operating instructions Instrucciones de uso Art.No. 96-83000...
  • Seite 2 Посетите нашу страницу в сети Интернет, используя QR-код или Web-ссылку, для получения дополнительной информации по данному устройству или для поиска доступных языковых версий данного руководства по эксплуатации. www.bresser.de/9683000...
  • Seite 3: Allgemeine Informationen

    Allgemeine Informationen Lesen Sie vor der Benutzung des Geräts aufmerksam die Sicherheitshinweise und die Bedienungsanleitung. Bewahren Sie diese Bedienungsanleitung für die erneute Verwendung zu einem späteren Zeitpunkt auf. Bei Verkauf oder Weitergabe des Gerätes ist die Bedienungsanleitung an jeden nachfolgenden Besitzer/Benutzer des Produkts weiterzugeben. Verwendungszweck Dieses Produkt dient ausschließlich der privaten Nutzung.
  • Seite 4: Hinweise Zur Reinigung

    • Reinigen Sie die Schutzhülle nach jedem Gebrauch mit klarem, sauberem Wasser und trocknen Sie es gründlich. EG-Konformitätserklärung Eine „Konformitätserklärung“ in Übereinstimmung mit den anwendbaren Richtlinien und entsprechenden Normen ist von der Bresser GmbH erstellt worden. Diese kann auf Anfrage jederzeit eingesehen werden.
  • Seite 5 ENTSORGUNG Entsorgen Sie die Verpackungsmaterialien sortenrein. Informationen zur ordnungsgemäßen Entsorgung erhalten Sie beim kommunalen Ent- sorgungsdienstleister oder Umweltamt. Werfen Sie Elektrogeräte nicht in den Hausmüll! Gemäß der Europäischen Richtlinie 2002/96/EG über Elektro- und Elektron- ik-Altgeräte und deren Umsetzung in nationales Recht müssen verbrauchte Elektrogeräte getrennt gesammelt und einer umweltgerechten Wiederverwer- tung zugeführt werden.
  • Seite 6 Lieferumfang Kamera Wasserdichtes Gehäuse Fahrradhalterung Flügelschrauben und Hutmutter Basis-Verbindungsstücke Multifunktions- Verbindungsstücke 2x 90° (a+b) und 1x gerade (c) Kameragehäuse und Gürtelhalterung 1/4” Stativadapter (male/female) Basis-Halterungen für flache oder gebogene Oberflächen Gehäuseklappen Kabelbinder Doppelseitige Klebepads für die Basis-Halterungen Riemen USB Kabel und Netzteil Sicherungsdraht und Putztuch...
  • Seite 8 So öffnen und schließen Sie das wasserdichte Gehäuse Gehäuse öffnen: Verriegelungsknopf (1) in Pfeilrichtung drücken und halten, anschließend die Klemme (2) zum öffnen in Pfeilrichtung drücken. Gehäuse schließen: Drücken Sie die Klappe an das Gehäuse (1), und lassen sie die Klemme am Gelenk einrasten (2).
  • Seite 9: Akku Wechseln

    Akku wechseln Akku wechseln Batteriefachabdeckung Der Akku kann mit dem beiliegenden Netzteil oder über das USB Kabel am Computer aufgeladen werden. Gehäuseklappe wechseln Ziehen Sie die alte Gehäuseklappe ab. Legen Sie die neue Gehäuseklappe am Scharnier an und drücken Sie bis die Klappe einrastet.
  • Seite 10 Funktionen Indikator Mikrofon EIN/AUS Schalter Micro SD/TF Port & MODUS Micro USB 2.0 Port Micro HDMI Linse HOCH & Mikrofon ein/aus Betriebsanzeige Ladeanzeige Lautsprecher RUNTER & Bildschirm ein/aus TFT Bildschirm...
  • Seite 11 Knopf um das Wasserdichte Gehäuse zu öffnen Batteriefachabdeckung Linse HOCH RUNTER EIN/AUS Schalter & MODUS...
  • Seite 12: Kamerabefestigung

    Kamerabefestigung Befestigung an flachen oder gebogenen Oberflächen: Wählen Sie, je nach Oberfläche, die flache oder gebogene Basis-Halterung aus. Befestigung an flacher Basis-Halterung:...
  • Seite 13 Vertikale Befestigung: Seitliche Befestigung:...
  • Seite 14: Montierungen - Beispiele

    Montierungen - Beispiele: Basis-Montierung: Das Basis-Verbindungsstück (5) in die Basis-Halterung (9) einrasten lassen. Nutzen Sie je nach Oberfläche die flache oder gebogene Halterung. Jetzt das Wasserdichte Gehäuse (2) mit Hilfe einer Flügelschraube (4) befestigen. Fahrradhalterung: Das Gehäuse mit Kamera (1/2) am Verbindungsstück 6a befestigen. Die Fahrradhalterung (3) an 6a befestigen und danach am Lenker anbringen.
  • Seite 15 Helm-Montierung (Vertikale Befestigung): An der Basis-Halterung (9) ein Klebepad (12) auftragen und am Helm befestigen. Helm-Montierung (Seitliche Befestigung): Verbindungsstück 6a am Verbindungsstück 6b befestigen und dann die Basis-Halterung (9/5) am Verbindungsstück 6a montieren. Als letztes das Gehäuse mit Kamera an 6b befestigen.
  • Seite 16: Produkteigenschaften

    Produkteigenschaften • Mit dem Wasserdichten Gehäuse filmen Sie faszinierende Wassersport Ereignisse: Wasserdicht bis zu 30 Meter. • TFT-Bildschirm, der Ihre faszinierenden Videos direkt am Gerät anzeigt. • Wiederaufladbarer Akku der einfach zu ersetzen ist um die Laufzeit ihrer Kamera zu verlängern.
  • Seite 17 4. Kamera ein- und ausschalten A. Drücken und halten Sie den Ein/Ausschalter für 3 bis 5 Sekunden, um die Kamera ein- oder auszuschalten. B. Um die Batterielebensdauer zu verlängern können Sie den Bildschirm aus- schalten indem Sie die [DOWN] -Taste drücken. 5.
  • Seite 18 6.2. Fotos aufnehmen Wechseln Sie in den Foto-Aufnahmemodus, indem Sie [ ] drücken. In der linken oberen Ecke wird das Symbol angezeigt. Drücken Sie “OK”, um Fotos aufzunehmen. 6.3. Speichern & Wiedergabe Wenn Sie mit der Aufnahme fertig sind können Sie zur Wiedergabe die Videos per USB Kabel auf Ihren Computer übertragen.
  • Seite 19 Tonaufnahme Aus / Ein Belichtung +2/3 / +1/3 / +0.0 / -1/3 - 2/3 / -1.0 / -4/3 / -5/3 / - 2.0 löschen Ein Bild löschen / Alle löschen schützen Ein Bild sperren / Ein Bild entsperren Alle sperren / Alle entsperren Formatieren Alle Daten auf der SD-Karte löschen Sprache...
  • Seite 20: Technische Daten

    Technische Daten TFT Bildschirm 1,5 Zoll (3.81 cm) Bildschirm Linse 140° Weitwinkel Wasserdichtes Gehäuse Wasserdicht bis 30 Meter Sprachen English / German / French / Spanish / Italian / Portuguese / Chinese Traditional / Chinese Simplifi ed / Japanese / Russian Bild-Aufl...
  • Seite 21 Speicher Micro SD-Speicherkarte (bis 32 GB möglich) Aufnahme-Modus Einzebild / Selbstauslöser (2s/5s/10s) Frequenz 50Hz/60Hz USB Anschluss USB 2.0 Stromquelle 500 mA Akku-Kapazität 900 mAh Energieableitung 400mA@4.2V Aufnahmezeit ca. 70 Minuten (bei 1080p) Ladezeit ca. 3 Stunden Betriebssystem (OS) Window XP / Vista / Win 7 Mac OS X Maße 59,3x41,1x24,6 mm...
  • Seite 22: Garantie Und Garantiezeitverlängerung

    Die Garantiezeit beträgt 2 Jahre und beginnt am Tag des Kaufs. Bitte bewahren Sie die Rechnung auf. Sie können die Garantiezeit auf 5 Jahre verlängern, wenn Sie sich auf www.bresser.de/garantie registrieren und den kurzen Fragebogen ausfüllen. Zur Inanspruchnahme der 5-Jahre-Garantie müssen Sie die Registrierung innerhalb von 3 Monaten nach dem Kauf (es gilt das Datum des Kaufbelegs) durchführen.
  • Seite 23 Wichtig bei Rücksendungen: Um Transportschäden zu vermeiden achten Sie bitte darauf, dass das Gerät sorgfältig verpackt in der Original-Verpackung zurückgegeben wird. Bitte den Kassenbon (oder eine Kopie) sowie die Fehlerbeschreibung beifügen. Ihre ge- setzlichen Rechte werden durch diese Garantie nicht eingeschränkt. Ihr Fachhändler: ......
  • Seite 24 Operating instructions...
  • Seite 25: Intended Use

    About this Instruction Manual Please read the safety instructions and the operating instructions carefully before use. Keep these instructions for renewed use at a later date. When the device is sold or given to someone else, the instruction manual must be provided to the new owner/user of the product. Intended Use This product is intended only for private use.
  • Seite 26: Notes On Cleaning

    • Clean the protective case after each use with clear, clean water and dry it thoroughly. EC Declaration of Conformity Bresser GmbH has issued a Declaration of Conformity‘ in accordance with applicable guidelines and corresponding standards. This can be viewed any...
  • Seite 27 Disposal Dispose of the packaging materials properly, according to their type, such as paper or cardboard. Contact your local waste-disposal service or environmental authority for information on the proper disposal. Do not dispose of electronic devices in the household garbage! As per the Directive 2002/96/EC of the European Parliament on waste electrical and electronic equipment and its adaptation into German law, used electronic devices must be collected separately and recycled in an environ-...
  • Seite 28: Scope Of Delivery

    Scope of delivery Camera Waterproof case Bicycle mount Thumb knobs and cap nut Base mounts Multifunction mounts 2x 90° (a+b) and 1x straight (c) Camera housing and belt clip 1/4” Tripod adapter (male/female) Base for flat and curved surface Case doors Cable ties Double sided sticker for base mounts...
  • Seite 30 How to open and close the waterproof case How to open: Press and hold down the switch (1) and then use the arrow (2) to open the clamp (3). How to close: Press the case door all the way down (1) and then snap the clamp to the hinge (2).
  • Seite 31: How To Replace The Battery

    How to replace the battery How to replace the battery Battery cover Charge with the included power adapter or via a computer using the usb cable. How to swap the case door Align the case door with the hinge and press down until it clicks into place.
  • Seite 32 Functions Indicator Microphone ON/OFF switch Micro SD/TF Port & MODE Micro USB 2.0 Port Micro HDMI Lens UP & Microphone on/off Operation indicator Charging indicator Speaker DOWN & Screen on/off TFT Screen...
  • Seite 33 Switch to open the Waterproof case Battery cover Lens DOWN ON/OFF switch & MODE...
  • Seite 34 Mount your camera Flat surface or curved surface mount: Choose the flat or curved base depending on the surface. Mount on flat base:...
  • Seite 35 Vertical mount: Side mount:...
  • Seite 36 Mount - Examples: Base-Mount: Snap the base mount (5) into the base (9). Use the flat or curved base, depending on the surface. Now use the thumb knobs (4) to mount the waterproof case (2). Bicycle mount: Attach the waterproof case with camera (1/2) on the multifunction mount (6a). Now secure the bicycle mount (3) to multifunction mount (6a) and then attach to the handlebars.
  • Seite 37 Helmet-Mount (Vertical mount): Apply the double sided sticker (12) at the base (9) and attach the base mounted camera to the helmet. Helmet-Mount (Side mount): Attach the multifunction mount (6a) on the multifunction mount (6b) and then mount the base (9/5) to multifunction mount (6a). Finally mount the waterproof case with camera to (6b).
  • Seite 38: Product Features

    Product features • A water-resistant casing that allows you to film fascinating water sports: Water-resistant up to 30 metres underwater. • High definition screen that displays and replays fascinating videos that have been recorded. • Rechargeable battery that is easy to replace and prolongs your camera’s service life. •...
  • Seite 39 ] repeatedly to cycle through the camera modes. Camera mode Description Video recording mode Video, Loop Recording, Motion detect Photo shooting mode Single, Photo timer, Burst, Time lapse Play back content on the TFT display or on Play back mode a TV via HDMI cable.
  • Seite 40 Off / 3 Picture / 5 Picture Time-lapse Single / 3s / 5s / 10s Time Stamp Off / On Motion Detect Off / On (video mode only) Loop Recording Off / 1 Min. / 2 Min. / 3 Min. (video mode only)
  • Seite 41 Audio Record Off / On EV (Exposure value) +2/3 / +1/3 / +0.0 / -1/3 - 2/3 / -1.0 / -4/3 / -5/3 / - 2.0 Delete Delete One / Delete All Protect Lock One / Unlock One Lock All / Unlock All Format All data on the sd card will be deleted Language...
  • Seite 42: Technical Data

    Technical Data TFT Display 1.5 inch (3.81 cm) display Lens 140° wide angle Waterproof case Resistant up to 30 metres Language options English / German / French / Spanish / Italian / Portuguese / Chinese Traditional / Chinese Simplifi ed / Japanese / Russian Resolution of photos 12 MP (4032x3024), 10 MP (3648x2736),...
  • Seite 43 Storage Micro SD card up to 32 GB Shooting mode Single shot / Self-timer (2s/5s/10s) Frequency of optical source 50Hz/60Hz USB interface USB 2.0 Power source interface 500 mA Battery capacity 900 mAh Power dissipation 400mA@4.2V Recording time About 70 minutes (at 1080p) Charging time About 3 hours Operating systems (OS)
  • Seite 44 The warranty term is two years from the date of purchase. Please keep your proof of purchase. Register at www.bresser.de/warranty and fi ll out a brief questionnaire to get your warranty term extended to fi ve years. Registration must be completed within three months of purchase (date of receipt) to validate the warranty.
  • Seite 45 Important for any returns: Please make sure to return the device carefully packed in the original packaging in order to prevent damage during transport. Also, please enclose your receipt for the device (or a copy) and a description of the defect. This warranty does not imply any restriction of your statutory rights.
  • Seite 46: Instrucciones De Uso

    Instrucciones de uso...
  • Seite 47: Sobre Este Manual

    Sobre este manual Antes de utilizar el aparato, lea detenidamente las indicaciones de seguridad y el manual de instrucciones. Guarde el presente manual de instrucciones por si necesita volver a utilizarlo más tarde. En caso de venta o entrega a terceros del aparato, se debe entregar el manual de instrucciones al siguiente propietario/usuario del producto.
  • Seite 48: Notas Sobre La Limpieza

    • Limpie la carcasa de protección después de su uso con agua limpia y clara y séquela. Declaración de conformidad de la Unión Europea (CE) Bresser GmbH ha emitido una “Declaración de conformidad” de acuerdo con las directrices y normas correspondientes. Dicha declaración se puede...
  • Seite 49 ELIMINACIÓN Elimine los materiales de embalaje separados por tipos. Obtendrá información sobre la eliminación reglamentaria en los proveedores de servicios de eliminación municipales o en la agencia de protección medioambiental. ¡No elimine los electrodomésticos junto con la basura doméstica! Conforme a la directiva europea 2002/96/UE sobre aparatos eléctricos y electrónicos usados y a su aplicación en la legislación nacional, los aparatos eléctricos usados se deben recoger por separado y conducir a un reciclaje que no perjudique al medio ambiente.
  • Seite 50: Volumen De Suministro

    Volumen de suministro Cámara Carcasa sumergible Soporte de bicicleta Tornillos y tuercas para la fijación del soporte Base de la montura Montura multifunción 2x 90° (a+b) y 1x recta (c) Carcasa de la cámara y clip para el cinturón Adaptador de trípode de 1/4”...
  • Seite 52 Como abrir y cerrar la carcasa sumergible Como abrirla: Presione y mantenga el botón (1) y luego use la flecha (2) para abrir la pinza (3). Como cerrarla: Presione la puerta trasera hacia abajo (1) y luego encaje la abrazadera en la bisagra (2).
  • Seite 53 Como cambiar la batería Como cambiar la batería Tapa de la batería Cargar con la Fuente de alimentación incluida o a través del ordenador usando el cable USB. Como cambiar la puerta trasera Alinee la puerta trasera con la bisagra y presione hacia abajo hasta que encaje en su lugar.
  • Seite 54 Funciones Indicador Micrófono Ranura de Interruptor tarjeta Micro SD/TF ON/OFF & MODE Puerto Micro USB 2.0 Micro HDMI Lente ARRIBA & Micrófono on/off Indicador de funcionamiento Indicador de carga Altavoz ABAJO & Pantalla on/off Pantalla TFT...
  • Seite 55 Interruptor para abrir la carcasa sumergible Bloqueo de la tapa de la batería Lente ARRIBA ABAJO Interruptor ON/OFF & MODO...
  • Seite 56: Montaje De La Cámara

    Montaje de la cámara Montaje en una superficie plana o curva: Elija la base plana o curva dependiendo de la superficie. Instalación en una base plana:...
  • Seite 57 Montaje vertical: Montaje lateral:...
  • Seite 58: Ejemplos De Montaje

    Ejemplos de montaje: Montaje de la base: Ajustar la montura de la base (5) en la base (9). Utilice la base plana o la curva, dependiendo de la superficie. Ahora utilice los tornillo (4) para montarla junto la carcasa impermeable (2). Montaje para bicicleta: Fije la carcasa impermeable con la cámara (1/2) en la montura multifunción 6a.
  • Seite 59 Montaje para el casco (Montaje vertical): Ponga la etiqueta adhesiva 3M (12) en la base (9) y coloque la base de la montura en el casco. Montaje para el casco (Montaje lateral): Coloque la montura multifunción 6a en la montura multifunción 6b y luego monte la base (9/5) en la montura multifunción 6a.
  • Seite 60: Características Del Producto

    Características del producto • Una carcasa resistente al agua que le permite filmar fascinantes deportes acuáticos: Resistente al agua hasta una profundidad de 30 metros. • Pantalla de alta definición que muestra y reproduce los fascinantes videos grabados. • Batería desmontable que es fácil de reemplazar y prolonga la vida útil de su cámara. •...
  • Seite 61 4. Encender y apagar la cámara A. Presione y mantenga presionado el botón de encendido entre 3 y 5 segun- dos para encender o apagar la cámara. B. Encienda o apague la pantalla presionando el botón [ABAJO] para aumentar la vida de la batería durante su uso. 5.
  • Seite 62: Modo De Configuración

    6.2. Fotografías & Ajustes Cambie el modo de disparo presionando [ ]. Aparecerá el icono en la esquina superior izquierda. Presione ”OK” para tomar las fotos. 6.3. Almacenamiento de archivo & Reproducción Después de que haya terminado la grabación utilice un cable USB para exportar los vídeos a un ordenador y reproducirlos.
  • Seite 63 Grabación de voz Off / On EV (Valor de exposición) +2/3 / +1/3 / +0.0 / -1/3 - 2/3 / -1.0 / -4/3 / -5/3 / - 2.0 Borrar Borrar uno / Borrar todo Protección Bloquear uno/ Desbloquear uno Bloquear todo / Desbloquear todo Formateo Todos los datos de la tarjeta SD se borrarán Idioma...
  • Seite 64: Datos Técnicos

    Datos técnicos Pantalla TFT Pantalla de 1.5 pulgadas (3.81 cm) Lente 140° gran angular Opciones de idioma Resistant up to 30 metres Language options Ingles / Alemán / Francés / Español / Italiano / Portugués / Chino tradicional / Chino simplifi...
  • Seite 65 Almacenaje Tarjeta Micro SD hasta 32 GB posible Modo de disparo Disparo individual /Disparador automático (2s/5s/10s) Frecuencia 50Hz/60Hz Interfaz USB USB 2.0 Fuente de alimentación 500 mA Capacidad de la batería 900 mAh Disipación de potencia 400mA@4.2V Tiempo de grabación Aproximadamente 70 minutos (a 1080p) Tiempo de carga...
  • Seite 66 5 años, sólo tiene que registrarse en Internet y rellenar un breve cuestionario. Puede realizar el registro en www.bresser.de/warranty. Para hacer uso de la garantía es necesario realizar este registro dentro del plazo de 3 meses después de la compra (para ello se utiliza como referencia el justifi...
  • Seite 67 Importante para cualquier devolución: Asegúrese de devolver el producto cuidadosamente empaquetado en el embala- je original para evitar daños durante el transporte. Por favor adjuntar el recibo de caja (o una copia) y una descripción del defecto. Esta garantía no implica ninguna restricción de sus derechos legales.
  • Seite 68 © 2016 National Geographic Partners LLC. All rights reserved. NATIONAL GEOGRAPHIC and Yellow Border Design are trademarks of the National Geographic Society, used under license. Bresser GmbH Gutenbergstr. 2 DE-46414 Rhede www.bresser.de · info@bresser.de Irrtümer und technische Änderungen vorbehalten. ANL9683000MSP0116NG Errors and technical changes reserved.

Inhaltsverzeichnis