Werbung
Verfügbare Sprachen
Verfügbare Sprachen
Quicklinks
PlayFrame
Recommended Use
The PlayFrame is appropriate for children aged 3 to 6
years. It can be configured in many ways to encourage
children to engage in active and imaginative play that
stretches both mind and muscle.
IMPORTANT
Retain these instructions for future reference.
© 2013 by Community Products UK Ltd
LK18 Eu 0566 Revision 03
PlayFrame components ....................... 2
PlayFrame sets ..................................... 3
Safety instructions .............................. 3
Assembly .............................................. 4
Disassembly ......................................... 8
Maintenance ........................................ 9
Community Playthings
Brightling Road, Robertsbridge, TN32 5DR UK
www.communityplaythings.co.uk sales@communityplaythings.co.uk
Phone: 0800 387 457
Werbung
Kapitel

Verwandte Anleitungen für Community Playthings PlayFrame


Inhaltszusammenfassung für Community Playthings PlayFrame
-
Seite 1: Inhaltsverzeichnis
PlayFrame Recommended Use PlayFrame components ....... 2 The PlayFrame is appropriate for children aged 3 to 6 PlayFrame sets ........3 years. It can be configured in many ways to encourage Safety instructions ......3 children to engage in active and imaginative play that Assembly .......... -
Seite 2: Playframe Components
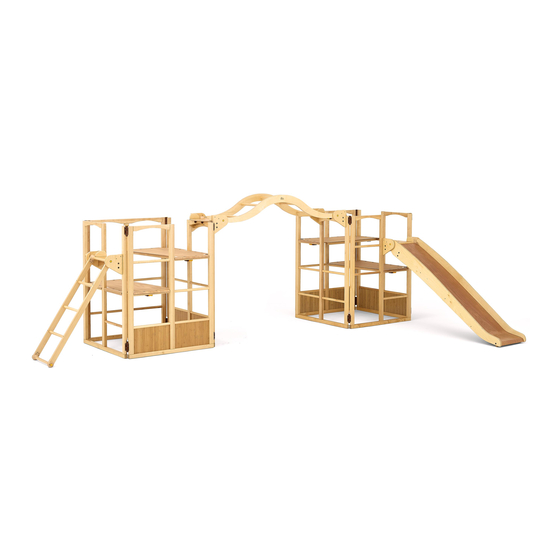
PlayFrame components Your PlayFrame set is made out of some or all of the components shown on this page. Square (with platforms) Square Platform Slide Bridge Ladder Perch communityplaythings.co.uk... -
Seite 3: Playframe Sets
Classic PlayFrame V865 Bridge PlayFrame V875 Grand PlayFrame V885 Make sure you have all the parts for your set before beginning to build your PlayFrame. If any parts are broken or missing, call customer service at 0800 387 457. Warnings Failure to follow these warnings and the assembly instructions could result in serious injury or death. -
Seite 4: Assembly
Assembly The PlayFrame must be assembled by adults. The steps below will help you set up your PlayFrame quickly and safely. Mats If using PlayFrame mats, we recommend laying them down first with no gaps • between them, and then erecting the PlayFrame on top of the mats. (Mats other than PlayFrame mats may not be firm enough to allow this.) - Seite 5 Platforms Always use at least one platform to ensure stability. CAUTION Install the platforms at any level other than resting on top of your PlayFrame. • The platforms can be installed either parallel or perpendicular to each other. • Lower platform in from top, slide narrow end out through frame, position and click in place Ensure that both latches on each platform are engaged.
- Seite 6 Ensure latch is fully engaged. • The Perch is used to connect the Bridge, Slide or Ladder to the PlayFrame. To do this, locate one • end of the accessory above the perch, depress the two yellow buttons and allow the accessory to lower into the Perch until both buttons click into place.
- Seite 7 Never hang a Ladder from a Perch connected to the top bar. Slide The Slide can be installed at different heights. • WARNINGS Ensure buttons are fully engaged into Perch Never connect a Slide to the top bar of the PlayFrame: communityplaythings.co.uk...
-
Seite 8: Disassembly
Disassembly Remove all accessories from the frame. Do Remove the Perches by disengaging the Remove the platforms. You must release this by pressing in both yellow buttons at the latches and lifting the Perches off. both latches. Two people doing this together end of the accessory and lifting it out of the is the easiest. -
Seite 9: Maintenance
Every 1 to 3 months test all connections to ensure they are functioning properly. Remove the product from service when any condition develops which might make operation unsafe. If you plan to store your PlayFrame, remember it is made of wood and should be kept in a dry place. Construction The wooden components are manufactured from solid birch wood or from birch or beech plywood and are protected with a durable child-safe finish. - Seite 10 PlayFrame Verwendungsrichtlinien PlayFrame Komponenten..... 2 PlayFrame Sets ........3 Das PlayFrame ist für Kinder von 3 bis 6 Jahren geeig- net. Es kann auf viele verschiedene Weisen aufgebaut Sicherheitshinweise ......3 werden, um Kinder dabei zu fördern, aktiv und fan- Zusammenbau ........
-
Seite 11: Playframe Komponenten
PlayFrame Komponenten Ihr PlayFrame-Set besteht aus einigen oder allen der unten abgebildeten Komponenten. Quadrat (mit Plattformen) Plattform für Quadrat Leiter Dock Brücke Rutsche communityplaythings.de... -
Seite 12: Playframe Sets
Classic PlayFrame V865 Brücken PlayFrame V875 Großes PlayFrame V885 Stellen Sie sicher, dass alle Teile Ihres PlayFrame-Sets vorhanden sind. Sollten Teile fehlen oder beschädigt sein, wenden Sie sich bitte an den Kundendienst unter 0800 266 7529. Achtung Die Missachtung dieser Warnungen und... -
Seite 13: Zusammenbau
Lücken zu lassen und dann das PlayFrame auf den Matten aufzubauen. (Andere Matten als die PlayFrame Matten sind möglicherweise nicht fest genug, um dies zu ermöglichen.) Stellen Sie sicher, dass der Boden bis zu einem Meter um das PlayFrame herum • völlig von Matten bedeckt ist. - Seite 14 Die Plattformen können entweder parallel oder im rechten Winkel zueinander • eingehängt werden. Heben Sie die Plattform von oben in das PlayFrame, schieben Sie dann das schmale Ende ein paar Zentimeter weit durch das Paneel hindurch, dann lässt sich die Plattform leicht positionieren und rastet hörbar ein.
- Seite 15 Stellen Sie sicher, dass der Schnappverschluss vollständig eingerastet ist. • Die Docks werden verwendet, um Brücke, Leiter oder Rutsche mit dem PlayFrame zu verbinden. • Platzieren Sie ein Ende des Zubehörteils (z.B. Leiter) oberhalb des Docks, drücken Sie die beiden gelben Knöpfe an den Seiten ein und lassen das Zubehör nach unten in das Dock hineingleiten...
- Seite 16 ACHTUNG Erlauben Sie Kindern niemals, über die Brücke zu klettern, wenn sie auf der oberen Umrandung zwischen zwei PlayFrame-Türmen eingehängt ist. Diese Konstellation darf nur zum Entlanghangeln an der Unterseite der Brücke benutzt werden. Stellen Sie sicher, dass sich keine harten Gegenstände unter der Leiter oder Brücke befinden, wenn diese zwischen zwei PlayFrame-Türmen eingehängt ist.
-
Seite 17: Auseinanderbau
Auseinanderbau Entfernen Sie alle Zubehörteile vom Entfernen Sie alle Docks, indem Sie den Nehmen Sie die Plattformen heraus. PlayFrame. Drücken Sie hierzu die Schnappverschluss unter dem Dock öffnen Dazu müssen beide Schnappverschlüsse beiden gelben Knöpfe tief ein, die in und das Dock anheben. -
Seite 18: Wartung
Alle 1 bis 3 Monate sollten Sie überprüfen, dass alle Verbindungen normal funktionieren. Stellen Sie das Produkt außer Dienst, wenn sich ein Zustand entwickelt, der die Benutzung unsicher machen könnte. Das PlayFrame ist aus Holz und muss an einem trockenen Ort verstaut werden. Konstruktion Die hölzernen Teile sind aus Birke massiv oder Birken- oder Buchensperrholz gefertigt und mit...