Inhaltsverzeichnis
Werbung
Verfügbare Sprachen
Verfügbare Sprachen
Professional Switch Mode Battery Charger and Conditioning Optimiser
P. 2 - 7
P. 8 - 14
2
4
6
7
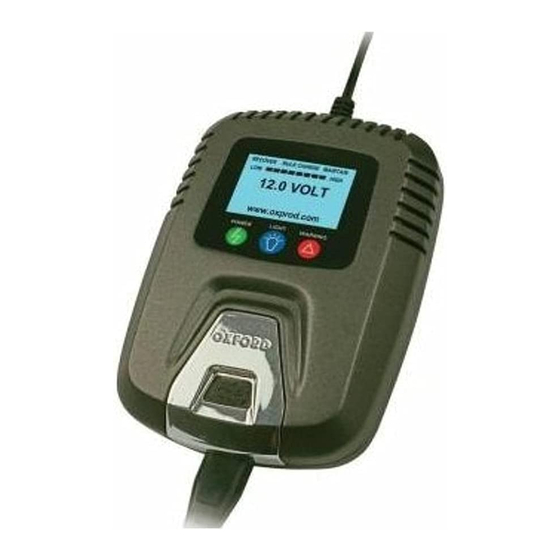
Ventilation
1
Charge Status
2
Battery level indicator
3
Battery voltage meter
4
see page 43 for foreign descriptions
Oximiser 900 v.1
For charging most 12 Volt batteries 1.2 - 30Ah
USER MANUAL
P. 15 - 21
www.oxprod.com
P. 22 - 28
P. 29 - 35
1
Battery connection
5
error indicator
Mains indicator
6
Back-lit display button
7
Induction cooling vent
8
P. 36 - 42
3
5
8
Werbung
Inhaltsverzeichnis

Verwandte Anleitungen für Oxford Oximiser 900


Inhaltszusammenfassung für Oxford Oximiser 900
- Seite 1 P. 22 - 28 P. 29 - 35 P. 36 - 42 Battery connection Ventilation error indicator Charge Status Mains indicator Battery level indicator Back-lit display button Battery voltage meter Induction cooling vent see page 43 for foreign descriptions www.oxprod.com Oximiser 900 v.1...
- Seite 2 If the battery is permanently damaged or will not accept a charge current, or if the voltage is below 4 volts, the Oximiser 900 will not attempt to re-charge. The red warning light will light up to prompt you to disconnect the Oximiser 900 from the battery.
- Seite 3 5. MAINTAIN ( FLOAT CHARGE ): a. The Oximiser 900 will maintain and optimise the battery indefi nitely so long as it remains connected to the battery. b. Continual voltage monitoring determines the battery condition and charge rate requirements.
-
Seite 4: Personal Precautions
7. Do not operate charger if it has received a sharp blow, been dropped, or otherwise damaged in any way; take it to a qualifi ed serviceman. Please note that Oxford Products are unable to offer this facility. If the charger case is opened it will invalidate the Oxford Products guarantee 8. - Seite 5 Do not operate charger in a closed-in area or restrict ventilation in any way. A suitable location should be selected for the Oximiser 900. This should be away from any moisture and with suffi cient ventilation to allow for cooling and battery gas discharge.
- Seite 6 fl ashing, then it means that the battery voltage is too low and the charger should be disconnected from the battery. 2. As soon as the mains power is turned on, the Oximiser 900 will start charging automatically. The charging process can be interrupted by switching off the mains power and then disconnecting the leads.
- Seite 7 3. The Oximiser 900 will automatically test, charge and maintain the battery so long as it is connected to the battery. 4. The digital display shows the voltage and charge rate in Amps/hour. When the Oximiser 900 has been connected for some time and it has entered the MAINTAIN mode, it will be normal for the digital display to read 0.00A.
-
Seite 8: Consignes De Sécurité Importantes *Conservez Ces Consignes
(B) Types de batterie et conseils sur le choix du mode de charge Étapes de charge L’Oximiser 900 est doté d’un système de gestion du cycle de charge sophistiqué. Ces étapes sont les suivantes : 1. CONTRÔLE DE POLARITÉ : Un contrôle de polarité... - Seite 9 Si la batterie est défi nitivement endommagée, ne tient pas la charge, ou si la tension est inférieure à 4 V, l’Oximiser 900 ne tente pas de la recharger. Le témoin rouge s’allume pour vous demander de débrancher l’Oximiser 900 de la batterie.
- Seite 10 état. L’Oximiser 900 chargera lentement jusqu’à 200 mA/h pour assurer que la batterie atteigne la pleine charge. iii. Si l’état de la batterie est optimal, l’Oximiser 900 ne tentera pas de la recharger pour éviter toute surcharge.
- Seite 11 éclater et de causer des blessures aux personnes ou d’endommager les biens. i) Ne chargez jamais une batterie gelée. 12. COMMENT BRANCHER L’OXIMISER 900 SUR UNE BATTERIE PRÉPARATION À LA MISE EN CHARGE : a) S’il s’avère nécessaire de déposer la batterie du véhicule pour la charger, débranchez toujours la fi...
- Seite 12 N’utilisez pas le chargeur dans un endroit fermé et ne gênez pas la ventilation de quelque manière que ce soit. L’Oximiser 900 doit être placé dans un endroit adéquat, c’est-à-dire protégé de toute humidité avec une aération suffi sante pour permettre le refroidissement et la dispersion des gaz de la batterie.
- Seite 13 Ces câbles sont fournis avec un capuchon étanche pour éviter la corrosion des connexions. NB : La programmation électronique avancée de l’Oximiser 900 empêche la production d’étincelles qui risqueraient d’enfl ammer les gaz de la batterie. Il est également impossible que les vis de serrage ou les pinces crocodile provoquent un court-circuit ou des étincelles car l’appareil revient en mode STANDBY (veille) s’il n’est pas connecté...
- Seite 14 L'Oximiser 900 teste, charge et entretient la batterie tant qu'il reste connecté à la batterie. L'écran numérique indique la tension et le taux de charge en ampères-heure. Lorsque l'Oximiser 900 a été connecté pendant un certain temps et est entré en mode ENTRETIEN, l'écran numérique affi...
-
Seite 15: Wichtige Sicherheitshinweise
Batterien und Gelbatterien. Kraftfahrzeugbatterien erfordern aufgrund ihrer Größe, Kapazität und Bauweise ein vorsichtigeres Laden, und der OXIMISER 900 ist für diese Aufgabe ideal geeignet. Er wurde spezifi sch zum Laden von Batterien in der Größenordnung von 1,2 bis 30 Ah entwickelt. -
Seite 16: Wiederherstellung
Sie den Oximiser 900 von der Batterie trennen müssen. 3. WIEDERHERSTELLUNG: a. Falls die Batterie auf ungefähr 4,1 Volt tiefentladen ist, wird der Oximiser 900 sie mit bis zu 900 mA/h aufl aden, bis ihre Spannung 11,8 Volt erreicht hat. Danach geht das Gerät in den Volllademodus über. - Seite 17 Weise beschädigt wurde. Das Gerät in diesem Fall von einem qualifi zierten Techniker überprüfen lassen. Bitte beachten Sie, dass Oxford Products leider keinen Reparaturdienst anbieten kann. Ein Öffnen des Gehäuses des Ladegeräts führt unvermeidlich zum Erlöschen der Garantie durch Oxford Products.
-
Seite 18: Persönliche Vorsichtsmaßnahmen
Das Laden von Trockenzellbatterien könnte zu deren Explosion und zur Verletzung von Personen sowie Sachbeschädigung führen. i) NIEMALS eine eingefrorene Batterie laden! 12. ANSCHLUSS DES OXIMISER 900 AN EINE BATTERIE VORBEREITUNG ZUM LADEN: a) Falls die Batterie zum Laden aus dem Fahrzeug ausgebaut werden muss, immer die Masseklemme zuerst von der Batterie abklemmen. -
Seite 19: Gs-Anschluss - Standardmäßige Vorsichtsmaßnahmen
Das Ladegerät nicht in einem geschlossenen Raum oder einem Raum betreiben, in dem die Belüftung in sonstiger Weise eingeschränkt ist. Wählen Sie einen geeigneten Standort für den Oximiser 900. Dieser Ort sollte trocken sein und über ausreichende Belüftung zum Abkühlen des Geräts und Entweichen der Batteriegase verfügen. -
Seite 20: (D) Beginn Des Ladevorgangs
Der Ladevorgang kann unterbrochen werden, indem die Netzspannung ausgeschaltet und die Kabel getrennt werden. 3. Der Oximiser 900 testet die Batterie automatisch und lädt sie und hält ihre Spannung so lange bei, wie er an die Batterie angeschlossen ist. Oximiser 900 v.1... -
Seite 21: (E) Standardausrüstung Und Optionales Zubehör
4. Die Digitalanzeige stellt die Werte für Spannung und Laderate in Ampere/Stunde dar. Wenn der Oximiser 900 eine Zeit lang angeschlossen gewesen und in den Wartungsmodus (MAINTAIN) übergegangen ist, stellt die Digitalanzeige normaler weise 0.00A dar. Damit wird angedeutet, dass das Ladegerät die Batterie nicht lädt, da sie jetzt voll geladen ist. - Seite 22 (B) Consigli sulla scelta della modalità di carica e i tipi di batteria Fasi di carica Oximiser 900 è dotato di un sistema sofi sticato per la gestione del ciclo di carica. Le fasi del ciclo di carica sono le seguenti: 1.
- Seite 23 Se la batteria è permanentemente danneggiata o non accetta una corrente di carica, oppure se la tensione è inferiore a 4 volt, Oximiser 900 non eseguirà alcun tentativo di carica. In questo caso, si accenderà la luce rossa per avvertire l’utente di scollegare l’Oximiser 900 dalla batteria.
- Seite 24 7. Non operare il caricabatteria se ha ricevuto un colpo, è caduto o è stato danneggiato in qualsiasi altro modo e rivolgersi ad un riparatore qualifi cato. Si fa presente che Oxford Products non è in grado di offrire questo servizio. Se l’involucro del caricatore viene aperto la garanzia Oxford Products non sarà più valida.
- Seite 25 NON caricare mai una batteria congelata. 12. COME COLLEGARE OXIMISER 900 AD UNA BATTERIA PREPARAZIONE ALLA CARICA: a) Se è necessario estrarre la batteria dal veicolo per caricarla, rimuovere sempre prima il terminale di terra dalla batteria.
- Seite 26 Non usare il caricabatteria in un’area chiusa o con ventilazione limitata. Individuare una posizione adatta per Oximiser 900 lontano da ambienti umidi e in luoghi con ventilazione suffi ciente da consentire il raffreddamento e la scarica dei gas dalla batteria.
- Seite 27 Il cavo della batteria può essere lasciato permanentemente in posizione sulla batteria e il connettore terminale può essere collocato in qualche posizione adatta che consenta una facile e rapida connessione a Oximiser 900 quando richiesto. I cavi sono forniti con un rivestimento resistente alle intemperie per evitare la corrosione delle connessioni.
- Seite 28 128 mm x 88 mm x 39 mm Peso: 0,4 kg (G) Dichiarazione di conformità Progettato e fabbricato da OXFORD PRODUCTS Ltd secondo le specifi che massime. Oximiser 900 è conforme ai seguenti standard: Standard di sicurezza: EN60335-1A13:2008, EN60335-2-29:2004, EN62233:2008, PPP76001:2008 inc. ZEK 01,2-08 Standard EMC: EN55014-1:2006, EN55014-2/A1:2001, EN61000-3-2:2006;...
-
Seite 29: Instrucciones Importantes Para La Seguridad
útil de una batería automotriz de 12 voltios. Este OXIMISER 900 utiliza el más avanzado software para electrónica, a fi n de asegurar que la batería sea cargada correctamente. Se puede utilizar con la mayoría de las baterías, incluidas las sin mantenimiento y de gel. - Seite 30 900 aplicará una carga suave, de hasta 200 mA/h, para asegurar que se lleva la batería a carga plena. iii. Si la batería sigue en estado óptimo, el Oximiser 900 no intentará cargarla; por lo tanto, no puede producirse sobrecarga.
-
Seite 31: Precauciones Personales
7. No utilice el cargador si ha recibido un golpe fuerte, se ha caído o ha sido averiado de manera alguna; llévelo a inspeccionar por personal de servicio califi cado. Recuerde que Oxford Products no ofrece este servicio. Si la carcasa del cargador está abierta, ello anulará la garantía de Oxford Products. -
Seite 32: Ubicación Del Cargador
JAMÁS cargue una batería congelada. 12. CÓMO CONECTAR EL OXIMISER 900 A UNA BATERÍA PREPARACIÓN PARA LA CARGA a) De ser necesario quite la batería del vehículo para cargarla. Deberá siempre desconectar primero el terminal de masa de la batería. - Seite 33 No opera el cargador en un lugar cerrado, ni restrinja la ventilación de manera alguna. Se debe elegir un lugar adecuado para el Oximiser 900. Debe estar alejado de la humedad y con sufi ciente ventilación para que pueda enfriarse y permitir que se disipen los gases descargados.
- Seite 34 (D) Cómo comenzar el proceso de carga 1. Observe lo indicado en el visualizador para verifi car que el Oximiser 900 ha sido conectado correctamente a los bornes de la batería. Si parpadea la luz de advertencia roja, signifi...
- Seite 35 4. El visualizador digital muestra la tensión y también la corriente de carga en amperios/ hora. Cuando el Oximiser 900 ya ha estado conectado por un cierto tiempo y ha pasado al modo MANTENIMIENTO, será normal que el visualizador digital indique 0.00 A.
- Seite 36 Można je stosować do większości akumulatorów, w tym bezobsługowych i żelowych. Różna wielkość akumulatorów w pojazdach samochodowych narzuca konieczność dokładnego ładowania; urządzenie OXIMISER 900 nadaje się doskonale do tego zadania. Nadaje się ono idealnie do ładowania akumulatorów o pojemności od 1,2Ah aż...
- Seite 37 ładowania, aby zapewnić utrzymanie akumulatora w doskonałym stanie. Oximiser 900 użyje delikatnego prądu ładowania, do 200mA/h, co zapewni doładowanie akumulatora do pełnej wartości. iii. Jeśli akumulator jest w bardzo dobrym stanie, Oximiser 900 nie podejmie próby ładowania, nie nastąpi zatem żadne przeciążenie akumulatora nadmiernym ładunkiem.
-
Seite 38: Osobiste Środki Ostrożności
7. Nie należy używać ładowarki, jeśli została mocno uderzona, spadła, bądź została uszkodzona w inny sposób; należy oddać ją do specjalistycznego punktu naprawy. Proszę zwrócić uwagę, że fi rma Oxford Products nie zapewnia takiej placówki. W wypadku otwarcia obudowy, nastąpi wygaśnięcie gwarancji fi rmy Oxford Products. - Seite 39 Ładowanie akumulatorków z ogniwami suchymi może spowodować ich wybuch i obrażenia ciała oraz zniszczenia mienia. i) NIGDY nie ładujmy zamarzniętego akumulatora. 12. SPOSÓB PODŁĄCZENIA URZĄDZENIA OXIMISER 900 DO AKUMULATORA PRZYGOTOWANIE DO ŁADOWANIA: a) Jeśli jest to konieczne do ładowania, należy wyjąć akumulator z pojazdu, przy czym pamiętajmy, aby zawsze najpierw odłączyć...
- Seite 40 Nie używajmy ładowarki w zamkniętych pomieszczeniach lub miejscach o ograniczonej, w ten czy inny sposób, wentylacji. Dla urządzenia Oximiser 900 musimy wybrać odpowiednie miejsce. Winno być pozbawione wszelkiej wilgoci i mieć wystarczającą wentylację umożliwiającą chłodzenie i odprowadzanie gazów z akumulatora.
- Seite 41 4. Wyświetlacz cyfrowy ukazuje napięcie i wartość natężenia prądu ładowania w Amp/ godz. Kiedy Oximiser 900 zostanie podłączony na określony czas i wejdzie w tryb KONSERWACJI, odczyt na wyświetlaczu wykaże wartość 0,00A, co jest zjawiskiem normalnym.
- Seite 42 • Wymiary maksymalne: 128mm x 88mm x 39mm • Ciężar: 0,4 kg (G) Deklaracja zgodności Urządzenie zaprojektowane i wytworzone przez OXFORD PRODUCTS Ltd i spełnia najsurowsze kryteria techniczne. Urządzenie Oximiser 900 spełnia wymogi następujących standardów: Standardy bezpieczeństwa: EN60335-1A13:2008, EN60335-2-9:2004, EN62233:2008, PPP76001:2008inc.
- Seite 43 Ventilation Belüftung État de charge Ladezustand Témoin de volte / ampère Batteriestandsanzeige Témoin d’erreur de branchement Batteriespannungsmesser Bouton témoin de marche/arrêt Batterieanschluss-Fehleranzeige Affi chage rétroéclairé Netz-Anzeigetaste Back-lit display Display mit Hintergrundbeleuchtung Induction cooling vent Induktionskühlöffnung Ventilazione Ventilación Stato della carica Estado de carga Indicatore del livello della batteria Indicador de nivel de batería...