Herunterladen Diese Seite drucken
Vorschau ausblenden Andere Handbücher für P1367-E:

Werbung

Verfügbare Sprachen
  • DE

Verfügbare Sprachen

  • DEUTSCH, seite 59
AXIS P1367-E Network Camera
Installation Guide

Werbung

loading

Inhaltszusammenfassung für Axis P1367-E

  • Seite 1 AXIS P1367-E Network Camera Installation Guide...
  • Seite 3 English France: Français Deutschland: Deutsch Italia: Italiano España: Español 日本: 日本語 中文: 简体中文...
  • Seite 4 Every care has been taken in the preparation of this 2011/65/EU. See Disposal and recycling 5. document. Please inform your local Axis office of any A copy of the original declaration of conformity may be obtained from Axis Communications AB. See Contact inaccuracies or omissions.
  • Seite 5 Search by product, category, or phrase disposed of together with household or commercial waste. • report problems to Axis support staff by logging in to Directive 2012/19/EU on waste electrical and electronic your private support area equipment (WEEE) is applicable in the European Union •...
  • Seite 6: Inhaltsverzeichnis

    Installation Guide Package contents ..........Product overview .
  • Seite 7 AXIS P1367-E Network Camera Batterie ............
  • Seite 8 Installation Guide Trasporto ............106 Batteria .
  • Seite 9 AXIS P1367-E Network Camera 安 安 安 全 全 全 手 手 手 順 順 順 ..........
  • Seite 10 Installation Guide...
  • Seite 11: Package Contents

    AXIS P1367-E Network Camera Package contents • AXIS P1367-E Network Camera • 4–pin I/O connector block for connecting external devices • 2–pin RS485/422 connector block (x2) • Wall mount • Torx screwdriver T20 • Torx screwbit T30 • Mounting tool for RJ45 •...
  • Seite 12: Product Overview

    AXIS P1367-E Network Camera Product overview Weather shield Top cover Window Intrusion alarm magnet Safety wire Cable tie anchor IK10 tool Intrusion alarm sensor Cable cover 10 Spring loaded thumb screw (4x) 11 Optic unit 12 Zoom puller 13 Lock screw for focus ring...
  • Seite 13 AXIS P1367-E Network Camera 15 Status LED 16 Network LED 17 Power LED 18 microSD card slot 19 I/O connector 20 RS485/422 connector 21 Control button 22 Network connector (PoE) 23 Audio out 24 Audio in 25 Cable gasket M20 (2x)
  • Seite 14: How To Install The Product

    • Be careful not to scratch, damage or leave fingerprints on the window because this could decrease image quality. The Axis product can be installed with the cables routed through or along the wall. Read all the instructions before installing the product.
  • Seite 15 AXIS P1367-E Network Camera 2. Select which cable gasket to use and pull the tab to open a hole for the network cable. Bottom cover Bottom cover screw T20 (4x) Cable gasket M20 (2x) 3. Push the network cable through the cable gasket.
  • Seite 16 AXIS P1367-E Network Camera NO TICE TICE TICE Not pulling the cable back could cause water to seep in and damage the product. 5. Make sure that the cable gasket is fitted properly. 6. If connecting an auxiliary device, for example an I/O, audio, or external power device, to the camera, repeat the steps above as applicable to the specific device.
  • Seite 17 AXIS P1367-E Network Camera 8. If applicable, connect external I/O devices or audio devices to the camera. 9. If using an SD card for local storage, insert the card into the camera’s SD card slot. 10. Connect the network cable.
  • Seite 18 AXIS P1367-E Network Camera Safety hook Desiccant bag 15. Remove the plastic wrapper from the desiccant bag. 16. Remove the protective strip from the adhesive and attach the desiccant bag to the top cover. 17. Close the housing. Alternately tighten the bottom cover screws a few turns at a time until they are tight (torque 1.5 Nm).
  • Seite 19 AXIS P1367-E Network Camera How to set up corridor format Lock screw (2x) Optic unit 1. Loosen the two lock screws. 2. Rotate the optic unit. 3. Tighten the lock screws. 4. Go to the Stream tab on the product’s webpage and rotate the view 90°.
  • Seite 20: How To Access The Product

    5. Tighten the thumb screws. How to access the product AXIS IP Utility and AXIS Camera Management are recommended methods for finding Axis products on the network and assigning them IP addresses in Windows®. Both applications are free and can be downloaded from www.axis.com/support...
  • Seite 21: How To Adjust Focus And Zoom

    • If movements in front of the camera cannot be avoided, the Focus Assistant should not be used. • If the control button is not released within two seconds, AXIS Internet Dynamic DNS Service is enabled instead of the Focus Assistant. For more information about AXIS Internet Dynamic DNS Service, see www.axis.com.
  • Seite 22 AXIS P1367-E Network Camera 7. Go to the Image tab in the product's webpage. 8. Click Autofocus and follow the instructions from the wizard.
  • Seite 23: How To Reset To Factory Default Settings

    AXIS P1367-E Network Camera How to reset to factory default settings Important Reset to factory default should be used with caution. A reset to factory default resets all settings, including the IP address, to the factory default values. To reset the product to the factory default settings: 1.
  • Seite 24: Further Information

    The user manual is available at www.axis.com • To check if there is updated firmware available for your product, see www.axis.com/support • For useful online trainings and webinars, see www.axis.com/academy Optional accessories For a complete list of available accessories for this product, go to www.axis.com...
  • Seite 25: Technical Specifications

    AXIS P1367-E Network Camera Technical specifications To find the latest version of the datasheet, go to www.axis.com > product > Support & Documentation. LED Indicators Status LED Indication Green Steady green for normal operation. Amber Steady during startup. Flashes when restoring settings.
  • Seite 26: Sd Card Slot

    Resetting the product to factory default settings. See How to reset to factory default settings on page 23. • Connecting to an AXIS Video Hosting System service or AXIS Internet Dynamic DNS Service. For more information about these services, see the User Manual. Connectors Network connector RJ45 Ethernet connector with Power over Ethernet (PoE).
  • Seite 27 AXIS P1367-E Network Camera • Audio out – 3.5 mm output for audio (line level) that can be connected to a public address (PA) system or an active speaker with a built-in amplifier. A stereo connector must be used for audio out.
  • Seite 28 AXIS P1367-E Network Camera 0 V DC (-) DC output 12 V, max 50 mA I/O configured as input I/O configured as output RS485/RS422 connector Two 2-pin terminal blocks for RS485/RS422 serial interface used to control auxiliary equipment such as pan-tilt devices.
  • Seite 29: Operating Conditions

    AXIS P1367-E Network Camera Function Notes RS485B alt RX pair for all modes (combined RX/TX for 2-wire RS485) RS485/422 RX(B) RS485A alt RS485/422 RX(A) TX pair for RS422 and 4-wire RS485 RS485/RS422 TX(B) RS485/RS422 TX(A) Important The recommended maximum cable length is 30 m (98 ft).
  • Seite 31: Safety Information

    AXIS P1367-E Network Camera Safety information Hazard levels DANGER Indicates a hazardous situation which, if not avoided, will result in death or serious injury. WARNING Indicates a hazardous situation which, if not avoided, could result in death or serious injury.
  • Seite 32: Safety Instructions

    Battery The Axis product uses a 3.0 V CR2032 lithium battery as the power supply for its internal real-time clock (RTC). Under normal conditions this battery will last for a minimum of five years. Low battery power affects the operation of the RTC, causing it to reset at every power-up. When the battery needs replacing, a log message will appear in the product’s server report.
  • Seite 33 AXIS P1367-E Network Camera • Dispose of used batteries according to local regulations or the battery manufacturer's instructions.
  • Seite 35: Contenu De L'emballage

    AXIS P1367-E Network Camera Contenu de l’emballage • Caméra réseau AXIS P1367-E • Bloc de connexion à 4 broches pour le raccordement de dispositifs externes au connecteur pour terminaux E/S • Bloc de connexion RS485/422 à 2 broches (x2) •...
  • Seite 36: Vue D'ensemble Du Produit

    AXIS P1367-E Network Camera Vue d'ensemble du produit Protection étanche Couvercle supérieur Fenêtre Aimant d’alarme d’intrusion Câble de sécurité point d'attache de câbles Outil IK10 Capteur d’alarme d’intrusion Couvercle de câble 10 Vis papillon (x4) 11 Unité optique 12 Commande de zoom...
  • Seite 37 AXIS P1367-E Network Camera 15 Voyant d’état 16 Voyant réseau 17 Voyant d’alimentation 18 Emplacement pour carte microSD 19 Connecteur d’E/S 20 Connecteur RS485/422 21 Bouton de commande 22 Connecteur réseau (PoE) 23 Sortie audio 24 Entrée audio 25 Joint de câble M20 (x2)
  • Seite 38: Comment Installer Le Produit

    • Veillez à ne pas rayer, endommager ou laisser d'empreintes sur la vitre, car cela pourrait altérer la qualité d'image. Le produit Axis peut être installé avec des câbles acheminés à travers ou le long du mur. Lisez toutes les instructions avant l’installation de l’appareil.
  • Seite 39 AXIS P1367-E Network Camera • Ouvrez uniquement un trou dans les joints de câble qui seront utilisés. Si un joint de câble est endommagé, remplacez-le par un nouveau. L’utilisation d’un joint de câble ouvert ou endommagé risque d’entraîner une infiltration d’eau et d’endommager le produit.
  • Seite 40 AXIS P1367-E Network Camera 4. Tirez légèrement sur le câble réseau pour que le joint s'ajuste dessus. A A A VIS Si vous ne tirez pas sur le câble, il existe un risque d'infiltration d’eau et d’endommagement du produit. 5. Assurez-vous que le joint de câble est correctement installé.
  • Seite 41 AXIS P1367-E Network Camera 7. Placez le couvercle inférieur sur la fixation murale et serrez les vis (couple 2 Nm). 8. Le cas échéant, connectez les dispositifs d’E/S ou les appareils audio externes à la caméra. 9. Si vous utilisez une carte SD en tant qu’espace de stockage local, insérez la carte dans le logement prévu à...
  • Seite 42 AXIS P1367-E Network Camera Crochet de sécurité Sachet dessiccatif 15. Retirez la protection en plastique du sachet dessiccatif. 16. Retirez la bande de protection de l’adhésif et fixez le sachet dessiccatif au couvercle supérieur. 17. Fermez le boîtier. Vous pouvez également serrer les vis du couvercle inférieur de quelques tours à...
  • Seite 43 AXIS P1367-E Network Camera Configuration du format corridor Vis de verrouillage (x2) Unité optique 1. Desserrez les deux vis de verrouillage. 2. Faites pivoter l’unité optique. 3. Serrez les vis de verrouillage. 4. Accédez à l’onglet Stream (Flux) de la page Web du produit et faites pivoter la vue à 90 °.
  • Seite 44: Comment Accéder Au Produit

    5. Serrez les vis papillon. Comment accéder au produit Si vous souhaitez rechercher des produits Axis sur le réseau ou leur affecter des adresses IP sous Windows®, nous recommandons l’utilisation des applications AXIS IP Utility et AXIS Camera Management. Ces deux applications sont gratuites et peuvent être téléchargées depuis www.axis.com/support...
  • Seite 45: Réglage De La Mise Au Point Et Du Zoom

    • Si les mouvements devant la caméra ne peuvent pas être évités, l’assistant de mise au point ne doit pas être utilisé. • Si vous ne relâchez pas le bouton de commande dans les deux secondes, le service AXIS Internet Dynamic DNS est activé au lieu de l’assistant de mise au point. Pour plus d’informations concernant le service AXIS Internet Dynamic DNS, consultez le site...
  • Seite 46 AXIS P1367-E Network Camera 3. Réglez la caméra sur sa position de mise au point à distance extrême en desserrant la commande de mise au point et en tournant la bague de mise au point au maximum dans le sens des aiguilles d’une montre.
  • Seite 47: Comment Restaurer Les Paramètres Par Défaut

    AXIS P1367-E Network Camera Comment restaurer les paramètres par défaut Important La restauration des paramètres par défaut doit être effectuée avec prudence. Cette opération reconfigure tous les paramètres, y compris l’adresse IP, aux valeurs d’usine par défaut. Pour réinitialiser l’appareil aux paramètres d’usine par défaut : 1.
  • Seite 48: Informations Complémentaires

    Pour vérifier si des mises à jour des logiciels sont disponibles pour votre appareil réseau, consultez le site www.axis.com/techsup. • Pour en savoir plus sur les formations, les webinaires, les tutoriels et les guides, visitez le site www.axis.com/academy. Accessoires en option Pour obtenir la liste complète des accessoires disponibles pour ce produit, consultez www.axis.com...
  • Seite 49: Caractéristiques Techniques

    AXIS P1367-E Network Camera Caractéristiques techniques Pour obtenir la dernière version de la fiche technique, rendez-vous sur www.axis.com> produit > Support et documentation. Voyants Indication Voyant d’état Vert Vert et fixe en cas de fonctionnement normal. Orange Fixe pendant le démarrage. Clignote lors de la restauration des paramètres.
  • Seite 50: Emplacement Pour Carte Sd

    Réinitialisation du produit aux paramètres d’usine par défaut. Cf. Comment restaurer les paramètres par défaut page 47. • Connexion au service du Système d’hébergement vidéo AXIS ou au service AXIS Internet Dynamic DNS. Pour plus d'informations sur ces services, reportez-vous au Manuel de l'utilisateur.
  • Seite 51 AXIS P1367-E Network Camera Connecteur audio Le produit Axis dispose des connecteurs audio suivants : • Entrée audio – entrée de 3,5 mm pour microphone mono ou signal d’entrée mono (le canal de gauche est utilisé pour le signal stéréo).
  • Seite 52 AXIS P1367-E Network Camera Peut servir à alimenter le matériel auxiliaire. Sortie CC 12 V CC Remarque : cette broche ne peut être utilisée que Charge maximale = comme sortie d’alimentation. 50 mA 3– Configurable Entrée numérique – Connectez-la à la broche 1 0 à...
  • Seite 53: Conditions D'utilisation

    AXIS P1367-E Network Camera Connecteur RS485/RS422 Deux blocs terminaux à 2 broches pour l’interface série RS485/RS422 utilisée pour commander les équipements auxiliaires, tels que les dispositifs panoramique/inclinaison. Le port série peut être configuré pour la prise en charge de : •...
  • Seite 54 AXIS P1367-E Network Camera Produit Alimentation par Ethernet (PoE) IEEE 802.3af/802.3at Type 1 Classe 3 Max. 9,2 W AXIS P1367-E Standard 5,3 W...
  • Seite 55: Informations Sur La Sécurité

    AXIS P1367-E Network Camera Informations sur la sécurité Niveaux de risques DANGER Indique une situation dangereuse qui, si elle n'est pas évitée, entraînera le décès ou des blessures graves. AVERTISSEMENT Indique une situation dangereuse qui, si elle n'est pas évitée, pourrait entraîner le décès ou des blessures graves.
  • Seite 56: Consignes De Sécurité

    éviter d'endommager le produit. Batterie Le produit Axis utilise une batterie au lithium CR2032 3,0 V comme alimentation de son horloge en temps réel interne (RTC). Dans des conditions normales, cette batterie a une durée de vie minimale de cinq ans.
  • Seite 57 AXIS P1367-E Network Camera Les piles boutons 3,0 V au lithium contiennent du 1,2-diméthoxyéthane, éthylène glycol diméthyl éther (EGDME), CAS N° 110-71-4. AVERTISSEMENT • Risque d'explosion si la batterie est remplacée de façon incorrecte. • Remplacez-la uniquement par une batterie identique ou une batterie recommandée par Axis.
  • Seite 59: Lieferumfang

    AXIS P1367-E Network Camera Lieferumfang • AXIS P1367-E Netzwerk-Kamera • 4-poliger E/A-Anschlussblock für den Anschluss externer Geräte • 2-poliger RS485/422-Anschlussblock (2x) • Wandhalterung • Torx T20-Schraubendreher • Torx T30-Schraubenset • RJ-45-Montagewerkzeug • IK10-Werkzeug • Antikondensationsbeutel • Gedruckte Dokumente Installationsanleitung (dieses Dokument) Zusätzliche Etiketten mit der Seriennummer (2x)
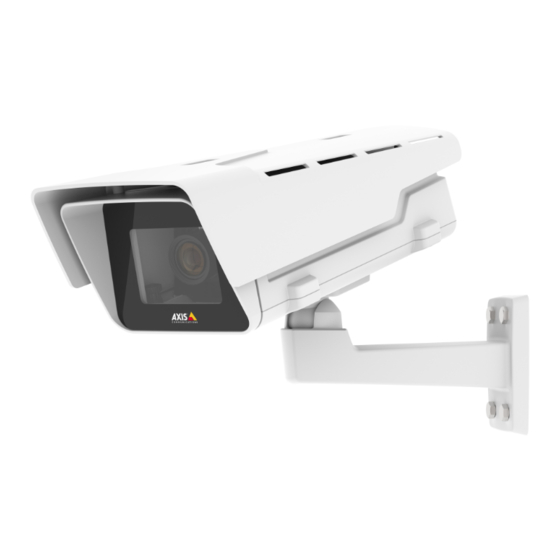
  • Seite 60: Produktübersicht

    AXIS P1367-E Network Camera Produktübersicht Wetterschutz Obere Abdeckung Fenster Einbruchalarmmagnet Sicherheitsdraht Kabelbinderverankerung IK10-Werkzeug Einbruchalarmsensor Kabelabdeckung 10 Gefederte Rändelschrauben (4x) 11 Optisches Gerät 12 Zoomregler 13 Feststellschraube für den Fokusring 14 Fokusring HINWEIS HINWEIS HINWEIS Heben Sie das Produkt nicht in die Kabelabdeckung hinein.
  • Seite 61 AXIS P1367-E Network Camera 15 Status-LED 16 Netzwerk-LED 17 Netz-LED 18 microSD-Kartensteckplatz 19 E/A-Anschluss 20 RS485/422-Anschluss 21 Steuertaste 22 Netzwerkanschluss (PoE) 23 Audioausgang 24 Audioeingang 25 Kabeldichtung M20 (2x) 26 Blendenanschluss...
  • Seite 62: Installieren Des Produkts

    • Vermeiden Sie Kratzer, Beschädigungen oder Fingerabdrücke am Fenster, da dies die Bildqualität beeinträchtigen kann. Bei der Installation des Axis Produkts können die Kabel durch die Wand oder an der Wand entlang geführt werden. Lesen Sie die Anweisungen, bevor Sie das Produkt installieren.
  • Seite 63 AXIS P1367-E Network Camera HINWEIS HINWEIS HINWEIS • Wird mehr als ein Kabel verwendet, muss jedes Kabel durch eine separate Kabeldichtung geführt werden. • Öffnen Sie bei den verwendeten Kabeldichtungen nur ein Loch. Wenn eine Kabeldichtung eingerissen ist, ersetzen Sie diese durch eine neue. Wenn eine Kabeldichtung geöffnet bleibt oder eine eingerissene Kabeldichtung verwendet wird, kann Wasser eindringen und das Produkt beschädigen.
  • Seite 64 AXIS P1367-E Network Camera 4. Ziehen Sie das Netzwerkkabel ein wenig zurück, bis die Kabeldichtung bündig um das Kabel sitzt. HINWEIS HINWEIS HINWEIS Wird das Kabel nicht zurückgezogen, kann Wasser eindringen und das Produkt beschädigen. 5. Vergewissern Sie sich, dass die Kabeldichtung ordnungsgemäß sitzt.
  • Seite 65 AXIS P1367-E Network Camera Untere Abdeckung Schraube T20 (4x) Wandhalterung Einstellschraube T30 für Halterung 7. Setzen Sie die untere Abdeckung auf die Wandhalterung und ziehen Sie die Schrauben an (Drehmoment 2 Nm). 8. Schließen Sie ggf. externe Eingabe-/Ausgabegeräte oder Audiogeräte an die Kamera an.
  • Seite 66 AXIS P1367-E Network Camera 9. Wenn Sie eine SD-Karte als lokalen Speicher verwenden, schieben Sie die Karte in den SD-Karteneinschub der Kamera. 10. Schließen Sie das Netzwerkkabel an. 11. Vergewissern Sie sich, dass die Kamera-LEDs den richtigen Betriebszustand anzeigen. Siehe LEDs auf Seite 74.
  • Seite 67 AXIS P1367-E Network Camera Sicherheitshaken Antikondensationsbeutel 15. Entfernen Sie die Plastikschutzhülle des Antikondensationsbeutels. 16. Entfernen Sie den Schutzstreifen von der Klebefläche und bringen Sie den Antikondensationsbeutel an der oberen Abdeckung an. 17. Schließen Sie das Gehäuse. Ziehen Sie die Schrauben der unteren Abdeckung im Wechsel jeweils wenige Umdrehungen an, bis sie fest sitzen (Drehmoment 1,5 Nm).
  • Seite 68: Einrichten Des Corridor Formats

    AXIS P1367-E Network Camera Einrichten des Corridor Formats Feststellschraube (2x) Optisches Gerät 1. Lösen Sie beide Feststellschrauben. 2. Drehen Sie das optische Gerät. 3. Ziehen Sie die Feststellschrauben an. 4. Rufen Sie auf der Produktwebseite die Registerkarte Stream auf und drehen Sie die...
  • Seite 69: Positionieren Des Objektivs Für Ik10

    5. Ziehen Sie die Rändelschrauben an. Zugriff auf das Produkt Für die Suche nach Axis Produkten im Netzwerk und die Zuweisung einer IP-Adresse unter Windows® werden AXIS IP Utility und AXIS Camera Management empfohlen. Beide Anwendungen sind kostenlos und können von www.axis.com/support heruntergeladen werden.
  • Seite 70: Einstellen Von Fokus Und Zoom

    • Wenn Sie die Steuertaste nicht innerhalb von zwei Sekunden loslassen, wird anstelle des Fokus-Assistenten der AXIS Internet Dynamic DNS-Service aktiviert. Weitere Informationen über den AXIS Internet Dynamic DNS-Service finden Sie unter www.axis.com. Wenn die Status-LED rot oder gelb blinkt, bevor Sie das Objektiv einstellen können, beenden Sie den Fokus-Assistenten und wiederholen Sie die Schritte.
  • Seite 71 AXIS P1367-E Network Camera 4. Drehen Sie den Fokusring vorsichtig gegen den Uhrzeigersinn bis zum Anschlag. 5. Drehen Sie den Fokusring langsam im Uhrzeigersinn, bis die Statusanzeige grün blinkt. 6. Drehen Sie den Schärferegler wieder fest. 7. Rufen Sie auf der Produktwebseite die Registerkarte Bild auf.
  • Seite 72: Zurücksetzen Auf Die Werksseitigen Standardeinstellungen

    AXIS P1367-E Network Camera Zurücksetzen auf die werksseitigen Standardeinstel- lungen Wichtig Die Funktion zum Zurücksetzen auf die werksseitigen Standardeinstellungen sollte mit Vorsicht angewendet werden. Beim Zurücksetzen auf die Werkseinstellungen werden alle Einstellungen einschließlich der IP-Adresse auf die Werkseinstellungen zurückgesetzt. So wird das Produkt auf die werksseitigen Standardeinstellungen zurückgesetzt: 1.
  • Seite 73: Weitere Informationen

    • Das Benutzerhandbuch steht unter www.axis.com zur Verfügung. • Unter www.axis.com/support finden Sie Firmware-Aktualisierungen für Ihre Produkte. • Nützliche Onlineschulungen und Webinare finden Sie unter www.axis.com/academy. Optionales Zubehör Eine vollständige Liste mit Zubehör für dieses Produkt finden Sie unter www.axis.com.
  • Seite 74: Technische Daten

    AXIS P1367-E Network Camera Technische Daten Die aktuelle Version der technischen Kenndaten finden Sie auf www.axis.com unter Product > Support & Documentation. LEDs Status-LED Bedeutung Leuchtet bei Normalbetrieb grün. Grün Gelb Leuchtet beim Start. Blinkt beim Wiederherstellen der Einstellungen. Netzwerk-LED Bedeutung Grün...
  • Seite 75: Sd-Karteneinschub

    Zurücksetzen des Produkts auf die Werkseinstellungen. Siehe Zurücksetzen auf die werksseitigen Standardeinstellungen auf Seite 72. • Verbinden mit einem AXIS Video Hosting System-Service oder einem AXIS Internet Dynamic DNS-Service. Weitere Informationen zu diesen Diensten finden Sie in der Bedienungsanleitung. Anschlüsse Netzwerkanschluss RJ45-Ethernetanschluss mit Power over Ethernet (PoE).
  • Seite 76: Über E/A-Anschlüsse

    AXIS P1367-E Network Camera • Audioeingang – 3,5 mm, für ein Monomikrofon oder ein Monosignal (der linke Kanal wird von einem Stereosignal benutzt). • Audioausgang – 3,5-mm-Audioausgang (Leitungspegel) zum Anschluss an eine Beschallungsanlage (PA) oder einen Aktivlautsprecher mit integriertem Verstärker. Für den Audioausgang muss ein Stereostecker verwendet werden.
  • Seite 77 AXIS P1367-E Network Camera DC-Ausgang Kann für die Stromversorgung von Zusatzgeräten 12 V DC verwendet werden. Max. Stromstärke = Hinweis: Dieser Kontakt kann nur für den 50 mA Stromausgang verwendet werden. 3– Konfigurier- Digitaleingang – zum Aktivieren mit Pin 1 0 bis max.
  • Seite 78: Betriebsbedingungen

    AXIS P1367-E Network Camera RS485-/RS422-Anschluss Zwei 2-polige Anschlussblöcke für serielle Schnittstellen vom Typ RS485/RS422 zur Steuerung von Zusatzgeräten, beispielsweise zum Schwenken und Neigen. Der serielle Anschluss kann in den folgenden Anschlussmodi konfiguriert werden: • zweiadriger RS485-Halbduplex-Anschluss • vieradriger RS485-Vollduplex-Anschluss • zweiadriger RS422-Simplex-Anschluss •...
  • Seite 79 AXIS P1367-E Network Camera Produkt Power over Ethernet (PoE) IEEE 802.3af/802.3at Typ 1, Klasse 3 AXIS P1367-E Max. 9,2 W Normal: 5,3 W...
  • Seite 81: Sicherheitsinformationen

    AXIS P1367-E Network Camera Sicherheitsinformationen Gefährdungsstufen GEFAHR Weist auf eine gefährliche Situation hin, welche zum Tod oder zu schweren Verletzungen führt. WARNUNG Weist auf eine gefährliche Situation hin, welche, falls nicht verhindert, zu Tod oder schweren Verletzungen führen kann. VORSICHT Weist auf eine gefährliche Situation hin, welche, falls nicht verhindert, zu geringfügiger...
  • Seite 82: Sicherheitsanweisungen

    • Lagern Sie das Axis Produkt in einer trockenen und belüfteten Umgebung. • Achten Sie darauf, dass das Axis Produkt weder Stößen noch starkem Druck ausgesetzt ist. • Installieren Sie das Produkt nicht an instabilen Masten, Halterungen, Oberflächen oder Wänden.
  • Seite 83 AXIS P1367-E Network Camera WARNUNG • Explosionsgefahr bei fehlerhaftem Batteriewechsel. • Die Batterie darf nur durch eine identische Batterie oder eine von Axis empfohlene Batterie ersetzt werden. • Verbrauchte Batterien sind gemäß den örtlichen Vorschriften oder den Anweisungen des Herstellers zu entsorgen.
  • Seite 85: Contenuto Della Confezione

    AXIS P1367-E Network Camera Contenuto della confezione • Telecamera di rete AXIS P1367-E • Morsettiera I/O a 4 pin per collegare dispositivi esterni • Morsettiera RS485/422 a 2 pin (2) • Montaggio a parete • Cacciavite Torx T20 • Punta da cacciavite Torx T30 •...
  • Seite 86: Panoramica Del Dispositivo

    AXIS P1367-E Network Camera Panoramica del dispositivo Schermo di protezione dagli agenti atmosferici Protezione superiore Finestra Calamita allarme anti intrusione Cavo di sicurezza Ancoraggio fascetta Strumento IK10 Sensore allarme anti intrusione Copertura dei cavi 10 Vite ad alette a molla (4) 11 Unità...
  • Seite 87 AXIS P1367-E Network Camera 15 LED di stato 16 LED di rete 17 Power LED 18 Slot per scheda di memoria microSD 19 Connettore I/O 20 Connettore RS485/422 21 Pulsante di comando 22 Connettore di rete (PoE) 23 Uscita audio...
  • Seite 88: Come Installare Il Dispositivo

    • Non graffiare, danneggiare o lasciare impronte digitali sulla finestra per preservare la qualità dell'immagine. È possibile installare il dispositivo Axis instradando i cavi attraverso o lungo la parete. Leggere attentamente tutte le istruzioni prima di installare il dispositivo. Installazione del supporto per il montaggio a parete ATTENZIONE Verificare che le viti e i tasselli siano adatti al materiale della parete (es.
  • Seite 89 AXIS P1367-E Network Camera 2. Scegliere la guarnizione per cavi da usare e tirare la linguetta per aprire il foro per il cavo di rete. Protezione inferiore Vite della protezioner inferiore T20 (4x) Guarnizione cavo M20 (2x) Linguetta 3. Inserire il cavo di rete attraverso la guarnizione per cavi.
  • Seite 90 AXIS P1367-E Network Camera A A A VVISO VVISO VVISO Se il cavo non viene tirato potrebbero verificarsi infiltrazioni d'acqua e danni al prodotto. 5. Verificare il corretto montaggio della guarnizione del cavo. 6. In caso di connessione di un dispositivo (es. di I/O, audio o alimentazione esterna) alla telecamera, ripetere i passaggi precedenti (se consentito per il dispositivo in questione).
  • Seite 91 AXIS P1367-E Network Camera 8. Se necessario, collegare alla telecamera dispositivi I/O esterni o dispositivi audio. 9. Se si utilizza una scheda di memoria per l'archiviazione locale, inserirla nell'apposito slot della telecamera. 10. Collegare il cavo di rete. 11. Verificare che i LED della telecamera indichino la corretta condizione. Consultare Indicatori LED alla pagina 99.
  • Seite 92 AXIS P1367-E Network Camera Gancio di sicurezza Sacchetto dell'essiccante 15. Rimuovere la busta di plastica dal sacchetto dell'essicante. 16. Rimuovere la striscia di protezione dall'adesivo e fissare il sacchetto dell'essicante al coperchio superiore. 17. Chiudere la custodia. Girare le viti del coperchio inferiore in maniera alternata finché...
  • Seite 93 AXIS P1367-E Network Camera Modalità di configurazione del formato corridoio Vite di arresto (2) Unità ottica 1. Allentare le due viti di arresto. 2. Ruotare l'unità ottica. 3. Stringere le viti di arresto. 4. Andare alla scheda Stream (Flusso) sulla pagina Web del dispositivo e ruotare la vista di...
  • Seite 94: Come Accedere Al Dispositivo

    5. Stringere le viti ad alette. Come accedere al dispositivo AXIS IP Utility e AXIS Camera Management sono i metodi consigliati per trovare i dispositivi Axis in rete e assegnare loro un indirizzo IP in Windows®. Queste applicazioni sono entrambe gratuite e possono essere scaricate dal sito Web www.axis.com/support...
  • Seite 95: Modalità Di Regolazione Della Messa A Fuoco E Dello Zoom

    • Se non si rilascia il pulsante di comando entro due secondi, viene abilitata la funzione AXIS Internet Dynamic DNS Service (Servizio DNS dinamico) anziché Focus Assistant. Per ulteriori informazioni su AXIS Internet Dynamic DNS Service, consultare il sito Web www.axis.com.
  • Seite 96 AXIS P1367-E Network Camera 3. Impostare la telecamera nella posizione corrispondente alla massima distanza di messa a fuoco allentando la levetta di regolazione della messa a fuoco e ruotando la ghiera di messa fuoco in senso orario fino in fondo.
  • Seite 97: Modalità Di Ripristino Dei Valori Predefiniti Di Fabbrica

    5. Utilizzare gli strumenti per l'installazione e la gestione del software per assegnare un indirizzo IP, impostare la password e accedere al flusso video. Gli strumenti per l'installazione e la gestione del software sono disponibili nelle pagine dedicate all'assistenza sul sito Web www.axis.com/support 6. Ripetere la messa a fuoco del dispositivo.
  • Seite 98: Ulteriori Informazioni

    AXIS P1367-E Network Camera Ulteriori Informazioni • Per la versione più recente di questo documento, visitare il sito all'indirizzo www.axis.com • Il manuale per l'utente è disponibile all'indirizzo www.axis.com • Per verificare se sono stati pubblicati aggiornamenti del firmware per il proprio dispositivo, vedere www.axis.com/support...
  • Seite 99: Specifiche Tecniche

    AXIS P1367-E Network Camera Specifiche tecniche Per la versione più aggiornata della scheda tecnica, visitare il sito www.axis.com > prodotto > Supporto e documentazione. Indicatori LED LED di stato Indicazione Verde Luce verde fissa: condizioni di normale utilizzo. Luce fissa durante l'avvio. Lampeggia durante il ripristino delle Giallo impostazioni.
  • Seite 100: Slot Per Scheda Sd

    Ripristino del dispositivo alle impostazioni predefinite di fabbrica. Consultare Modalità di ripristino dei valori predefiniti di fabbrica alla pagina 97. • Collegamento a un servizio AXIS Video Hosting System o ad AXIS Internet Dynamic DNS Service. Per ulteriori informazioni su questi servizi, consultare il Manuale Utente. Connettori Connettore di rete Connettore Ethernet RJ45 con Power over Ethernet (PoE+).
  • Seite 101 AXIS P1367-E Network Camera • Ingresso audio: input da 3,5 mm per microfono mono o segnale ingresso linea mono (il canale sinistro viene utilizzato da un segnale stereo). • Uscita audio: 3,5 mm (di linea) che è possibile collegare a un sistema di indirizzo pubblico (PA) o a un altoparlante con amplificatore integrato.
  • Seite 102 AXIS P1367-E Network Camera 3– Ingresso digitale - collegare al pin 1 per Configura- da 0 a max 30 V CC bile (in- attivarlo oppure lasciarlo isolato (scollegato) per disattivarlo. gresso o us- cita) Uscita digitale – Collegare al pin 1 quando Da 0 a max 30 V CC, attiva, isolata (scollegata) quando inattiva.
  • Seite 103: Condizioni Di Funzionamento

    AXIS P1367-E Network Camera La porta seriale può essere configurata per supportare: • RS485 a due fili, half-duplex • RS485 a quattro fili, full-duplex • RS422 a due fili, simplex • Comunicazione full-duplex punto a punto con RS422 a quattro fili...
  • Seite 105: Informazioni Di Sicurezza

    AXIS P1367-E Network Camera Informazioni di sicurezza Livelli di pericolo PERICOLO Indica una situazione pericolosa che, se non evitata, provoca morte o lesioni gravi. AVVERTENZA Indica una situazione pericolosa che, se non evitata, potrebbe provocare la morte o lesioni gravi.
  • Seite 106: Informazioni Di Sicurezza

    • Durante il trasporto del dispositivo Axis, utilizzare l'imballaggio originale o equivalente per evitare danni al dispositivo. Batteria Il dispositivo Axis utilizza una batteria al litio da 3,0 V CR2032 come alimentazione per il suo real-time clock (RTC) interno. In condizioni normali questa batteria avrà una durata minima di cinque anni.
  • Seite 107 • Rischio di esplosione se la batteria viene sostituita in modo errato. • Sostituire solo con una batteria identica o una batteria consigliata da Axis. • Smaltire le batterie usate in base alle normative locali o alle istruzioni del produttore...
  • Seite 109: Contenido Del Paquete

    AXIS P1367-E Network Camera Contenido del paquete • Cámara de red AXIS P1367-E • Bloque de conectores de E/S de cuatro pines para conectar dispositivos externos • Bloque de conectores de dos pines RS485/422 (2) • Montaje en pared •...
  • Seite 110: Información General Del Producto

    AXIS P1367-E Network Camera Información general del producto Parasol Cubierta superior Ventana Imán de alarma contra intrusiones Cable de seguridad Anclaje para abrazaderas de cable Herramienta IK10 Sensor de alarma contra intrusiones Cubierta de cable 10 Tornillo de mariposa con resorte (4) 11 Unidad óptica...
  • Seite 111 AXIS P1367-E Network Camera 15 LED de estado 16 LED de red 17 LED de alimentación 18 Ranura para tarjeta microSD 19 Conector de E/S 20 Conector RS485/422 21 Botón de control 22 Conector de red (PoE) 23 Salida de audio...
  • Seite 112: Cómo Instalar El Producto

    • Preste atención para no arañar, dañar ni dejar las huellas en la ventana de la carcasa, puesto que esto puede provocar una disminución de la calidad de imagen. El producto de Axis puede instalarse guiando los cables a través de la pared o sobre esta. Lea todas las instrucciones antes de instalar el producto.
  • Seite 113 AXIS P1367-E Network Camera • Solo abra un orificio en las juntas de cable que se vayan a utilizar y si alguna junta está desgastada, reemplácela con una nueva. Si deja la junta de cable abierta o utiliza una desgastada, el agua podría filtrarse y dañar el producto.
  • Seite 114 AXIS P1367-E Network Camera 4. Tire del cable de red hacia atrás suavemente de manera que la junta de cable se ajuste en el cable. A A A VISO VISO VISO Si no se tira del cable hacia atrás, podría filtrarse agua y dañar el producto.
  • Seite 115 AXIS P1367-E Network Camera 7. Coloque la cubierta inferior sobre el montaje en pared y apriete los tornillos (par de torsión de 2 Nm). 8. Si procede, conecte dispositivos de E/S externos o de audio a la cámara. 9. En caso de utilizar una tarjeta SD como unidad de almacenamiento local, inserte la tarjeta en la ranura para tarjetas SD de la cámara.
  • Seite 116 AXIS P1367-E Network Camera Gancho de seguridad Bolsa desecante 15. Retire el envoltorio de plástico de la bolsa desecante. 16. Retire la tira protectora del adhesivo y coloque la bolsa desecante en la cubierta superior. 17. Cierre la carcasa. Asimismo, puede apretar los tornillos de la cubierta inferior poco a poco, de forma alterna, hasta que estén bien apretados (par de torsión de 1,5 Nm).
  • Seite 117 AXIS P1367-E Network Camera Cómo configurar el formato pasillo Tornillo de bloqueo (2) Unidad óptica 1. Afloje los dos tornillos de bloqueo. 2. Gire la unidad óptica. 3. Apriete los tornillos de bloqueo. 4. Vaya a la pestaña Stream (Flujo) en la página web del producto y gire la vista 90°.
  • Seite 118: Cómo Acceder Al Producto

    Cómo acceder al producto Se recomiendan AXIS IP Utility y AXIS Camera Management como métodos para buscar los productos de Axis en la red y asignarles direcciones IP en Windows®. Ambas aplicaciones son gratuitas y pueden descargase de www.axis.com/support El producto se puede utilizar con los siguientes navegadores:...
  • Seite 119: Cómo Ajustar El Enfoque Y El Zoom

    • Si el botón de control no se suelta en dos segundos, se activará el Servicio de DNS dinámico de Internet de AXIS en lugar del Asistente de Enfoque. Para obtener más información sobre el Servicio de DNS dinámico de Internet de AXIS, consulte www.axis.com.
  • Seite 120 AXIS P1367-E Network Camera 4. Gire lentamente el anillo de enfoque en sentido contrario a las agujas del reloj hasta que se detenga. 5. Gire lentamente el anillo de enfoque en el sentido de las agujas del reloj hasta que el indicador de estado parpadee en verde.
  • Seite 121: Cómo Restablecer Los Ajustes Predeterminados De Fábrica

    AXIS P1367-E Network Camera Cómo restablecer los ajustes predeterminados de fábrica Importante Es preciso tener cuidado si se va a restablecer los ajustes predeterminados de fábrica. Todos los valores, incluida la dirección IP, se restablecerán a la configuración predeterminada de fábrica.
  • Seite 122: Más Información

    AXIS P1367-E Network Camera Más información • Para consultar la versión más reciente de este documento, vaya a www.axis.com • El manual de usuario se encuentra disponible en www.axis.com. • Para comprobar si existe un firmware actualizado disponible para su producto, vaya a www.axis.com/support...
  • Seite 123: Especificaciones Técnicas

    AXIS P1367-E Network Camera Especificaciones técnicas Para acceder a la versión más reciente de la hoja de datos, visite www.axis.com > productos> soporte técnico y documentación. Indicadores LED LED de estado Indicación Verde Fijo para indicar un funcionamiento normal. Fijo durante el inicio. Parpadea al restaurar valores de Ámbar...
  • Seite 124: Ranura Para Tarjetas Sd

    121. • Conectarse a un servicio AXIS Video Hosting System o al Servicio de DNS dinámico de Internet de AXIS. Para obtener más información sobre estos servicios, consulte el Manual del usuario.
  • Seite 125 AXIS P1367-E Network Camera • Entrada de audio: Entrada de 3,5 mm para micrófono mono, o entrada de línea de señal mono (se usa el canal izquierdo de una señal estéreo). • Salida de audio: Salida para audio (nivel de línea) de 3,5 mm que se puede conectar a un sistema de megafonía pública o a un altavoz con amplificador incorporado.
  • Seite 126 AXIS P1367-E Network Camera 3– Configurable Entrada digital: Conéctela al pin 1 para activarla, o 0 a 30 V CC máx. (entrada o bien déjela suelta (sin conectar) para desactivarla. salida) Salida digital: Conectada al pin 1 cuando se activa, De 0 a 30 V CC máx.,...
  • Seite 127: Condiciones De Funcionamiento

    AXIS P1367-E Network Camera El puerto serie puede configurarse para admitir: • Semidúplex RS485 de dos cables • Dúplex completo RS485 de cuatro cables • Símplex RS422 de dos cables • Dúplex completo RS422 de cuatro cables para comunicación dúplex punto a punto Notas Función...
  • Seite 129: Información De Seguridad

    AXIS P1367-E Network Camera Información de seguridad Niveles de peligro PELIGRO Indica una situación peligrosa que, si no se evita, provocará lesiones graves o la muerte. ADVERTENCIA Indica una situación peligrosa que, si no se evita, puede provocar lesiones graves o la muerte.
  • Seite 130: Instrucciones De Seguridad

    Batería Este producto de Axis utiliza una batería de litio CR2032 de 3,0 V como fuente de alimentación del reloj interno en tiempo real. En condiciones normales, esta batería durará un mínimo de cinco años.
  • Seite 131 ADVERTENCIA • La sustitución incorrecta de la batería implica riesgo de explosión. • Sustituya la batería por una batería idéntica u otra batería recomendada por Axis. • Deseche las baterías usadas de conformidad con la normativa local o las instrucciones...
  • Seite 133: パ パ パ ッ ッ ッ ケ ケ ケ ー ー ー ジ ジ ジ の の の 内 内 内 容 容 容

    AXIS P1367-E Network Camera パ パ パ ッ ッ ッ ケ ケ ケ ー ー ー ジ ジ ジ の の の 内 内 内 容 容 容 AXIS P1367-E ネットワークカメラ • 外部デバイス接続⽤4ピンI/Oコネクタブロック • 2ピンRS485/422コネクタブロック (×2) • 壁⾯取付ブラケット • トルクスT20ドライバー...
  • Seite 134: 製 製 製 品 品 品 の の の 概 概 概 要 要 要

    AXIS P1367-E Network Camera 製 製 製 品 品 品 の の の 概 概 概 要 要 要 ウェザーシールド 上蓋 ウィンドウ 侵⼊アラームマグネット 安全ワイヤー ケーブルタイアンカー IK10ツール 侵⼊アラームセンサー ケーブルカバー 10 バネ付きつまみネジ (×4) 11 光学ユニット 12 ズーム調節レバー 13 フォーカスリング固定ネジ 14 フォーカスリング 注記...
  • Seite 135 AXIS P1367-E Network Camera 15 ステータスLED 16 ネットワークLED 17 電源LED 18 microSDカードスロット 19 I/Oコネクタ 20 RS485/422コネクタ 21 コントロールボタン 22 ネットワークコネクタ (PoE) 23 ⾳声出⼒ 24 ⾳声⼊⼒ 25 ケーブルガスケットM20 (×2) 26 アイリスコネクタ...
  • Seite 136: 製 製 製 品 品 品 の の の 取 取 取 り り り 付 付 付 け け け 方 方 方 法 法 法

    AXIS P1367-E Network Camera 製 製 製 品 品 品 の の の 取 取 取 り り り 付 付 付 け け け ⽅ ⽅ ⽅ 法 法 法 ハ ハ ハ ー ー ー ド ド ド ウ ウ ウ ェ ェ ェ ア ア ア の の の イ イ イ ン ン ン ス ス ス ト ト ト ー ー ー ル ル ル...
  • Seite 137 AXIS P1367-E Network Camera • 使⽤するケーブルガスケットにのみ⽳を開けます。ケーブルガスケットが破 損した場合には、新品のケーブルガスケットに交換してください。ケーブル ガスケットに⽳を開けたままにしたり、破損したケーブルガスケットを使⽤ したりすると、浸⽔し、製品が破損するおそれがあります。 2. 使⽤するケーブルガスケットを選び、タブを引いてネットワークケーブル ⽤の⽳を開けます。 裏蓋 裏蓋ネジT20 (x4) ケーブルガスケットM20 (x2) タブ 3. ネットワークケーブルをケーブルガスケットに通します。 注記 ネットワークケーブルにネットワークコネクタが付いている場合、ケーブ ルガスケットを取り外し、コネクタガードを使⽤して、ケーブルガスケッ トの破損を防⽌します。キャップ付きネットワークコネクタの付いたネッ トワークケーブルは使⽤しないでください。コネクタガードを使⽤しても ケーブルガスケットが破損するおそれがあります。...
  • Seite 138 AXIS P1367-E Network Camera 4. ネットワークケーブルを少し⼿前に引き、ケーブルガスケットをケーブル にぴったりと合わせます。 注記 ケーブルを引いて⼿前に戻さないと、浸⽔して製品が損傷するおそれが あります。 5. ケーブルガスケットが正しく取り付けられていることを確認します。 6. I/O、⾳声、外部電源デバイスなどの補助デバイスをカメラに接続する場 合、それぞれのデバイスについて同じ⼿順を繰り返します。 注記 ケーブルをケーブルガスケットに通した後にコネクタを取り付けます。...
  • Seite 139 AXIS P1367-E Network Camera 裏蓋 ネジT20 (×4) 壁⾯ブラケット ブラケット調節ネジT30 7. 裏蓋を壁⾯取付ブラケットに取り付け、ネジを締めます (トルク2 Nm)。 8. 必要に応じて、外部I/Oデバイスまたは⾳声デバイスをカメラに接続します。...
  • Seite 140 AXIS P1367-E Network Camera 9. SDカードをローカルストレージとして使⽤する場合は、カメラのSDカード スロットにSDカードを挿⼊します。 10. ネットワークケーブルを接続します。 148ページの、 11. カメラのLEDが正しい状態を⽰しているかを確認します。 LEDインジケーター を参照してください。 12. ブラケット調整ネジを緩め、カメラを撮影⽅向に向けます。ビデオスト 143ページの、製品のアクセス⽅法 リームを表⽰する⽅法については、 を参照してください 144ページの、フォーカスとズームの 13. フォーカスとズームを設定するには、 調整⽅法 の⼿順を参照してください。 14. 納⼊時に、レンズはIK10に対応するよう正しく配置されています。レンズ を移動または交換する場合は、光学部をIK10に合うように再配置する必要 143ページの、IK10に準拠するためのレン があります。詳細については、 ズ配置⽅法 を参照してください。...
  • Seite 141 AXIS P1367-E Network Camera 安全フック 乾燥剤 15. 乾燥剤のビニール包装を取り外します。 16. 接着保護ストリップを剥がして乾燥剤を上蓋に取り付けます。 17. ハウジングを閉じます。裏蓋ネジを数回ずつ回して、すべてのネジが締 まるまでこれを繰り返します (トルク1.5 Nm)。これにより、裏蓋のガス ケットに均等に⼒が掛かります。 注記 ハウジングを閉じるときに、ケーブルを挟まないようにしてください。 18. 必要に応じて、ウェザーシールドのネジを緩め、位置を調節してネジを 締めます。...
  • Seite 142 AXIS P1367-E Network Camera Corridor Format Format の の の 設 設 設 定 定 定 ⽅ ⽅ ⽅ 法 法 法 Corridor Corridor Format 固定ネジ (×2) 光学ユニット 1. 固定ネジを緩めます。 2. 光学ユニットを回転させます。 3. 固定ネジを締めます。 Stream ( ( ( ス ス ス ト ト ト リ リ リ ー ー ー ム ム ム ) ) ) ] タブに移動し、視野を90°...
  • Seite 143: 製品のアクセス方法

    AXIS P1367-E Network Camera IK10 IK10 に に に 準 準 準 拠 拠 拠 す す す る る る た た た め め め の の の レ レ レ ン ン ン ズ ズ ズ 配 配 配 置 置 置 ⽅ ⽅ ⽅ 法 法 法...
  • Seite 144: フォーカスとズームの調整方法 フォーカスアシスタントによるフォーカスの調節方法

    AXIS P1367-E Network Camera ® ® ® ® を使⽤する場合) Chrome (推奨)、Firefox 、Edge 、または Opera (Windows • ® ® を使⽤する場合) Chrome (推奨)、またはSafari (OS X • Chrome またはFirefox ® (その他のオペレーティングシステムの場合) • www.axis.com 製品の使⽤の詳細については、Axisのホームページ ( ) でユーザーズマ ニュアルを参照してください フ フ フ ォ ォ ォ ー ー ー カ カ カ ス ス ス と と と ズ ズ ズ ー ー ー ム ム ム の の の 調 調 調 整 整 整 ⽅ ⽅ ⽅ 法 法 法...
  • Seite 145 AXIS P1367-E Network Camera 4. フォーカスリングを反時計⽅向にいっぱいまでゆっくりと回します。 5. ステータスLEDが緑に点滅するまでフォーカスリングを時計⽅向にゆっく りと回します。 6. ピント調節レバーを締め直します。 Image ( ( ( 画 画 画 像 像 像 ) ) ) ] タブを表⽰します。 7. 本製品のWebページで [Image Image Autofocus ( ( ( オ オ オ ー ー ー ト ト ト フ フ フ ォ ォ ォ ー ー ー カ カ カ ス ス ス ) ) ) ] ボタンをクリックし、ウィザードの指...
  • Seite 146 AXIS P1367-E Network Camera ⼯ ⼯ ⼯ 場 場 場 出 出 出 荷 荷 荷 時 時 時 の の の 設 設 設 定 定 定 に に に リ リ リ セ セ セ ッ ッ ッ ト ト ト す す す る る る ⽅ ⽅ ⽅ 法 法 法...
  • Seite 147: 関 関 関 連 連 連 情 情 情 報 報 報

    AXIS P1367-E Network Camera 関 関 関 連 連 連 情 情 情 報 報 報 www.axis.com 本書の最新バージョンについては、 にアクセスしてください。 • www.axis.com ユーザーズマニュアルは、 で⼊⼿できます。 • ご使⽤の製品の新しいファームウェアがリリースされていないかを確認す • www.axis.com/support るには、 にアクセスしてください。 役に⽴つオンライントレーニングおよびWebセミナーをご⽤意しており • www.axis.com/academy ます。 をご覧ください。 オ オ オ プ プ プ シ シ シ ョ ョ ョ ン ン ン ア ア ア ク ク ク セ セ セ サ サ サ リ リ リ ー ー ー...
  • Seite 148 AXIS P1367-E Network Camera 技 技 技 術 術 術 仕 仕 仕 様 様 様 最新バージョンのデータシートについては、Axisのホームページwww.axis.com > [製 品] > [サポートとドキュメント] を参照してください。 LED イ イ イ ン ン ン ジ ジ ジ ケ ケ ケ ー ー ー タ タ タ ー ー ー...
  • Seite 149: Sdカードスロット

    146ページの、⼯場出荷時の設定 製品を⼯場出荷時の設定にリセットする。 • にリセットする⽅法 を参照してください。 AXIS Video Hosting SystemサービスまたはAXIS Internet Dynamic DNSサービ • スに接続する。これらのサービスの詳細については、ユーザーズマニュ アルを参照してください。 コ コ コ ネ ネ ネ ク ク ク タ タ タ ー ー ー ネ ネ ネ ッ ッ ッ ト ト ト ワ ワ ワ ー ー ー ク ク ク コ コ コ ネ ネ ネ ク ク ク タ タ タ...
  • Seite 150 AXIS P1367-E Network Camera ⾳ ⾳ ⾳ 声 声 声 ⼊ ⼊ ⼊ ⼒ ⼒ ⼒ - モノラルマイクロフォンまたはラインインモノラル信号⽤ (左 • チャンネルはステレオ信号で使⽤) 3.5 mm⼊⼒。 ⾳ ⾳ ⾳ 声 声 声 出 出 出 ⼒ ⼒ ⼒ - 3.5 mm⾳声 (ラインレベル) 出⼒ (パブリックアドレス (PA) システ...
  • Seite 151 AXIS P1367-E Network Camera 3‒ 設定可能 0〜30 V DC (最⼤) デジタル⼊⼒ ‒ 動作させるにはピン1に接 (⼊⼒また 続し、動作させない場合はフロート状態 は出⼒) (未接続) のままにします。 デジタル出⼒ ‒ 動作させるにはピン1に接 0〜30 V DC (最⼤)、 オープンドレイ 続し、動作させない場合はフロート状態 (未接続) にします。誘導負荷 (例: リレー) ン、100 mA とともに使⽤する場合は、過渡電圧から保 護するため、ダイオードを負荷と並列に接 続する必要があります。 0 V DC (-) DC出⼒12 V、最⼤50 mA...
  • Seite 152: 動作条件

    AXIS P1367-E Network Camera シリアルポートの設定により、次のモードをサ ポート可能。 • 2ワイヤーRS485半⼆重 • 4ワイヤーRS485全⼆重 • 2ワイヤーRS422単⽅向 • 4ワイヤーRS422全⼆重ポイントツー ポイント通信 機 機 機 能 能 能 備 備 備 考 考 考 ピ ピ ピ ン ン ン RS485Bまたは すべてのモードのRXペア (2ワイヤーRS485のRX/TXペ RS485/422 RX(B) ア) RS485A5Bまたは...
  • Seite 153: 安 安 安 全 全 全 情 情 情 報 報 報

    AXIS P1367-E Network Camera 安 安 安 全 全 全 情 情 情 報 報 報 危 危 危 険 険 険 レ レ レ ベ ベ ベ ル ル ル 危険 回避しない場合、死亡または重傷につながる危険な状態を⽰します。 警告 回避しない場合、死亡または重傷につながるおそれのある危険な状態を ⽰します。 注意 回避しない場合、軽傷または中程度の怪我につながるおそれのある危険 な状態を⽰します。 注記...
  • Seite 154: 安 安 安 全 全 全 手 手 手 順 順 順

    AXIS P1367-E Network Camera 安 安 安 全 全 全 ⼿ ⼿ ⼿ 順 順 順 注記 • 本製品は、お使いになる地域の法律や規制に準拠して使⽤してください。 • 本製品は乾燥した換気のよい環境に保管してください。 • 本製品に衝撃または強い圧⼒を加えないでください。 • 本製品を不安定なポール、ブラケット、表⾯、または壁に設置しないで ください。 • 本製品を設置する際には、適切な⼯具のみを使⽤してください。 電動⼯具を 使⽤して過剰な⼒をかけると、製品が損傷することがあります。 • 化学薬品、腐⾷剤、噴霧式クリーナーは使⽤しないでください。 • 清掃には、きれいな⽔に浸した清潔な布を使⽤してください。 • 製品の技術仕様に準拠したアクセサリーのみを使⽤してください。 これらの アクセサリーは、Axisまたはサードパーティから⼊⼿できます。 Axisは、ご使 ⽤の製品と互換性のあるAxis給電ネットワークスイッチの使⽤を推奨します。...
  • Seite 155 AXIS P1367-E Network Camera • バッテリーは、正しく交換しないと爆発する危険があります。 • 交換⽤バッテリーとしては、同⼀品またはAxisが推奨するバッテリーのみを 使⽤してください。 • 使⽤済みバッテリーは、地域の規制またはバッテリーメーカーの指⽰に 従って廃棄してください。...
  • Seite 157: 包 包 包 装 装 装 内 内 内 容 容 容

    AXIS P1367-E Network Camera 包 包 包 装 装 装 内 内 内 容 容 容 AXIS P1367-E 网络摄像机 • 用于连接外部设备的 4 针 I/O 连接器块 • 2 针 RS485/422 连接器块(2 个) • 墙壁式安装 • Torx 螺丝刀 T20 • Torx 螺丝批头 T30 •...
  • Seite 158: 产 产 产 品 品 品 概 概 概 述 述 述

    AXIS P1367-E Network Camera 产 产 产 品 品 品 概 概 概 述 述 述 耐候保护罩 顶盖 窗片 入侵报警磁铁 安全线 扎线带固定点 IK10 工具 入侵报警传感器 电缆盖板 10 带弹簧的拇指螺丝(4 颗) 11 光学单元 12 变焦拉杆 13 对焦环的锁定螺丝 14 对焦环 注意 请勿使用电缆盖板提起该产品。...
  • Seite 159 AXIS P1367-E Network Camera 15 状态 LED 16 网络 LED 17 电源 LED 18 microSD 卡插槽 19 I/O 连接器 20 RS485/422 连接器 21 控制按钮 22 网络连接器 (PoE) 23 音频输出 24 音频输入 25 电缆垫片 M20(2 个) 26 光圈连接器...
  • Seite 160: 如 如 如 何 何 何 安 安 安 装 装 装 产 产 产 品 品 品

    AXIS P1367-E Network Camera 如 如 如 何 何 何 安 安 安 装 装 装 产 产 产 品 品 品 安 安 安 装 装 装 硬 硬 硬 件 件 件 注意 • 由于当地法规或产品使用场所的环境和电气条件,可能需要使用屏蔽网络电缆 (STP)。将产品连接到网络的所有电缆以及在室外或恶劣电气环境中布放的电缆 应专用于其特定用途。确保根据制造商的说明安装网络设备。 Regulatory information 4 有关法规要求的信息,请参见...
  • Seite 161 AXIS P1367-E Network Camera 底盖 底盖螺丝 T20(4 颗) 电缆垫片 M20(2 个) 卡舌 3. 将网络电缆穿过电缆垫片。 注意 如果网络电缆具有预装网络连接器,请移除电缆垫片并使用连接器防护件防止 电缆垫片破损。避免使用具有带帽网络连接器的网络电缆,因为即使使用连接 器防护件,它们也可能导致电缆垫片破损。 4. 轻轻回拉网络电缆,以便调整电缆垫片在电缆上的位置。 注意 不回拉电缆可能会导致水渗入而损坏产品。 5. 确保电缆垫片正确安装。...
  • Seite 162 AXIS P1367-E Network Camera 6. 如果将辅助设备(例如,I/O、音频或外部电源设备)连接到摄像机,请 重复上述适用于特定设备的步骤。 注意 将电缆穿过电缆垫片,然后安装连接器。 底盖 螺丝 T20(4 颗) 墙挂支架 支架调整螺丝 T30 7. 将底盖放在墙挂支架上,然后拧紧螺丝(扭矩 2 Nm)。 8. 如果适用,将外部 I/O 设备或音频设备连接到摄像机。...
  • Seite 163 AXIS P1367-E Network Camera 9. 如果使用 SD 卡进行本地存储,请将卡插入摄像机的 SD 卡插槽。 10. 连接网线。 LED 指示灯 在第170页 11. 确保摄像机 LED 指示正确的情况。请参见 。 12. 松开支架调整螺丝,将摄像机朝向感兴趣的地方。有关如何查看视频流的信 如何访问产品 在第166页 息,请参见 如何调整对焦和变焦 在第167页 13. 设置对焦和变焦,请参见 14. 在交货时,镜头已正确定位,满足 IK10 防护等级。如果移动或更换镜头,您 如何定位镜头以满足 需要重新定位光学总成以确保 IK10 防护等级,请参见 IK10 防护等级 在第166页...
  • Seite 164 AXIS P1367-E Network Camera 安全挂钩 干燥剂袋 15. 从干燥剂袋中取出塑料包装。 16. 移除粘合剂上的保护条,然后将干燥剂袋粘贴在顶盖上。 17. 关上护罩。交替拧几次底盖螺丝,直到将其拧紧为止(扭矩 1.5 Nm)。这将 均匀压缩底盖垫片。 注意 关闭护罩时,请勿夹住任何电缆。 18. 如果需要,请松开耐候保护罩上的螺丝,调整其位置,然后拧紧螺丝。...
  • Seite 165 AXIS P1367-E Network Camera 如 如 如 何 何 何 设 设 设 置 置 置 走 走 走 廊 廊 廊 模 模 模 式 式 式 锁定螺丝(2 颗) 光学单元 1. 松开两颗锁定螺丝。 2. 旋转光学单元。 3. 拧紧锁定螺丝。 4. 转到产品网页中的 Stream Stream (...
  • Seite 166: 如何访问产品

    2. 将 IK10 工具安装到底盖上。 3. 松开带弹簧的拇指螺丝。 4. 移动镜头以使其接触该工具。 5. 拧紧拇指螺丝。 如 如 如 何 何 何 访 访 访 问 问 问 产 产 产 品 品 品 AXIS IP Utility 和 AXIS Camera Management 是用于在网络上查找安讯士产品以及在 Windows® 中为其分配 IP 地址的建议方法。这两种应用程序都是免费的,可以从 www.axis.com/support 上进行下载 该产品可与以下浏览器兼容:...
  • Seite 167: 如何调整对焦和变焦

    AXIS P1367-E Network Camera Chrome (推荐)、Firefox 、Edge 或 Opera ,用于 Windows ® ® ® ® • Chrome (推荐)或 Safari ,用于 OS X ® ® • Chrome 或 Firefox ,用于其他操作系统。 ® • www.axis.com 有关使用产品的更多信息,请参阅 上提供的用户手册 如 如 如 何 何 何 调 调 调 整 整 整 对 对 对 焦 焦 焦 和 和 和 变 变 变 焦 焦 焦...
  • Seite 168: 如 如 如 何 何 何 重 重 重 置 置 置 为 为 为 出 出 出 厂 厂 厂 默 默 默 认 认 认 设 设 设 置 置 置

    AXIS P1367-E Network Camera 如 如 如 何 何 何 重 重 重 置 置 置 为 为 为 出 出 出 厂 厂 厂 默 默 默 认 认 认 设 设 设 置 置 置 重要 重置为出厂默认值时应谨慎。重置为出厂默认值会将所有设置(包括 IP 地址)...
  • Seite 169: 更 更 更 多 多 多 信 信 信 息 息 息

    AXIS P1367-E Network Camera 更 更 更 多 多 多 信 信 信 息 息 息 www.axis.com 有关本文档的最新版本,请参见 • www.axis.com 用户手册可从 获取 • www.axis.com/support 要检查是否有产品的可用更新固件,请参见 • www.axis.com/academy 如需有用的在线培训和在线研讨会,请参见 • 可 可 可 选 选 选 附 附 附 件 件 件...
  • Seite 170: 技 技 技 术 术 术 规 规 规 格 格 格

    AXIS P1367-E Network Camera 技 技 技 术 术 术 规 规 规 格 格 格 要查找最新版本的数据表,请转到 www.axis.com > 产品 > 支持和文档。 LED 指 指 指 示 示 示 灯 灯 灯 状 状 状 态 态 态 LED 指 指 指 示 示 示...
  • Seite 171 AXIS P1367-E Network Camera • 数据丢失和录制内容损坏的风险。 产品正在运行时,请勿取出 SD 卡。 在移除 之前,请断开电源或从产品的网页卸载 SD 卡。 本产品支持 microSD/microSDHC/microSDXC 卡(不包括)。 www.axis.com 有关 SD 卡的建议,请参见 按 按 按 钮 钮 钮 控 控 控 制 制 制 按 按 按 钮 钮 钮 控制按钮用于: 启用对焦助手。按下并快速释放控制按钮。...
  • Seite 172 AXIS P1367-E Network Camera 1 尖部 2 中间环 3 尾段 音 音 音 频 频 频 输 输 输 入 入 入 麦克风/线路输入 接地 音 音 音 频 频 频 输 输 输 出 出 出 线路输出(单声道) 接地 关 关 关 于 于 于 I/O I/O 连...
  • Seite 173 AXIS P1367-E Network Camera 0 V DC (-) DC 输出12 V,最大 50 mA I/O 已配置为输入 I/O 已配置为输出 RS485/RS422 连 连 连 接 接 接 器 器 器 RS485/RS422 RS485/RS422 两个用于 RS485/RS422 串行接口的 2 针接线端子,用于控制辅助设备(如水平转 动-垂直转动设备)。 串行端口可配置为支持: • 两线 RS485 半双工...
  • Seite 174: 工作条件

    AXIS P1367-E Network Camera RS485/RS422 适用于 RS422 和四线 RS485 的 TX 对 TX(B) RS485/RS422 TX(A) 重要 推荐的最大电缆长度为 30 米(98 英尺)。 工 工 工 作 作 作 条 条 条 件 件 件 产 产 产 品 品 品 温 温 温 度 度 度...
  • Seite 175: 安 安 安 全 全 全 信 信 信 息 息 息

    AXIS P1367-E Network Camera 安 安 安 全 全 全 信 信 信 息 息 息 危 危 危 险 险 险 等 等 等 级 级 级 危险 表示如果不避免则会导致死亡或严重伤害的危险情况。 警告 表示如果不避免则可能导致死亡或严重伤害的危险情况。 小心 表示如果不避免则可能导致轻微或中度伤害的危险情况。 注意 表示如果不避免则可能导致财产损失的情况。 其 其 其 他 他 他 消 消 消 息 息 息 等 等 等 级 级 级...
  • Seite 176: 安 安 安 全 全 全 说 说 说 明 明 明

    AXIS P1367-E Network Camera 安 安 安 全 全 全 说 说 说 明 明 明 注意 • 使用安讯士产品时应遵守当地法律和法规。 • 在干燥通风的环境中存放安讯士产品。 • 避免将安讯士产品暴露在冲击或重压下。 • 请勿将本产品安装在不稳定的立杆、支架、表面或墙壁上。 • 安装安讯士产品时,仅使用适用的工具。 使用电动工具过度施力可能导致 产品损坏。 • 请勿使用化学品、腐蚀剂或气雾剂。 • 使用蘸纯净水的干净布进行清洁。 • 仅使用符合产品技术规格的附件。 这些附件可由安讯士或第三方提供。 安讯 士推荐使用与产品兼容的安讯士电源设备。 • 仅使用安讯士提供或推荐的备件。...
  • Seite 178 Installation Guide Ver. M1.3 AXIS P1367-E Network Camera Date: May 2017 © Axis Communications AB, 2017 Part No. 1741438...