
Verwandte Anleitungen für Fermax VDS CITYLINE SMILE


Inhaltszusammenfassung für Fermax VDS CITYLINE SMILE
- Seite 1 KIT VIDÉO CITYLINE VDS SMILE VIDEO SET VDS CITYLINE SMILE MANUEL D’INSTALLATION ET D'UTILISATION F R A N Ç A I S INSTALLATIONS- UND BENUTZERHANDBUCH D E U T S C H...
- Seite 2 Fermax Electrónica développe et fabrique des équipements de prestige qui répondent aux normes de design et technologie les plus développées. Votre moniteur pour portier vidéo FERMAX vous permettra de communiquer avec la platine de rue, voir la personne qui vous appelle et ouvrir la porte d’entrée, si vous le souhaitez.
-
Seite 3: Inhaltsverzeichnis
SMILE VDS SMILE VDS SMILE VDS SMILE VDS SMILE VDS SMILE VDS SMILE VDS SMILE VDS SMILE VDS SMILE VDS SOMMAIRE SECTION I - MANUEL D'INSTALLATION ..............5 Installation de l’alimentation ................6 Installation de la platine de rue ..............6 Dimensions du moniteur encastrable/en saillie ......... - Seite 4 SMILE VDS SMILE VDS SMILE VDS SMILE VDS SMILE VDS SMILE VDS SMILE VDS SMILE VDS SMILE VDS SMILE VDS Page 4...
-
Seite 5: Section I - Manuel D'installation
SMILE VDS SMILE VDS SMILE VDS SMILE VDS SMILE VDS SMILE VDS SMILE VDS SMILE VDS SMILE VDS SMILE VDS Section I - Manuel d'installation Page 5... -
Seite 6: Installation De L'alimentation
SMILE VDS SMILE VDS SMILE VDS SMILE VDS SMILE VDS SMILE VDS SMILE VDS SMILE VDS SMILE VDS SMILE VDS INSTALLATION DE L'ALIMENTATION Instalación en carril DIN Fixation au moyen de vis Dèsmontage Montage A IN -6 0 H z. A L I K I T N T A... -
Seite 7: Dimensions Du Moniteur Encastrable/En Saillie
Moniteur SMILE 3,5” Moniteur SMILE 7” Dimensions du boîtier encastrable Fermax moniteur 3,5” réf. 6546 (hauteur x largeur x prof.) : 186 x 116 x 46 mm Dimensions du boîtier encastrable Fermax moniteur 7” réf. 6551 (hauteur x largeur x prof.) :... -
Seite 8: Installation Du Moniteur
SMILE VDS SMILE VDS SMILE VDS SMILE VDS SMILE VDS SMILE VDS SMILE VDS SMILE VDS SMILE VDS SMILE VDS INSTALLATION MONITEUR ENCASTRABLE Moniteur SMILE 3,5” Page 8... - Seite 9 SMILE VDS SMILE VDS SMILE VDS SMILE VDS SMILE VDS SMILE VDS SMILE VDS SMILE VDS SMILE VDS SMILE VDS Moniteur SMILE 7” Page 9...
- Seite 10 SMILE VDS SMILE VDS SMILE VDS SMILE VDS SMILE VDS SMILE VDS SMILE VDS SMILE VDS SMILE VDS SMILE VDS INSTALLATION MONITEUR EN SAILLIE Moniteur SMILE 3,5” 3,5" Moniteur SMILE 7” 7" Page 10...
-
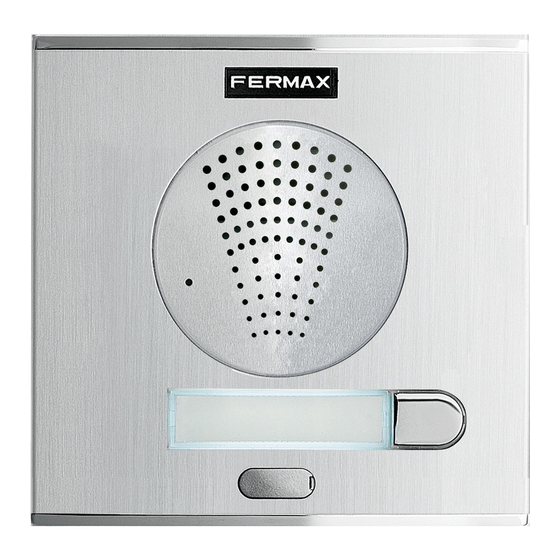
Seite 11: Description Des Équipements
SMILE VDS SMILE VDS SMILE VDS SMILE VDS SMILE VDS SMILE VDS SMILE VDS SMILE VDS SMILE VDS SMILE VDS DESCRIPTION DES ÉQUIPEMENTS Platine de rue AMPLIFICADOR - VERSTÄRKER AMPLIFICATEUR - AMPLIFIER MASTER SLAVE AUDIO LEDS ON LEDS OFF CT OUT CT IN PACK EXTENSION PROG... - Seite 12 SMILE VDS SMILE VDS SMILE VDS SMILE VDS SMILE VDS SMILE VDS SMILE VDS SMILE VDS SMILE VDS SMILE VDS CN7 : moniteur de test vidéo Connecteur de test et programmation des moniteurs SW1 (mappage) Bouton pour entrer en mode programmation des boutons-poussoirs. « Voir manuel de mappage ». Synthétiseur vocal : Sélection de la langue du message vocal émis pour «...
-
Seite 13: Durée D'activation De La Gâche
SMILE VDS SMILE VDS SMILE VDS SMILE VDS SMILE VDS SMILE VDS SMILE VDS SMILE VDS SMILE VDS SMILE VDS Durées d’activation de la gâche PROGRAMMATION AVANCÉE : Temps d'activation de la gâche Il existe deux durées d'activation programmables pour la gâche électrique : - Temps d'ouverture des portes à... -
Seite 14: Caractéristiques Techniques
SMILE VDS SMILE VDS SMILE VDS SMILE VDS SMILE VDS SMILE VDS SMILE VDS SMILE VDS SMILE VDS SMILE VDS CARACTÉRISTIQUES TECHNIQUES Alimentation 18 Vcc Consommation 57 mA en veille 180 mA image active IP43 390 mA son et image actifs [-10 , +60 °C] Température de fonctionnement [14, 140ºF]... -
Seite 15: Fonctions Disponibles
TFT 7” Ver.: 480 Line TV Signal vidéo Signal composite1 Vpp 75 Ω, 7 Mhz. Boutons Remarque importante : Universel Menu (wildcard) pour les autres fonctions de ce moniteur, voir le manuel avancé code 97711 sur Audio Gâche www.fermax.com Page 15... - Seite 16 SMILE VDS SMILE VDS SMILE VDS SMILE VDS SMILE VDS SMILE VDS SMILE VDS SMILE VDS SMILE VDS SMILE VDS Bouton pour activer le son et raccrocher · ·Lors d'un appel entrant, (vous disposez de 30 s. pour répondre avant que l'appareil ne se remette en mode veille.
-
Seite 17: Programmation Du Moniteur
SMILE VDS SMILE VDS SMILE VDS SMILE VDS SMILE VDS SMILE VDS SMILE VDS SMILE VDS SMILE VDS SMILE VDS PROGRAMMATION DU MONITEUR SMILE Le moniteur, fourni dans le kit de 1 Ligne EST DÉJÀ PROGRAMMÉ à l’usine ! Le moniteur, fourni dans le kit de 2 Ligne EST DÉJÀ PROGRAMMÉ à l’usine ! Remarque : si pour une raison quelconque vous avez besoin de programmer de nouveau le moniteur, voir Annexe à... -
Seite 18: Son
SMILE VDS SMILE VDS SMILE VDS SMILE VDS SMILE VDS SMILE VDS SMILE VDS SMILE VDS SMILE VDS SMILE VDS 1. Sélectionnez l'option Réglage audio avec le bouton capacitif correspondant. Fonction mute : on l'active/la désactive à l'aide du bouton-poussoir capacitif correspondant. Fonction pour supprimer le son. -
Seite 19: Schémas De Câblage
SMILE VDS SMILE VDS SMILE VDS SMILE VDS SMILE VDS SMILE VDS SMILE VDS SMILE VDS SMILE VDS SMILE VDS Schémas de câblage Page 19... -
Seite 20: Schéma De Câblage
SMILE VDS SMILE VDS SMILE VDS SMILE VDS SMILE VDS SMILE VDS SMILE VDS SMILE VDS SMILE VDS SMILE VDS SCHÉMA DE CÂBLAGE (COAX) Kit 1L & 12 Vca 10 KOhm (*) IMPORTANT Il est nécessaire de placer une résistance de 10 Kohms entre les bornes + et L du moniteur. - Seite 21 SMILE VDS SMILE VDS SMILE VDS SMILE VDS SMILE VDS SMILE VDS SMILE VDS SMILE VDS SMILE VDS SMILE VDS SCHÉMA DE CÂBLAGE (5 FILS) Kit 1L & 12 Vca 10 KOhm 75 Ohm (*) IMPORTANT Il est nécessaire de placer une résistance de 10 Kohms entre les bornes + et L du moniteur.
- Seite 22 SMILE VDS SMILE VDS SMILE VDS SMILE VDS SMILE VDS SMILE VDS SMILE VDS SMILE VDS SMILE VDS SMILE VDS SCHÉMA DE CÂBLAGE (COAX) Kit 2L & 12 Vca 10 KOhm metros / metres pies / feet 1 - 50 3 - 150 75 Ohm 75 Ohm...
- Seite 23 SMILE VDS SMILE VDS SMILE VDS SMILE VDS SMILE VDS SMILE VDS SMILE VDS SMILE VDS SMILE VDS SMILE VDS SCHÉMA DE CÂBLAGE (5 FILS) Kit 2L & 12 Vca 10 KOhm (*) IMPORTANT Il est nécessaire de placer une résistance de 10 Kohms entre les bornes + et L du moniteur.
-
Seite 24: Extensions
SMILE VDS SMILE VDS SMILE VDS SMILE VDS SMILE VDS SMILE VDS SMILE VDS SMILE VDS SMILE VDS SMILE VDS EXTENSIONS Ce kit peut recevoir deux postes ou un moniteur en plus sans avoir à ajouter de sources d'alimentation supplémentaires. Schéma de câblage COAX Raccordement moniteur supplémentaire 10 KOhm... - Seite 25 SMILE VDS SMILE VDS SMILE VDS SMILE VDS SMILE VDS SMILE VDS SMILE VDS SMILE VDS SMILE VDS SMILE VDS Raccordement postes supplémentaires F1F2 F1F2 10 KOhm 75 Ohm COAX Schéma de câblage 5 FILS / UTP CAT5 Raccordement moniteur supplémentaire 10 KOhm 75 Ohm Page 25...
- Seite 26 SMILE VDS SMILE VDS SMILE VDS SMILE VDS SMILE VDS SMILE VDS SMILE VDS SMILE VDS SMILE VDS SMILE VDS Raccordement moniteur supplémentaire DISTRIBUIDOR VIDEO 2 SALIDAS REF.2448 2 OUTPUTS VIDEO DISTRIBUTOR 75 Ohm Raccordement postes supplémentaires F1F2 F1F2 10 KOhm 75 Ohm Page 26...
-
Seite 27: Annexe: Programmation : Menu Administrateur
SMILE VDS SMILE VDS SMILE VDS SMILE VDS SMILE VDS SMILE VDS SMILE VDS SMILE VDS SMILE VDS SMILE VDS ANNEXE PROGRAMMATION : menu ADMINISTRATEUR Accéder au menu Administrateur Lorsque le moniteur est déjà programmé. 1. Pour entrer dans le menu ADMINISTRATEUR. Appuyez sur « Menu » pendant 3 secondes. -
Seite 28: A) Option Codes
0 0 1 programmer le moniteur : Option a1) : à partir du monituer. Voir manuel _ _ _ avancé code 97711 sur www.fermax.com Option a2) : à partir de la platine et du _ _ _ _ moniteur. . - Seite 29 Continuez d'appuyer sur jusqu'à sortir du mode programmation. Le moniteur quitte automatiquement le mode programmation après 60 secondes d'inactivité. • • • • • Pour plus de renseignements à propos du moniteur, décharger le manuel 97711 sur : www.fermax.com Page 29...
- Seite 30 SMILE VDS SMILE VDS SMILE VDS SMILE VDS SMILE VDS SMILE VDS SMILE VDS SMILE VDS SMILE VDS SMILE VDS Reset moniteur g) Remise à zéro des paramètres L'installateur peut remettre à zéro les paramètres pour que le moniteur récupère la configuration par défaut.
- Seite 31 SMILE VDS SMILE VDS SMILE VDS SMILE VDS SMILE VDS SMILE VDS SMILE VDS SMILE VDS SMILE VDS SMILE VDS 2. Après être passé par tous les boutons-poussoirs capacitifs (le dernier s'éteint), cela signifie que les valeurs indiquées dans cette option ont été réinitialisées. Si l'adresse du moniteur programmée est effacée, le bouton universel clignote (couleur rouge), indiquant de la sorte que le moniteur n'est pas programmé.
- Seite 32 SMILE VDS SMILE VDS SMILE VDS SMILE VDS SMILE VDS SMILE VDS SMILE VDS SMILE VDS SMILE VDS SMILE VDS Page 32...
-
Seite 33: Section Ii - Manuel D'utilisation
Grâce à son menu sur l’écran, vous pourrez profiter de nouvelles prestations pour la configuration des paramètres du moniteur. Nous espérons que vous profiterez pleinement de toutes les fonctions de votre nouveau produit. www.fermax.com Page 33... -
Seite 34: Moniteur Smile
SMILE VDS SMILE VDS SMILE VDS SMILE VDS SMILE VDS SMILE VDS SMILE VDS SMILE VDS SMILE VDS SMILE VDS MONITEUR SMILE Universel Menu (wildcard) Gâche Boutons Bouton pour activer le son et raccrocher · Lors d'un appel entrant, (vous disposez de 30 s. pour répondre avant que l'appareil ne se remette en mode veille. - Seite 35 SMILE VDS SMILE VDS SMILE VDS SMILE VDS SMILE VDS SMILE VDS SMILE VDS SMILE VDS SMILE VDS SMILE VDS Une fonction peut être configurée par l'installateur en vue d'activer automatiquement le canal audio lors de la réception d'un appel. Dans ce mode, la communication prend fin normalement, en appuyant sur le bouton AUDIO ou au bout de 90 s.
-
Seite 36: Fonctionnement
SMILE VDS SMILE VDS SMILE VDS SMILE VDS SMILE VDS SMILE VDS SMILE VDS SMILE VDS SMILE VDS SMILE VDS Bouton-poussoir de la gâche électrique / appel au concierge · Lors d’une communication avec la platine de rue, la gâche électrique est activée en appuyant sur ce bouton. - Seite 37 SMILE VDS SMILE VDS SMILE VDS SMILE VDS SMILE VDS SMILE VDS SMILE VDS SMILE VDS SMILE VDS SMILE VDS Prendre un appel : Mode mains libres : En appuyant sur le bouton-poussoir d'appel sur la platine de rue, il se produit une tonalité d'appel aussi bien au niveau de la platine de rue que du moniteur ;...
- Seite 38 SMILE VDS SMILE VDS SMILE VDS SMILE VDS SMILE VDS SMILE VDS SMILE VDS SMILE VDS SMILE VDS SMILE VDS Activation manuelle du moniteur (allumage automatique) Si le moniteur est en veille, appuyez sur ce bouton universel pendant 1 seconde pour allumer manuellement le moniteur.
-
Seite 39: Programmation : Menu Utilisateur
SMILE VDS SMILE VDS SMILE VDS SMILE VDS SMILE VDS SMILE VDS SMILE VDS SMILE VDS SMILE VDS SMILE VDS PROGRAMMATION : Menu UTILISATEUR Accéder au menu Utilisateur Remarque : - Boutons de navigation et boutons-poussoirs capacitifs Boutons de navigation Les icônes visualisées sur l'écran (boutons de navigation : , , ... -
Seite 40: A) Mélodies
SMILE VDS SMILE VDS SMILE VDS SMILE VDS SMILE VDS SMILE VDS SMILE VDS SMILE VDS SMILE VDS SMILE VDS a) Mélodies Au sein du menu, le moniteur permet de sélectionner une mélodie indépendante pour l’appel à partir de - a1) La platine de rue principale. - a2) La platine de rue secondaire. -
Seite 41: Réglage Son
SMILE VDS SMILE VDS SMILE VDS SMILE VDS SMILE VDS SMILE VDS SMILE VDS SMILE VDS SMILE VDS SMILE VDS 5. Si le mode continu est sélectionné, appuyez sur , pour le sélectionner. Pour sortir de la sélection, on appuie également sur . -
Seite 42: Description Des Fonctions
SMILE VDS SMILE VDS SMILE VDS SMILE VDS SMILE VDS SMILE VDS SMILE VDS SMILE VDS SMILE VDS SMILE VDS Description des fonctions 1. Mode Ne pas déranger (annuler la tonalité d'appel) Dans le menu utilisateur, vous pouvez sélectionner le mode Ne pas déranger. Fonction pour désactiver la tonalité... -
Seite 43: Sonnette De La Porte
SMILE VDS SMILE VDS SMILE VDS SMILE VDS SMILE VDS SMILE VDS SMILE VDS SMILE VDS SMILE VDS SMILE VDS Si l'on souhaite sélectionner ce mode indéfiniment (- - : - -), en arrivant sur cet écran, le premier chiffre clignote, appuyez sur + jusqu'à... - Seite 44 Diese technische Anleitung wurde von FERMAX ELECTRONICA S.A.U. herausgegeben und dient zu Informationszwecken. Fermax behält sich dabei das Recht vor, die Eigenschaften der aufgeführten Produkte jederzeit und ohne vorherige Ankündigung zu ändern. Eventuelle Änderungen werden in nachfolgenden Auflagen berücksichtigt.
- Seite 45 SMILE VDS SMILE VDS SMILE VDS SMILE VDS SMILE VDS SMILE VDS SMILE VDS SMILE VDS SMILE VDS SMILE VDS INHALTSVERZEICHNIS TEIL I - Installationsanleitung ................... 5 Installation des Netzgeräts ................6 Installation der Türstation ................6 Monitorabmessungen Unterputz/Aufputz ............7 Installation des Monitors ................
- Seite 46 SMILE VDS SMILE VDS SMILE VDS SMILE VDS SMILE VDS SMILE VDS SMILE VDS SMILE VDS SMILE VDS SMILE VDS Seite 4...
-
Seite 47: Teil I - Installationsanleitung
SMILE VDS SMILE VDS SMILE VDS SMILE VDS SMILE VDS SMILE VDS SMILE VDS SMILE VDS SMILE VDS SMILE VDS Teil I - Installationsanleitung Seite 5... -
Seite 48: Installation Des Netzgeräts
SMILE VDS SMILE VDS SMILE VDS SMILE VDS SMILE VDS SMILE VDS SMILE VDS SMILE VDS SMILE VDS SMILE VDS INSTALLATION DES NETZGERÄTS Installation einer DIN-Schiene Befestigung mit Schrauben Einbau Ausbau A IN -6 0 H z. A L I K I T N T A C I O... -
Seite 49: Monitorabmessungen Unterputzmontage
Abmessungen in mm. 3,5” Monitor SMILE 7” Monitor SMILE Abmessungen Unterputzkasten 3,5“ Fermax-Monitor, Ref. 6546 (Höhe x Breite x Tiefe): 186 x 116 mm x 46 mm Abmessungen Unterputzkasten 7“ Fermax-Monitor, Ref. 6551 (Höhe x Breite x Tiefe): 186 x 198 mm x 46 mm MONITORABMESSUNGEN AUFPUTZMONTAGE Abmessungen in mm. -
Seite 50: Monitorinstallation Unterputzmontage
SMILE VDS SMILE VDS SMILE VDS SMILE VDS SMILE VDS SMILE VDS SMILE VDS SMILE VDS SMILE VDS SMILE VDS MONITORINSTALLATION UNTERPUTZMONTAGE 3,5” Monitor SMILE Seite 8... - Seite 51 SMILE VDS SMILE VDS SMILE VDS SMILE VDS SMILE VDS SMILE VDS SMILE VDS SMILE VDS SMILE VDS SMILE VDS 7” Monitor SMILE Seite 9...
-
Seite 52: Monitorinstallation Aufputzmontage
SMILE VDS SMILE VDS SMILE VDS SMILE VDS SMILE VDS SMILE VDS SMILE VDS SMILE VDS SMILE VDS SMILE VDS MONITORINSTALLATION AUFPUTZMONTAGE 3,5” Monitor SMILE 3,5" 7” Monitor SMILE 7" Seite 10... -
Seite 53: Beschreibung Der Geräte
SMILE VDS SMILE VDS SMILE VDS SMILE VDS SMILE VDS SMILE VDS SMILE VDS SMILE VDS SMILE VDS SMILE VDS BESCHREIBUNG DER GERÄTE Türstation AMPLIFICADOR - VERSTÄRKER AMPLIFICATEUR - AMPLIFIER MASTER SLAVE AUDIO LEDS ON LEDS OFF CT OUT CT IN PACK EXTENSION PROG IDIOMA... - Seite 54 SMILE VDS SMILE VDS SMILE VDS SMILE VDS SMILE VDS SMILE VDS SMILE VDS SMILE VDS SMILE VDS SMILE VDS CN7: Video-Testmonitor Testanschluss und Monitorprogrammierung SW1 (Mapping) Programmiertaste der Ruftasten "Siehe dazu Mapping-Handbuch" Sprachsynthese: Sprachwahl der Meldung "Tür offen". Siehe KODIERUNG am Ende dieses Handbuchs. Audioeinstellungen: Mikrofonanschluss (Mikrofon befindet sich am unteren Profil der Türstation).
-
Seite 55: Aktivierungszeit Des Türöffners
SMILE VDS SMILE VDS SMILE VDS SMILE VDS SMILE VDS SMILE VDS SMILE VDS SMILE VDS SMILE VDS SMILE VDS Aktivierungszeit des Türöffners FORTGESCHRITTENE PROGRAMMIERUNG: Türöffnungszeit Folgende zwei Aktivierungszeiten können programmiert werden: - Türöffnungszeit bei Auslösung von einer Wohnung - Türöffnungszeit bei Auslösung über den Schalter im Flur (angeschlossen an die Klemmen "BS"... -
Seite 56: Anschlüsse
SMILE VDS SMILE VDS SMILE VDS SMILE VDS SMILE VDS SMILE VDS SMILE VDS SMILE VDS SMILE VDS SMILE VDS TECHNISCHE EIGENSCHAFTEN Stromversorgung 18 VDC Stromverbrauch 57 mA im Bereitschaftsmodus 180 mA Aktive Videoverbindung IP43 390 mA Audio und Video aktiviert [-10 , +60 °C] Betriebstemperatur [14, 140ºF]... - Seite 57 SMILE VDS SMILE VDS SMILE VDS SMILE VDS SMILE VDS SMILE VDS SMILE VDS SMILE VDS SMILE VDS SMILE VDS Verfügbare Funktionen Die verfügbaren Funktionen des Monitors Smile VDS Basic sind in der folgenden Liste zusammengefasst: - Kapazitive Tasten - Türöffnung - Portierruf - Lautstärkeregelung (8-stufig) - Ausschaltung der Anruffunktion (Modus Nicht stören)
- Seite 58 SMILE VDS SMILE VDS SMILE VDS SMILE VDS SMILE VDS SMILE VDS SMILE VDS SMILE VDS SMILE VDS SMILE VDS Taste Audioaktivierung und Auflegen · Bei einem eingehenden Anruf, (hat man 30 Sek. Zeit ihn anzunehmen, bevor der Bereitschaftsmodus erneut aktiviert wird. Während diesem Zeitraum blinkt die blaue LED der Diese Audiotaste und zeigt dadurch an, dass der Anruf noch nicht angenommen worden ist.).
-
Seite 59: Programmierung Des Monitor Smile
SMILE VDS SMILE VDS SMILE VDS SMILE VDS SMILE VDS SMILE VDS SMILE VDS SMILE VDS SMILE VDS SMILE VDS PROGRAMMIERUNG MONITOR SMILE Der im Set für 1 Linie mitgelieferte Monitor ist bereits WERKSMÄSSIG PROGRAMMIERT! Die im Set für 2 Linien mitgelieferten Monitore sind bereits WERKSMÄSSIG PROGRAMMIERT! Hinweis: Falls der Monitor aus irgend einem Grund neu programmiert werden muss, Anhang am Ende des Installateur-Teils konsultieren. -
Seite 60: Audio
SMILE VDS SMILE VDS SMILE VDS SMILE VDS SMILE VDS SMILE VDS SMILE VDS SMILE VDS SMILE VDS SMILE VDS Audioeinstellungen entsprechenden kapazitiven Taste auswählen. Stummschaltfunktion: wird entsprechenden kapazitiven Tasten aktiviert / deaktiviert. Funktion zur Audiounterdrückung Audio- Durch Aktivierung wird das Symbol oben rechts einstellungen auf dem Bildschirm ausgeblendet. - Seite 61 SMILE VDS SMILE VDS SMILE VDS SMILE VDS SMILE VDS SMILE VDS SMILE VDS SMILE VDS SMILE VDS SMILE VDS Verkabelunsschema Seite 19...
- Seite 62 SMILE VDS SMILE VDS SMILE VDS SMILE VDS SMILE VDS SMILE VDS SMILE VDS SMILE VDS SMILE VDS SMILE VDS VERKABELUNGSSCHEMA (KOAXIAL) Kit 1L & 12 VAC 10 KOhm (*) WICHTIG Es ist erforderlich, einen 10 kOhm Widerstand zwischen Anschlüssen „+“ und „L“ des Monitors 75 Ohm anzubringen.
- Seite 63 SMILE VDS SMILE VDS SMILE VDS SMILE VDS SMILE VDS SMILE VDS SMILE VDS SMILE VDS SMILE VDS SMILE VDS VERKABELUNGSSCHEMA (5 DRÄHTE) Kit 1L & 12 VAC 10 KOhm 75 Ohm (*) WICHTIG Es ist erforderlich, einen 10 kOhm Widerstand zwischen Anschlüssen „+“...
- Seite 64 SMILE VDS SMILE VDS SMILE VDS SMILE VDS SMILE VDS SMILE VDS SMILE VDS SMILE VDS SMILE VDS SMILE VDS VERKABELUNGSSCHEMA (KOAXIAL) Kit 2L & 12 VAC 10 KOhm metros / metres pies / feet 75 Ohm 1 - 50 3 - 150 75 Ohm 50 - 100...
- Seite 65 SMILE VDS SMILE VDS SMILE VDS SMILE VDS SMILE VDS SMILE VDS SMILE VDS SMILE VDS SMILE VDS SMILE VDS VERKABELUNGSSCHEMA (5 DRÄHTE) Kit 2L & 12 VAC 10 KOhm (*) IMPORTANTE Es ist erforderlich, einen 10 kOhm Widerstand zwischen Anschlüssen „+“...
-
Seite 66: Erweiterungen
SMILE VDS SMILE VDS SMILE VDS SMILE VDS SMILE VDS SMILE VDS SMILE VDS SMILE VDS SMILE VDS SMILE VDS ERWEITERUNGEN Dieses Set kann zusätzlich mit zwei Telefonen und einem Zusatzmonitor ausgestattet werden, ohne dass dazu ein weiteres Netzgerät angeschlossen werden muss. Verkabelungsschema KOAXIAL Anschluss Zusatzmonitor 10 KOhm... - Seite 67 SMILE VDS SMILE VDS SMILE VDS SMILE VDS SMILE VDS SMILE VDS SMILE VDS SMILE VDS SMILE VDS SMILE VDS Anschluss Zusatztelefone F1F2 F1F2 10 KOhm 75 Ohm COAX Verkabelungsschema 5 DRÄHTE /UTP CAT5 Anschluss Zusatzmonitor 10 KOhm 75 Ohm Seite 25...
- Seite 68 SMILE VDS SMILE VDS SMILE VDS SMILE VDS SMILE VDS SMILE VDS SMILE VDS SMILE VDS SMILE VDS SMILE VDS Anschluss Zusatzmonitor DISTRIBUIDOR VIDEO 2 SALIDAS REF.2448 2 OUTPUTS VIDEO DISTRIBUTOR 75 Ohm Anschluss Zusatztelefone F1F2 F1F2 10 KOhm 75 Ohm Seite 26...
-
Seite 69: Anhang
SMILE VDS SMILE VDS SMILE VDS SMILE VDS SMILE VDS SMILE VDS SMILE VDS SMILE VDS SMILE VDS SMILE VDS ANHANG PROGRAMMIERUNG: SYSTEMVERWALTERMENÜ Zugriff auf das Systemverwaltermenü Wenn der Monitor bereits programmiert ist. 1. Zugang ins SYSTEMVERWALTERMENÜ. Die Taste „Menü“ 3 Sekunden lang gedrückt halten. -
Seite 70: Monitorprogrammierung
0 0 1 programmieren: Option a1): Über den Monitor. Siehe _ _ _ Fortgeschrittenes Handbuch, Kode 97711, auf der Webseite www.fermax.com entnehmen _ _ _ _ Option a2): Über Türstation + Monitor. a.1) Monitorprogrammierung über den Mo- 1 1 1 1 nitor. - Seite 71 Menü aufgerufen. erneut drücken, bis die Programmierung beendet wird. Der Moni- tor verlässt den Programmiermodus nach 60 Sekunden Inaktivität automatisch. • • • • • Für weitere Information über den Monitor, siehe Handbuch, Ref. 97711 auf der Webseite: www.fermax.com Seite 29...
- Seite 72 SMILE VDS SMILE VDS SMILE VDS SMILE VDS SMILE VDS SMILE VDS SMILE VDS SMILE VDS SMILE VDS SMILE VDS Nullstellung des Monitors g) Parameternullstellung Der Installateur kann eine Parameternullstellung durchführen, um die Standardkonfiguration wiederherzustellen. g1) Benutzerinformation Diese Funktion ist im Basis-Modell nicht verfügbar. g2) Standardparameter Stellt die Standardkonfiguration ab Werk wieder her, ohne dabei die einprogrammierte Monitoradresse zu löschen.
- Seite 73 SMILE VDS SMILE VDS SMILE VDS SMILE VDS SMILE VDS SMILE VDS SMILE VDS SMILE VDS SMILE VDS SMILE VDS 2. Wenn alle kapazitiven Tasten gedrückt worden sind, schaltet sich die letzte aus und zeigt dadurch an, dass sämtliche Werte dieser Option zurück-gestellt wurden. Da die Monitoradresse gelöscht wurde, blinkt die frei definierbare Funktionstaste rot und zeigt dadurch an, dass der Monitor nicht programmiert ist.
- Seite 74 SMILE VDS SMILE VDS SMILE VDS SMILE VDS SMILE VDS SMILE VDS SMILE VDS SMILE VDS SMILE VDS SMILE VDS Seite 32...
-
Seite 75: Teil Ii - Bedienungsanleitung
Ihnen mit der Türstation zu kommunizieren, die Person, die anruft auf dem Monitor zu betrachten und bei Bedarf die Tür zu öffnen. Dank dem Bildschirmmenü können neue Optionen zur Einstellung der Monitorparameter integriert werden. Überzeugende Funktionalität für Ihr Eigenheim. www.fermax.com Seite 33... -
Seite 76: Monitor Smile
SMILE VDS SMILE VDS SMILE VDS SMILE VDS SMILE VDS SMILE VDS SMILE VDS SMILE VDS SMILE VDS SMILE VDS MONITOR SMILE Frei definierbare Menü Funktionstaste (wildcard) Audio Türöffner Tasten Taste Audioaktivierung und Auflegen. · Bei einem eingehenden Anruf (man hat 30 Sek. Zeit ihn anzunehmen, bevor der Bereitschaftsmodus erneut aktiviert wird. - Seite 77 SMILE VDS SMILE VDS SMILE VDS SMILE VDS SMILE VDS SMILE VDS SMILE VDS SMILE VDS SMILE VDS SMILE VDS Es gibt eine durch den Installateur konfigurierbare Funktion, um den Sprechkanal bei eingehendem Anruf automatisch zu aktivieren. In diesem Modus wird das Gespräch normal beendet; entweder durch Drücken der AUDIOTASTE oder nach Ablauf der maximalen Sprechzeit von 90 Sekunden.
-
Seite 78: Funktionsweise
SMILE VDS SMILE VDS SMILE VDS SMILE VDS SMILE VDS SMILE VDS SMILE VDS SMILE VDS SMILE VDS SMILE VDS Türöffnungs-/Portierruftaste · Bei bestehender Sprechverbindung mit der Türstation, kann durch Drücken dieser Taste der Türöffner ausgelöst werden. Hinweis: Das Türöffnungssymbol wird dabei auf dem Display des Monitors angezeigt (oben rechts am Bildschirm) ·... - Seite 79 SMILE VDS SMILE VDS SMILE VDS SMILE VDS SMILE VDS SMILE VDS SMILE VDS SMILE VDS SMILE VDS SMILE VDS Anrufbeantwortung: Freisprechmodus: Durch Drücken der Ruftaste an der Türstation ertönt an der Türstation und am Monitor ein Rufton und der Bildschirm schaltet sich ein. Ruftaste drücken, um mit dem Besucher zu sprechen.
- Seite 80 SMILE VDS SMILE VDS SMILE VDS SMILE VDS SMILE VDS SMILE VDS SMILE VDS SMILE VDS SMILE VDS SMILE VDS Manuelle Aktivierung des Monitors (Eigenstart) Wenn der Monitor sich im Bereitschaftsmodus befindet, die frei definierbare Funktionstaste Sekunde gedrückt halten, um den Monitor manuell einzuschalten.
-
Seite 81: Programmierung: Benutzermenü
SMILE VDS SMILE VDS SMILE VDS SMILE VDS SMILE VDS SMILE VDS SMILE VDS SMILE VDS SMILE VDS SMILE VDS PROGRAMMIERUNG: BENUTZERMENÜ Benutzermenü aufrufen Hinweis: - Navigationstasten und kapazitive Tasten Navigationstasten Symbole Display (Navigationstasten: , , y ) werden mit den entsprechenden kapazitiven Tasten des Monitors bedient. -
Seite 82: A) Melodien
SMILE VDS SMILE VDS SMILE VDS SMILE VDS SMILE VDS SMILE VDS SMILE VDS SMILE VDS SMILE VDS SMILE VDS a) Melodien Im Menü kann man jeweils eine bestimmte Melodie auswählen, um unterscheiden zu können, von wo das Signal stammt: - a1) Haupttürstation. -
Seite 83: Audioeinstellungen
SMILE VDS SMILE VDS SMILE VDS SMILE VDS SMILE VDS SMILE VDS SMILE VDS SMILE VDS SMILE VDS SMILE VDS 5. Im kontinuierlichen Modus zur Auswahl drücken. Um die Auswahl zu löschen, drücken. Um die folgenden Optionen aufzurufen ... -
Seite 84: Modus Nicht Stören (Deaktivierung Des Ruftons)
SMILE VDS SMILE VDS SMILE VDS SMILE VDS SMILE VDS SMILE VDS SMILE VDS SMILE VDS SMILE VDS SMILE VDS Funktionenbeschreibung 1. Modus Nicht stören (Deaktivierung des Ruftons) Im Benutzermenü kann der Modus Nicht stören ausgewählt werden: Funktion zur Deaktivierung des Ruftons. Wenn diese Funktion zum ersten Mal ausgewählt wird, zeigt das Display die Standardoption ohne Zeitsteuerung an (- - : - -) und der Benutzer kann diese bestätigen oder die Werte ändern, indem er die Stunden- und Minutenangaben eingibt. - Seite 85 SMILE VDS SMILE VDS SMILE VDS SMILE VDS SMILE VDS SMILE VDS SMILE VDS SMILE VDS SMILE VDS SMILE VDS Falls dieser Modus ohne Zeitbeschränkung aktiviert werden soll (- - : - -), wenn die erste Nummer blinkt die Taste + solange gedrückt halten, bis der Balken - eingeblendet wird und dann , _ _ : _ _ drücken.