Sparco Corsa SPC F1000KI Bedienungsanleitung
Für die gruppen 1+2+3
Vorschau ausblenden
Andere Handbücher für Corsa SPC F1000KI:
- Bedienungsanleitung (122 Seiten) ,
- Bedienungsanleitung (85 Seiten)
Inhaltsverzeichnis
Werbung
Verfügbare Sprachen
Verfügbare Sprachen
Quicklinks
Werbung
Inhaltsverzeichnis

Verwandte Anleitungen für Sparco Corsa SPC F1000KI


Inhaltszusammenfassung für Sparco Corsa SPC F1000KI
- Seite 1 CHILD CAR SEAT FOR GROUPS 1+2+3 INSTRUCTION MANUAL...
- Seite 2 1+2+3 Child Car Seat for Groups Thank you for your purchasing our child car seat. Please contact our Customer Service if you have comments on the child car seat, wish to replace certain accessories, or seek help. Please note that the child car seat is only suitable for fitting on a car seat compliant with ECE R16 or equivalent standards with a three-point seat belt with an emergency locking retractor.
- Seite 3 Precautions: W A R N I N G ! Do not fit the child car seat on a car seat in front of which an airbag is installed, since the airbag may harm the child upon impact. It is advisable to use the child car seat on a rear car seat only, even if your local tra c regulations allow fitting on such a front seat.
- Seite 4 W A R N I N G ! Never use a child car seat without a backrest, since it cannot provide maximum protection during a collision. W A R N I N G ! Toxic cleaning solutions may lead to illness. Do not bleach, iron, machine-wash, or dry the child car seat covers with a roller-drier, as these methods will damage the child car seat covers and require a replacement..
-
Seite 5: General Safety Information
General Safety Information Keep this Instruction Manual together with the child car seat, so you can readily access it in the future. Noncompliance with these instructions may a ect your child’s safety. After the child car seat has been placed and fitted, under normal driving conditions, there should be no compressed part under the movable seat or car door or between the two. - Seite 6 Using your SPARCO child car seat Understand how to properly fit the child car seat before using Become familiar with the features and functions of the child car seat to ensure a proper fit.
- Seite 7 EU Standard ECE R44 04 Group Weight Orientation Fixing of child Group 0-10 Backward Child seat belt 0-10 kg facing months (5 points) Group Backward Child seat belt 0-18 0-13kg facing (5 points) months Group Forward Child seat belt 9 months – 9-18kg facing (5 points)
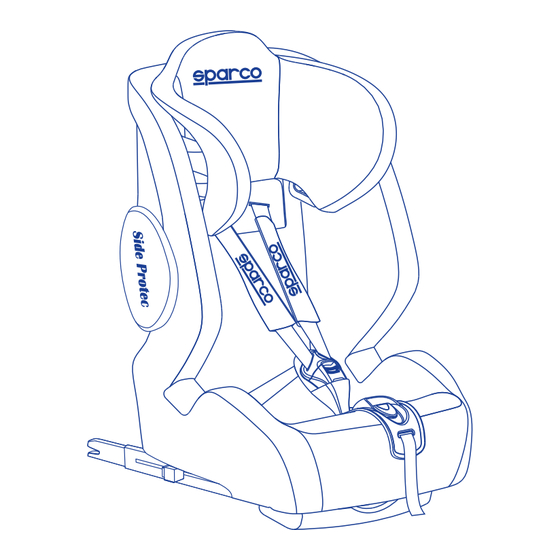
- Seite 8 Headrest Shoulder Belt Guide Harness Slots Harness Strap Shoulder Pads Harness Buckle Buckle Pads Adjustment Device Harness Adjustment Strap Headrest Adjustment Handle Guide slot Top tether release button Cover Top tether strap Red waist Top tether hook belt guide Snap button ISOFIX Attachment ISOFIX release button...
-
Seite 9: Securing Your Baby
Securing your baby 1.1 How to adjust the belts, headrest and seat positions IMPORTANT The correct belt height of the shoulder belts is attained when the belt disappears into the shell slightly above the shoulder of the child. Make sure that the shoulder belts fit properly over the shoulders of the child. - Seite 10 Securing your baby 1.2 Securing your baby using the harness Loosen the harness straps by pressing the release button and pulling the harness straps as far as you can. Note! Do not pull the shoulder pads. Open harness buckle, then place the harness straps to the sides of the car seat.
- Seite 11 Securing your baby 1.3 Tightening the harness CAUTION Pull the straps end straight towards you, not upwards or downwards. Please pay attention to the strap end. Whilst traveling (especially outside the car) it should always be attached to the cover. 1.4 Checklist to ensure that your baby is buckle up correctly.
-
Seite 12: Installation In The Vehicle
Installation in the vehicle 2. Installation in the vehicle Please do not leave your child unattended in the child safety seat in the vehicle. For the protection of all vehicle occupants. In the case of an emergency stop or an accident unsecured persons or objects may cause injury to other vehicle occupants. - Seite 13 ISOFIX and Top tether 2.1 Installation of Group I for the children whose weight between 9-18kg with ISOFIX and top tether. IMPORTANT First please check if there are 2 ISOFIX anchorages in the perpendicular intersection of the vehicle seat back and seat cushion, and the user ready tether anchorage behind the vehicle seat.
- Seite 14 ISOFIX and Top tether 2.2 Installation of Group I for the children whose weight between 9-18kg with ISOFIX and top tether. Pull out the top tether and press the tether strap release button to extend the strap until it is long enough to hook the user-ready tether anchorage behind.
- Seite 15 Group I Car Belt Installation 2.3 Group I Car Belt Installation (For Children weight between 9-18KG) click click Pull the car belt through guide slot and insert belt buckle into front side cover hole(picture 1), then across seat back and took out from the other side of cover hole (picture 2) , finally buckle up until heard“click”sound.
- Seite 16 Group II/III Car Belt Installation 2.4 Installation of Group II/III and it is for the children whose weight between 15-36kg. Before the installation, please take away the Harness system of baby car seat. Note: The Harness strap, Harness buckle, Buckle pads& Shoulder pads should be stored away safely for future use ( see 3.1 Removing the 5 point harness system and cover ).
-
Seite 17: Care Instructions
Care instructions 3.1 Removing the 5 point harness system and cover Press adjusting a device and pull harness strap towards as far as you can, details see (1.2) Open the cover snap button at the bottom of seat back as shown right picture. - Seite 18 Care instructions 3.2 Refitting the 5 point harness system and cover After washing, place the cover on the shell. Pass both sides of harness strap through strap slots bottom of seat. Then, lead straps through buckle metal connector Pass buckle clip through buckle pads and put clip into bottom...
- Seite 19 Care instructions 3.3 Cleaning Please be sure to use only original seat covers, as the seat cover is important to the proper functioning of the system. Replacement seat covers are available from your retailer and or at branches. The child seat must not be used without the seat cover. The cover can be removed and washed with a mild detergent using the washing machine's cycle for delicate items (30°C).
- Seite 20 CAUTIONS 1. This is a "Universal" child restraint. It is approved to Regulation No. 44, 04 series of amendments, for general use in vehicles and it will fit most, but not all, car seats. 2. A correct fit is likely if the vehicle manufacturer has declared in the vehicle handbook that the vehicle is capable of accepting a "Universal"...
- Seite 21 DĚTSKÁ AUTOSEDAČKA PRO SKUPINY 1+2+3 NÁVOD K OBSLUZE...
- Seite 22 Dětská autosedačka pro skupiny 1+2+3 Děkujeme vám, že jste se rozhodli pro koupi naší dětské autosedačky. Budete-li mít k dětské autosedačce nějaké připomínky nebo budete-li potřebovat pomoci či vyměnit některé příslušenství, obraťte se na naše oddělení zákaznického servisu. Dětská autosedačka je určena pouze k instalaci do vozidel vybavených tříbodovými samonavíjecími bezpečnostními pásy, které...
-
Seite 23: Bezpečnostní Upozornění
Bezpečnostní upozornění: V A R O V Á N Í ! Nepoužívejte dětskou autosedačku na sedadle, které je vybaveno čelním airbagem, protože airbag může při nárazu dítě zranit. Doporučujeme používat dětskou autosedačku pouze na zadních sedadlech, a to i v případě, že místní předpisy dovolují použití na sedadle spolujezdce. - Seite 24 V A R O V Á N Í ! Nikdy nepoužívejte dětskou autosedačku bez opěradla, protože by při srážce neposkytla dítěti dostatečnou ochranu. V A R O V Á N Í ! Toxické čisticí prostředky mohou vyvolat onemocnění. Polstrování dětské autosedačky nebělte, nežehlete, neperte v automatické...
- Seite 25 Všeobecné informace týkající se bezpečnosti Tento návod k obsluze uchovávejte spolu s autosedačkou, aby byl v případě nutnosti ihned k dispozici. Nedodržení tohoto pokynu může ohrozit bezpečnost dítěte. Autosedačka musí být umístěna a uchycena tak, aby při běžném používání vozidla nemohlo dojít k přiskřípnutí některé...
- Seite 26 Během zimního období zkontrolujte, zda změna oblečení nemá vliv na správné napnutí bezpečnostních pásů a funkčnost popruhů autosedačky. Použití dětské autosedačky SPARCO Před použitím se seznamte s řádným postupem upevnění dětské autosedačky. Rovněž se seznamte s prvky a funkcemi autosedačky, které...
- Seite 27 Evropský předpis č. 44 série změn 04 Skupina Hmotnost Věk Orientace Upevnění dítěte Skupina 0-10 Proti směru Bezpečnostní 0-10 kg pásy autosedačky jízdy měsíců (pětibodové) Bezpečnostní Skupina Proti směru 0-18 0-13kg pásy autosedačky jízdy měsíců (pětibodové) Skupina Ve směru Bezpečnostní 9 měsíců...
- Seite 28 opěrka hlavy vodítko ramenního pásu otvory pro popruhy popruhy polstrování ramen přezka popruhů polstrování přezky seřizovací mechanismus seřizovací popruh seřizovací páka opěrky hlavy vodicí drážka tlačítko pro uvolnění horního upevňovacího pásu polstrování horní upevňovací pás háček horního červené vodítko pásu břišního pásu cvoček držák ISOFIX...
- Seite 29 Upevnění dítěte 1.1 Jak nastavit popruhy, opěrku hlavy a polohu sedačky. DŮLEŽITÉ Správné výšky ramenních pásů je dosaženo, když se pás ztrácí do korpusu těsně nad úrovní ramen dítěte. Přesvědčte se, že ramenní pásy dobře obepínají ramena dítěte. - Seřízení pásů Stisknutím uvolňovacího tlačítka...
- Seite 30 Upevnění dítěte 1.2 Upevnění dítěte pomocí popruhů Stisknutím uvolňovacího tlačítka povolte popruhy a vytáhněte je, co nejdále to půjde. Poznámka! Netahejte polstrování ramen. Rozepněte přezku odsuňte popruhy stran. Usaďte dítě do autosedačky. Správné výšky polstrování ramen je dosaženo, když se pás ztrácí do korpusu těsně...
- Seite 31 Upevnění dítěte 1.3 Napnutí popruhů POZOR Za konec popruhů tahejte k sobě, nikoli nahoru ani dolů. Dávejte pozor na konec popruhů. Při cestování (a zvláště při přenášení mimo vozidlo) musí být vždy upevněn k polstrování. 1.4 Kontrola správného upevnění dítěte DŮLEŽITÉ...
- Seite 32 Instalace do vozidla 2. Instalace do vozidla ! Nenechávejte dítě v autosedačce ve vozidle bez dozoru. ! V zájmu ochrany všech cestujících. případě nouzového zastavení nebo nehody mohou nepřipoutané osoby nebo neupevněné předměty způsobit zranění jiným cestujícím. Vždy zkontrolujte, že… Jsou zajištěny opěrky všech sedadel ve vozidle (tj.
- Seite 33 Systém ISOFIX s horním upevňovacím pásem 2.1 Upevnění pomocí systému ISOFIX s horním upevňovacím pásem u skupiny I – dětí s hmotností 9–18 kg. DŮLEŽITÉ Nejdříve zkontrolujte, zda je vozidlo na přechodu mezi sedákem a opěradlem zadního sedadla vybaveno dvěma kotevními body systému ISOFIX.
- Seite 34 Systém ISOFIX s horním upevňovacím pásem 2.2 Upevnění pomocí systému ISOFIX s horním upevňovacím pásem u skupiny I – dětí s hmotností 9–18 kg. Uchopte horní upevňovací pás, stiskněte tlačítko pro uvolnění upevňovacího pásu, a vytáhněte pás, dosáhl připravenému úchytu. Připevněte háček upevňovacího pásu k...
- Seite 35 Upevnění pomocí bezpečnostních pásů vozidla – Skupina I 2.3 Upevnění pomocí bezpečnostních pásů vozidla u skupiny I – dětí s hmotností 9–18 kg click click Protáhněte bezpečnostní pás vodicí drážkou. Zasuňte západku pásu do otvoru na přední straně polstrování (obrázek 1), poté ji protáhněte za opěradlem autosedačky, protáhněte druhým otvorem v polstrování...
- Seite 36 Upevnění autosedačky pomocí bezpečnostních pásů – Skupiny II a III 2.4 Upevnění pomocí bezpečnostních pásů vozidla u skupin II a III – dětí s hmotností 15–36 kg Před upevněním vyjměte systém popruhů dětské autosedačky. Poznámka: Popruhy, přezku, polstrování přezky a ramen odložte pro případ potřeby (viz odstavec Vyjmutí...
-
Seite 37: Pokyny K Údržbě
Pokyny k údržbě 3.1 Vyjmutí systému pětibodových popruhů a sejmutí polstrování. Stiskněte seřizovač a vytáhněte popruhy, co nejdále to půjde, viz odstavec 1.2. Odepněte cvoček spodní části opěradla, viz obrázek vpravo. Povolte popruhy odpojte je od třmenu, viz obrázek vpravo. Vytáhněte dvojici popruhů... - Seite 38 Pokyny k údržbě 3.2 Zpětná montáž systému pětibodových popruhů a nasazení polstrování Po vyprání nasaďte polstrování na korpus. Protáhněte popruh na obou stranách otvory ve spodní části sedadla. Poté protáhněte popruhy kovovou spojkou od přezky. Protáhněte příchytku přezky polstrováním a zasuňte ji do otvoru ve spodní...
- Seite 39 Pokyny k údržbě 3.3 Čištění Používejte pouze originální polstrování, protože polstrování je důležité pro správnou funkci systému. Náhradní polstrování dostanete u svého prodejce nebo na pobočkách. ! Dětská autosedačka se nesmí používat bez polstrování. Polstrování lze sejmout a vyprat ve slabém roztoku detergentu v pracím programu pro citlivé...
- Seite 40 UPOZORNĚNÍ 1. Toto je „univerzální“ dětský zádržný systém. Je schválen podle předpisu č. 44 série změn 04, pro obecné použití ve vozidlech a vyhovuje pro většinu, ale ne pro všechna sedadla ve vozidle. 2. Správnou instalaci lze očekávat, jestliže výrobce vozidla v příručce prohlašuje, že do vozidla je možné...
- Seite 41 AUTOKINDERSITZ FÜR DIE GRUPPEN 1+2+3 BEDIENUNGSANLEITUNG...
- Seite 42 Autokindersitz für die Gruppen 1+2+3 Danke, dass Sie sich für unseren Autokindersitz entschie- den haben. Bitte kontaktieren Sie unseren Kundenservice, falls Sie Kommentare haben, Zubehörteile austauschen möchten oder Hilfe benötigen. Bitte beachten Sie, dass der Kindersitz nur für einen Autositz mit ECE R16 oder vergleichbaren Standards mit einem Dreipunktgurt-System mit notfallverriegelnder Aufrollvorrichtung geeignet ist.
-
Seite 43: Vorsichtsmaßnahmen
Vorsichtsmaßnahmen: W A R N U N G ! Befestigen Sie den Kindersitz nicht auf einem Autositz, der mit einem Airbag ausgestattet ist, da dieser das Kind beim Aufprall verletzen könnte. Es ist zu empfehlen den Kindersitz stets auf einem der Rücksitze zu verwenden, auch wenn die jeweiligen Verkehrsbestim- mungen das Anbringen auf dem Vordersitz erlauben. - Seite 44 W A R N U N G ! Verwenden Sie den Kindersitz niemals ohne Rückenlehne. Im Falle eines Unfalls könnte so kein optimaler Schutz gewährleistet werden. W A R N U N G ! Chemische Reinigungsmethoden könnten zu Krankheit führen. Die Kindersitzbezüge dürfen nicht geblichen, gebügelt, in der Maschine gewaschen oder maschinell getrocknet werden, da sie so beschädigt werden und somit ersetzt werden müssen.
-
Seite 45: Generelle Sicherheitsinformationen
Generelle Sicherheitsinformationen Bewahren Sie diese Bedienungsanleitung zusammen mit dem Kindersitz auf, sodass Sie sie in Zukunft gut erreichen können. Die Nichteinhaltung dieser Anweisungen könnte die Sicherheit Ihres Kindes beeinträchtigen. Nachdem der Kindersitz platziert und befestigt wurde, sollten bei normaler Fahrweise keine Teile unter dem beweglichen Sitz, der Autotür oder zwischen den beiden eingeklemmt sein. - Seite 46 Stellen Sie während der Nutzung in kalten Wintermonaten sicher, dass die Bekleidung des Kindes die reguläre Spannung des Kindersitzgurtes oder des Autositzgurtes nicht beeinflusst. Benutzung Ihres SPARCO Autokindersitzes Verstehen Sie vor der Benutzung, wie der Kindersitz ordnungsgemäß befestigt wird. Erproben Sie den Umgang mit den Eigenschaften und Funktionen des Kindersitzes um eine ordentliche Anpassung zu gewährleisten.
- Seite 47 EU Standard ECE R44 04 Gruppe Gewicht Alter Ausrichtung Befestigung des Kindes Gruppe Kindersitz-Gurt 0-10 kg rückwärts 0-10 Monate (5 Punkte) Gruppe Kindersitz-Gurt 0-13 kg rückwärts 0-18 Monate (5 Punkte) Gruppe 9 Monate Kindersitz-Gurt vorwärts 9-18kg (5 Punkte) – 4 Jahre Gruppe Sicherheitsgurt des vorwärts...
- Seite 48 Kopfstütze Schultergurtführung Gurtschlitze Gurtband Schulterpolster Gurtschloss Schlosspolster Einstellvorrichtung Tragebügel zur Einstellung der Kopfstütze Gurteinstellband Führungsschlitz Auslöser für den oberen Haltegurt Bezug Oberer Haltegurt Haken des oberen Rote Haltegurts Beckengurtführung ISOFIX-Befestigung- Druckknopf svorrichtung ISOFIX-Auslöser...
-
Seite 49: Sicherung Ihres Kindes
Sicherung Ihres Kindes 1.2 Anpassung der Gurte, Kopfstütze und Sitzpositionen WICHTIG Die korrekte Gurtlänge der Schultergurte ist erreicht, wenn der Gurt knapp über der Schulter des Kindes in der Sitzschale verschwindet. Stellen Sie sicher, dass die Schultergurte richtig über den Schultern des Kindes sitzen. - Seite 50 Sicherung Ihres Kindes 1.2 Sicherung Ihres Kindes mit dem Gurt Lösen Sie die Gurtbänder, indem Sie auf den Auslöser drücken und so weit wie möglich an den Gurtbändern ziehen. Achtung! Ziehen Sie nicht an den Schulter- polstern! Ö nen Gurtschloss positionieren Gurtbänder an die Seiten Auto-Kindersitzes.
- Seite 51 Sicherung Ihres Kindes 1.3 Stra en der Gurte ACHTUNG Gurtende gerade herausziehen, nicht nach oben oder unten ziehen. Bitte achten Sie auf das Gurtende. Es sollte unterwegs (insbesondere außerhalb des Fahrzeugs) stets am Bezug befestigt sein. 1.4 Checkliste: So ist Ihr Kind richtig gesichert WICHTIG Bitte achten Sie zur Sicherheit Ihres Kindes darauf, dass...
-
Seite 52: Einbau Im Fahrzeug
Einbau im Fahrzeug 2. Einbau im Fahrzeug Bitte lassen Sie Ihr Kind im Auto-Kindersitz nie unbeaufsichtigt im Fahrzeug zurück. Zum Schutz aller Fahrzeuginsassen. Bei einer Notbremsung oder einem Unfall können ungesicherte Gegenstände und Personen andere Mitfahrer verletzen. Bitte achten Sie deshalb stets darauf, dass... Die Rückenlehnen der Fahrzeugsitze festgestellt sind (z. -
Seite 53: Isofix Und Oberer Haltegurt
ISOFIX und oberer Haltegurt 2.1 Montage von Gruppe I für Kinder mit einem Gewicht zwischen 9 und 18 kg mit ISOFIX und oberem Haltegurt. WICHTIG Bitte prüfen Sie zuerst, ob sich 2 ISOFIX-Verankerungen am rechtwinkligen Schnittpunkt des Fahrzeugsitzlehne und dem Sitzkissen und die einsatzbereite Haltegurtver- ankerung hinter dem Fahrzeugsitz befinden. - Seite 54 ISOFIX und oberer Haltegurt 2.2 Montage von Gruppe I für Kinder mit einem Gewicht zwischen 9 und 18 kg mit ISOFIX und oberem Haltegurt. Ziehen Sie den oberen Haltegurt heraus und drücken Haltegurt-Auslöser, um den Gurt herauszuz- iehen, bis er lang genug ist, um an der einsatz- bereiten Haltegurtver- ankerung...
-
Seite 55: Montage Des Fahrzeuggurtes Der Gruppe
Montage des Fahrzeuggurtes der Gruppe 1 2.3 Montage des Fahrzeuggurtes der Gruppe 1 (Kinder mit einem Körpergewicht von 9-18 kg) click click Ziehen Sie den Fahrzeuggurt durch den Führungsschlitz und führen Sie das Gurtschloss durch die Ö nung am vorderen Bezug (Abb. -
Seite 56: Montage Des-Fahrzeuggurtes Der Gruppe-2
Montage des-Fahrzeuggurtes der Gruppe-2/3 2.4 Montage Gruppe 2/3 (Kinder mit einem Körpergewicht von 15-36 kg) Bitte entfernen Sie vor der Montage das Gurtsystem aus dem Auto-Kindersitz. Hinweis: Gurtband, Gurtschloss, Schlosspol- ster und Schulterpolster sollten für eine zukünftige Verwendung sicher aufbewahrt werden (siehe Ausbau... - Seite 57 Pflegeanleitung 3.1 Ausbau des 5‐Punkt-Gurtsystem und des Bezugs Drücken Sie auf die Einstellvorrichtung und ziehen Sie so weit wie möglich an den Gurtbändern (mehr dazu unter 1.2). Ö nen Druckknopf des Bezugs unten an der Rückseite des Sitzes, wie auf der Abbildung rechts.
- Seite 58 Pflegeanleitung 3.2 Erneutes Anbringen des 5‐Punkt-Gurtsystem und des Bezugs Befestigen Sie den Bezug nach dem Waschen an der Sitzschale. Schieben beide Gurtbandseiten durch die Bandschlitze unter dem Sitz. Führen Sie dann die Bänder durch Metallschloss- Konnektor. Schieben Schlossclip durch die Schlosspolster und den Clip in den Schlitz unten.
- Seite 59 Pflegeanleitung 3.3 Reinigung Achten Sie darauf, nur Originalbezüge zu verwenden, da der Bezug einen wesentlichen Teil der Systemfunktion darstellt. Ersatz erhalten Sie bei Ihrem Fachhändler oder bei den Filialen. Der Auto-Kindersitz darf nicht ohne Bezug verwendet werden. Den Bezug können Sie abziehen und mit Feinwaschmittel im Schonwaschgang bei 30 °C in der Waschmaschine waschen.
- Seite 60 VORSICHT 1. Dies ist eine „Universal“-Rückhalteeinrichtung für Kinder. Sie ist nach der Regelung Nr. 44, Änderungs- serie 04, für die allgemeine Verwendung in Fahrzeu- gen zugelassen und für die meisten - aber nicht alle - Fahrzeugsitze geeignet. 2. Ein korrekter Einbau der Einrichtung kann erwar- tet werden, wenn der Fahrzeughersteller im Fahrzeughandbuch erklärt, dass das Fahrzeug für den Einbau einer „Universal“-Rückhalteeinrichtung...