Park Tool CRC-1 Bedienungsanleitung
Quicklinks
PARK TOOL CO.
5115 Hadley Ave. N., St. Paul, MN 55128 (USA) www.parktool.com
CRC-1 Crown Race Cutter Tool
The Park Tool CRC-1 Crown Race Cutter is designed to mill and/or face a
fork's crown race seat to precise dimensions. Milling and/or facing the crown
race seat insures a proper press fit of the crown race, as well as proper
performance and longevity of the headset.
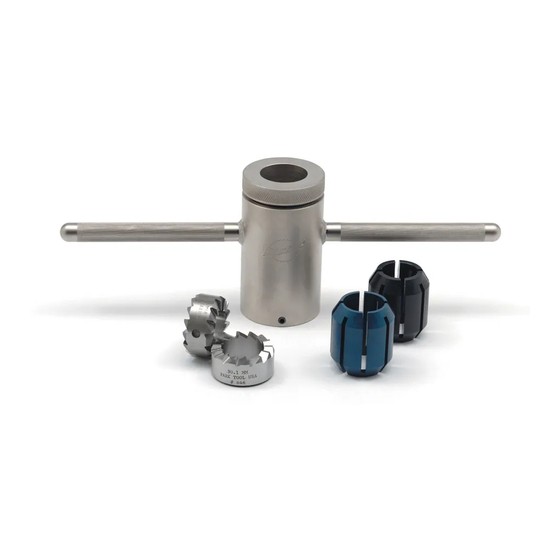
The CRC-1 includes a handle assembly, two adjustable bushings, and two
high speed steel cutters to mill and face 26.5mm and 27.1mm crown race
seats on 1" forks and 30.1mm crown race seats on 1-1/8" forks.
The CRC-1 is not intended for use on full carbon fiber steering columns.
Additionally, it should not be used on crown race seats that are chrome
plated, as it will dull the cutters very quickly. If a chrome-plated fork has a
crown race seat that needs to be milled and/or faced, the chrome should first
be removed.
Instructions:
1. Measure the inside diameter of the crown race being installed and select
the proper size cutter. The CRC-1 includes two cutters. Part #845 (used
on 1" forks) has a 26.5mm cutter on one side and a 27.1mm cutter on the
other. Part #846 (used on 1-1/8" forks) has a 30.1mm cutter. If the inside
diameter of the race is between 26.3mm and 26.4mm, use the 26.5mm
cutter. If the inside diameter of the race is between 26.9mm and 27.0mm,
use the 27.1mm cutter. If the inside diameter of the race is between
29.9mm and 30.0mm, use the 30.1mm cutter.
2. Position the cutter in the handle assembly (#841) and tighten the two set
screws (#609), making sure the set screws are in line with the positioning
points in the cutter.
3. Select the proper adjustable bushing. Use the black bushing (#843) for 1"
forks and the blue bushing (#844) for 1-1/8" forks. Unthread the cap/nut
(#842) from the top of the handle assembly, drop the bushing in the body
of the handle assembly, and re-install the cap/nut. At this point, do not
tighten the cap/nut. Tightening the cap/nut before installing the tool on
the fork will damage the bushing.
4. Position the CRC-1 onto the fork column and tighten the cap/nut just until
there is no play between the tool and the fork.
5. Mount the fork onto a front wheel. With the wheel on the ground, grasp
the wheel between your legs to stabilize the fork.
6. Liberally apply cutting oil or cutting fluid to the cutter and to the fork's
crown race seat. Park Tool CF-2 Cutting Fluid is recommended.
7. Lean over the wheel and fork and apply downward pressure while turning
the tool in a clockwise direction. Turning the tool in a counterclockwise
direction will damage the cutter. As the tool cuts down the crown race
seat, continually add fresh cutting oil or cutting fluid. Continue turning
the tool clockwise until the cutter contacts the bottom of the crown race
seat and a flat, smooth, evenly faced surface is created.
8. Clean the fork and the tool completely. The fork is now ready for
installation of the crown race.
Note:
All components should be used and stored with extreme care. The cutters
should be cleaned and wiped with an oily cloth or rust inhibitor after use
and should be periodically sharpened by a qualified technician. Park Tool
Co. offers a sharpening service that can return cutting tools to factory
specifications. Information can be found at: www.parktool.com.
CRC-1 Gabelkonussitz-Fräser
Mit dem CRC-1 wird der Konussitz der Gabel präzise abgedreht und
plangefräst. Diese Bearbeitung gewährleistet die exakte Passung des
Gabelkonus auf der Gabel sowie die einwandfreie Funktion und Haltbarkeit
des gesamten Steuersatzes.
Dieses komplette Fräser-Set umfasst neben dem Werkzeugschaft zwei
anpassbare Schneidführungen, zwei HSS-Fräsköpfe für 26,5 und 27,1 mm
Konussitze bei 1" Gabeln sowie für 30,1 mm Konussitze bei 1-1/8" Gabeln.
Der CRC-1 ist nicht für Gabelschäfte aus Vollcarbon geeignet. Auch bei
CRC-1
Instructions / Instructions / Anleitung / Instrucciones
verchromten Gabelschäften ist Vorsicht geboten, da die Fräsköpfe durch die
Chromschicht schnell abstumpfen. Entfernen Sie gegebenenfalls vor dem
Fräsen die Verchromung rund um den Konussitz.
Bedienungsanleitung:
1. Messen Sie den Innendurchmesser des zu installierenden Gabelkonus
und wählen Sie den passenden der beiden Fräsköpfe. Artikel #845 (für 1"
Gabeln) bietet die Abmessungen 26,5 mm sowie 27,1 mm. Artikel #846 (für
1-1/8" Gabeln) bietet 30,1 mm. Verfügt der Konus über 26,3 bis 26,4 mm
Innendurchmesser, verwenden Sie den 26,5 mm Fräser. Bei 26,9 bis 27,0 mm
Innendurchmesser nehmen Sie den 27,1 mm Fräser. Für Innendurchmesser
von 29,9 bis 30,0 mm kommt der 30,1 mm Fräser zum Einsatz.
2. Platzieren Sie den passenden Fräskopf im Werkzeugschaft (#841)
und sichern Sie ihn an seinen Fixierbohrungen mit den beiden
Fixierschrauben (#609).
3. Wählen Sie die passende Schneidführung. Die schwarze Führung
(#843) passt für 1" Gabeln, die blaue (#844) für 1-1/8" Gabeln.
Schrauben Sie die Werkzeugkappe (#842) aus dem Korpus, setzen Sie
die gewünschte Schneidführung in den Korpus und montieren Sie die
Justiermutter wieder ohne sie festzuziehen. Achtung: Das Festziehen der
Werkzeugkappe vor Installation des CRC-1 auf dem Gabelschaft führt zur
Beschädigung der Schneidführung.
4. Platzieren Sie den CRC-1 auf dem Gabelschaft und drehen Sie die
Werkzeugkappe fest, bis es kein Spiel mehr zwischen Werkzeug und
Gabelschaft gibt.
5. Montieren Sie die Gabel in ein Vorderrad und klemmen Sie das auf dem
Boden stehende Laufrad mit den Beinen fest.
6. Tragen Sie großzügig Schneidöl auf Fräskopf und Konussitz. Wir
empfehlen unser Schneidöl CF-2.
7. Beugen Sie sich über Gabel und Laufrad und üben Sie leichten Druck
nach unten aus während Sie den Fräser im Uhrzeigersinn drehen.
Drehen gegen den Uhrzeigersinn beschädigt den Fräskopf. Geben Sie
während des Fräsvorgangs laufend weiteres Schneidöl hinzu. Drehen
Sie den Fräser solange im Uhrzeigersinn bis der Fräskopf die Oberfläche
des Konussitzes berührt und diese plan, eben und gleichmäßig gefräst
worden ist.
Hinweis:
Alle Werkzeugkomponenten sollten mit großer Sorgfalt eingesetzt und
gelagert werden. Reinigen Sie die Fräseisen nach jeder Benutzung mit
einem öligen Lappen und lassen Sie sie regelmäßig von einem Fachmann
nachschleifen. Park Tool Co. bietet einen Schleifservice in Industriequalität
an. Weitere Informationen auf www.parktool.com.
CRC-1 Kit de Surfaçage de Pivot de Fourche
Le kit de surfaçage de pivot de fourche CRC-1 Park Tool est conçu pour
surfacer et préparer l'embase de votre fourche à des dimensions précises.
Le surfaçage du pivot assure un ajustement parfait, ainsi qu'une meilleur
performance et longévité.
Le CRC-1 est constitué d'une poignée d'assemblage, deux guides ajustables
et deux fraises de surfaçage pour embases de 26.5mm et 27.1mm sur
fourches de 1" et 30.1mm sur fourches de 1-1/8".
Le CRC-1 n'est pas conçu pour une utilisation sur des fourches 100% carbone.
De plus, il ne devrait pas être utilisé sur des embases chromées, ceci entrainant
une usure très rapide des fraises. Si une fourche à l'embase chromée nécessite
d'être surfacée, il faudra dans un premier temps retirer le chrome.
Instructions:
1. Mesurer le diamètre interne de la cuvette à installer et sélectionner la
fraise appropriée. Le CRC-1 comprend deux fraise. La pièce #845 (utilisée
sur les fourches de 1") a une face de 26.5mm et une face de 27.1mm. La
pièce #846 (utilisée sur les fourches de 1-1/8") a un cutter de 30.1mm. Si
le diamètre intérieur de la cuvette est compris entre 26.3mm et 26.4mm,
utiliser la fraise de 26.5mm. Si le diamètre intérieur de la cuvette est

Verwandte Anleitungen für Park Tool CRC-1


Inhaltszusammenfassung für Park Tool CRC-1
- Seite 1 Gabelschäften ist Vorsicht geboten, da die Fräsköpfe durch die Chromschicht schnell abstumpfen. Entfernen Sie gegebenenfalls vor dem The Park Tool CRC-1 Crown Race Cutter is designed to mill and/or face a Fräsen die Verchromung rund um den Konussitz. fork’s crown race seat to precise dimensions. Milling and/or facing the crown...
- Seite 2 Serer le capot avant d’installer l’outil sur la fourche abimerait le guide. uniforme sea creada. 4. Placer le CRC-1 sur la colonne de direction puis serer le capot jusqu’à ce 8. Limpie la herramienta y la tijera. La tijera está lista para instalar el cono qu’il n’y ait plus de jeu entre l’outil et la fourche.