Park Tool FAG-2 Anleitung
Fahrradrahmen
Quicklinks
PARK TOOL CO.
5115 Hadley Ave. N., St. Paul, MN 55128 (USA) www.parktool.com
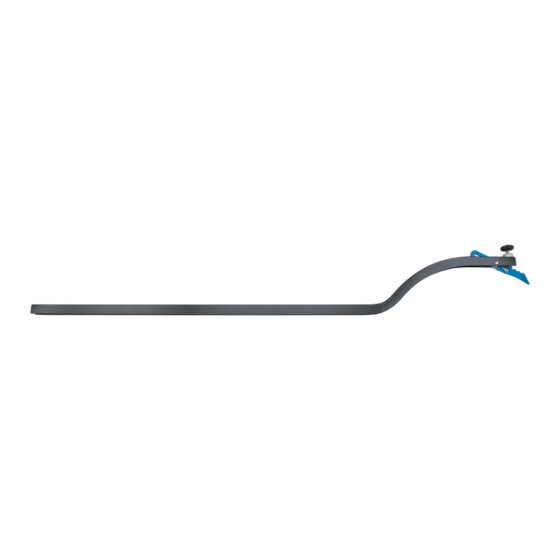
FAG-2 Frame Alignment Gauge
Misalignment of a bike frame's rear triangle can cause handling issues, chain
misalignment, shifting problems and wheel installation difficulties. The FAG-2
Frame and Fork Alignment Gauge quickly and easily determines if the rear tri-
angle is properly aligned.
Instructions:
1. Remove the rear wheel from the bike. Place the FAG-2 on the frame's left
side head tube and seat tube, avoiding contact with lugs, welds, cable
stops, cables, etc. Adjust the knob (Ref. #6) as needed until the indica-
tor pointer (Ref. #1) contacts the left rear dropout and the FAG-2 has three
points of contact with the frame (Figure 1).
2. Without changing the position of the indicator, place the FAG-2 on the
right side of the frame and note the result.
a. If the FAG-2 has the same three points of contact with the head tube,
seat tube and dropout of the frame, the rear triangle is aligned (Figure 2).
b. If the FAG-2 contacts the head tube and dropout but there is a gap be-
tween the FAG-2 and the seat tube, the rear triangle is right of center
and out of alignment (Figure 3).
c. If the FAG-2 contacts the head tube and seat tube but there is a gap be-
tween the FAG-2 indicator and the right dropout, the rear triangle is left
of center and out of alignment (Figure 4).
Correcting Alignment:
Frames made of steel or titanium can sometimes be cold-set (bent) to correct
alignment problems. Step by step instructions can be found at www.park-
tool.com. Other materials, such as carbon fiber or aluminum, are too rigid or
fragile to cold-set. Do not attempt to correct alignment problems on frames
made of carbon fiber or aluminum.
Always check with the frame manufacturer for recommendations before at-
tempting to align any frame.
FAG-2 Outil de Mesure d'alignement de Cadre
Le non alignement du triangle arrière d'un cadre peut poser plusieurs problèmes
dont des problèmes de passages de vitesses, d'alignement de chaine et de mon-
tage de roues. L'outil de mesure d'alignement de cadre FAG-2 permet de facile-
ment et rapidement déterminer si le triangle arrière est correctement aligné.
Notice d'utilisation:
1. Retirer la roue arrière du velo. Placer le FAG-2 le long du cadre sur le coté
gauche du tube de direction et du tube de selle, tout en évitant le contact
avec les butées, câbles, gaines, etc. Ajuster la molette (Ref. #6) de façon
à ce que le pointeur (Ref. #1) arrive au contact de l'extrémité du triangle
arrière et que le FAG-2 ait trois points de contact avec le cadre (Figure 1).
2. Sans changer la position du pointeur, reporter le FAG-2 sur le coté droit
du cadre et noter les résultats.
a. Si le FAG-2 a les mêmes trois points de contact avec le tube de direc-
tion, le tube de selle et l'extrémité du triangle arrière, alors le cadre est
aligné correctement (Figure 2).
b. Si le FAG-2 est en contact avec le tube de direction et l'extrémité du
triangle arrière, mais pas avec le tube de selle, alors le triangle arrière
est trop porté à droite et est hors d'alignement (Figure 3).
c. Si le FAG-2 est en contact avec le tube de direction et le tube de selle,
mais pas avec l'extrémité du triangle arrière, alors celui-ci est trop por-
té à gauche et est hors d'alignement (Figure 4).
Correction de l'alignement:
Les cadres en acier ou en titane peuvent parfois être redressés manuelle-
ment pour corriger des problèmes d'alignement. Un guide détaillé de la pro-
cédure peut être trouvé sur le www.parktool.com . D'autres matériaux, tels
que la fibre de carbone ou l'aluminium, sont beaucoup trop rigides ou fragiles
pour être redressés. Ne jamais essayer de corriger un défaut d'alignement
sur un cadre en fibre de carbone ou en titane.
Toujours vérifier les recommandations du fabriquant auprès de celui-ci avent
de tenter d'aligner un cadre.
FAG-2
Instructions / Instructions / Anleitung / Instrucciones
FAG-2 Rahmenkontrolllehre
Wenn ein Fahrradrahmen nicht korrekt ausgerichtet ist, kann dies zu mangelhaf-
tem Fahrverhalten, Schalt- und Laufradproblemen führen. Mit der FAG-2 Rahmen-
kontrolllehre lässt sich die Ausrichtung des Rahmens leicht und sicher feststellen.
Anleitung:
1. Demontieren Sie das Hinterrad. Platzieren Sie die FAG-2 auf der in Fahrt-
richtung linken Rahmenseite an Steuerrohr und Sattelrohr ohne Muffen,
Schweißnähte, Kabelführungen, Züge etc zu berühren. Drehen Sie den
Justierknopf (Ref. #6) solange bis der Zeiger (Ref. #1) das linke Ausfallen-
de des Hinterbaus berührt und die FAG-2 den Rahmen somit an drei Punk-
ten gleichzeitig berührt (Abb. 1).
2. Platzieren Sie die FAG-2 nun spiegelbildlich an der rechten Rahmenseite
ohne den Messfühler zu verändern und stellen Sie das Ergebnis fest:
a. Wenn die FAG-2 den Rahmen an Steuer-/Sattelrohr und Ausfallende
berührt wie zuvor, ist der Rahmen korrekt zentriert (Abb. 2).
b. Wenn die FAG-2 Steuerrohr und Ausfallende berührt, am Sattelrohr je-
doch eine Lücke auftritt, ist der Hinterbau des Rahmens nach rechts
verzogen (Abb. 3).
c. Wenn die FAG-2 Steuer- und Sitzrohr berührt, jedoch am Ausfallende
eine Lücke zwischen Zeiger und Ausfallende erscheint, ist der Hinter-
bau nach links verzogen (Abb. 4).
Rahmen Zentrieren:
Rahmen aus Stahl oder Titan können manchmal gerichtet werden. Eine Schritt-
für-Schritt-Anleitung gibt es auf www.parktool.com. Andere Rahmenmateria-
lien wie Carbon oder Aluminium sind zu steif bzw. zu zerbrechlich für das Rich-
ten. Versuchen Sie daher niemals, Carbon- oder Alurahmen zu richten.
Klären Sie die Korrekturmöglichkeiten immer mit dem Hersteller ab, bevor Sie
einen Rahmen zu richten versuchen.
FAG-2 Calibrador para Alineación del Cuadro
La falta de alineación de la parte posterior del cuadro de la bicicleta puede
causar problemas como, mala alineación de la cadena, dificultades de instala-
ción y problemas en la instalación de la rueda. El FAG-2 de forma rápida y sen-
cilla determina si el triángulo trasero del cuadro está bien alineado.
Instrucciones:
1. Quite la rueda trasera de la bicicleta. Coloque el FAG-2 en el tubo del lado
izquierdo del marco y el tubo del asiento, evitando el contacto con las za-
patas, las soldaduras, topes del cable, cables, etc. Ajuste la perilla de
mando (Ref. # 6) según sea necesario hasta que la aguja del indicador
(Ref. # 1 ) este en contacto con la pata posterior izquierda y el FAG-2 haga
tres puntos de contacto con el cuadro (Figura 1).
2. Sin cambiar la posición del indicador, coloque el FAG-2 en el lado derecho
del marco y anote el resultado.
a. Si el FAG-2 tiene los mismos tres puntos de contacto con el tubo de di-
rección, tubo del asiento y el cuadro, el triángulo trasero está alinea-
do (Figura 2).
b. Si el FAG-2 hace contacto con el tubo de dirección y la pata trasera,
pero hay una brecha entre el FAG-2 y el tubo del asiento, el triángulo
trasero esta a la derecha del centro y fuera de la alineación (Figura 3).
c. Si el FAG-2 esta en contacto con la barra de dirección y tubo del asien-
to, pero existe una brecha entre el indicador FAG-2 y la pata derecha,
el triángulo trasero esta a la izquierda del centro y fuera de la alinea-
ción (Figura 4)
Corrigiendo la Alineacion:
Los cuadros de acero o titanio pueden ser doblados en frió para intentar corregir
los problemas de alineación. Las instrucciones se pueden encontrar paso a paso
en www.parktool.com. Otros materiales, como la fibra de carbono o el aluminio,
son demasiado rígidos o frágiles para doblarlos en frío por lo que no trate de co-
rregir los problemas de alineación a los cuadros de fibra de carbono o aluminio.
Siempre consulte con el fabricante del cuadro por recomendaciones antes
de intentar alinear cualquier cuadro.

Verwandte Anleitungen für Park Tool FAG-2


Inhaltszusammenfassung für Park Tool FAG-2
- Seite 1 (Figure 3). verzogen (Abb. 3). c. If the FAG-2 contacts the head tube and seat tube but there is a gap be- c. Wenn die FAG-2 Steuer- und Sitzrohr berührt, jedoch am Ausfallende tween the FAG-2 indicator and the right dropout, the rear triangle is left eine Lücke zwischen Zeiger und Ausfallende erscheint, ist der Hinter-...
- Seite 2 Made in the USA WARNING: Cancer and Reproductive Harm 1107 Knurled Nut www.P65Warnings.ca.gov 1109 Knob and Shaft 1151 Channel Warranty Info: parktool.com/warranty © 2019 Park Tool Co. 04/19 PARK TOOL® and the color BLUE are registered trademarks of Park Tool Co.