Herunterladen Inhalt Inhalt Diese Seite drucken

Daikin E2MV03A6 Installationsanleitung

Motorisierter ventilsatz

Werbung

Verfügbare Sprachen
  • DE

Verfügbare Sprachen

  • DEUTSCH, seite 8
English language: Original Instructions
All other language: Translation of the Original Instruction
E2mV03a6
E2mV06a6
E2mV10a6
E4mV03a6
E4mV06a6
E4mV10a6
InstallatIon manual
Motorised valve kit
Kit della valvola motorizzata
Installation manual
Motorised valve kit
Installationsanleitung
Motorisierter Ventilsatz
Manuel d'installation
Kit vanne motorisée
Manual de instalación
Kit de válvula motorizada
Manuale d'installazione
English
Deutsch
Français
Español
Italiano

Werbung

Inhaltsverzeichnis
loading

Inhaltszusammenfassung für Daikin E2MV03A6

  • Seite 1 InstallatIon manual Motorised valve kit English language: Original Instructions All other language: Translation of the Original Instruction E2mV03a6 E2mV06a6 E2mV10a6 Installation manual E4mV03a6 English Motorised valve kit E4mV06a6 E4mV10a6 Installationsanleitung Deutsch Motorisierter Ventilsatz Manuel d’installation Français Kit vanne motorisée Manual de instalación Español...
  • Seite 2 Riferimenti FIGURA 5a Model FW 01-06 FW 08-10 FW 01-06 FW 08-10...
  • Seite 4: B Efore The Installation

    All the powered circuits must be opened before you access the terminals. The kit of the motorized 3-way ON/OFF valve connected to the Daikin controller allows to set the ambient temperature by interrupting the flow of water directed to the heat exchanger.
  • Seite 5 Insert the bushing in the hole at the rear of the unit’s galvanized notes side panel (see figure 2). Pass the cable of the actuator through the hole and secure it to the cable clamps located on the fan seat until it reaches the side where the electrical connections are located (the side opposite the hydraulic joint side) (see figure 3).
  • Seite 6: Operation

    The table refers to the 2-way valve kit with a 24V power supply unit. 2. s implified version standard battery additional battery FW01-06 E2MV207A6 E2MV210A6 two-pipe system Four-pipe system FW08-10 E2MV207A6 E2MV207A6 FW01-35 E2MVD03A6 E4MVD03A6 FW04-06 E2MVD06A6 E4MVD06A6 FW08-10 E2MVD10A6 E4MVD10A6 actuators cannot...
  • Seite 7: Connection Instructions

    The control signal comes from the FWEC3A control panel: refer to its manual to view the instructions and electrical connections. Daikin units do not have a 230V-24V transformer. You need to provide for a separate power supply. CTRL notes 24V - Power Supply - Red (RD) + 24V and Common (CM).
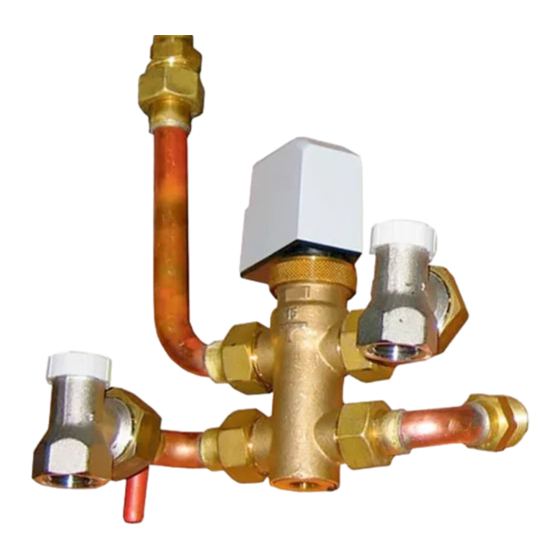
  • Seite 8: B Ausatz 3- Wege On / Off

    Einheit verwendet zu werden; sie müssen von ΔP = (Q Fachpersonal installiert werden. wobei: Kontaktieren Sie den Installateur Daikin, um im Falle von ΔP ist der Ladungsverlust ausgedrückt in kg/cm Zweifeln bei der Montage oder dem Gebrauch Ratschläge ist die Wasserdurchflussmenge ausgedrückt in m und Informationen zu erhalten.
  • Seite 9 Die Buchse in die Bohrung an der Rückseite des seitlichen HINWEIS verzinkten Paneels der Einheit einführen (siehe Seite 2). Das Kabel des Stellantriebs über diese Bohrung führen, an den Schellen des Kabels am Gehäuse des Gebläses befestigen, bis man die Seite der elektrischen Anschlüsse erreicht hat (die entgegengesetzte Seite dieser Hydraulikkupplung) (siehe Abbildung 3).
  • Seite 10: B Ausatz 2- Wege - Ventil

    2. v ereinfachte version Die Tabelle bezieht sich auf den Bausatz 2-Wege mit Speiser 24V. satndardregister Zusatzregister 2-Rohr-anlagen 4-Rohr-anlagen FW01-06 E2MV207A6 E2MV210A6 FW01-35 E2MVD03A6 E4MVD03A6 FW08-10 E2MV207A6 E2MV207A6 FW04-06 E2MVD06A6 E4MVD06A6 FW08-10 E2MVD10A6 E4MVD10A6 Die Stellglieder 24V können nicht mit elektromechanischen Die Abbildungen 4a, 4b e 4c zeigen einen vereinfachten Bausatz für Steuerungen mit Ausgang 230 V befohlen werden.
  • Seite 11: Anweisungen Für Den Anschluss

    Das Steuersignal geht von Bedientafel FWEC3A aus: Konsultieren Sie das Handbuch für die Anweisungen und die elektrischen Anschlüsse. CTRL Die Einheiten Daikin sind nicht mit Transformator 230V-24V ausgestattet. Sorgen Sie für eine unabhängige Speisung. 24V - hinWeis Versorgung rot (RD) + 24V und allgemein (CM).
  • Seite 12: Manuel D'installation

    Le kit de la vanne ON/OFF motorisée à 3 voies, branché aux systèmes par un électricien qualifié et conformément aux exigences de contrôle Daikin, permet de configurer la température ambiante en de la norme nationale et locale en vigueur en la matière.
  • Seite 13 Insérer la bague dans le trou placé sur l’arrière du panneau latéral remarQues zingué de l’unité (voir figure 2). Faire passer le câble de l’actuateur à travers ce trou, en le fixant aux colliers du câble placés sur le logement du ventilateur jusqu’à atteindre le côté...
  • Seite 14 2. v ersion simplifiee Le tableau se réfère au kit vanne 3 voies avec alimentation 24V. système à 2 tuyaux système à 4 tuyaux FW01-35 E2M2V03A6 E4M2V03A6 système à 2 tuyaux système à 4 tuyaux FW04-06 E2M2V06A6 E4M2V06A6 FW01-35 E2MVD03A6 E4MVD03A6 FW08-10 E2M2V10A6...
  • Seite 15: Branchements Électriques

    Le signal de commande vient du panneau de commande FWEC3A : en consulter le manuel pour voir les instructions et les branchements électriques. CTRL Les unités Daikin ne sont pas équipées de transformateur 230V-24V. Prévoir une alimentation indépendante. 24V - remarQues Alimentation Rouge (RD) + 24V et Commune (CM).
  • Seite 16: Manual De Instalación

    Contacte al instalador Daikin para obtener consejos e es la tasa de flujo identificada en la tabla informaciones en caso de dudas sobre los procedimientos de montaje o de uso.
  • Seite 17 Introduzca el casquillo en el agujero colocado detrás del panel notas lateral galvanizado de la unidad (véase figura 2). Haga pasar el cable del actuador a través de ese agujero, fijándolo a las abrazaderas del cable colocadas en el alojamiento del ventilador hasta alcanzar el lado de las conexiones eléctricas (el lado opuesto al de la junta hidráulica) (véase la figura 3).
  • Seite 18 2. v ó ersi n simplificada La tabla se refiere al kit de válvula de 3 vías con alimentador de 24 V. sistema de 2 tubos sistema de 4 tubos FW01-35 E2M2V03A6 E4M2V03A6 sistema de 2 tubos sistema de 4 tubos FW04-06 E2M2V06A6 E4M2V06A6...
  • Seite 19: Instalación

    La señal de mando viene del panel de mando FWEC3A: consulte su manual para las instrucciones y las conexiones eléctricas. CTRL Las unidades Daikin tienen un transformador de 230V-24V. Disponga una alimentación independiente. 24V - notas Alimentación Rojo (RD) + 24 V y Común (CM).
  • Seite 20: Manuale D'installazione

    Accertarsi di La perdita di carico del gruppo kit idraulico/valvola di collegamento si utilizzare solo accessori prodotti da Daikin, che sono ottiene dalla seguente formula: progettati specificamente per essere utilizzati con l’unità e devono essere installati da professionisti.
  • Seite 21 Inserire la boccola nel foro posto sul retro del pannello laterale note zincato dell’unità (vedi figura 2). Far passare il cavo dell’attuatore attraverso quel foro, fissandolo alle fascette del cavo poste sull’alloggiamento della ventola fino a raggiungere il lato dei collegamenti elettrici (il lato opposto a quello del giunto idraulico) (vedi figura 3).
  • Seite 22 2. v ersione semplificata La tabella si riferisce al kit valvola 2 vie con alimentatore 24V. Batteria standard Batteria addizionale sistema a 2 tubi sistema a 4 tubi FW01-06 E2MV207A6 E2MV210A6 FW01-35 E2MVD03A6 E4MVD03A6 FW08-10 E2MV207A6 E2MV207A6 FW04-06 E2MVD06A6 E4MVD06A6 FW08-10 E2MVD10A6 E4MVD10A6...
  • Seite 23: Caratteristiche Tecniche

    NOTE Il segnale di comando viene da il pannello comando FWEC3A: CTRL consultarne il manuale per le istruzioni ed i collegamenti elettrici. Le unità Daikin non sono provviste di trasformatore 230V-24V. Prevedere un’alimentazione indipendente. 24V - note Alimentazione Rosso (RD) + 24V e Comune (CM).
  • Seite 24 4PW17554-2 Zandvoordestraat 300, B-8400 Oostende, Belgium...

Diese Anleitung auch für:

E2mv10a6E2mv06a6E4mv06a6E4mv03a6E4mv10a6

Inhaltsverzeichnis