Smartwares SH5-RBS-10A Kurzanleitung
Quicklinks
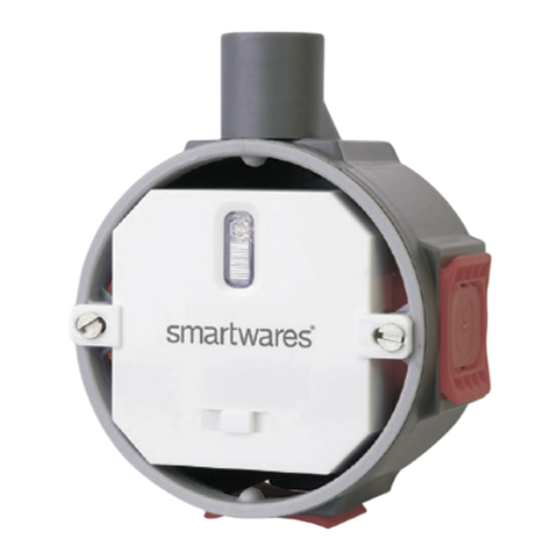
SH5-RBS-10A
Wireless build-in switch, Eingebauter Funkschalter,
Draadloze inbouwschakelaar, Interrupteur sans fil
intégré, Wbudowany wyłącznik bezprzewodowy,
Interruptor integrado inalámbrico
1
220-240 VAC
50/60Hz
2
3
3 sec
4
Flash
5
10 sec
GB
Preparation for use
• Turn off the power with the power switch in your meter cupboard
Connecting the receiver (SH5-RBS-10A) to the power supply 1
• Connect the phase wire (brown) to L and connect the neutral wire (blue) to N.
Connecting the receiver to the lamp 2
• Connect the black wire of the lamp to
and connect the blue wire from the lamp to N.
Mounting the receiver
• Mount the receiver to the desired spot (lamp fitting, mounting- or junction box) and switch on the
power with the power switch in your meter cupboard.
Pairing/disconnecting the receiver with/from a transmitter
a. Press and hold the button on the receiver for 3 seconds and then release it 3 . During this
operation the LED starts to blink 4 . Your receiver is now switched into the pairing mode.
Attention: the LED should blink only after releasing the button. If the LED starts to blink while
holding the button, there will be no pairing.
b. Press the " I" / "ON" button on the transmitter to pair it with a receiver. During this operation the LED
on the receiver will light up. Press the " 0" / " OFF" button on the transmitter to disconnect it from a
receiver. During this operation the LED on the receiver turns off.
Attention: it is possible to pair a receiver with multiple transmitters, six memory positions are
available.
Attention: When the LED on the receiver keeps blinking rapidly, the memory is full. Disconnect one
transmitter or disconnect all links.
Operating receivers
a. Press the " I" / "ON" button on the transmitter to turn on the receiver.
b. Press the " 0" / " OFF" button on the transmitter to turn off the receiver.
Disconnecting all links
a. Press and hold the button on the receiver for 10 seconds 5 .
b. During this operation the LED starts to blink.
c. When the LED on the receiver turns off, all links will be disconnected.
D
Benutzung vorbereiten
• Schalten Sie den Strom an Ihrem Verteilerkasten aus
Empfänger (SH5-RBS-10A) am Stromkreis anschließen 1
• Schließen Sie das stromführende Kabel (braun) an L an und den Nullleiter (blau) an N.
Empfänger mit Lampe verbinden 2
• Schließen Sie das schwarze Kabel der Lampe an
Empfänger installieren
• Schrauben Sie den Empfänger an der gewünschten Stelle (Lampenfassung, Verteilerdose) an und
schalten Sie den Strom an Ihrem Verteilerkasten wieder ein.
Verbindung/Trennung des Empfängers mit einem/von einem Transmitter
a. Drücken und halten Sie die T aste am Empfänger 3 Sekunden lang und lassen Sie sie wieder los 3 . W ährend
dieses V organgs beginnt die LED zu blinken 4 . Ihr Empfänger wurde jetzt in den V erbindungsmodus geschaltet.
Achtung: Die LED darf erst nach der Freigabe blinken. W enn die LED beginnt zu blinken, während die T aste noch
gedrückt wird, wird keine V erbindung aufgebaut.
b. Drücken Sie die „ I" / „ EIN"-Taste am Transmitter, um ihn mit dem Empfänger zu verbinden. Bei
diesem Vorgang leuchtet die LED am Empfänger auf. Drücken Sie am Transmitter die „ 0"/„AUS"-
Taste, um ihn vom Empfänger zu trennen. Bei diesem Vorgang erlischt die LED am Empfänger.
Achtung: Es ist möglich, einen Empfänger mit mehreren Transmittern zu verbinden, es sind sechs
Speicherstellen verfügbar.
Achtung: Wenn die LED am Empfänger weiterhin schnell blinkt, ist der Speicher voll. Trennen Sie
einen Transmitter oder trennen Sie alle Verbindungen.
Bedienung der Empfänger
a. Drücken Sie die „ I" /„EIN"-Taste am Transmitter, um den Empfänger einzuschalten.
b. Drücken Sie die „ O" / „ AUS"-Taste am Transmitter, um den Empfänger auszuschalten.
Pairing löschen (alle)
a. Drücken und halten Sie die Taste am Empfänger 10 Sekunden lang 5 .
b. Während dieses Vorgangs beginnt die LED zu blinken.
c. Wenn die LED am Empfänger erlischt, werden alle Verbindungen getrennt.
NL
Voorbereiding voor gebruik
• Schakel de stroom uit met de hoofdschakelaar in uw meterkast.
De ontvanger (SH5-RBS-10A) aansluiten met de stroomtoevoer 1
• Verbind de fasedraad (bruin) met L en verbind de nuldraad (blauw) met N.
De ontvanger aansluiten met de lamp 2
• Verbind de zwarte draad van de lamp met
en verbind de blauwe draad van de lamp met N.
De ontvanger bevestigen
• Schroef de ontvanger vast op de gewenste plek (lampfitting, inbouw- of kabel doos) en schakel de
stroom in met de hoofdschakelaar in uw meterkast.
De ontvanger met een zender koppelen of ontkoppelen
a.
Druk 3 seconden op de knop op de ontvanger en laat deze vervolgens los
gaat de LED knipperen 4 . Uw ontvanger bevindt zich nu in de koppelmodus.
Let op! De LED mag pas knipperen na het loslaten. Als de LED gaat knipperen tijdens indrukken dan
wordt er niet gekoppeld.
b. Druk op " I" / "ON" op de zender om deze te koppelen. Bij deze handeling gaat de LED op de
ontvanger branden. Druk op " 0" / " OFF" op de zender om deze te ontkoppelen. Bij deze handeling
dooft de LED op de ontvanger.
Let op! Het is mogelijk om een ontvanger aan meerdere zenders te koppelen, zes
geheugenplaatsen zijn beschikbaar.
Let op! Wanneer de LED op de ontvanger snel blijft knipperen, zijn alle geheugenplaatsen vol.
Ontkoppel dan één zender of maak alle koppelingen ongedaan.
Een ontvanger bedienen
a. Druk op " I" / "ON" op de zender om de ontvanger in te schakelen.
b. Druk op " 0" / " OFF" op de zender om de ontvanger uit te schakelen.
Alle koppelingen ongedaan maken
a. Druk 10 seconden op de knop op de ontvanger 5 .
b. Bij deze handeling gaat de LED knipperen.
c. Zodra de LED dooft zijn alle koppelingen ongedaan gemaakt.
Specifications:
AC Input Voltage: 220V~240V, 50/60Hz.
Maximum distance: 50 m.
Maximum power: 1000 W.
Operating temperature: -10 ~ 50 °C.
Warranty: 2 years
F
Préparation avant utilisation
• Coupez I'alimentation avec l'interrupteur électrique dans votre armoire de compteur électrique.
Connexion du récepteur (SH5-RBS-10A) à l'alimentation électrique 1
• Branchez le fil de phase (marron) sur L et le fil neutre (bleu) sur N.
Connexion du récepteur à la lampe 2
• Branchez le fil noir de la lampe
Montage du récepteur
• Vissez le récepteur à l' e ndroit voulu (douille d'ampoule, boîter de montage ou de jonction) et activez
l'alimentation avec I'interrupteur principal dans vorte armoire de compteur électrique.
Connecter/Déconnecter le récepteur à un émetteur
a. Maintenez le bouton du récepteur enfoncé pendant 3 secondes avant de le relâcher 3 . Pendant
cette opération, la DEL commence à clignoter 4 . Votre récepteur est à présent en mode de
connexion.
Attention : la DEL doit clignoter uniquement une fois le bouton relâché. Si la DEL commence à
clignoter lorsque le bouton est enfoncé, aucune connexion ne se produira.
b. Appuyez sur le bouton " I" / " ON" de l' é metteur pour le connecter à un récepteur. Pendant cette
opération, la DEL du récepteur s'allumera. Appuyez sur le bouton " 0" / " OFF" de l' é metteur pour le
déconnecter d'un récepteur. Pendant cette opération, la DEL du récepteur s' é teindra.
Attention : il est possible de connecter un récepteur à de multiples émetteurs, six positions de
mémoire sont possibles.
Attention : Lorsque la DEL du récepteur continue à clignoter rapidement, la mémoire est pleine.
Déconnecter un émetteur ou déconnecter tous les liens.
Utiliser les récepteurs
a. Appuyez sur le bouton " I" / " ON" de l' é metteur pour mettre le récepteur en marche.
b. Appuyez sur le bouton " 0" / " OFF" de l' é metteur pour éteindre le récepteur.
Dissociation de tous les liens
a. Maintenez le bouton du récepteur enfoncé pendant 10 secondes 5 .
b. Pendant cette opération, la DEL commence à clignoter.
c. Lorsque la DEL du récepteur s' é teint, tous les liens seront déconnectés.
PL
Przygotowanie do użytkowania
• Wyłączyć zasilanie za pomocą głównego wyłącznika zasilania na tablicy rozdzielczej.
Sposób podłączenia odbiornika (SH5-RBS-10A) do źródła zasilania 1
• Podłączyć przewód fazowy (brązowy) do zacisku L, a przewód zerowy (niebieski) do zacisku N.
Sposób podłączenia odbiornika do lampy 2
und das blaue Kabel der lampe sur N .
• Podłączyć czarny przewód lampy do zacisku
Montaż odbiornika
• Przymocować odbiornik w wybranym miejscu (obudowa lampy, puszka montażowa lub puszka
połączeniowa) i włączyć zasilanie za pomocą głównego wyłącznika na tablicy rozdzielczej.
Łączenie/rozłączanie odbiornika z nadajnikiem
a. Naciśnij i przytrzymaj przycisk na odbiorniku przez 3 sekundy, a następnie zwolnij go 3 . W trakcie
tej operacji kontrolka LED zaczyna migać 4 . Odbiornik jest teraz przełączony na tryb łączenia.
Uwaga: Kontrolka LED powinna migać tylko po zwolnieniu. Jeśli kontrolka LED zacznie migać już w
trakcie naciskania przycisku, wtedy nie będzie połączenia.
b. Naciśnij przycisk " \" I " ON" na nadajniku, aby połączyć go z odbiornikiem. Podczas wykonywania
tej czynności zaświeci się kontrolka LED na odbiorniku. Naciśnij przycisk " 07"OFF" na nadajniku,
aby przerwać połączenie z odbiornikiem. Podczas wykonywania tej czynności kontrolka LED na
odbiorniku zgaśnie.
Uwaga: Możliwe jest połączenie odbiornika z wieloma nadajnikami; jest dostępne sześć miejsc pamięci.
Uwaga: Gdy kontrolka LED na odbiorniku nadal szybko miga, oznacza to, że pamięć jest pełna.
Odłącz jeden nadajnik lub rozłącz wszystkie połączenia.
Użytkowanie odbiorników
a. Naciśnij przycisk TV " ON" na nadajniku, aby włączyć odbiornik.
b. Aby wyłączyć odbiornik, naciśnij przycisk " 0" / " OFF" na nadajniku.
Anulowanie wszystkich połączeń
a. Naciśnij i przytrzymaj przycisk na odbiorniku przez 10 sekund 5 .
b. W trakcie tej operacji kontrolka LED zaczyna migać.
c. Gdy kontrolka LED na odbiorniku zgaśnie, wszystkie połączenia zostaną rozłączone.
E
Preparación para el uso
• Desconecte la corriente con el interruptor de corriente del armario del contador.
Conectar el receptor (SH5-RBS-10A) a la alimentación 1
• Conecte el cable de fase (marrón) con L y conecte el cable neutro (azul) a N.
Conectar el receptor con la lámpara 2
• Conecte el cable negro de la lámpara a
Montar el receptor
• Atornille el receptor en el lugar deseado (accesorio de bombilla, montaje o caja de conexiones) y
conecte la alimentación con el interruptor principal del armario del contador.
Conectar/desconectar el receptor a un transmisor
3 . Bij deze handeling
a.
Presione y mantenga el botón del receptor durante 3 segundos y suéltelo
operación el LED comenzará a parpadear 4 . El receptor pasará a modo conexión.
Atención: el LED solamente debe parpadear tras soltar el botón. Si el LED comienza a parpadear
durante la pulsación no se producirá la conexión.
b. Pulse el botón " I" / " ON" del transmisor para conectarlo a un receptor. Durante la operación se
encenderá el LED del receptor. Pulse el botón " 0" / " OFF" del transmisor para desconectarlo de un
receptor. Durante la operación se apagará el LED del receptor.
Atención: es posible conectar un receptor a múltiples transmisores, dispone de seis posiciones
de memoria.
Atención: Cuando el LED del receptor siga parpadeando rápidamente, la memoria estará llena.
Desconecte un transmisor o desconecte todas las conexiones.
Uso de receptores
a. Pulse el botón'TV " ON" en el transmisor para encender el receptor.
b. Pulse el botón " 0" / " OFF" en el transmisor para apagar el receptor.
Desconectar todas las conexiones
a. Presione y mantenga el botón del receptor durante 10 segundos 5 .
b. Durante esta operación el LED comenzará a parpadear.
c. Cuando el LED del receptor se apague se desconectarán todas las conexiones.
www.smartwares.eu
et le fil bleu venant de la lampe à N.
, a niebieski przewód lampy do zacisku N.
y conecte el cable azul de la lámpara a N.
3 . Durante esta

Verwandte Anleitungen für Smartwares SH5-RBS-10A


Inhaltszusammenfassung für Smartwares SH5-RBS-10A
- Seite 1 Preparation for use Préparation avant utilisation • Turn off the power with the power switch in your meter cupboard • Coupez I’alimentation avec l’interrupteur électrique dans votre armoire de compteur électrique. Connecting the receiver (SH5-RBS-10A) to the power supply 1 Connexion du récepteur (SH5-RBS-10A) à l’alimentation électrique 1 • Connect the phase wire (brown) to L and connect the neutral wire (blue) to N. • Branchez le fil de phase (marron) sur L et le fil neutre (bleu) sur N. Connecting the receiver to the lamp 2 Connexion du récepteur à la lampe 2 • Connect the black wire of the lamp to...
- Seite 2 Pregătirea pentru utilizare • Κλείστε την παροχή ρεύματος από τον κεντρικό διακόπτη στο κουτί του μετρητή • Opriţi curentul cu ajutorul comutatorului de curent din tabloul de comandă. Σύνδεση του δέκτη (SH5-RBS-10A) στην παροχή ρεύματος 1 Conectarea receptorului (SH5-RBS-10A) la sursa de alimentare 1 . • Συνδέστε το καλώδιο φάσης (καφέ) στο L και συνδέστε το ουδέτερο καλώδιο (μπλε) στο N. • Conectaţi firul conductor (maro) la L şi conectaţi firul neutru (albastru) la N. Σύνδεση του δέκτη με τη λάμπα 2 Conectarea receptorului la bec 2 • Συνδέστε το μαύρο καλώδιο της λάμπας στο και συνδέστε το μπλε καλώδιο της λάμπας στο N.