Werbung
Quicklinks
I I I I I
TESTEUR DE TENSION
I I I I I
VOLTAGE TESTER
I I I I I
SPANNUNGSPRÜFER
I I I I I
TESTER DI TENSIONE
I I I I I
COMPROBADOR DE TENSION
C.A 745
10 - 2009
Code 691148A00 - Ed.3
DEUTSCHLAND - Chauvin Arnoux GmbHStraßburger
DEUTSCHLAND - Chauvin Arnoux GmbHStraßburger
DEUTSCHLAND - Chauvin Arnoux GmbHStraßburger
DEUTSCHLAND - Chauvin Arnoux GmbHStraßburger
DEUTSCHLAND - Chauvin Arnoux GmbHStraßburger
Str. 34 - 77694 Kehl / Rhein
Tel: (07851) 99 26-0 - Fax: (07851) 99 26-60
ESPAÑA - Chauvin Arnoux Ibérica S.A.
ESPAÑA - Chauvin Arnoux Ibérica S.A.
ESPAÑA - Chauvin Arnoux Ibérica S.A.
ESPAÑA - Chauvin Arnoux Ibérica S.A.
ESPAÑA - Chauvin Arnoux Ibérica S.A.
C/ Roger de Flor N° 293, Planta 1- 08025 Barcelona
Tel: 902 20 22 26 - Fax: 934 59 14 43
TALIA - Amra SpA
TALIA - Amra SpA
TALIA - Amra SpA
TALIA - Amra SpA
TALIA - Amra SpA
Via Sant'Ambrogio, 23/25 - 20050 Bareggia di Macherio (MI)
Tel: 039 245 75 45 - Fax: 039 481 561
ÖSTERREICH - Chauvin Arnoux Ges.m.b.H
ÖSTERREICH - Chauvin Arnoux Ges.m.b.H
ÖSTERREICH - Chauvin Arnoux Ges.m.b.H
ÖSTERREICH - Chauvin Arnoux Ges.m.b.H
ÖSTERREICH - Chauvin Arnoux Ges.m.b.H
Slamastrasse 29/2/4 - 1230 Wien
Tel: 01 61 61 961-0 - Fax: 01 61 61 961-61
SCANDINAVIA - CA Mätsystem AB
SCANDINAVIA - CA Mätsystem AB
SCANDINAVIA - CA Mätsystem AB
SCANDINAVIA - CA Mätsystem AB
SCANDINAVIA - CA Mätsystem AB
Box 4501 - SE 18304 TÄBY
Tel: +46 8 50 52 68 00 - Fax: +46 8 50 52 68 10
SCHWEIZ - Chauvin Arnoux AG
SCHWEIZ - Chauvin Arnoux AG
SCHWEIZ - Chauvin Arnoux AG
SCHWEIZ - Chauvin Arnoux AG
SCHWEIZ - Chauvin Arnoux AG
Moosacherstrasse 15 - 8804 AU / ZH
Tel: 044 727 75 55 - Fax: 044 727 75 56
UNITED KINGDOM - Chauvin Arnoux Ltd
UNITED KINGDOM - Chauvin Arnoux Ltd
UNITED KINGDOM - Chauvin Arnoux Ltd
UNITED KINGDOM - Chauvin Arnoux Ltd
UNITED KINGDOM - Chauvin Arnoux Ltd
Waldeck House - Waldeck Road - Maidenhead SL6 8BR
Tel: 01628 788 888 - Fax: 01628 628 099
MIDDLE EAST - Chauvin Arnoux Middle East
MIDDLE EAST - Chauvin Arnoux Middle East
MIDDLE EAST - Chauvin Arnoux Middle East
MIDDLE EAST - Chauvin Arnoux Middle East
MIDDLE EAST - Chauvin Arnoux Middle East
P.O. BOX 60-154 - 1241 2020 JAL EL DIB (Beirut) - LEBANON
Tel: (01) 89 04 25 - Fax: (01) 89 04 24
CHINA - Shanghai Pu-Jiang - Enerdis Instruments Co. Ltd
CHINA - Shanghai Pu-Jiang - Enerdis Instruments Co. Ltd
CHINA - Shanghai Pu-Jiang - Enerdis Instruments Co. Ltd
CHINA - Shanghai Pu-Jiang - Enerdis Instruments Co. Ltd
CHINA - Shanghai Pu-Jiang - Enerdis Instruments Co. Ltd
3 F, 3 rd Building - N° 381 Xiang De Road - 200081 SHANGHAI
Tel: +86 21 65 21 51 96 - Fax: +86 21 65 21 61 07
USA - Chauvin Arnoux Inc - d.b.a AEMC Instruments200
USA - Chauvin Arnoux Inc - d.b.a AEMC Instruments200
USA - Chauvin Arnoux Inc - d.b.a AEMC Instruments200
USA - Chauvin Arnoux Inc - d.b.a AEMC Instruments200
USA - Chauvin Arnoux Inc - d.b.a AEMC Instruments200
F R A N C A I S
Mode d'Emploi
Foxborough Blvd. - Foxborough - MA 02035
E N G L I S H
User's Manual
Tel: (508) 698-2115 - Fax: (508) 698-2118
D E U T S C H
Bedienungsanleitung
I T A L I A N O
Libretto d'Istruzioni
http://www.chauvin-arnoux.com
E S P A N O L
Manual de Instrucciones
190, rue Championnet - 75876 PARIS Cedex 18 - FRANCE
Tél. : +33 1 44 85 44 85 - Fax : +33 1 46 27 73 89 - info@chauvin-arnoux.fr
Export : Tél. : +33 1 44 85 44 86 - Fax : +33 1 46 27 95 59 - export@chauvin-arnoux.fr
English
SUMMARY
Thank you for purchasing a VOLTAGE TESTER. To
1
- PRESENTATION ....................................................
get the best service from this instrument:
2
- AUTO-TEST ............................................................
I
read this user's manual carefully
3
- VOLTAGE TEST .....................................................
I
respect the safety precautions detailed
4
- PHASE/NEUTRAL IDENTIFICATION .................
5
- CONTINUITY AND RESISTANCE TEST ...........
6
- DIODE TEST ............................................................
7
- GENERAL SPECIFICATIONS ..............................
Meaning of the symbol
8
- MAINTENANCE .....................................................
Warning ! Please refer to the User's Manual before
9
- WARRANTY ...........................................................
using the instrument.
10 - APPENDIX ...............................................................
In this User's Manual, the instructions preceded
by the above symbol, should they not be carried
out as shown, can result in a physical accident or
damage the instrument and the installations.
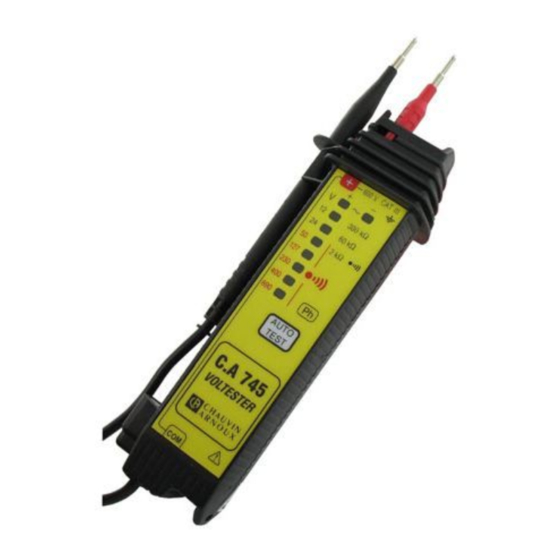
1 - PRESENTATION
See drawing 10.Appendix
The C.A 745 is an audible and visual DC and AC voltage,
Meaning of the symbol
continuity and resistance tester. It also has a phase/
This device is protected by a double insulation or
neutral identification function. Its maximum operating
by a reinforced insulation. No linking is required
voltage, 690 V, allows tests on a 3-phase 400 V/ 690 V
from the protection earth terminal to ensure the
installation whilst respecting the max voltage in relation
electrical security.
to the earth of 600 V.
This tester does not have a fuse and its design avoids
risks of internal short circuit.
Œ
Test prods (with 19 mm gap)
Non-slip guard to avoid any accidental contact
SAFETY PRECAUTIONS
with a live conductor
Ž
Ramp of LED's giving the value of the voltage
I
Always make an AUTO-TEST before using
AUTO-TEST: test button
the tester.
Continuity button on the back of the case
I
Maximum operating voltage: 690 V.
I
Do not use on an installation in which the
voltage is greater than 600 V in relation to the
earth, and which has an overvoltage category
2 - AUTO-TEST
greater than III.
I
Never make a resistance test on a live circuit.
The auto-test allows testing of the correct operation of
However, in case of incorrect operation,
the complete tester: test prods with light emitting diodes
protection up to 550 V.
(LED), via the lead, the electronics and the 9 V battery.
I
Never touch the metallic test prods during a test.
NB: Never use the tester if the auto-test is negative.
TO ORDER
How to do the auto-test
Press the AUTO-TEST button
I
The "+" LED and the 12 to 690 V LED's light up, and
I
Tester C.A 745 ................................P01.1917.36Z
the buzzer comes on.
Supplied with a 9 V battery and this User's manual
I
Short-circuit the test prods, with the AUTO-TEST
button still pressed: the "-" LED lights up.
I
Accessories
The tester is in good working condition if all the
- Holster n°10 ......................................P01. 2980.12
LED's light. If not, change the 9 V battery (see §.
- Wrist strap ........................................P03.1008.24
8. Maintenance) and do the auto-test again.
I
Spare
- Red test prod ......................................P01.1008.55
Vous venez d'acquérir un TESTEUR DE TENSION
E N G L I S H . . . . . . . . . . . . . . . . . . . . . . . . . . . . . . . . . . . .
et nous vous remercions de votre confiance.
D E U T S C H . . . . . . . . . . . . . . . . . . . . . . . . . . . . . . . . .
Pour obtenir le meilleur service de votre appareil :
I T A L I A N O . . . . . . . . . . . . . . . . . . . . . . . . . . . . .
E S P A Ñ O L . . . . . . . . . . . . . . . . . . . . . . . . . . . . . . . . .
I
lisez attentivement ce mode d'emploi
I
respectez les précautions d'emploi
SOMMAIRE
1
- PRÉSENTATION...........................................
Significations du symbole
2
- AUTO-TEST......................................................
Attention ! Consulter le mode d'emploi avant
3
- TEST DE TENSION..........................................
d'utiliser l'appareil.
4
- REPERAGE PHASE/NEUTRE.......................
Dans le présent mode d'emploi, les instructions
5
- TEST DE CONTINUITE ET DE RESISTANCE
précédées de ce symbole, si elles ne sont pas
6
- TEST DIODE .....................................................
bien respectées ou réalisées, peuvent
7
- CARACTÉRISTIQUES GÉNÉRALES...........
occasionner un accident corporel ou
8
- MAINTENANCE.............................................
endommager l'appareil et les installations.
9
- GARANTIE......................................................
10 - ANNEXE..........................................................
Signification du symbole
1 - PRÉSENTATION
Cet appareil est protégé par une isolation double
ou une isolation renforcée. Il ne nécessite pas de
raccordement à la borne de terre de protection
Voir dessin en 10.Annexe
pour assurer la sécurité électrique.
Le C.A 745 est un testeur visuel et sonore de tension
continue et alternative, de continuité et de résistance.
Il dispose également de la fonction repérage phase/
neutre. Sa tension maxi d'utilisation, 690 V, permet
les tests sur une installation triphasée 400 V/690 V
PRECAUTIONS D'EMPLOI
tout en respectant la tension maxi par rapport à la
terre de 600 V. Ce testeur ne possède pas de fusible
et sa conception évite les risques de court-circuit
I
Toujours procéder à un AUTO-TEST avant
interne.
Œ
Pointe de touche (avec entraxe 19 mm)
d'utiliser le testeur.
Garde anti-glissement pour éviter tout contact
I
Tension maxi d'utilisation : 690V
accidentel avec un conducteur sous tension
I
Ne pas utiliser sur une installation dont la
Ž
Rampe à LED donnant la valeur de la tension
tension est supérieure à 600 V par rapport à
ou de la résistance
la terre et dont la catégorie de surtension est
AUTO-TEST : touche de contrôle
supérieure à III.
Poussoir "continuité" au dos du boîtier
I
Ne jamais procéder à un test de résistance sur
un circuit sous tension. Cependant en cas de
2 - AUTO-TEST
fausse manoeuvre, protection jusqu'à 550V.
I
Ne jamais toucher les pointes de touche
L'auto-test permet de contrôler le bon fonctionnement
métalliques pendant un test.
du testeur dans son ensemble : des pointes de touche
aux diodes électroluminescentes (LED) via le cordon,
l'électronique, le buzzer et la pile 9 V.
POUR COMMANDER
NB : Ne jamais utiliser le testeur si l'auto-test est
négatif
I
Testeur de tension C.A 745 ........P01.1917.36Z
Livré avec une pile 9 V et ce mode d'emploi
Mise en oeuvre
Appuyer sur la touche AUTO-TEST.
I
Accessoires
I
La LED «+» et les LED 12 à 690 V s'allument
- Sacoche n°10 ...........................P01.2980.12
et le bip sonore fonctionne
- Dragonne .................................P03.1008.24
I
Court-circuiter les pointes de touche, avec la
I
Rechange
touche AUTO-TEST toujours appuyée : la
- Pointe de touche rouge....................P01.1008.55
LED «-» s'allume
4 - PHASE / NEUTRAL IDENTIFICATION
3 - VOLTAGE TEST
Always perform an AUTO-TEST before
Always do an AUTO-TEST before using
using the tester
the tester. Do not press the "continuity" button on
the back of the tester.
Bring the black test prod into contact with the circuit to
be
tested.
In
the
presence
3.1 HOW TO USE
(U > 100 V) the "Ph" LED flashes. In certain cases, the
Place the red test prod in position in the lockable "+"
"Ph" LED may light up in the presence of static charges.
terminal. Hold the tester in your hand, without pressing
the AUTO-TEST button, and place the test prods at the
terminals of the circuit to be tested.
The simple presence of a voltage ensures automatic
operation.
5 - CONTINUITY AND RESISTANCE TEST
3.2 RECOGNITION OF DC OR AC
I
Both green LED's "+" and "-" light up: AC voltage
Always perform an AUTO-TEST before
I
The "+" LED lights: DC, positive at the test
using the tester. Never make a resistance
prod of the tester
test on a live circuit
I
The "-" LED lights: DC, negative at the test
prod of the tester
5.1 HOW TO USE
I
No LED lights up: no voltage or voltage < 12 V.
Place the test prods at the terminals of the component
or the circuit to be tested. Press the "continuity" button
3.3 VALUE OF THE VOLTAGE
on the back of the tester.
I
2 green LED's: 12 V and 24 V
I
5 red LED's: 50 V, 127 V, 230 V, 400 V and 690 V
5.2 VALUE OF RESISTANCE
The last LED lit gives the level of voltage present.
I
2 green LED's: 300 kΩ and 60 kΩ (to nearest
Lights to 85 % of the nominal voltage.
25%)
: Emission of continuous audible buzzer
I
1 red LED: 2 kΩ
simultaneously with lighting of the red
The last LED lit gives the value of the resistance
LED's (U > 50 V).
present; value below that marked on the tester.
In case of bright sunlight, the visual
perception of the presence of voltage may
5.3 CONTINUITY SOUND TEST
be affected.
A continuous buzzer sounds simultaneously with
lighting of the red LED «
3.4 SPECIFICATIONS AND DOMAIN OF USE
Voltage detection: 12 V ≤ U ≤ 690 V
I
I
Frequency: 0...400 Hz
5.4 SPECIFICATIONS
I
Maximum voltage in relation to the earth: 600 V
I
Impedance: 12 kΩ
I
I
Permited overload: 1000 Vrms for 30 seconds
Max test current: 100 µA
I
I
Consumption: variable depending on the voltage.
Empty voltage test: 3.8 V
125 µA at 50 V and 1.7 mA at 690 V
I
Positive polarity on the test prod of the tester
I
Impedance: 400 kΩ
I
Response time: < 0.5 seconds
I
I
Response time: < 0.5 seconds
Protection: up to 550 V (consumption < 20 mA
Duration of test: unlimited for U ≤ 690 Vrms.
I
for 230 V. Does not trigger 10 and 30 mA RCD's)
6 - DIODE TEST
The diode test is done in exactly the same way as the
continuity test; to check the direction of conduction (or
reverse) of diodes, transistors,...
Le testeur est en bon état de fonctionnement si
toutes les LED s'allument. Si non, changer la pile
9 V (voir 8- Maintenance) et recommencer
l'autotest.
3 - TEST DE TENSION
Toujours procéder à un AUTO-TEST avant
Amener la pointe de touche noire au contact du circuit
d'utiliser le testeur.
à tester. En présence de phase (U > 100 V) la LED "Ph"
Ne pas appuyer sur le poussoir "continuité"
clignote. Dans certains cas la LED "Ph" peut s'allumer
au dos du boîtier.
en présence de charges statiques.
3.1 MISE EN OEUVRE
Mettre la pointe de touche rouge en place dans la
borne "+" verrouillable. Prendre le testeur en main,
sans appuyer sur la touche AUTO-TEST et placer
les pointes de touche aux bornes du circuit à contrôler.
La simple présence d'une tension assure le
d'utiliser le testeur. Ne jamais procèder à un test de
fonctionnement automatique.
résistance sur un circuit sous tension.
3.2 RECONNAISSANCE DU CONTINU OU DE
5.1 MISE EN OEUVRE
L'ALTERNATIF
Placer les pointes de touche aux bornes du composant
I
Les deux LED vertes «+» et «-» s'allument :
ou du circuit à contrôler. Appuyer sur le poussoir
tension alternative
"continuité" au dos du boîtier.
I
La LED «+» s'allume : continu, le positif à la
pointe de touche du boîtier
5.2 VALEUR DE RESISTANCE
I
La LED «-» s'allume : continu, le négatif à la
I
pointe de touche du boîtier
I
I
Aucune LED ne s'allume : pas de tension ou
tension < 12 V.
3.3 VALEUR DE LA TENSION
I
2 LED vertes : 12 V et 24 V
5.3 TEST SONORE DE CONTINUITE
I
5 LED rouges : 50 V, 127 V, 230 V, 400 V et 690 V
Il y a émission d'un signal sonore continu simultanément
La dernière LED allumée donne le niveau de
à l'allumage de la LED rouge "
tension en présence. Allumage à 85 % de la
tension nominale
5.4 CARACTÉRISTIQUES
: Emission d'un signal sonore continu
I
simultanément avec l'allumage des
I
LED rouges (U > 50 V)
I
En cas d'ensoleillement intense, la
I
perception visuelle de présence de
I
tension peut-être affectée.
I
3.4 CARACTÉRISTIQUES ET DOMAINE
D'UTILISATION
Détection de tension : 12 V ≤ U ≤ 690 V
I
I
Fréquence : 0...400 Hz
I
Tension maxi par rapport à la terre : 600 V
I
Surcharge admissible : 1000 V eff. pendant
30s.
I
Consommation : variable suivant la tension.
125 µA à 50 V et 1,7 mA à 690 V
La mise en oeuvre du test diode est identique à celle du
I
Impédance : 400 kΩ
test de continuité; pour vérifier le sens de conduction
I
Temps de réponse : < 0,5 seconde
(ou inverse) des diodes, transistors, ...
Durée de test : illimité pour U ≤ 690 V eff.
I
7 - GENERAL SPECIFICATIONS
8.2 CLEANING
I
7.1 ENVIRONMENTAL CONDITIONS
Conditions to respect to guarantee good
operation
I
Use indoors.
of
phase
8.3 STORAGE
I
Temperature: -10...+55°C
I
If the tester is not used for more than 60 days, remove
Relative humidity: 10...90% RH
I
Altitude: up to 2000 m
the battery and store it separately.
7.2 POWER SUPPLY
8.4 PERIODIC VERIFICATION
I
1 battery 9 V (6 F 22, 6 LF 22 or NEDA 1604)
I
Battery life:
- 5000 tests of 5 seconds with alkaline battery
(6 LF 22)
This instrument should be checked at least once a
- 3500 tests of 5 seconds with ordinary battery
year. For checks and calibrations, contact one of our
accredited metrology laboratories (information and
7.3 DIMENSIONS AND WEIGHT
contact details available on request), at our Chauvin
I
Dimensions: 193 x 47 x 36 mm (outside)
Arnoux subsidiary or the branch in your country.
Weight: 170 g (with battery)
I
Length of lead: 1.20 m
8.5 REPAIR
I
Diameter of test prods: 2 mm and 3.7 mm
For all repairs before or after expiry of warranty, please
7.4 CONFORMITY WITH STANDARDS
return the device to your distributor.
I
DIN - VDE 0680 - Part 5: German standard
defining dual pole voltage testers.
I
Electrical safety (to IEC 1010-1)
- Double insulation
- Installation category III
- Degree of pollution 2
- Rated voltage: 600 V (in relation to the earth)
Our guarantee is applicable for twelve months
I
Watertightness (to NF EN 60529):
after the date on which the equipment is made
Protection index IP 50
available (extract from our General Conditions of Sale,
I
Electromagnetic compatibility
»: R ≤ 2 kΩ
available on request).
(to EN 61326-1 : 2006).
8 - MAINTENANCE
For maintenance, use only specified
spare parts. The manufacturer will not be held
responsible for any accident occurring following
a repair done other than by its After Sales Service
or approved repairers.
8.1 REPLACING THE BATTERY
Always disconnect the tester from any
electric source before opening the case
I
Remove the two screws from the lower half of
the case
I
Replace the used 9 V battery by a battery of
the same type (6 F 22, 6 LF 22 or NEDA 1604)
I
Close the case again before using the tester
7 - CARACTERISTIQUES GENERALES
4 - REPÉRAGE DE PHASE / NEUTRE
7.1 CONDITIONS D'ENVIRONNEMENT
Conditions à respecter pour garantir le bon
Toujours procéder à un AUTO-TEST avant
fonctionnement
d'utiliser le testeur
I
Utilisation en intérieur
I
Température : -10 ... +55°C
I
Humidité relative : 10 ... 90 % HR
I
Altitude : jusqu'à 2000 m
7.2 ALIMENTATION
I
1 pile 9 V (6 F 22, 6 LF 22 ou NEDA 1604)
I
5 - TEST DE CONTINUITE ET DE RESISTANCE
Autonomie :
- 5000 tests de 5 secondes avec pile alcaline
(6 LF 22)
- 3500 tests de 5 secondes avec pile ordinaire
Toujours procèder à un auto-test avant
7.3 DIMENSIONS ET MASSE
I
Dimensions : 193 x 47 x 36 mm (hors tout)
Masse : 170 g (avec pile)
I
Longueur du cordon : 1,20 m
I
Diamètre des pointes de touche : 2mm et 3,7 mm
7.4 CONFORMITÉ AUX NORMES
I
DIN-VDE 0680 - Partie 5 : norme allemande
définissant les testeurs bipolaires de tensions.
2 LED vertes : 300 kΩ et 60 kΩ (à 25 % près)
I
Sécurité électrique (selon IEC 1010-1)
1 LED rouge : 2 kΩ
La dernière LED allumée donne l'évaluation
- Double isolation
de la résistance en présence; valeur inférieure
- Catégorie d'installation III
- Degré de pollution 2
à celle marquée sur le testeur.
- Tension assignée : 600 V (par rapport à la
terre)
I
Etanchéité (selon NF EN 60529) :
" : R ≤ 2 kΩ
Indice de protection IP 50
I
Compatibilité électromagnétique
(selon EN 61326-1 : 2006).
Impédance : 12 kΩ
Courant de test maxi : 100 µA
Tension de test à vide : 3,8 V
Polarité positive sur la pointe de touche du boîtier
8 - MAINTENANCE
Temps de réponse : < 0,5 seconde
Protection : jusqu'à 550 V
Pour la maintenance, utilisez seulement
(consommation < 20 mA pour 230 V. Ne fait
les pièces de rechange qui ont été
pas disjoncter les différentiels 10 et 30 mA)
spécifiées. Le fabricant ne pourra être tenu pour
responsable de tout accident survenu suite à
une réparation effectuée en dehors de son
service après-vente ou des réparateurs agréés.
6 - TEST DIODE
8.1 REMPLACEMENT DE LA PILE
Toujours déconnecter le testeur de toute
source électrique avant d'ouvrir le boîtier.
Deutsch
Clean the case with a cloth slightly moistened
Wir bedanken uns bei Ihnen für den Kauf des
with soapy water. Wipe off with a damp cloth.
SPANNUNGSPRÜFERS
und
Then dry quickly with a cloth or in a hot air flow.
entgegengebrachte Vertrauen. Um die besten
Ergebnisse mit Ihrem Meßgerät zu erzielen, bitten
wir Sie :
I
die vorliegende Bedienungsanleitung auf-
merksam zu lesen und die darin enthaltenen
Sicherheitshinweise zu beachten
Bedeutung des Zeichens
Like all measuring or testing devices, the
Achtung ! Beachten Sie vor Benutzung
instrument must be checked regularly.
des Gerätes die Hinweise in der Bedienungs-
anleitung.
Falls die Anweisungen die in vorliegender
Bedienungsanleitung nach diesem Zeichen
erscheinen nicht beachtet bzw. nicht ausgeführt
werden, können körperliche Verletzungen
verursacht bzw. das Gerät und die Anlagen
beschädigt werden.
Bedeutung des Zeichens
Das Gerät ist schutzisoliert bzw. durch eine
verstärke Isolierung geschützt. Ein Anschluβ an
einem Erdleiter ist für die Gewährleistung der
elektrischen Sicherheit nicht erforderlich.
9 - WARRANTY
SICHERHEITSHINWEISE
I
Führen Sie vor Benutzung des Geräts stets den
Selbsttest durch.
I
Die maximal zulässige Eingangsspannung
beträgt 690 V.
I
Das Gerät niemals an Anlagen mit mehr als
600 V. Spannung gegenüber Erde bzw. mit einer
Überspannungsklasse größer als III benutzen.
I
Führen Sie niemals eine Widerstandsprüfung
an einer Schaltung durch, die unter Spannung
steht. Bei Fehlbedienung ist das Gerät jedoch
bis 550 V geschützt.
I
Berühren Sie niemals die metallischen
Tastspitzen während einer Prüfung.
BESTELLANGABEN
I
Spannungsprüfer C.A 745 .........P01.1917.36Z
Lieferung mit 9 V-Batterie und Bedienungsanleitung
I
Zubehör
- Tragetasche Nr. 10 ......................P01.2980.12
- Trageschlaufe .................................P01.1008.24
I I I I I
Ersatzteile
- Rote Tastspitze ..........................P01.1008.55
I
Démonter les deux vis du demi-boîtier inférieur.
I
Remplacer la pile 9 V défectueuse par une pile
de même type (6 F 22, 6 LF 22 ou NEDA 1604)
et refermer le boîtier avant utilisation.
8.2 ENTRETIEN
I
Nettoyage du boîtier avec un chiffon légèrement
imbibé d'eau savonneuse. Rincer avec un chiffon
humide. Ensuite sécher rapidement avec un chiffon
ou de l'air pulsé.
8.3 STOCKAGE
Si le testeur n'est pas mis en service pendant une
durée dépassant 60 jours, enlevez la pile et stockez la
séparément.
8.4 VÉRIFICATION PÉRIODIQUE
Comme tous les appareils de mesure
ou d'essais, une vérification périodique
est nécessaire.
Nous vous conseillons une vérification annuelle de cet
appareil. Pour les vérifications et étalonnages,
adressez- vous à nos laboratoires de métrologie
accrédités (renseignements et coordonnées sur
demande) ou à l'agence de votre pays.
8.5 RÉPARATION
Pour les réparations sous garantie et hors garantie,
contactez votre agence commerciale Chauvin Arnoux
la plus proche ou votre centre technique régional
Manumesure qui établira un dossier de retour et vous
communiquera la procédure à suivre.
Coordonnées disponibles sur notre site : http://
www.chauvin-arnoux.com ou par téléphone aux
numéros suivants : 02 31 64 51 55 (centre technique
Manumesure) , 01 44 85 44 85 (Chauvin Arnoux).
Pour les réparations hors de France métropolitaine,
sous garantie et hors garantie, retournez l'appareil à
votre agence Chauvin Arnoux locale ou à votre
distributeur.
9 - GARANTIE
Notre garantie s'exerce, sauf stipulation expresse,
pendant douze mois après la date de mise à
disposition du matériel (extrait de nos Conditions
Générales de Vente, communiquées sur demande).
INHALTSÜBERSICHT
1
- GERÄTEVORSTELLUNG ..............................
das
damit
2
- SELBSTTEST.................................................
3
- SPANNUNGSPRÜFUNG ..............................
4
- ERKENNUNG PHASE/NULLEITER ..............
5
- DURCHGANGS- UND
WIDERSTANDSPRÜFUNG ..........................
6
- DIODENTEST................................................
7
- ALLGEMEINE TECHNISCHE DATEN ..........
8
- WARTUNG....................................................
9
- GARANTIE.....................................................
10 - ANHANG........................................................
1 - GERÄTEVORSTELLUNG
Siehe Abbildung 10- Anhang
Der C.A 745 ist ein Spannungsprüfer für Gleich-
und Wechselstrom, sowie ein Durchgangs- und
Widerstandsprüfer mit optischer und akustischer
Anzeige. Außerdem zeigt er Phase und Nulleiter
an. Die maximal zulässige Eingangsspannung von
690 V ermöglicht auch Prüfungen an Drehstrom-
Anlagen mit 400 V/690 V unter Einhaltung der
maximalen Spannung gegenüber Erde von 600 V.
Der Prüfer besitzt keine Schmelzsicherung und
sein Aufbau verhindert zuverlässig interne
Kurzschlüsse.
Œ
Isolierte Tastspitzen (mit 19 mm Abstand)
Gleitschutzring, verhindert unbeabsichtigtes
Abrutschen der Hand und Berührung der Leiter
Ž
LED-Rampe zur Anzeige der Spannung bzw.
des Widerstands
AUTO-TEST : Selbsttest des Geräts
Taste für Durchgangsprüfung auf der Rückseite
2 - SELBSTTEST
Mit dem Selbsttest können Sie sämtliche Funktionen
des Geräts prüfen: Tastspitzen, LED-Anzeige, Kabel,
Elektronik, Prüfsummer und Batterie.
Hinweis: Den Prüfer bei nicht erfolgreichem
Selbsttest niemals benutzen !
Selbsttest durchführen:
Taste AUTO-TEST drücken
I
LED "+" und die LEDs von "12" bis "690"
leuchten; außerdem ertönt der Summer.
I
Tastspitzen kurzschließen und Taste AUTO-
TEST gedrückt halten: die LED "-" muß leuchten.
Wenn alle LEDs richtig leuchten und der Summer
ertönt, ist der Prüfer in Ordnung, andernfalls die 9 V-
Batterie auswechseln (siehe Kapitel 8 Wartung) und
Selbsttest erneut durchführen.
Werbung

Verwandte Anleitungen für Chauvin Arnoux C.A 745


Inhaltszusammenfassung für Chauvin Arnoux C.A 745
- Seite 1 Dimensions: 193 x 47 x 36 mm (outside) und Wechselstrom, sowie ein Durchgangs- und werden, können körperliche Verletzungen The C.A 745 is an audible and visual DC and AC voltage, Arnoux subsidiary or the branch in your country. prod of the tester...
- Seite 2 Leuchtet nur die LED “-” : Gleichspannung - der die unter Spannung steht. Meereshöhe : bis 2000 m benutzbar Gehäusehälften wieder zusammen. Il C.A 745 è un tester visivo e sonoro di tensione tensione alternata Minuspol liegt an der Tastspitze am Gehäuse. continua e alternata 5.1 MESSA IN SERVIZIO...