Inhaltsverzeichnis
Werbung
Verfügbare Sprachen
Verfügbare Sprachen
Drum Set Session I
BEDIENUNGSANLEITUNG ................................. 2
Bitte vor Inbetriebnahme des Gerätes lesen!
USER INSTRUCTIONS ..................................... 10
Please read the manual before using the equipment!
MODE D'EMPLOI ............................................ 18
Veuillez lire cette notice avant d'utiliser le système!
MODO DE EMPLEO......................................... 26
¡Sirvase leer el manual antes de utilizar el equipo!
Werbung
Kapitel
Inhaltsverzeichnis
Fehlerbehebung

Verwandte Anleitungen für AKG Drum Set Session I


Inhaltszusammenfassung für AKG Drum Set Session I
- Seite 1 Drum Set Session I BEDIENUNGSANLEITUNG ......... 2 Bitte vor Inbetriebnahme des Gerätes lesen! USER INSTRUCTIONS ........10 Please read the manual before using the equipment! MODE D’EMPLOI ..........18 Veuillez lire cette notice avant d’utiliser le système! MODO DE EMPLEO......... 26...
-
Seite 2: Inhaltsverzeichnis
Anschlussbelegung ................5 Anschließen des Mikrofons ..............5 Anwendung ..................6 Reinigung ................... 7 Mikrofon ....................7 Innen-Windschutz (P2, P4) ..............7 Fehlerbehebung ................. 8 Technische Daten ................9 P2 ....................... 9 P4 ....................... 9 P17 ..................... 9 Drum Set Session I... -
Seite 3: Sicherheit Und Umwelt
Am Ende der Lebensdauer des Produkts trennen Sie Gehäuse, Elektronik und Kabel voneinander und entsorgen Sie alle Komponenten gemäß den dafür geltenden Entsorgungsvorschriften. Die Verpackung ist wiederverwertbar. Entsorgen Sie die Verpackung in einem dafür vorgesehenen Sammelsystem. Drum Set Session I... -
Seite 4: Beschreibung
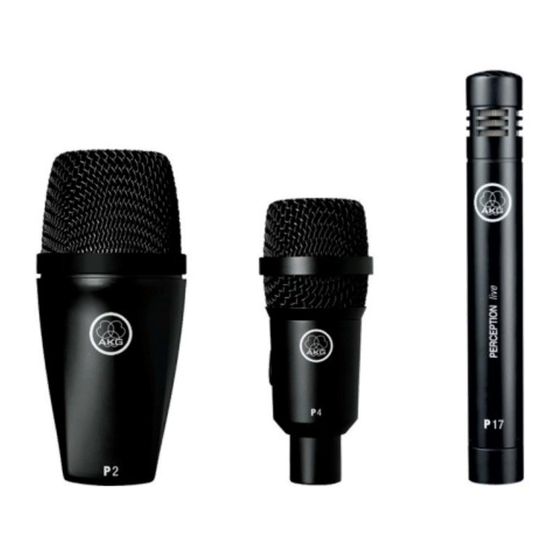
Beschreibung 2 Beschreibung Einleitung Vielen Dank, dass Sie sich für ein Produkt von AKG entschieden haben. Bitte lesen Sie die Bedienungsanleitung aufmerksam durch, bevor Sie das Gerät benutzen und bewahren Sie die Bedienungsanleitung sorgfältig auf, damit Sie jederzeit darin nachschlagen können. Wir wünschen Ihnen viel Spaß! Dynamisches Instrumentalmikrofon Nierenförmige Richtcharakteristik... -
Seite 5: Anschluss An Audiogeräte
Phantomspeisung Anschließen des Verwenden Sie ein XLR Kabel um das Mikrofon zu einem symmetrischen Mikrofons XLR Eingang mit Phantomspeisung zu verbinden. Schalten Sie die Phantomspeisung ein. (Weitere Hinweise finden sie in der Bedienungsanleitung des entsprechenden Gerätes) Drum Set Session I... -
Seite 6: Anwendung
Anwendung 4 Anwendung P 17 Drum Set Session I... -
Seite 7: Reinigung
Nehmen Sie den Windschutz aus der Gitterkappe heraus und reinigen Sie den Windschutz mit Seifenwasser. Lassen Sie den Windschutz über Nacht trocknen. Legen Sie den Windschutz in die Gitterkappe und schrauben Sie die Gitterkappe im Uhrzeigersinn auf das Mikrofon auf. Drum Set Session I... -
Seite 8: Fehlerbehebung
Kabel defekt. Kabel überprüfen und falls nötig ersetzen. Verzerrungen Gain-Regler am Mischpult nicht Gain-Regler so einstellen, dass richtig eingestellt. Verzerrungen verschwinden. Mikrofon klingt dumpf Verschmutzter Innen- oder Innen- bzw. Außenwindschutz Außenwindschutz dämpft hohe reinigen. Frequenzen. Drum Set Session I... -
Seite 9: Technische Daten
135 / 155 dB SPL (0 / -20 dB) Phantomspeisung: 48 V ±4 V nach IEC 61938 Vorabschwächung: -20 dB Dieses Produkt entspricht den in der Konformitätserklärung angegebenen Normen. Sie können die Konformitätserklärung per E-Mail von sales@akg.com anfordern. Drum Set Session I... - Seite 10 Connecting the Microphone ..............13 Operation ..................14 Cleaning ................... 15 Microphone ..................15 Internal Windscreen (P2, P4) ............... 15 Troubleshooting ................16 Technical data .................. 17 P2 ..................... 17 P4 ..................... 17 P17 ....................17 Drum Set Session I...
-
Seite 11: Safety And The Environment
At the end of the lifetime of the product, disconnect the housing, electronics and cable from each other and discard all components according to applicable disposal regulations. The packaging is recyclable. Dispose of the packaging via an appropriate collection system provided for this purpose. Drum Set Session I... -
Seite 12: Description
2 Description Introduction Thank you for your decision to buy an AKG product. Please read the user instructions carefully before using the unit and keep them in a safe place so that you can refer to them in the future at any time. We wish you a lot of fun! -
Seite 13: Connecting To Audio Equipment
Use an XLR cable to connect the microphone to a balanced XLR input with Microphone phantom power. Switch the phantom power on. (Refer to the user manual of the unit to which you connected your microphone. Drum Set Session I... -
Seite 14: Operation
Operation 4 Operation P 17 Drum Set Session I... -
Seite 15: Cleaning
Remove the windscreen from the front grill and wash the windscreen in soap suds. Allow the windscreen to dry overnight. Replace the windscreen in the front grill and screw the front grill on the microphone CW. Drum Set Session I... -
Seite 16: Troubleshooting
Check cable and replace if damaged. Distortion Gain control on mixer or transmitter Set gain control to stop distortion. module not set correctly. Microphone sounds dull Internal or external windscreen Clean internal or external attenuates high frequencies when windscreen. soiled. Drum Set Session I... -
Seite 17: Technical Data
Phantom powering: 48 V ±4 V to IEC 61938 Preattenuation pad: -20 dB This product corresponds to the standards stated in the Declaration of Conformity. You can request the Declaration of Conformity by e-mail from sales@akg.com Drum Set Session I... - Seite 18 Comment connecter le microphone ............21 Application ..................22 Nettoyage ..................23 Microphone ..................23 Bonnette anti-vent interne (P2, P4) ............23 Élimination des erreurs ..............24 Caractéristiques techniques ............. 25 P2 ..................... 25 P4 ..................... 25 P17 ....................25 Drum Set Session I...
-
Seite 19: Sécurité Et Environnement
En fin de durée de vie du produit, démontez et séparez le boîtier, le système électronique et les câbles et éliminez chacun de ces éléments conformément aux prescriptions en vigueur. L’emballage peut être recyclé. Déposez l’emballage auprès d’un centre de collecte prévu à cet effet. Drum Set Session I... -
Seite 20: Description
Accessoires en option Pour les accessoires en option, consultez le catalogue AKG actuel ou allez sur www.akg.com. Votre revendeur se fera un plaisir de vous conseiller. Drum Set Session I... -
Seite 21: Connexion
Comment connecter le Utilisez un câble XLR pour connecter le microphone à une entrée XLR microphone symétrique avec alimentation fantôme. Mettez l’alimentation fantôme sous tension. (Consultez le manuel de l’utilisateur de l’appareil auquel vous connectez votre microphone.) Drum Set Session I... -
Seite 22: Application
Application 4 Application P 17 Drum Set Session I... -
Seite 23: Nettoyage
Retirez la bonnette anti-vent du capuchon grillagé, puis nettoyez-la à l'eau savonneuse. Laissez sécher la bonnette anti-vent durant la nuit. Placez la bonnette anti-vent dans le capuchon grillagé, puis vissez le capuchon grillagé sur le microphone dans le sens horaire. Drum Set Session I... -
Seite 24: Élimination Des Erreurs
Régler le régulateur Gain de façon table de mixage. à faire disparaître les distorsions. Le microphone bourdonne Une protection contre le vent Nettoyer la protection contre le vent intérieure ou extérieure encrassée intérieure ou extérieure. absorbe les fréquences hautes. Drum Set Session I... -
Seite 25: Caractéristiques Techniques
(d.t.h. = 0,5 %): Alimentation fantôme: 48 V ±4 V selon CEI 61938 Pré-atténuateur: -20 dB Ce produit répond aus normes indiquées sur le certificat de conformité. Vous pouvez demander le certificat de conformité auprès de sales@akg.com Drum Set Session I... - Seite 26 Conexión del micrófono ............... 29 Aplicación ..................30 Limpieza ................... 31 Micrófono ................... 31 Pantalla antiviento interna (P2, P4) ............31 Corrección de errores ............... 32 Características técnicas ..............33 P2 ..................... 33 P4 ..................... 33 P17 ....................33 Drum Set Session I...
-
Seite 27: Seguridad Y Medio Ambiente
Al final de la vida útil del producto, separe la carcasa, componentes electrónicos y cables y elimine cada uno de los componentes según las normativas de eliminación vigentes. El embalaje es reutilizable. Deposite el embalaje en un punto de recogida adecuado. Drum Set Session I... -
Seite 28: Descripción
Descripción 2 Descripción Introducción Gracias por haberse decidido por un producto de AKG. Lea atentamente las instrucciones de uso antes de utilizar el aparato y conserve las instrucciones para poder consultarlas siempre que sea necesario. ¡Esperamos que lo disfrute! Micrófono instrumental dinámico Patrón polar cardioide... -
Seite 29: Conexión
Conexión del micrófono Use un cable XLR para conectar el micrófono a una entrada XLR balanceada con alimentación Phantom. Active la alimentación Phantom. (Consulte el manual de instrucciones del producto al que va a conectar su micrófono). Drum Set Session I... -
Seite 30: Aplicación
Aplicación 4 Aplicación P 17 Drum Set Session I... -
Seite 31: Limpieza
Retire la pantalla antiviento interna de la rejilla y limpie la pantalla antiviento con agua jabonosa. Deje secar la pantalla antiviento durante toda la noche. Coloque la pantalla antiviento en la rejilla y atornille esta en el micrófono en el sentido de las agujas del reloj. Drum Set Session I... -
Seite 32: Corrección De Errores
El micrófono produce un sonido La suciedad de la pantalla Limpie la pantalla antiviento interior sordo antiviento interior o exterior atenúa o exterior. las frecuencias altas. Drum Set Session I... -
Seite 33: Características Técnicas
Alimentación fantasma: 48 V ±4 V conforme a IEC 61938 Preatenuador: -20 dB Este producto corresponde con las normas indicadas en la declaración de conformidad. Puede solicitar la declaración de conformidad por correo electrónico a sales@akg.com Drum Set Session I... - Seite 34 LAXENBURGER STRASSE 254, A-1230 VIENNA/AUSTRIA, PHONE: +43 1 86654 0 E-MAIL: SALES@AKG.COM For other products and distributors worldwide visit www.akg.com Technische Änderungen vorbehalten. Specifications subject to change without notice. Ces caractéristiques sont susceptibles de modifications. Ci riserviamo il diritto di effettuare modifiche tecniche. Nos reservamos el derecho de introducir modificaciones técnicas. Especificações sujeitas a mudanças sem aviso prévio.