Herunterladen Inhalt Inhalt Diese Seite drucken

Werbung

Verfügbare Sprachen
  • DE

Verfügbare Sprachen

  • DEUTSCH, seite 9
L-82
INSTRUCTION MANUAL
For information and support, www.lenco.eu
1

Werbung

Inhaltsverzeichnis
loading

Inhaltszusammenfassung für LENCO L-82

  • Seite 1 L-82 INSTRUCTION MANUAL For information and support, www.lenco.eu...
  • Seite 2: Inhaltsverzeichnis

    CONTENTS Assembly-------------------------------------------------------3 Description-----------------------------------------------------4~5 Mains Connection----------------------------------------------6 Amplifier Connection-----------------------------------------6 Specification----------------------------------------------------6...
  • Seite 3: Assembly

    ASSEMBLY Drive belt: The belt and turntable platter have been installed properly at factory, but the belt may be loose during transportation. If so, the following procedures will be taken for belt installation by yourself. Remove the rubber mat from the turntable platter and the E ring from the turntable shaft, then release the turntable platter from the shaft Put the drive belt on the inner rim of the turntable platter and pull it through the hole...
  • Seite 4: Description

    DESCRIPTION...
  • Seite 5 Adaptor: Use this adaptor when playing 45 RPM records. Platter: Place a record here to play. 33/45 RPM Switch: Switch 33 or 45 rpm for playing a record at a correct speed. REC: Press it to enter into record mode. SPLIT For stopping the current recording, forming a record file manually and then going on recording the next track.
  • Seite 6: Mains Connection

    MAINS CONNECTION Ensure that the mains voltage of your home corresponds to the operating voltage of the unit. Your unit is ready to be connected to a correct voltage of your location. AMPLIFIER CONNECTION Connect RCA line out cable (10) to the AUX input on your amplifier: Red plug into R channel input.
  • Seite 7 Do not covering the ventilation. No naked flame sources, such as lighted candles, should be placed on the apparatus. No objects filled with liquids, such as vases, shall be placed on the apparatus. The apparatus shall not be exposed to dripping or splashing. The mains plug is used as the disconnect device, the disconnect devices shall remain readily operable.
  • Seite 8 L-82 BEDIENUNGSANLEITUNG Zur Information und Unterstützung, www.lenco.eu...
  • Seite 9 INHALT Zusammenbau------------------------------------------------------- 3 Beschreibung----------------------------------------------------- 4 ~ 5 Netzanschluss-------------------------------------------------------- 6 Anschluss eines Verstärkers--------------------------------------- 6 Technische Daten----------------------------------------------------- 6...
  • Seite 10: Zusammenbau

    ZUSAMMENBAU Antriebsriemen: Der Antriebsriemen und der Plattenteller wurden werksseitig ordnungsgemäß installiert. Es kann allerdings vorkommen, dass der Riemen sich während des Transports löst. Wenn dies der Fall ist, können Sie ihn auf folgende Weise selbst wieder anbringen. A. Nehmen Sie die Gummimatte vom Plattenteller und die E-Ring von der Welle Plattentellers. Danach können Sie den Plattenteller von der Welle herunternehmen.
  • Seite 11: Beschreibung

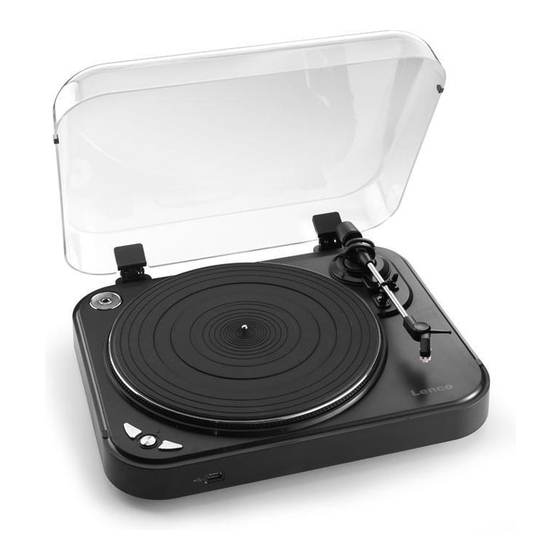
    BESCHREIBUNG 1. Adapter: Benutzen Sie diesen Adapter zum Abpielen von 45-RPM-Schallplatten. 2. Plattenteller: Legen Sie hier Ihre Schallplatten zur Wiedergabe auf. 3. 33/45-RPM-Schalter: Schalten Sie die Geschwindigkeit entsprechend der von Ihnen verwendeten Schallplatte auf 33 oder 45 U/Min. 4. REC: Betätigen Sie die Taste, um in den Aufnahmemodus zu wechseln.
  • Seite 12 14. LED USB-Aufnahme und LED-Signalanzeige 1. USB-Speichermedium ist nicht angeschlossen.→ LED leuchtet nicht 2. USB-Speichermedium ist angeschlossen → LED blinkt 3. System ist bereit zur Aufnahme. → LED leuchtet 4. REC-Taste zum Starten der Aufnahme betätigen. → LED blinkt langsam 5.
  • Seite 13: Netzanschluss

    Netzanschluss Vergewissern Sie sich, dass die Spannung Ihres Netzanschlusses zu Hause mit der Betriebsspannung des Geräts übereinstimmt. Das Gerät ist für den Anschluss an die übliche Netzspannung Ihres Orts geeignet. ANSCHLUSS EINES VERSTÄRKERS Schließen Sie das Cinch-Line-Out-Kabel (10) an den AUX-Eingang Ihres Verstärkers an: Roter Stecker zum R-Kanal-Eingang.
  • Seite 14 L-82 MANUEL D’INSTRUCTION Pour information & support technique, www.lenco.eu...
  • Seite 15 TABLE DES MATIÈRES Montage ------------------------------------------------------3 Description-----------------------------------------------------4~6 Connections principales------------------------------------7 Connections des amplificateurs---------------------------7 Spécification----------------------------------------------------7...
  • Seite 16 MONTAGE Courroie : La courroie et le plateau tourne-disque ont été correctement installés à l’usine, mais il se peut que la courroie se desserre lors du transport. Si tel est le cas, veuillez suivre les instructions suivantes pour installer la courroie vous-même. A .
  • Seite 17 DESCRIPTION...
  • Seite 18 1 . 1 . 1 . 1 . Adaptateur : Utilisez cet adaptateur lorsque vous jouez des disques 45 tours. 2 . 2 . 2 . 2 . Plateau : Placez un disque ici pour le jouer 3 . 3 . 3 . 3 . Bouton 33/45 tours : Positionnez sur 33 ou 45 tours pour lire un disque à...
  • Seite 19 la DEL clignote lentement. 5. Appuyez sur la touche SPLIT pour créer un nouveau fichier d'enregistrement. 6. Appuyez à nouveau sur la touche REC pour stopper l’enregistrement. -> la DEL clignote un court instant, puis la lumière de la DEL se stabilise à nouveau. Note: N’enlevez pas le dispositif de stockage USB lorsque la DEL clignote.
  • Seite 20: Connexion Au Secteur

    CONNEXION AU SECTEUR Assurez-vous que la tension du secteur de votre foyer corresponde à la tension de fonctionnement de l’unité. Votre unité est prête à être connectée à voltage correct de la location de votre choix. CONNEXION DE L’AMPLIFICATEUR Connectez le câble de sortie RCA (10) à l’entrée AUX de votre amplificateur.
  • Seite 21 Si à l'avenir vous devez vous débarrasser de ce produit, veuillez noter que : Les produits électriques ne peuvent pas être jetés avec le reste des déchets ménagers. Si possible, amenez l'appareil à un centre de recyclage. Vérifiez auprès de votre municipalité ou de votre détaillant pour en savoir plus sur le recyclage.
  • Seite 22 L-82 Manual de instrucciones Para obtener información y apoyo, www.lenco.eu...
  • Seite 23 ÍNDICE Montaje-----------------------------------------------------------------3 Descripción------------------------------------------------------------4~6 Conexión del suministro--------------------------------------------7 Conexión del amplificador-----------------------------------------7 Especificaciones-----------------------------------------------------7...
  • Seite 24: Montaje

    MONTAJE Correa: La correa y el plato del giradiscos se instalaron correctamente en la fábrica, pero la corre podría soltarse durante la transportación. De ser así, debe seguirse el procedimiento a continuación para instalar la correa usted mismo. Quite la almohadilla de caucho del plato del giradiscos y el anillo E del eje del giradiscos, después libere el plato del giradiscos del eje.
  • Seite 25: Descripción

    DESCRIPCIÓN...
  • Seite 26 Adaptador: Use este adaptador cuando reproduzca discos de 45 RPM. Plato: Coloque un disco aquí para reproducirlo. Interruptor 33/45 RPM: Cambie entre 33 y 45 rpm para reproducir un disco a la velocidad adecuada. REC: Púlselo para entrar al modo de grabación. SPLIT Para detener la grabación actual, creando un archivo de grabación manualmente y posteriormente continuar la grabación de la pista siguiente.
  • Seite 27 6. Pulse el botón REC de nuevo para detener la grabación. -> La LED parpadeará algunos momentos, después se mantendrá encendida. Nota: No quite el almacenamiento USB si el LED está parpadeando.
  • Seite 28: Conexión Del Suministro

    CONEXIÓN DEL SUMINISTRO Asegúrese de que el voltaje de su casa corresponda con el voltaje de funcionamiento de la unidad. Su unidad está lista para conectarse al voltaje correcto de su ubicación. CONEXIÓN DEL AMPLIFICADOR Conecte el cable de salida RCA (10) a la entrada AUX de su amplificador: Enchufe la clavija roja en la entrada del canal R.
  • Seite 29 Si requiere desechar este producto en cualquier momento futuro, por favor note que: Los residuos de productos eléctricos no deben tirarse en la basura doméstica. Por favor recicle donde existan centros para ello. Consulte con su autoridad local o minorista para obtener información sobre el reciclaje (Directiva de Residuos de Aparatos Eléctricos y Electrónicos).
  • Seite 30 L-82 HANDLEIDING Voor informatie en ondersteuning, www.lenco.eu...
  • Seite 31 INHOUDSOPGAVE Montage---------------------------------------------------------------3 Omschrijving----------------------------------------------------------4~6 Aansluiten op lichtnet-----------------------------------------------6 Aansluiten op versterker-------------------------------------------6 Specificaties-----------------------------------------------------------7...
  • Seite 32: Montage

    MONTAGE Aandrijfriem: De aandrijfriem en draaiplateau zijn op een correcte manier geïnstalleerd in de fabriek, maar het is mogelijk dat de aandrijfriem is losgeraakt tijdens het transport. Als dit zo is, volg dan de volgende procedure om installatie van de riem zelf uit te voeren.
  • Seite 33: Omschrijving

    OMSCHRIJVING...
  • Seite 34 Adapter: Gebruik deze adapter bij het afspelen van 45 RPM platen. Draaiplateau: Plaats hier een plaat om af te spelen. 33/45 toerenschakelaar: Schakel naar 33 of 45 toeren om een plaat op de juiste snelheid af te spelen. REC: Druk op deze knop om de opname-modus te starten. SPLIT Om de huidige opname te stoppen, handmatig een opnamebestand te vormen en vervolgens de opname te hervatten op de volgende track.
  • Seite 35: Aansluiten Op Lichtnet

    LED knippert voor korte tijd, daarna zal de LED weer constant branden. Opmerking: Verwijder het USB-opslagapparaat niet als de LED knippert. AANSLUITEN OP LICHTNET Zorg ervoor dat de netspanning in uw huis overeenkomt met de bedrijfsspanning van het apparaat. Uw apparaat is klaar om aangesloten te worden indien de netspanning juist is.
  • Seite 36: Specificaties

    TECHNISCHE SPECIFICATIES Voeding: 230V, 50Hz Stroomverbruik: <10W Wow & Flutter: 0.25% Vervorming: 3%~4% S/N: 50 dB Audio-uitgangsspanning: 500mV ±200mV USB: 5V/500 mA Bedek de ventilatieopeningen niet. Plaats geen voorwerpen met open vlam, zoals kaarsen, op het apparaat. Plaats geen voorwerpen gevuld met vloeistof, zoals vazen, op het apparaat. Het apparaat mag niet worden blootgesteld aan druppend of spattend water.

Inhaltsverzeichnis