Herunterladen Inhalt Inhalt Diese Seite drucken

Werbung

Verfügbare Sprachen

Verfügbare Sprachen

DIGITAL JOCKEY
CONTROLLER EDITION
Professioneller MIDI-Controller
Professional MIDI controller
Contrôleur MIDI professionnel
WARNUNG!
Um Feuer oder einen elektrischen Schock zu
vermeiden, setzen Sie dieses Gerät nicht Wasser
oder Flüssigkeiten aus! Öffnen Sie niemals das
Gehäuse!
WARNING!
To prevent fire or avoid an electric shock do not
expose the device to water or fluids! Never open
the housing!
ATTENTION !
Afin d'éviter un incendie ou une décharge
électrique, veillez à tenir cet appareil à l'écart des
liquides et de l'humidité ! N´ouvrez jamais le boîtier
Für weiteren Gebrauch aufbewahren!
Keep information for further reference!
Gardez ces instructions pour des utilisations
ultérieurs !
www.digital-jockey.dj
DEUTSCH
Seite 02-27
ENGLISH
page 28-53
FRANÇAIS
page 54-79
Bedienungsanleitung
ACHTUNG!
Lesen Sie sich vor der ersten Inbetriebnahme zur eigenen Sicherheit
diese Bedienungsanleitung sorgfältig durch! Alle Personen, die mit der
Aufstellung, Inbetriebnahme, Bedienung, Wartung und Instandhaltung
dieses Gerätes zu tun haben, müssen entsprechend qualifiziert sein und
diese Betriebsanleitung genau beachten. Dieses Produkt erfüllt die
Anforderungen der geltenden europäischen und nationalen Richtlinien,
die Konformität wurde nachgewiesen, die entsprechenden Erklärungen
und Unterlagen sind beim Hersteller hinterlegt.
Operation Manual
CAUTION!
For your own safety, please read this operation manual carefully before
initial operation! All persons involved in the installation, setting-up,
operation, maintenance and service of this device must be
appropriately qualified and observe this operation manual in detail. This
product complies with the requirements of the applicable European and
national regulations. Conformity has been proven. The respective
statements and documents are deposited at the manufacturer.
Mode d'emploi
ATTENTION !
!
Pour votre propre sécurité, veuillez lire attentivement ce mode d'emploi
avant la première utilisation ! Toutes les personnes chargées de
l'installation, de la mise en service, de l'utilisation, de l'entretien et la
maintenance de cet appareil doivent posséder les qualifications
nécessaires et respecter les instructions de ce mode d'emploi. Ce
produit est conforme aux directives européennes et nationales, la
conformité a été certifiée et les déclarations et documents sont en
possession du fabricant.

Werbung

Inhaltsverzeichnis
loading

Inhaltszusammenfassung für Reloop digital jockey

  • Seite 1 DEUTSCH Seite 02-27 ENGLISH page 28-53 FRANÇAIS page 54-79 DIGITAL JOCKEY CONTROLLER EDITION Professioneller MIDI-Controller Professional MIDI controller Contrôleur MIDI professionnel Bedienungsanleitung ACHTUNG! Lesen Sie sich vor der ersten Inbetriebnahme zur eigenen Sicherheit diese Bedienungsanleitung sorgfältig durch! Alle Personen, die mit der Aufstellung, Inbetriebnahme, Bedienung, Wartung und Instandhaltung dieses Gerätes zu tun haben, müssen entsprechend qualifiziert sein und...
  • Seite 2: Sicherheitshinweise

    Vor Inbetriebnahme bitten wir Sie, alle Anweisungen sorgfältig zu studieren und zu befolgen. Nehmen Sie den Reloop Digital Jockey aus der Verpackung. Bitte überprüfen Sie vor der ersten Inbetriebnahme, ob kein offensichtlicher Transportschaden vorliegt. Sollten Sie Schäden am Stromkabel oder am Gehäuse entdecken, nehmen Sie das Gerät nicht in Betrieb und setzen Sie sich bitte mit Ihrem...
  • Seite 3: Bestimmungsgemäße Verwendung

    Stellen Sie keine Flüssigkeitsbehälter, die leicht umfallen können, auf dem Gerät oder in dessen Nähe ab. Falls doch einmal Flüssigkeit in das Geräteinnere gelangen sollte, sofort den Netzstecker ziehen. Lassen Sie das Gerät von einem qualifizierten Servicetechniker prüfen, bevor es erneut genutzt wird.
  • Seite 4: Wartung

    1. ERSTE SCHRITTE: 1.1. Hardware Anschluss Nehmen Sie den Reloop Digital Jockey aus der Verpackung und verbinden Sie das Netzteil mit der DC-Buchse auf der Rückseite des Gerätes. Schalten Sie das Gerät mittels der Power-Taste ein. Die Load A und Load B Tasten sollten aufleuchten.
  • Seite 5 a) Installations-Begrüßung Als erstes sehen Sie die Installations-Begrüßung. Drücken Sie auf „Weiter/Next“. b) Versionsauswahl Belassen Sie die Auswahl bei „Complete Version“ und bestätigen Sie mit „Weiter/Next“.
  • Seite 6 c) Kundeninformation Fügen Sie Ihre Daten, Name, Firma und die Seriennummer ein. HINWEIS! Ihre persönliche Seriennummer finden Sie auf der Rückseite der CD Hülle. Bestätigen Sie Ihre Eingaben mit „Weiter/Next“. d) Installationspfad Hier wird der Installationspfad angezeigt. Bei Bedarf können Sie diesen manuell ändern.
  • Seite 7 e) Installationsbestätigung Bestätigen Sie die Installation indem Sie auf „Install“ drücken. Nun wird die Installation ausgeführt, eventuell muss nach der Installation Ihr Computer neu gestartet werden. f) Installation abgeschlossen Schließen Sie die Installation mittels der „Finish“ Taste ab. HINWEIS! Falls Sie zu einem Neustart aufgefordert werden, so führen Sie diesen aus.
  • Seite 8 Drücken Sie auf das Reloop Digital Jockey Bild im Fenster „Availabe Type“. Danach drücken Sie auf „Digital Jockey“ im „MIDI Devices“ Fenster darüber. Als Bestätigung sollte oben der Satz „Digital Jockey set as Reloop Digital Jockey is enabled“ erscheinen. Nun ist Ihr Controller in der Software konfiguriert. HINWEIS! Diese Einstellungen müssen nur einmalig vorgenommen werden.
  • Seite 9 Anweisungen auf dem Bildschirm, um die Installation auszuführen. HINWEIS! Ihre Traktor 3 LE Version wurde optimal auf den Digital Jockey angepasst. Achten Sie darauf, dass Ihr Controller bei der Installation ausgewählt ist. Starten Sie Traktor 3 LE nach erfolgreicher Installation. Sofern der Digital Jockey bei der Installation ausgewählt wurde, sind nun alle Kontrollelemente...
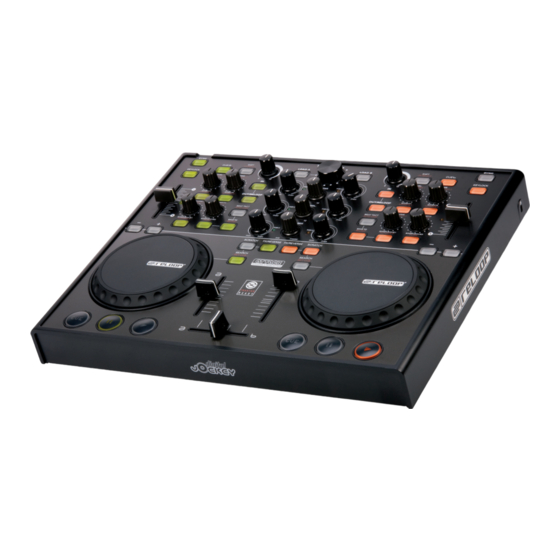
  • Seite 10: Übersicht Controller & Software

    ÜBERSICHT CONTROLLER & SOFTWARE HINWEIS! Elemente mit gleicher Funktion auf gegenüberliegenden Seiten sind nur einmal gekennzeichnet.
  • Seite 11 22 H / S: ..Cue/Monitor Funktion 23 H: ..Shift Funktion 24 H / S: ..Loop In/Out Reloop Funktion 25 H / S: ..Beat Tact Funktion 26 H / S: .
  • Seite 12: Bedienung

    3. BEDIENUNG Nachdem Sie die ersten Schritte befolgt haben und den Controller angeschlossen und die Software richtig konfiguriert haben, können Sie nun, wie folgend erklärt, Ihren Controller und Ihre Software bedienen: 3.1. Library Die Attack Library ist Ihre Datenbank für Ihre gesamte Musik. In der Library können Sie nach Musik suchen, browsen und Informationen, wie beispielsweise BPM-Werte oder Titellänge, einsehen.
  • Seite 13 3.1.4. iTunes Playlist -LIV- Hier werden automatisch Ihre iTunes Playlisten angezeigt. Auch diese können in zuvor beschriebener Weise editiert und angepasst werden. HINWEIS! Mit Hilfe der „Import iTunes Library File To Database“-Funktion -L VII- können Sie Ihre komplette iTunes Library mit einem Klick der Database hinzufügen (xml-Format).
  • Seite 14 HINWEIS! Durch Rechtsklick auf die Rubrikleiste der List View können Sie einzelne Rubriken ein- bzw. ausblenden lassen. 3.1.6. Waveform-Displays Ihnen stehen zwei detailierte Waveform-Displays zur Verfügung: a) Complete View -32 S-: Die Complete View zeigt den Wellenverlauf des kompletten Tracks an. So können Sie die Dynamik des Tracks, beispielsweise Intros oder Breaks eines Tracks, gut erkennen.
  • Seite 15 DIV: Auto Cue-Anzeige Zeigt an, ob die Auto Cue-Funktion aktiviert ist. Sie können Auto Cue in dem Voreinstellungesmenü -43 S- im Reiter „Audio Einstellungen“ (Audio System Settings) beim Punkt „Auto Cue aktivieren“ (Enable Auto Cue) (de-)aktivieren. DV: Auto BPM-Anzeige Zeigt an, ob die automatische BPM-Analyse (de-)aktiviert ist. DVI: Cue-Anzeige Diese Anzeige blinkt beim Setzen eines Cue-Punktes und leuchtet im Cue-Modus.
  • Seite 16 3.3. Transport Controls Unter dem Jog Wheel -18 H- finden Sie drei Tasten zum Abspielen, Cuen und Pausieren eines Tracks. Mittels der Play-Taste -6 H- können Sie den zuvor geladenen Track abspielen. Erneutes Drücken der Play-Taste -6 H- bewirkt, dass der Track Stutter-artig vom zuletzt gesetzten Cue-Punkt abgespielt wird (Bop-Funktion).
  • Seite 17 3.6. Geschwindigkeitskontrolle Um die Geschwindigkeit zu regulieren, steht Ihnen der Pitchfader -14 H / S- zur Verfügung. Wenn Sie den Fader nach oben schieben, verringert das die Geschwindigkeit. Schieben Sie den Fader nach unten, so nimmt die Geschwindigkeit zu. Der aktuell eingestellte Pitchwert wird im Info Display an Stelle -DXII- angezeigt.
  • Seite 18 Schaltfläche Auto BPM -35 S-. Im Display wird “A.BPM“ -DV- in rot angezeigt. 3.7. Jog Wheel-Sektion -18 H / S- Ihr Digital Jockey Controller besitzt extra große, hochauflösende Jog Wheels -18 H / S-, mit denen Sie verschiedene Aktionen durchführen können: a) Frame Search-Funktion Befindet sich der Player im Pause/Cue-Modus, so können Sie mit dm Jog Wheel...
  • Seite 19 Bitte entnehmen Sie weitere Einzelheiten dem nächsten Kapitel 3.8. Effekt- Sektion. 3.8. Effekt-Sektion Ihre Reloop Attack Software verfügt über 8 hochwertige Effekte. Pro Player können je zwei Effekte gemeinsam aktiviert werden. HINWEIS! Es können zwei verschiedene Effekte pro Player kombiniert werden.
  • Seite 20 Die Effekt-Parameter können im Effekt-Voreinstellungsmenü eingestellt werden. Das Effekt-Voreinstellungsmenü können Sie entweder mit der Schaltfläche -44 S- aufrufen oder mittels der Tastenkombination Shift -23 H- plus einmaliges Drücken eines der Effekt-Encoders -30 H-. Die Effekt-Voreinstellungen sind in Deck A und Deck B eingeteilt. Die oben aufgelisteten Effekt-Parameter können hier pro Effekt eingestellt werden.
  • Seite 21 Ihr Player in den nahtlosen Loop über. Verlassen Sie diesen durch Drücken der Loop-Out Taste -24 H / S-. HINWEIS! Durch Drücken der Loop-Out / Reloop-Taste -24 H- im normalen Wiedergabemodus springt der Player zum zuletzt gesetzten Loop zurück. Auto-Loop: Sofern der BPM-Wert zu einem Titel analysiert wurde, kann per Knopfdruck ein automatischer Beat-Loop gesetzt werden.
  • Seite 22 HINWEIS! Um den Beat-Takt vorher einzustellen, halten Sie Shift -23 H- gedrückt und drücken die Beat Tact-Taste -25 H-. 3.9.3. Sample-Funktion Sie haben auch die Möglichkeit einen erstellten Loop auf zwei Samplebänke abzuspeichern. Nachdem ein Loop erstellt wurde, drücken Sie die Save To-Taste -26 H / S- und wählen die Sample-Bank 1 oder 2 -27 H / S- aus.
  • Seite 23 PI: Enable Auto Cue Ist diese Funktion aktiviert, wird ein Cue-Punkt automatisch beim ersten Beat des Tracks gesetzt. PII: Save Data When Program Exits Ist diese Funktion aktiviert, so werden Ihre Daten (beispielsweise Cue-Punkte, Samples oder Fader- und Pitch-Werte) beim Beenden des Programms gespeichert.
  • Seite 24 Sie die Latenz mit dem Regler -PX- wieder höher setzen. PXI / PXII: 3rd Audio Device Reloop Attack unterstützt bis zu drei Soundkarten. Setzen Sie das Häkchen im Feld -PXI- um die dritte Audiokarte auszuwählen -PXII- und zu aktivieren.
  • Seite 25 • Keyboard Shortcuts P XX P XXI P XXII P XXIV P XXV P XXIII P XXVI In den Shortcut-Einstellungen können Sie nach Wunsch verschiedene Funktionen einer Taste Ihrer Tastatur zuweisen. Wählen Sie mit dem Auswahlmenü -PXX- das entsprechende Deck aus. Wählen Sie die zu belegende Funktion aus dem Auswahlmenü...
  • Seite 26: Systemanforderungen

    5. SYSTEMANFORDERUNGEN Minimale Systemanforderung: • Intel Pentium 4, 1 GHz Prozessor, Intel Centrino Mobile Technology 1,6 GHz oder höher • Intel Celeron Prozessor NICHT empfohlen • Microsoft Windows XP oder Vista • DirectX 9 oder höher • Windows Media Player 9 oder höher •...
  • Seite 27 TRAKTOR 3 LE MAPPING EQ with Kill Master Effect Select Phones Sync Gain Load A/B Master Track Phones Browser Cue/Monitor Loop Volume In/Out Keylock Only mapped in Traktor 3 Studio FX Parameter 3 Pitchfader FX Parameter 2 FX Amount FX TAP FX ON Pitchbend Auto Loop...
  • Seite 28: Safety Instructions

    Before operating this equipment we ask you to carefully study and observe all instructions. Please remove the Digital Jockey from its packaging. Check before initial operation to make sure that the device has not been visibly damaged during transport.
  • Seite 29: Application In Accordance With Regulations

    Do not operate the device under extremely hot (in excess of 35° C) or extremely cold (below 5° C) conditions. Keep the device away from direct exposure to the sun and heat sources such as radiators, ovens, etc. (even during transport in a closed vehicle). Never cover the cooling fan or vents. Always ensure sufficient ventilation.
  • Seite 30: Maintenance

    1. FIRST STEPS: 1.1. Hardware connections Take the Reloop Digital Jockey out of its packaging and connect the mains adapter to the DC jack on the backside of the device. Turn on the device via the power button. The Load A and Load B buttons should light up.
  • Seite 31 a) Installation address of welcome First you will see the address of welcome. Click „next“. b) Version selection Leave the „complete version“ as it is and confirm by clicking „next“.
  • Seite 32 c) Customer information Enter your data such as name, company and serial number. NOTE! Your personal serial number can be found on the backside of the CD cover. Confirm your entries by clicking „next“. d) Installation path The installation path is shown here. If required you can change it manually. Confirm the path by clicking „next“.
  • Seite 33 e) Installation confirmation Confirm the installation by clicking „install“. Now the installation will be carried out, possibly your computer has to be re- booted after installation. f) Installation completed Complete the installation by clicking „finish“. NOTE! If you are asked to reboot your computer please do so.
  • Seite 34 Please start the Reloop Attack software by clicking on the icon on your desktop or via the start programm menu in the Reloop Software folder. Go to „preferences“. The according button can be found on the upper right software window. Open the rider „devices“. The Reloop Digital Jockey should be visible there.
  • Seite 35 You will find an overview of the Digital Jockey assignment for Traktor 3 LE and Treaktor 3 Studio (can be upgraded) in the appendix.
  • Seite 36 OVERVIEW CONTROLLER AND SOFTWARE NOTE! Elements with the same function on the opposite side have only been marked once.
  • Seite 37 22 H / S: . . .Cue/Monitor function 23 H: ..Shift function 24 H / S: . . .Loop In/Out Reloop function 25 H / S: . . .Beat tact function 26 H / S: . . .Save to function 27 H / S: .
  • Seite 38: Operation

    3. OPERATION After having concluded the first steps, the controller being connected and the software being installed properly, you can now operate your controller and software as follows: 3.1. Library The Attack library is your data base for all of your music. You can search and browse the library for music and information such as BPM values or length of tracks.
  • Seite 39 3.1.4. iTunes Playlist -LIV- Your iTunes playlists will be displayed here automatically. They can also be adjusted as described above. NOTE! With one click you can add your complete iTunes library to the database via the “Import iTunes Library File To Database” function -LVII- (xml format). 3.1.5.
  • Seite 40 NOTE! Via right mouse click on the list view's category task-bar you can fade in and fade out particular categories. 3.1.6. Waveform Displays Two detailed waveform displays are at your disposal: a) Complete View -32 S-: The Complete View displays the waveform of a whole track. This way it is easy to recognise a track's dynamic like for example intros or breaks.
  • Seite 41 DIV: Auto Cue display Here you can see if the auto cue function is enabled. It is possible to (de-)activate the auto cue function in the pre-settings menue -43 S-, rider “Audio System Settings”, item “Enable Auto Cue”. DV: Auto BPM display Shows if the automatic BPM analysis is enabled.
  • Seite 42 3.3. Transport Controls Below the jog wheel -18 H- you can find three buttons for the play, cue or pause functions of a track. Via the play button -6 H- you can play the previously selected track. By repeatedly pushing the play button -6 H- again the track will be played in a stutter style from the last set cue point (bop function).
  • Seite 43 3.6. Speed control Use the pitch fader -14 H / S- in order to adjust the speed. If you push the fader upwards the speed will decrease. Push the fader downwards and the speed will increase. The currently set pitch value is shown in the info display -DXII-. The adjusted pitch is shown in the software on the left and right side respectively of the pitch fader.
  • Seite 44 S-. On the display -DV- “A.BPM” will be shown in red. 3.7. Jog wheel section -18 H / S- Your Digital Jockey controller disposes of two extra large, high resolution jog wheels -18 H / S- that can accomplish various function:...
  • Seite 45 Please refer to the next chapter 3.8. “Effect Section” for further details. 3.8. Effect section Your Reloop Attack software disposes of 8 high-quality effects. It is possible to enable two effects per player. NOTE! It is possible to combine two different effects per player.
  • Seite 46 The effect parameters can be adjusted in the effect preferences. The effect preferences can be opened by clicking -44 S- or via the hot key combination shift -23 H- plus pushing the effect encoder -30 H-. The effect preferences are divided into deck A and deck B.
  • Seite 47 Exit the loop by pushing the loop out button -24 H / S-. NOTE! By pushing the loop out/reloop button -24 H- during playback mode the player will return to the last set loop. Auto loop: If the BPM value of a track has been analyzed an automatic beat loop can be set at the push of a button.
  • Seite 48 NOTE! In order to adjust the bars beforehand hold the shift button -23 H- and push the beat tact button -25 H-. 3.9.3. Sample function You can also save a created loop to two sample banks. After having created a loop push the “Save To”...
  • Seite 49 PI: Enable auto cue If this function is enabled a cue point will be set automatically at the first beat of a track. PII: Save data when program exits If this function is enabled your data, such as cue points, samples or fader and pitch values, will be saved when exiting the software.
  • Seite 50 -PX-. PXI / PXII: 3rd audio device Reloop Attack supports up to three sound cards. Check mark field -PXI- in order to select and enable the third sound card -PXII-.
  • Seite 51 • Keyboard Shortcuts P XX P XXI P XXII P XXIV P XXV P XXIII P XXVI In the shortcut settings you can assign different functions to a key of your keyboard. Select the desired function from the preferences -PXXI-. The current assignment is shown in field -PXXII-.
  • Seite 52: System Requirements

    5. SYSTEM REQUIREMENTS Minimum system requirements: • Intel Pentium 4, 1 GHz processor, Intel Centrino Mobile Technology 1.6 GHz or above • Intel Celeron Processor NOT recommended • Microsoft Windows XP or Vista • DirectX 9 or above • Windows Media Player 9 or above •...
  • Seite 53 TRAKTOR 3 LE MAPPING EQ with Kill Master Effect Select Phones Sync Gain Load A/B Master Track Phones Browser Cue/Monitor Loop Volume In/Out Keylock Only mapped in Traktor 3 Studio FX Parameter 3 Pitchfader FX Parameter 2 FX Amount FX TAP FX ON Pitchbend Auto Loop...
  • Seite 54: Consignes De Sécurité

    Retirez la Reloop Digital Jockey de son emballage. Avant la première mise en service, vérifiez le bon état de l’appareil. Si le boîtier ou le câble sont endommagés, n’utilisez pas l’appareil et contactez votre revendeur.
  • Seite 55: Utilisation Conforme

    N’utilisez pas l’appareil dans un environnement extrêmement chaud (plus de 35°C) ou froid (sous 5° C). N’exposez pas l’appareil directement aux rayons solaires ou à des sources de chaleur telles que radiateurs, fours, etc. (également valable lors du transport). Veillez à ne pas obstruer les ventilateurs ou les fentes de ventilation.
  • Seite 56: Entretien

    1. PREMIERS PAS : 1.1 Branchement du matériel Retirer le Reloop Digital Jockey de son emballage et raccorder le bloc secteur avec la prise DC de la face arrière de l'appareil. Allumer l'appareil d'une pression sur la touche Power. Les touches Load A et Load B doivent s'allumer.
  • Seite 57 a) Accueil de l'installation Le premier dialogue affiche l'accueil de l'installation. Cliquer sur „Suivant/Next“. b) Sélection de la version Sélectionner „Complete Version“ et valider avec „Suivant/Next“.
  • Seite 58 c) Informations du client Entrez vos données, à savoir nom, société et numéro de série. NOTE Votre numéro de série personnel est écrit sur la face postérieure de la pochette du cédérom. Valider les entrées avec „Suivant/Next“. d) Chemin d'installation Affiche le chemin d'installation.
  • Seite 59 e) Confirmer l'installation Confirmer l'installation en cliquant sur „Install“. L'installation est alors exécutée et il faut ensuite éventuellement redémarrer l'ordinateur. f) Installation terminée Finaliser l'installation d'un clic sur le bouton „Finish“. NOTE! Si un message demande si vous désirez redémarrer le système, redémarrez l’ordinateur.
  • Seite 60 Lancer à présent le logiciel Reloop Attack en cliquant sur le symbole affiché sur le Bureau ou en sélectionnant le répertoire Reloop Software dans le menu Démarrer/Programmes. Sélectionner ensuite „Preferences“. Le bouton respectif est en haut à droite dans l'écran du logiciel. Ouvrir l'onglet „Devices“. Reloop Digital Jockey doit être affiché.
  • Seite 61 Après le démarrage de Traktor 3 LE Setup, procéder selon les instructions affichées sur l'écran pour effectuer l'installation. NOTE Votre version de Traktor 3 LE est parfaitement adaptée au Digital Jockey. Veiller à sélectionner votre contrôleur lors de l'installation. Une fois l'installation correctement terminée, lancer Traktor 3 LE. Si Digital Jockey a été...
  • Seite 62 VUE D’ENSEMBLE CONTRÔLEUR ET LOGICIEL NOTE! Les éléments possédant la même fonction sur le côté apposé ne sont signalés qu’une seule fois.
  • Seite 63 21 H / S:..Fonction FX-Reverse 22 H / S:..Fonction Cue/Monitor 23 H: .....Fonction Shift 24 H / S:..Fonction Loop In/Out Reloop 25 H / S:..Fonction Beat Tact 26 H / S:..Fonction Save To 27 H / S:..Bancs d'échantillonnage / Fonction Hot Cue 28 H / S:..Fonction Sample Encoder...
  • Seite 64 3. UTILISATION Après avoir achevé les premiers pas et la configuration correcte du contrôleur et du logiciel, vous pouvez maintenant les utiliser comme décrit ci-dessous. 3.1. Library Attack Library désigne votre base de données pour toute votre musique. La librairie permet de rechercher des pistes et de naviguer dans celles-ci, ainsi que de consulter des informations telles que les BPM ou la durée du titre.
  • Seite 65 3.1.4. iTunes Playlist -LIV- Affiche automatiquement vos listes de lecture iTunes. Ces listes peuvent également être éditées et adaptées comme décrit plus haut. NOTE La fonction „Import iTunes Library File To Database“ -L VII- permet d'ajouter votre librairie iTunes entière à la base de données (format xml) d'un seul clic.
  • Seite 66 NOTE Cliquer sur le bouton droit de la souris dans la barre d'infos de la List View pour afficher ou masquer différentes informations. 3.1.6. Waveform-Displays Vous disposez de deux oscillogrammes détaillés : a) Complete View -32 S-: Complete View affiche le tracé de l'onde de la piste entière. Vous pouvez clairement visualiser la dynamique de la piste, par exemple les intros ou les changements de rythme d'une piste.
  • Seite 67 DIV: Affichage Auto Cue Indique si la fonction Auto Cue est activée. Vous pouvez activer ou désactiver la fonction Auto Cue dans le menu des préréglages -43 S- de l'onglet „Préréglages audio“ (Audio System Settings), à l'option „Activer Auto Cue“ (Enable Auto Cue). DV: Affichage Auto BPM Indique si l'analyse automatique des BPM est activée ou non.
  • Seite 68 3.3. Transport Controls Sous la Jog Wheel -18 H-, trois touches servent à exécuter les fonctions lecture, Cue et pause d'une piste. La touche Play -6 H- sert à lire la piste chargée auparavant. Appuyer de nouveau sur Play -6 H- pour lire la piste hachée (Stutter) depuis le dernier point Cue défini (fonction Bop).
  • Seite 69 3.6. Contrôle de vitesse Le Pitchfader -14 H / S- sert à contrôler la vitesse. Déplacer le curseur vers le haut pour diminuer la vitesse. Déplacer le curseur vers le bas pour augmenter la vitesse. La valeur de BPM actuellement réglée est affichée dans l’écran Infos sous -DXII-.
  • Seite 70 S-. !A.BPM“ -D V- est affiché en rouge sur l'écran. 3.7. Section Jog Wheel -18 H / S- Votre Digital Jockey Controller est équipé d'une Jog Wheel haute résolution surdimensionnée -18 H / S-, permettant d'exécuter différentes fonctions. a) Fonction Frame Search : lorsque le lecteur est en mode Pause/Cue, la Jog Wheel permet de rechercher une séquence avec précision, par exemple pour définir un point Cue.
  • Seite 71 Vous trouverez d'autres détails au chapitre 3.8. Section Effets. 3.8. Section Effets Votre logiciel Reloop Attack dispose de plus de 8 superbes effets. Jusque deux effets peuvent être activés simultanément sur chaque lecteur. NOTE Il est uniquement possible de combiner deux effets différents par lecteur.
  • Seite 72 Les paramètres d'effet peuvent être réglés dans le menu de préréglage des effets. Pour accéder au menu de préréglage des effets, vous pouvez cliquer sur le bouton -44 S- ou utiliser le raccourci Shift -23 H- et une pression sur un des Encoders -30 H-.
  • Seite 73 Votre lecteur commute alors en mode de boucle sans fin. Cliquer sur la touche Loop-Out -24 H / S- pour quitter ce mode. NOTE Si vous appuyez sur la touche Loop-Out / Reloop -24 H- lors du mode de lecture normal, le lecteur retourne à la dernière boucle définie. Auto-Loop : Si la valeur BPM d'un titre a été...
  • Seite 74 NOTE Pour prérégler le Beat Tact, enfoncer la touche Shift -23 H- et cliquer sur Beat Tact -25 H-. 3.9.3. Fonction Sample Vous pouvez également enregistrer une boucle créée sur deux bancs d'échantillons. Après avoir défini la boucle, cliquer sur la touche Save To -26 H / S- et sélectionner le banc d'échantillon 1 ou 2 -27 H / S-.
  • Seite 75 PI: Enable Auto Cue Si cette fonction est activée, un point Cue est défini automatiquement au premier battement de la piste. PII: Save Data When Program Exits Si cette fonction est activée, vos données (par ex. points Cue, échantillons ou valeurs Fader et Pitch) sont enregistrées à...
  • Seite 76 -PX-. PXI / PXII: 3rd Audio Device Reloop Attack prend en charge jusque trois cartes son. Cocher la case du champ -P XI- pour sélectionner la troisième carte son et -P XII- pour l'activer.
  • Seite 77 • Keyboard Shortcuts P XX P XXI P XXII P XXIV P XXV P XXIII P XXVI Dans les réglages des raccourcis, vous pouvez affecter au choix différentes fonctions à une touche de votre clavier. Sélectionner la platine respective dans le menu de sélection -PXX-.
  • Seite 78: Matériel Requis

    5. MATÉRIEL REQUIS Configuration minimum : • Intel Pentium 4, processeur 1 GHz, Intel Centrino Mobile Technology 1,6 GHz ou supérieur • Les processeurs Intel Celeron NE SONT PAS recommandés • Microsoft Windows XP ou Vista • DirectX 9 ou supérieur •...
  • Seite 79 TRAKTOR 3 LE MAPPING EQ with Kill Master Effect Select Phones Sync Gain Load A/B Master Track Phones Browser Cue/Monitor Loop Volume In/Out Keylock Only mapped in Traktor 3 Studio FX Parameter 3 Pitchfader FX Parameter 2 FX Amount FX TAP FX ON Pitchbend Auto Loop...
  • Seite 80 Reloop Distribution © COPYRIGHT Nachdruck verboten! Global Distribution GmbH, Schuckertstr. 28, 48153 Münster/Germany Reproduction prohibited! Fax +49.251.6099368 Réproduction interdite !

Diese Anleitung auch für:

Digital jockey

Inhaltsverzeichnis