Herunterladen Inhalt Inhalt Diese Seite drucken

Werbung

Verfügbare Sprachen
  • DE

Verfügbare Sprachen

  • DEUTSCH, seite 30
Quick Start Owner's Manual
ENGLISH (3-11)
Manual de inicio rápido del usuario
ESPAÑOL (12-20)
Guide d'utilisation simplifié
FRANÇAIS (21-29)
Schnellbedienungsanleitung
DEUTSCH (30-38)
Manuale rapido di utilizzazione
ITALIANO (39-47)

Werbung

Inhaltsverzeichnis
loading

Inhaltszusammenfassung für Numark TTXUSB

  • Seite 1 Quick Start Owner’s Manual ENGLISH (3-11) Manual de inicio rápido del usuario ESPAÑOL (12-20) Guide d’utilisation simplifié FRANÇAIS (21-29) Schnellbedienungsanleitung DEUTSCH (30-38) Manuale rapido di utilizzazione ITALIANO (39-47)
  • Seite 3: Box Contents

    Quick Start Owner’s Manual BOX CONTENTS TTXUSB with Straight Tonearm Counter Weight Anti-Drag Aluminum Platter 10. Additional Counter Weight for Slipmat S-Shaped Tonearm Headshell 11. IEC Power Cable 2.5g Weight for Headshell 12. RCA Cord Target Light 13. USB Cord 45 RPM Adapter 14.
  • Seite 4 Connect only the supplied power cord and ensure that power setting switch is in the correct position for your region. If you would like to record audio directly to your computer, connect the included USB cord from the TTXUSB to your computer’s USB port. Note: Be sure not to pinch wiring under base.
  • Seite 5 This switch should be set to the proper level depending on the type of input the turntable is connected to. PHONO is used with traditional turntable inputs on older receivers or where PHONO is stated. LINE level allows the TTXUSB to directly connect to modern electronic inputs such as computers, home stereos, and mixers.
  • Seite 6 WARNING: DO NOT OVERTIGHTEN LOCK COLLAR (5) OR THE LOCK NUT (8)! CONNECTING ANYTHING OTHER THAN NUMARK ARMS TO THIS COLLAR MAY DAMAGE THE INTERNAL PIN HEIGHTS OF THE CONTACTS!
  • Seite 7: Operation Notes

    Tonearm Setup Install cartridge and raise the arm lift for cartridge/stylus protection. Notice how the counterweight can be moved. With the cueing system lift lever down, adjust the weight so entire tonearm assembly is freely balanced. Zero the scale on the weight by moving the black ring until “0” is aligned with the slot. The tonearm assembly should still be balanced as shown in Figure 2.
  • Seite 8: General Controls

    General Controls Power Button: Turns on the turntable when pressed. It illuminates blue when the turntable is switched on. Start/Stop Buttons: Start and stop the turntable motor. Both buttons have the same function. Platter: This turntable has a special edge design that has been optimized for "dragged" platter slow downs.
  • Seite 9: Display Controls

    2 seconds, the BPM counter will recalculate the BPM estimation. If the display is indicating a steady "---" this means that the TTXUSB is calculating the BPM range OR it is unable to distinguish an estimate. If the BPM estimation is a flashing "---" then this indicates that there is no audio being processed.
  • Seite 10 Interchanging the Pitch Fader and Button Cartridges Remove the Button Cartridge now by using The TTXUSB unique design allows the the SERVICE TOOL to pry out the cartridge configuration of the PITCH FADER and BUTTON from the turntable. Once removed, detach...
  • Seite 11 PERMANENT DAMAGE to the turntable and/or a VOIDED SOFTWARE The TTXUSB connects directly to your computer to turn your treasured vinyl recordings into digital music. We have included several software packages to aid you in converting your vinyl recordings. You should install one of the...
  • Seite 12: Contenido De La Caja

    Manual de inicio rápido del usuario CONTENIDO DE LA CAJA TTXUSB con brazo de lectura Brazo de lectura en forma de recto “S” Plato de aluminio anti-arrastre Contrapeso Alfombrilla 10. Contrapeso adicional para el Portacápsulas brazo de lectura en forma de Contrapeso de 2.5 g para...
  • Seite 13 Instrucciones de ensamblaje rápido POR FAVOR LEA LAS INSTRUCCIONES DEL FOLLETO DE SEGURIDAD ANTES DE UTILIZAR ESTE PRODUCTO Observe los pasadores de bloqueo que se muestran. ASEGÚRESE QUE EL GIRADISCOS NO ESTÉ ENCHUFADO. Haga concordar el motor interior con la Figura 2. Alinee los agujeros del plato cuidadosamente con la base, como se muestra aquí.
  • Seite 14 Se usa la entrada fonográfica PHONO con las entradas de giradiscos tradicionales en receptores más antiguos o donde se requiera PHONO. El nivel de línea LINE permite que el TTXUSB se conecte directamente a las entradas de equipos electrónicos modernos como computadoras, estéreos y mezcladores.
  • Seite 15 ADVERTENCIA: ¡NO SOBREAPRIETE EL ANILLO DE BLOQUEO (5) O TUERCA DE FIJACIÓN DEL BRAZO ! (8) ¡SI SE CONECTAN A ESTE ANILLO BRAZOS QUE NO SEAN DE NUMARK PODRÍAN DAÑARSE LAS ALTURAS DE LOS PASADORES INTERNOS DE LOS CONTACTOS!
  • Seite 16: Notas Sobre El Funcionamiento

    Instalación del brazo de lectura Instale la cápsula y levante el elevador del brazo para protección de la cápsula/púa. Note cómo se puede mover el contrapeso. Con la palanca elevadora del sistema de señalización, ajuste el peso para que todo el montaje del brazo de lectura esté...
  • Seite 17: Controles Generales

    Controles Generales Botón de encendido: Enciende el giradiscos cuando se presiona. Se ilumina de color azul cuando está encendido el giradiscos. Botones Start/Stop: Inician y paran el motor del giradiscos. Ambos botones tienen la misma función. Plato: Este giradiscos cuenta con un diseño de vanguardia especial que ha sido optimizado para desacelerar con “arrastre”.
  • Seite 18 2 segundos, el contador de BPM recalculará la aproximación de los BPM. Si el visualizador indica “---“ constante, significa que el TTXUSB está calculando el rango de los ritmos por minuto (BPM) O que no puede distinguir una aproximación. Si el cálculo de los BPM es un “---“...
  • Seite 19 Intercambio de las cápsulas de Pitch Fader y de botones clip de alambre de la parte inferior de la El diseño único del TTXUSB permite que las cápsula. configuraciones del PITCH FADER y los Retire la cápsula de botones usando la...
  • Seite 20 DAÑO PERMANENTE al giradiscos y/o en una GARANTÍA INVÁLIDA. SOFTWARE TTXUSB se conecta directamente a su computadora para convertir sus valiosos vinilos en música digital. Hemos incluido varios paquetes de software para ayudarle a convertir sus grabaciones de vinilo. Debe instalar una de las siguientes aplicaciones para aprovechar la función de grabación de su computadora:...
  • Seite 21: Contenu De La Boîte

    Guide d’utilisation simplifié CONTENU DE LA BOÎTE : TTXUSB équipé d’un bras de Bras de lecture en forme de S lecture droit Contrepoids Plateau antitraîné en 10. Contrepoids supplémentaire aluminium pour bras de lecture en forme Tapis de S Coquille 11.
  • Seite 22 Guide d’assemblage rapide VEUILLEZ LIRE LE LIVRET DES CONSIGNES DE SÉCURITÉ AVANT D'UTILISER LE PRODUIT. Veuillez porter une attention particulière aux tiges de verrouillage illustrées ci-dessus. VEUILLEZ VOUS ASSURER QUE LE TOURNE-DISQUE N’EST PAS BRANCHÉ À UNE PRISE ÉLECTRIQUE. Alignez le moteur interne tel qu'indiqué à la figure 2. Placez le plateau en alignant les trous à...
  • Seite 23 PHONO est indiqué sur l’appareil. L’option niveau ligne permet au TTXUSB de se brancher directement aux appareils modernes tels que les ordinateurs, les systèmes stéréo et les consoles de mixage.
  • Seite 24: Bras De Lecture

    MISE EN GARDE : NE PAS SERRER LA BAGUE DE VERROUILLAGE À FOND (5) OU LA BAGUE DE VERROUILLAGE DU BRAS DE LECTURE! (8) L’UTILISATION DE BRAS AUTRES QUE CEUX DE MARQUE NUMARK AVEC CETTE BAGUE POURRAIT ENDOMMAGER LA HAUTEUR DES TIGES INTERNES DES CONTACTS!
  • Seite 25 Réglage du bras de lecture Installez la cartouche et relevez le levier du bras afin de protéger la cartouche et la pointe de lecture. Voyez comment le contrepoids peut être déplacé. Avec le relève-bras abaissé, équilibrez le poids du bras de lecture. Réglez la tension à...
  • Seite 26: Commandes Principales

    Commandes principales Interrupteur d'alimentation : Permet de mettre le tourne-disque sous tension. Il s’illumine lorsque le tourne-disque est sous tension. Commutateurs Marche/Arrêt : Permet de démarrer et d’arrêter le moteur du tourne-disque. Les deux boutons ont la même fonction. Plateau : Ce tourne-disque est doté d'un détail de bordure qui est optimisé pour les ralentissements «...
  • Seite 27: Commandes D'affichage

    2 secondes, le compteur refait une estimation du BPM. Si l'écran affiche un « --- » de façon soutenue, cela indique que le TTXUSB recalcule la portée du BPM OU, il est incapable de faire une estimation. Si l'estimation du BPM est indiquée par un « --- », c’est qu’il n'y a aucun signal audio.
  • Seite 28 Changer l'atténuateur de la hauteur tonale et les boutons de réglage l'illustration). Une fois retirée, détachez la La conception unique du TTXUSB permet bague du filmage située sous la cartouche. d’échanger la position de l’atténuateur de la Utiliser l’OUTIL FOURNI pour retirer...
  • Seite 29: Remarques Importantes

    DOMMAGES PERMANENTS et/ou ANNULER LA GARANTIE. LOGICIEL Le TTXUSB se branche directement à un ordinateur afin de transférer vos précieux vinyles au numérique. Plusieurs logiciels sont inclus afin de vous aider à faire la conversion des enregistrements de vos disques de vinyle. Vous devez installer une des applications suivantes afin d’enregistrer sur ordinateur :...
  • Seite 30: Verpackungsinhalt

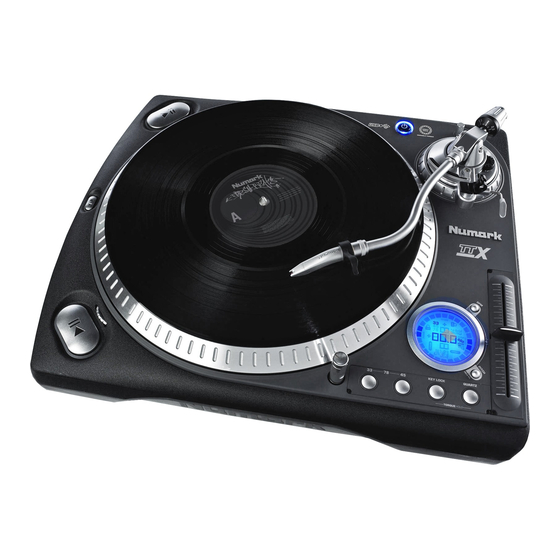
    Schnellbedienungsanleitung VERPACKUNGSINHALT TTXUSB mit geradem Tonarm S-förmiger Tonarm Anti-Drag Aluminum- Gegengewicht Plattenteller 10. Zusätzliches Gegengewicht für Slipmat S-förmigen Tonarm Headshell 11. Netzkabel 2,5g-Gewicht für Headshell 12. Kabel mit Cinchstecker Ziellampe 13. USB Kabel 45 RPM-Adapter 14. Werkzeug...
  • Seite 31 Stromspannungsschalter auf die für Ihren Betriebsort korrekte Stromspannung eingestellt ist. Benutzen Sie das mitgelieferte USB Kabel um den Plattenspieler mit ihrem Computer zu verbinden. Der TTXUSB ist kompatibel zu USB 1 und USB 2 Anschlüssen. Hinweis: Stellen Sie sicher, dass keine Kabel unter dem Gerät eingeklemmt werden.
  • Seite 32: Bedienelemente Unterseite

    Benutzen Sie das mitgelieferte USB Kabel um den Plattenspieler mit ihrem Computer zu verbinden. Der TTXUSB ist kompatibel zu USB 1 und USB 2 Anschlüssen. Weitere Hinweise zu den System Einstellung der Software entnehmen Sie bitte der Anleitung zur Software Installation.
  • Seite 33: Zusammenbau Des Tonarms

    Wird der Heber gesenkt, wird der Tonarm langsam auf die Platte abgesenkt, bis die Tonabnehmernadel auf die Platte trifft. WARNUNG: SCHLIEßMANSCHETTE BEIM FESTSTELLEN NICHT ÜBERDREHEN! (5 & 8) BEI ANSCHLUSS VON ANDEREN TONARMEN ALS DER MARKE NUMARK KÖNNEN DIE LÄNGEN DER INTERNEN ANSCHLUSSSTIFTE BESCHÄDIGT WERDEN!
  • Seite 34: Aufbau Des Tonarms

    Aufbau des Tonarms Setzen Sie das Einsteckmodul ein und heben Sie den Arm mit dem dafür vorgesehenen Hebel zum Schutz des Einsteckmoduls/der Tonabnehmernadel an. Machen Sie sich mit der Art und Weise, auf die das Gegengewicht bewegt werden kann, vertraut. Mit abgesenktem Cueing-Systemhebel stellen Sie das Gewicht so ein, dass der gesamte Tonarm frei schwebt.
  • Seite 35: Allgemeine Bedienelemente

    Allgemeine Bedienelemente Ein/Aus-Taste: Schaltet bei Herunterdrücken den Plattenspieler ein und ist bei eingeschaltetem Plattenspieler blau beleuchtet. Start/Stop-Tasten: Start und Stop des Plattenspielermotors. Beide Tasten haben dieselbe Funktion. Plattenteller: Der Rand dieses Plattentellers besitzt ein spezielles Design, welches für eine "schleppende" Verlangsamung des Plattentellers optimiert wurde. Wird die Ziellampe verwendet, scheint das Muster bei einer Tonhöhe von 0% still zu stehen.
  • Seite 36: Bedienelemente Anzeige

    Bedienelemente Anzeige Die Bedienelemente der Anzeige des TTXUSB wurden entwickelt, um jederzeit genaue Auskunft über den Betriebsmodus des Geräts zu geben, unabhängig von dessen Ausrichtung. Ein Verständnis der Funktionen resultiert in besserer Bedienung. Richtungssensoren für Plattenteller: Unabhängig davon, ob sich der Plattenteller dreht oder anhält, zeigen diese Segmente die Drehrichtung an.
  • Seite 37: Positionswechsel Des Tonhöhen-Faders Und Der Tastensteuerung

    Positionswechsel des Tonhöhen-Faders und der Tastensteuerung Das einmalige Design des TTXUSB ermöglicht es heraus, stecken Sie den Kabelstecker an der dem Benutzer, die Position des TONHÖHEN-FADERS Unterseite des Gehäuses aus. und der TASTENSTEUERUNG je nach Ausrichtung des Entfernen Sie nun das Tastengehäuse durch Plattenspielers gegeneinander auszuwechseln.
  • Seite 38: Weitere Wichtige Hinweise

    Um die Softwareprogramme zu installieren, legen Sie einfach die mitgelieferte CD in das Laufwerk Ihres Computers ein und folgen den Bildschirmanweisungen. Nachdem Sie Ihre Schallplatten digitalisiert haben, können Sie aus den Titeln eine CD brennen oder die Songs auf einen portablen MP3-Player laden. Spezifikationen des TTXUSB Plattenspieler: Tonarm: Motor: Direct Drive –...
  • Seite 39: Contenuti Della Confezione

    Manuale rapido di utilizzazione CONTENUTI DELLA CONFEZIONE TTXUSB con braccio dritto Braccio a S Piatto in alluminio Anti- Contrappeso trascinamento 10. Contrappeso aggiuntivo per il Base braccio a S Fonorivelatore 11. Cavo di alimentazione IEC Peso da 2.5g per il 12.
  • Seite 40 Istruzioni rapide di montaggio LEGGERE ATTENTAMENTE IL LIBRETTO DELLE ISTRUZIONI DI SICUREZZA PRIMA DI SERVIRSI DI QUESTO PRODOTTO Notare i perni di bloccaggio illustrati. ASSICURARSI CHE IL GIRADISCHI NON SIA COLLEGATO. Abbinare il motore interno alla Figura 2. Posizionare il piatto badando di allineare i fori alla base come illustrato Collegamenti Rovesciare il giradischi come illustrato.
  • Seite 41 PHONO viene utilizzato con ingressi tradizionali da giradischi su ricevitori più vecchi o laddove è indicato PHONO. Il livello di LINEA (line) permette al TTXUSB di collegarsi direttamente a ingressi elettronici moderni quali computer, home stereo e mixer.
  • Seite 42 AVVERTENZA: NON SERRARE ECCESSIVAMENTE IL DADO DI BLOCCAGGIO! (5 & 8) IL COLLEGAMENTO DI UN BRACCIO CHE NON SIA NUMARK A QUESTO DADO PUÒ DANNEGGIARE L’ALTEZZA DEI PERNI INTERNI DEI CONTATTI!
  • Seite 43 Impostazione del braccio Installare la cartuccia e sollevare l’alzabraccio per proteggere la cartuccia/puntina. Notare come può essere mosso il contrappeso. Con la leva di sollevamento del sistema di cueing, regolare il peso in modo tale che l’intero gruppo del braccio sia equilibrato liberamente. Azzerare la scala sul peso spostando l’anello nero fino ad allineare “0”...
  • Seite 44: Comandi Generali

    Comandi Generali Tasto di alimentazione: accende il giradischi. Quando il giradischi è acceso, si illumina di blu. Tasti Start/Stop: avvia e ferma il motore del giradischi. Entrambi i tasti hanno la stessa funzione. Piatto: questo giradischi è dotato di uno speciale design dei bordi ottimizzato per i rallentamenti del piatto "trascinato".
  • Seite 45 2 secondi, il contatore di BPM rifarà la stima dei BPM. Se il display indica "---" significa che TTXUSB calcola la gamma del BPM OPPURE è incapace a distinguere una stima. Se la stima del BPM è "---" lampeggiante, ciò indica che non vi è audio in corso.
  • Seite 46 Sostituire il fader del pitch e le cartucce dei tasti rimossa, staccare la clip di cablaggio dalla Il design unico del TTXUSB consente la parte inferiore della cartuccia. sostituzione della configurazione del FADER del Rimuovere la cartuccia del tasto servendosi PITCH e dei COMANDI DEI TASTI in base dell’ATTREZZO per estrarla dal giradischi.
  • Seite 47 DANNI PERMANENTI al giradischi e/o una NULLITÀ della GARANZIA. SOFTWARE L’TTXUSB si collega direttamente al computer per trasformare i vostri preziosi dischi in vinile in musica digitale. Per aiutarvi nella conversione dei dischi in vinile, abbiamo incluso diversi pacchetti software. Sarà necessario installare una delle seguenti applicazioni per sfruttare la registrazione su computer: EZ Vinyl/Tape Converter* (unicamente per PC) è...
  • Seite 48: Manual Version

    MANUAL VERSION 2.3...

Inhaltsverzeichnis