RICOO FS304 Montageanleitung
Inhaltsverzeichnis
Verfügbare Sprachen
Verfügbare Sprachen
Quicklinks
Bitte überprüfen Sie VOR der Montage den Lochabstand zwischen den VESA-Befestigungs-
!
löchern an Ihrem Bildschirm!
Diese Wandhalterung unterstützt folgende Lochabstände:
Horizontal / Waagerecht
Vertikal / Senkrecht
FS304
alle Farbvarianten
TV STAND
VESA-Befestigungslöcher
Vertikal /
Senkrecht
Horizontal / Waagerecht
100x100
400x100
400x200
200x100
400x300
200x200
400x400
300x200
300x300
1
MONTAGEANLEITUNG
ACHTUNG: NIEMALS DAS MAXIMAL
ZULÄSSIGE BELASTUNGSGEWICHT
ÜBERSCHREITEN. MISSACHTUNG
KANN ZU SACHSCHÄDEN ODER
SCHWEREN VERLETZUNGEN FÜHREN!
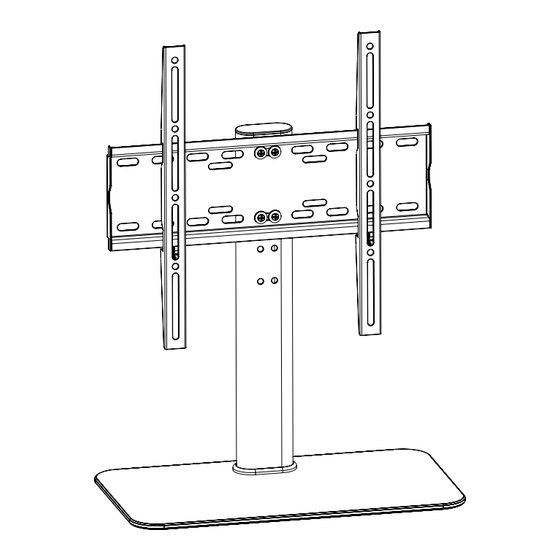
Bildschirm Rückseite
min. 30mm - max. 425mm
min. 75mm - max. 400mm
40kg
(88lbs)
MAX
v.17.09
Deutsch
English
Kapitel
Inhaltsverzeichnis

Verwandte Anleitungen für RICOO FS304


Inhaltszusammenfassung für RICOO FS304
- Seite 1 VESA-Befestigungslöcher Vertikal / Senkrecht Horizontal / Waagerecht Bildschirm Rückseite Diese Wandhalterung unterstützt folgende Lochabstände: Horizontal / Waagerecht min. 30mm - max. 425mm Vertikal / Senkrecht min. 75mm - max. 400mm FS304 40kg 100x100 400x100 400x200 200x100 (88lbs) 400x300 200x200 400x400...
- Seite 2 ACHTUNG: Lesen Sie die gesamte Bedienungsanleitung durch, bevor Sie mit der Montage beginnen. WARNUNG • Bitte beachten: Bilder in dieser Montageanleitung stellen nur technische Darstellung des Produktes dar. Tatsächliches Produktdesign kann minimal abweichen. • Beginnen Sie nicht mit der Montage, bis Sie alle Anweisungen und Warnungen, welche in dieser Montageanleitung vorhanden sind, durchgelesen und verstanden haben.
-
Seite 3: Inhaltsverzeichnis
Lieferumfang WICHTIG: Stellen Sie vor der Montage sicher, dass alle Teile welche hier aufgeführt sind, bei der Lieferung dabei sind. Sollten Teile fehlen oder defekt sein, kontaktieren Sie Ihren Händler. A1 (x4) A2 (x10) A3 (x10) A4 (x2) A5 (x4) A6 (x4) A7 (x1) A8 (x1) -
Seite 4: A1 (X4)
Liebe Kundin, lieber Kunde, FS304 wir freuen uns, dass Sie sich für ein Produkt der Marke "RICOO" entschieden haben Manchmal trotz aller Bemühungen unsererseits Ihnen ein qualitativ hochwertiges Produkt zu liefern, kann es vorkommen, dass einmal ein Zubehörteil fehlt oder ein Teil während des Transports beschädigt wird... -
Seite 5: A4 (X2)
Schritt 2 A2 (x2) A4 (x2) A3 (x2) Schritt 3 A3 (x4) A6 (x4) A2 (x4) A2 (x4) A3 (x4) A5 (x4) Deutsch English... - Seite 6 Schritt 4 Schritt 5 ODER ODER ODER Deutsch English...
- Seite 7 Schritt 6 Bildschirm Deutsch English...
-
Seite 8: B4 (X2)
Schritt 7 B4 (x2) Schritt 8 A11 (x4) A9 (x2) Fertig Wartung • Prüfen Sie in regelmäßigen Abständen (mindestens alle drei Monate), ob alle Schrauben an dem Produkt fest angezogen sind. • Bei Fragen kontaktieren Sie Ihren Händler. Deutsch English... -
Seite 13: A4 (X2)
Step 2 A2 (x2) A4 (x2) A3 (x2) Step 3 A3 (x4) A6 (x4) A2 (x4) A2 (x4) A3 (x4) A5 (x4) English Deutsch... - Seite 14 Step 4 Step 5 English Deutsch...
- Seite 15 Step 6 Display English Deutsch...