Denon DN-X800 Bedienungsanleitung
Inhaltsverzeichnis
Verfügbare Sprachen
Verfügbare Sprachen
Quicklinks
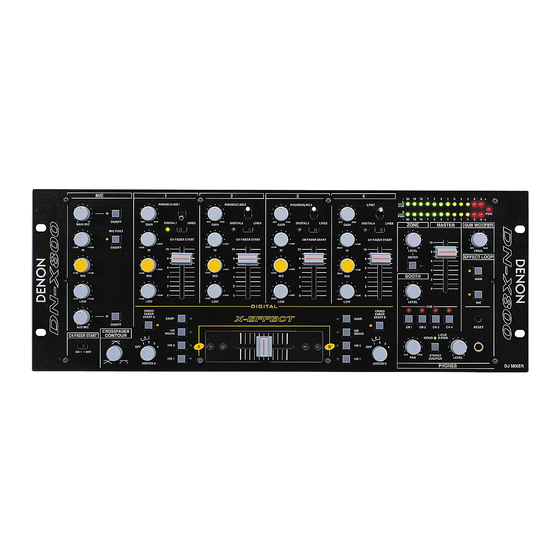
DJ MIXER
DN-X800
OPERATING INSTRUCTIONS
BEDIENUNGSANLEITUNG
MIC
1
PH1/LN1
0
10
ON/OFF
MIN
MAX
DIGITAL1
MAIN MIC
GAIN
MIC POST
-26dB
+10dB
ON/OFF
-26dB
+10dB
HI
HI
10
8
6
-26dB
+10dB
-26dB
+10dB
MID
MID
4
2
0
-26dB
+10dB
-26dB
+10dB
LOW
LOW
CROSS
FADER
START A
SAMP.
0
10
ON/OFF
AUX MIC
CROSSFADER
BRAKE
CH FADER START
CONTOUR
X
2
1
3
OFF
4
ON
OFF
ASSIGN A
2
3
4
PH2/LN3
PH3/LN5
LINE7
MIN
MAX
MIN
MAX
MIN
MAX
LINE2
DIGITAL2
LINE4
DIGITAL3
LINE6
DIGITAL4
GAIN
GAIN
GAIN
CH FADER START
CH FADER START
CH FADER START
CH FADER START
-26dB
+10dB
-26dB
+10dB
-26dB
+10dB
HI
10
HI
10
HI
10
8
8
8
6
6
6
-26dB
+10dB
-26dB
+10dB
-26dB
+10dB
MID
MID
MID
4
4
4
2
2
2
0
0
0
-26dB
+10dB
-26dB
+10dB
-26dB
+10dB
LOW
LOW
LOW
DIGITAL
SAMP.
H/S
H/S
BRAKE
H/S 2
A
B
H/S 2
OFF
H/S 1
H/S 1
-
20
15
10
7
5
3
1
0
1
3
5
8
+
L
CUE
R
PWR
PGM
-
20
15
10
7
5
3
1
0
1
3
5
8
+
LINE8
ZONE
MASTER
SUB WOOFER
10
0
10
MIN
MAX
LEVEL
FREQ.
8
EFFECT LOOP
METER
6
4
BOOTH
2
MAIN
0
0
10
LEVEL
MIC
CUE
CROSS
FADER
START B
CH 1
CH 2
CH 3
CH 4
RESET
L-CUE
X
MONO
R-PGM
2
1
3
4
CUE
PGM
0
10
STEREO
PAN
LEVEL
CUE/PGM
ASSIGN B
PHONES
DJ MIXER
FOR ENGLISH READERS
PAGE
14 ~ PAGE
FÜR DEUTSCHE LESER
SEITE
10 ~ SEITE
19
15
Kapitel
Inhaltsverzeichnis

Verwandte Anleitungen für Denon DN-X800


Inhaltszusammenfassung für Denon DN-X800
-
Seite 1: Operating Instructions
DJ MIXER DN-X800 OPERATING INSTRUCTIONS BEDIENUNGSANLEITUNG PH1/LN1 PH2/LN3 PH3/LN5 LINE7 ON/OFF DIGITAL1 LINE2 DIGITAL2 LINE4 DIGITAL3 LINE6 DIGITAL4 LINE8 ZONE MASTER SUB WOOFER MAIN MIC GAIN GAIN GAIN GAIN MIC POST CH FADER START CH FADER START CH FADER START... -
Seite 10: Hauptmerkmale
In der Mittelposition ist der Sound flach. Tief (LOW) EFFEKTSCHLEIFEN-Taste (HAUPT) Wenn der DN-X800 in ein Behältnis oder das DJ-Pult eingebaut • Stellt die Tiefen des Sounds ein –26 dB bis +10 dB. (EFFECT LOOP MAIN) wird, empfehlen wir, über dem Mixer möglichst einen freien... - Seite 11 Betriebsanzeige (POWER) 1 bis 4 X-EFFEKT-Buchse (X-EFFECTS) ZUSATZ-MIKRO-Eingangsbuchse • Wenn die rote Anzeige leuchtet, ist der DN-X800 Wählt aus, welche Kanäle (CH-1 bis CH-4) A und B • Verbinden Sie diese Buchse mit der Fernbedienung (AUX MIC) betriebsbereit. zuzuordnen sind.
-
Seite 12: Aerbindungen
Sie Ihre Verstärker, dann den Mixer und 1. Stellen Sie sicher, dass die Stromversorgung ausgeschaltet benutzen. Schließen Sie Ihre Mikrofone und die Monitor- Schließen Sie den DN-X800 an der Netzsteckdose an. zuletzt die Eingangseinheiten abschalten. ist, während die Verbindungen vorgenommen werden. -
Seite 13: Fader-Start
Stellen Sie sicher, dass die CH3-Faderbuchse CH4-Faderbuchse CH FADER START angeschlossenen ist. Eingangsfader (Ch.-Fader) der CH-3- oder CH-4-Regelung ganz DN-X800 Schieben Sie den Crossfader vollständig in die nach unten geschoben sind. entgegengesetzte Richtung der Quelle, die Sie PH1/LN1 PH2/LN3 PH3/LN5 LINE7 starten wollen. -
Seite 14: X-Effekte (X-Effect)
Sampler (DN-2600F), Hot-Start Unterbrechung Platte (DN-2100F und DN-2600F), Hot-Start (DN-2100F und DN-2600F) H/S 2 H/S 2 H/S 1 H/S 1 CH-1- CH-2- X-Effekt-Buchse ASSIGN A ASSIGN B Leuchtet Eingangsbuchse Eingangsbuchse DN-X800 PH1/LN1 PH2/LN3 PH3/LN5 LINE7 CROSS Leuchtet CROSS FADER FADER ON/OFF DIGITAL1 LINE2... -
Seite 15: Ausbau Des Crossfader
DEUTSCH AUSBAU DES CROSSFADER TECHNISCHE DAREN Der Ausbau des Crossfaders kann ohne die Demontage des DN-X800 selbst erfolgen; dies kann ohne Unterbrechung des ALLGEMEIN Audiosignals durchgeführt werden. Abmessungen: 482 (B) x 105 (H) x 177 (T) mm (ohne Füße) Installation: 4 HE für 19-Zoll-Gestell-Installation... - Seite 16 14-14, AKASAKA 4-CHOME, MINATOKU, TOKYO 107-8011, JAPAN Telephone: (03) 3584-8111 Printed in Japan 511 3769 000...