Werbung
Quicklinks
TENT PACK SACK CONTENTS
• 1 groundsheet tarp with sun canopy
• 3 fi breglass poles (1 long, 2 short)
• 2 guylines
• 4 aluminium pegs (e.g. for grass and rocky areas)
• 6 plastic pegs for sand, 6 removable sandbags
• Repair materials in a peg bag
At JACK WOLFSKIN we are continually improving and upgrading our
products. We, therefore, reserve the right to make changes to indi-
vidual components. Diagrams used for the pitching instructions may
differ slightly from the actual product.
ZELTPACKSACKINHALT
• 1 Bodenplane mit Sonnensegel
• 3 Fiberglasstangen (1 lange, 2 kurze)
• 2 Abspannleinen
• 4 Aluminiumheringe (z. B. für Wiese und steinigen Untergrund)
• 6 Plastikheringe für Sand, 6 abnehmbare Sandtaschen
• Reparaturmaterialien im Heringspackbeutel
JACK WOLFSKIN entwickelt seine Produkte ständig weiter. Wir be-
halten uns vor, einzelne Komponenten zu verändern. Abbildungen
der Aufbauanleitung können vom aktuellen Produkt abweichen.
1
A
PITCHING
We recommend doing a trial run with your new tent, in order to
familiarise yourself with all the pitching instructions before embark-
ing on your fi rst trip. Firstly, choose a suitable location for your tent,
removing all sharp objects which might damage the groundsheet.
1 Spread out the groundsheet tarp with the light side facing up.
Choose the best way to fi x down the groundsheet tarp depending
on the type of ground surface. The aluminium pegs (A) are best for
stony and grassy areas. Fix the aluminium pegs to the four corners
where no poles are attached. The plastic sand pegs are suitable for
sandy surfaces and can be used upright (B) or skewed like an an-
chor (C), so that they offer better support in the sand. You can also
fi ll the accompanying round bags with sand or gravel and attach
these to the corners of the tarp (D).
2 Carefully connect all sections of the poles, ensuring they lock
together fi rmly.
3 Lead the long pole (E) carefully through the small pole sleeve inside
the outer tarp.
4 Tension the pole by inserting the pointed ends of the pole into
the respective eyelets of the groundsheet sun canopy. Wrap the
Velcro fastenings around the pole and put the sun canopy into the
correct shape.
5 Place both of the short poles (F) into the pockets at the corners, so
that the short poles form a right angle to the long one. Wrap all
Velcro fastenings around the two small poles here too.
6 Where each of the two short poles cross with the long one, use
the Velcro to cross over and fi x the two poles together. Do not use
force if you experience resistance as you are inserting or tensioning
the poles, identify and remedy the problem.
CONTENU DU SAC DE TENTE
• 1 bâche de sol avec vélum
• 3 arceaux en fi bre de verre (1 long, 2 courts)
• 2 haubans
• 4 sardines en aluminium (par ex. pour l'herbe et les
sols caillouteux)
• 6 sardines en plastique pour le sable, 6 poches à sable amovibles
• matériel de réparation dans le sac à sardines
JACK WOLFSKIN développe et améliore ses produits en permanence.
Nous nous réservons le droit de modifi er certains composants. Les illus-
trations de la notice de montage peuvent différer du produit actuel.
B
C
D
E
F
AUFBAU
Du solltest dein neues Zelt erst einmal probeweise auf-
|
bauen und dich vor Antritt der ersten Reise mit allen Aufbauschritten
vertraut machen. Wähle zunächst einen geeigneten Standort für
dein Zelt aus und entferne dort alle spitzen Gegenstände, die den
Zeltboden beschädigen könnten.
1 Breite die Bodenplane mit der hellen Seite oben liegend aus. Je
nach Untergrund wählst du die beste Möglichkeit, die Bodenplane
zu fi xieren. Die Aluminiumheringe (A) halten am besten in steinigem
und in Wiesenboden. Fixiere die Aluheringe an den vier Ecken, in
denen kein Gestänge befestigt ist. Die Sandheringe aus Plastik eignen
sich besonders für sandigen Boden, du kannst sie hochkant (B) oder
quer wie einen Anker (C) für besseren Halt in den Sand graben. Zu-
sätzlich befüllst du die beiliegenden runden Taschen mit Sand oder
Kies und befestigst diese an den Ecken der Plane (D).
2 Füge die Segmente der einzelnen Stangen sorgfältig zusammen,
sodass diese fest ineinandersitzen.
3 Führe die lange Stange (E) vorsichtig durch den kleinen Stangen-
kanal auf der Innenseite der Außenplane.
4 Die Stange setzt du unter Spannung, indem du die spitzen Stangen-
enden jeweils in die Ösen der Bodenplane steckst. Wickle die Klett-
verschlüsse um die Stange herum und bring das Segel so in die
richtige Form.
5 Stecke die beiden kurzen Stangen (F) in die Taschen an den Ecken,
so dass die kurzen Stangen einen rechten Winkel zur Langen bilden.
Wickle auch hier alle Klettverbindungen um die beiden kleinen
Stangen.
6 An den Punkten, an denen sich die zwei kurzen Stangen jeweils
mit der Langen kreuzen, fi xierst du das Stangenkreuz mittels der
Klettverbindung. Wende keine Gewalt an. Wenn ein Widerstand
zu spüren ist, während du die Stangen in den Kanal einführst oder
spannst, mach das Problem ausfi ndig und behebe es.
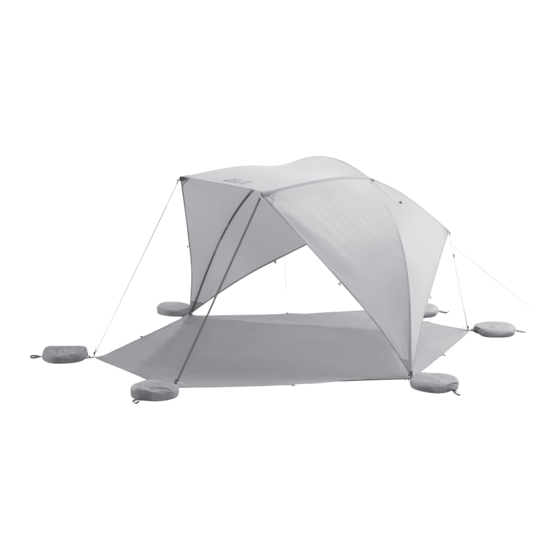
VARIO BEACH SHELTER
VARIO BEACH SHELTER provides
protection against the sun for 2 people.
Perfect for the beach, park, outdoor
swimming pool – anywhere!
Das VARIO BEACH SHELTER ist ein Sonnenschutz
für 2 Personen. Perfekt für den Strand, den Park,
das Freibad – einfach überall!
La VARIO BEACH SHELTER constitue une protection
contre le soleil pour 2 personnes. Parfaite pour la
plage, le parc, la piscine en plein air –
tout simplement partout !
Avant d'entamer votre voyage, il est conseillé tout
MONTAGE |
d'abord de procéder au montage de votre nouvelle tente, afi n de
vous familiariser avec les différentes étapes de montage. Choisissez
d'abord un emplacement adapté pour votre tente et enlevez tous les
objets pointus qui pourraient endommager le sol de la tente.
1 Disposez la bâche de sol à plat avec le côté clair vers le haut. Selon
le type de surface, choisissez la possibilité de fi xation la plus adap-
tée pour la bâche de sol. Les sardines en aluminium (A) conviennent
mieux pour les sols caillouteux et l'herbe. Fixez les sardines en alu-
minium dans les quatre coins, où il n'y a pas d'arceau. Les sardines
en plastique sont particulièrement adaptées aux sols sablonneux.
Vous pouvez les fi xer de manière verticale (B) ou pour une meilleure
fi xation les enterrer dans le sable comme une ancre (C). En plus,
remplissez les poches à lest rondes fournies de sable ou de cailloux
et attachez-les ensuite aux coins de la bâche (D).
2 Assemblez soigneusement tous les segments des différents arceaux,
de manière à ce qu'ils soient bien imbriqués les uns dans les autres.
3 Glissez à présent l'arceau long (E) avec précaution dans le petit
fourreau sur le côté intérieur de la toile.
4 Mettez l'arceau sous tension en veillant à placer les extrémités
pointues des arceaux dans les œillets correspondants de la bâche
de sol. Enroulez les bandes velcro autour des arceaux et mettez
ainsi le vélum en forme.
5 Insérez les deux arceaux courts (F) dans les poches dans les coins,
de manière à ce qu'ils forment un angle droit avec le grand arceau.
Fermez également les velcros autour des deux petits arceaux.
6 Aux intersections respectives entre les deux arceaux courts et l'arceau
long, fi xez les arceaux croisés à l'aide du velcro. Ne forcez pas. En
cas de résistance pendant que vous insérez ou tendez les arceaux,
ne forcez pas, cherchez l'origine du problème pour y remédier.
E
3
4
6
5
E
Werbung

Verwandte Anleitungen für Jack Wolfskin VARIO BEACH SHELTER


Inhaltszusammenfassung für Jack Wolfskin VARIO BEACH SHELTER
- Seite 1 • 6 sardines en plastique pour le sable, 6 poches à sable amovibles At JACK WOLFSKIN we are continually improving and upgrading our • matériel de réparation dans le sac à sardines products. We, therefore, reserve the right to make changes to indi- La VARIO BEACH SHELTER constitue une protection vidual components.
- Seite 2 Ainsi, la VARIO that the VARIO BEACH SHELTER will keep you in the shade for the BEACH SHELTER vous garantit de l‘ombre durant toute la journée, entire day without the need to alter the position.