Velleman VTLAN4 Bedienungsanleitung
VTLAN4 – LAN TESTER FOR RJ45, RJ12, RJ11
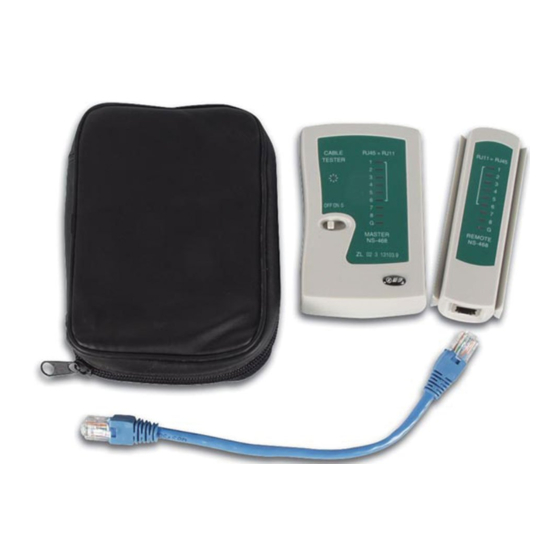
1. Introduction & Features
Thank you for buying the VTLAN4! Please read the manual thoroughly before bringing this device into service.
If the device was damaged in transit, don't install or use it and contact your dealer. The VTLAN4 can check RJ11, RJ12
and RJ45 cables on the 1, 2, 3, 4, 5, 6, 7, 8 and G lines for wrong connections, short circuits and open lines.
2. Operation
Switch the power on and put the cable ends into both the main tester
and the remote tester. The lights of the main tester will light up
sequentially from 1 to G. The on/off switch can also be set to 'S',
which stands for 'slow', to execute the sequence in a slower tempo.
Main Tester:
1-2-3-4-5-6-7-8-G
Remote Tester: 1-2-3-4-5-6-7-8-G (RJ45)
1-2-3-4-5-6--------- (RJ12)
1-2-3-4-------------- (RJ11)
3. Error Reading
1. If one line, e.g. 3, is open, the no.3 lights of the main tester and remote tester will not light up.
2. If several lines are not connected, several lights will be out. If less than two lines are connected, all lights are out.
3. If two ends of a line are mixed up, for example 2 and 4, then the following sequences are displayed:
Main Tester:
Remote Tester: 1-4-3-2-5-6-7-8-G
4. If two lines are short circuited, neither of the corresponding lights on the remote tester will light up, while the
sequence of the main tester remains unchanged. If three lines are mixed up, none of the lights will light up.
4. Beware
• This cable tester cannot test an electrified product.
• The VTLAN4 requires a 9V battery. Change it when the lights on the device become weaker.
• Insert the connectors completely into the device. Use only professionally pressed connectors.
5. Technical Specifications
Power supply
9Vdc battery
Current consumption
25mA
The information in this manual is subject to change without prior notice.
Dispose of this product in accordance with Local and National Disposal Regulations.
VTLAN4 – LAN TESTER VOOR RJ45, RJ12, RJ11
1. Inleiding en kenmerken
Dank u voor uw aankoop! Lees deze handleiding grondig voor u het toestel in gebruik neemt. Als het toestel werd
beschadigd tijdens het transport, installeer het dan niet en raadpleeg uw dealer. De VTLAN4 kan de lijnen 1, 2, 3, 4,
5, 6, 7, 8 en G van RJ11, RJ12 en RJ45-kabels controleren op foute aansluitingen, kortsluiting en open lijnen.
VTLAN4
1-2-3-4-5-6-7-8-G
1
VELLEMAN
Inhaltsverzeichnis

Verwandte Anleitungen für Velleman VTLAN4


Inhaltszusammenfassung für Velleman VTLAN4
- Seite 1 Thank you for buying the VTLAN4! Please read the manual thoroughly before bringing this device into service. If the device was damaged in transit, don't install or use it and contact your dealer. The VTLAN4 can check RJ11, RJ12 and RJ45 cables on the 1, 2, 3, 4, 5, 6, 7, 8 and G lines for wrong connections, short circuits and open lines.
-
Seite 2: Technische Specificaties
Nous vous remercions de votre achat ! Lisez le présent manuel attentivement avant la mise en service de l'appareil. Si l’appareil a été endommagé pendant le transport, ne l'installez pas et consultez votre revendeur. Le VTLAN4 peut tester les fils 1, 2, 3, 4, 5, 6, 7, 8 et G de câbles RJ11, RJ12 et RJ45 sur de fausses connexions, des courts-circuits et des lignes ouvertes. -
Seite 3: Spécifications Techniques
Si el aparato ha sufrido algún daño en el transporte no lo instale y póngase en contacto con su distribuidor. El VTLAN4 puede verificar si los hilos 1, 2, 3, 4, 5, 6, 7, 8 y G de los cables RJ11, RJ12 y RJ45 tienen falsas conexiones, están cortocircuitados o abiertos. -
Seite 4: Especificaciones
Transportschäden vorliegen. Sollte dies der Fall sein, benutzen Sie das Gerät nicht und wenden Sie sich an Ihren Händler. Der VTLAN4 kann die Leitungen 1, 2, 3, 4, 5, 6, 7, 8 und G von RJ11, RJ12 und RJ45-Kabeln auf falsche Anschlüsse, Kurzschluss und offene Leitungen prüfen. -
Seite 5: Technische Daten
• Dieser Kabeltester kann keine stromführenden Produkte prüfen. • Der VTLAN4 braucht eine 9V-Batterie. Ersetzen die Batterie wenn die LEDs des VTLAN4 schwächer brennen. • Bringen Sie die Stecker ganz in das Gerat ein. Verwenden Sie nur professionell gepresste Stecker.