Herunterladen Inhalt Inhalt Diese Seite drucken
Gram K3 Serie Benutzerhandbuch
Vorschau ausblenden Andere Handbücher für K3 Serie:
Inhaltsverzeichnis

Werbung

Verfügbare Sprachen

Verfügbare Sprachen

SERIES / SERIE / SERIEN
K3 / K3P / K3i / K3i Printer
MK3 / MK3 Printer
S3/ S5i / TCamel 2T
OPERATION MANUAL
MANUAL DE UTILIZACIÓN
BENUTZERHANDBUCH

Werbung

Inhaltsverzeichnis
loading

Inhaltszusammenfassung für Gram K3 Serie

  • Seite 1 SERIES / SERIE / SERIEN K3 / K3P / K3i / K3i Printer MK3 / MK3 Printer S3/ S5i / TCamel 2T OPERATION MANUAL MANUAL DE UTILIZACIÓN BENUTZERHANDBUCH...
  • Seite 2: Inhaltsverzeichnis

    INDEX English Warning Features Options Package contents Assembly Display description Touch pad description Connections Platform 1 connection RS-232 Unit reset Using the tare Normal Tare Fixed tare Stored Tare Values Using the TARE memory Auto-tare Function Activating the function Using the function Regular weighing Weight sum total Individual counter function...
  • Seite 3 Selecting Warning Mode Activating the Limit (+/-) function Product code (Item) Manual function Scanner function Advanced functions Activating the display’s light Hold Last Weight Value (Auto Hold) Auto-Off function Auto Tare Activate the Auto Tare function Using the Auto Tare Zero Memory (memory slots) Stability Filter Sound activation...
  • Seite 4 ÍNDICE Español Precauciones Características Opciones Embalaje Montaje Descripción del display Descripción del teclado Conexiones Conector de plataforma 1 RS-232 Puesta a cero Utilización de la tara Tara normal Tara fijada Memorias de TARA Uso de la memoria de TARA Función Auto-Tara Activación de la función Uso de la función Pesada normal...
  • Seite 5 Selección del tipo de aviso Activación de la función de Limites (+/-) Código de producto (Item) Funcionamiento manual Funcionamiento por scanner Funciones avanzadas Activación de la iluminación del display Mantenimiento de ultima pesada (Auto Hold) Autodesconexión Auto Tara Activación de la función Utilización de Auto Tara Memoria del cero (pesaje de depósito y silos) Filtro de estabilidad...
  • Seite 6 INHALT Deutsch Warnung Eigenschaften Optionen Verpackung Montage Beschreibung des Displays Beschreibung der Tastatur Anschlüsse Grundfunktionen Nullstellung Tara-Funktion Einfaches Tarieren Festgelegtes Tarieren TARA-Speicher Verwendung des Tara-Speichers Funktion Auto-Tara Einfaches Wägen Summenfunktion Funktion Stückzählen Prüfvorgang Zählen Einzelgewichtsspeicher (Stückzählen) Wägen mit Toleranzbereich (Plus/Minus Kontrollwägen) Speicher der Grenzwerte und Antwortmodus Meldungsmodus auswählen Meldungstyp auswählen...
  • Seite 7 Manuelle Funktion Funktion mittels Scanner Erweiterte Funktionen Aktivierung der Displayhintergrundbeleuchtung Beibehaltung des letzten Wägung (Auto-Hold) Automatische Abschaltung Automatisches Tarieren Aktivierung der Funktion Verwendung der Automatischen Tara Nullspeicher (Wiegen von Depot und Silos) Stabilitätsfilter Tonaktivierung Aktivierung der Hilfseinheiten Blockierung der Tastatur Überprüfungsfunktion des A/D-Converters Interner Test Konfiguration des datenausgangs RS-232-C...
  • Seite 8: Précautions D'emploi

    SOMMAIRE Français Précautions d’emploi Caractéristiques Options Emballage Montage Description de l’équipement Description du clavier Connexions Connecteur Plate-forme 1 RS-232 Mise à zéro Fonction de tarage Détermination manuelle de la Tare Fixation de la tare Mémorisation de Tare Sélection et utilisation de la tare mémorisée Fonction de tarage automatique Activation de la fonction de tarage automatique Utilisation de la fonction de tarage automatique...
  • Seite 9 Choix du type de signal Hi/Lo Activation de la fonction Contrôle (+/-) Code de produit (Item) Fonctionnement manuel Fonctionnement par scanner Fonctions avancées Activation de l’éclairage de l’écran Mode Rétention Auto (Auto Hold) Mise Hors Tension Auto Tarage automatique Activation de la fonction de tarage automatique Utilisation de la fonction de tarage automatique Mémoire du zéro (pesée de dépôt et silos) Filtre de stabilité...
  • Seite 10 ÍNDICE Español Precauciones Características Opciones Embalaje Montaje Descripción del display Descripción del teclado Conexiones Conector de plataforma 1 RS-232 Puesta a cero Utilización de la tara Tara normal Tara fijada Memorias de TARA Uso de la memoria de TARA Función Auto-Tara Activación de la función Uso de la función Pesada normal...
  • Seite 11 Selección del tipo de aviso Activación de la función de Limites (+/-) Código de producto (Item) Funcionamiento manual Funcionamiento por scanner Funciones avanzadas Activación de la iluminación del display Mantenimiento de ultima pesada (Auto Hold) Autodesconexión Auto Tara Activación de la función Utilización de Auto Tara Memoria del cero (pesaje de depósito y silos) Filtro de estabilidad...
  • Seite 12: Warning

    ENGLISH WARNINg • Unplug the power supply before installing or disconnecting the unit. • Before using the device, make sure the voltage indicated on the nameplate corresponds to your network’s voltage. If it doesn’t do not plug the device into the electrical network. •...
  • Seite 13 • Liquid and dust IP-67 protection. • Hermetic cell connectors, feed and options. • Reversible panel display allows placing the device on a table or on the wall without requiring any additional parts (except for the k3i model, which needs wall support). •...
  • Seite 14: Options

    OPTIONS • External tare input (pedal or switch). • Printing out date and time on tickets (optional). PACKAgE CONTENTS • 1 Scale. • 2 weighing platforms (if the entire equipment package is purchased). • 2 Columns (optional). • 1 Network adapter 220V/9V. •...
  • Seite 15: Display Description

    Insert the power cable to connection “C1”, and the plug it into the power outlet. Do not use other cables besides the included one as it may damage the unit’s inner circuits. Plug the power cable to a 110V or 220V electrical network outlet. It supports dual voltage supply.
  • Seite 16: Touch Pad Description

    TOUCH PAD DESCRIPTION Power on/Power off. Press this button to turn on the scale. When the scale is on, pressing this button for approximately one second, will turn off the scale. Weight Unit change. Press this button to change the weight unit. In menu mode, it will work as an escape (return to normal mode) function.
  • Seite 17: Connections

    MR and left arrow. Press this arrow to show the total accumulated weight. In menu mode, it verifies the selected adjustment value, and returns to the previous menu. M+ and right arrow. Press this arrow to have the device memorise the value shown on the display.
  • Seite 18: Platform 1 Connection

    Platform 1 connection Multipin mobile connector. Male chassis socket P700 (7-pin). Load Cell A Load Cell B PIN 1 SIG - Blue White PIN 2 SIG + Brown Green PIN 3 SHIELD Shield Shield PIN 4 EXC - Black Black PIN 5 SENSE - Blue...
  • Seite 19: Unit Reset

    UNIT RESET If the platform is empty and the display is not showing a value of zero, press to reset it. USINg THE TARE Normal Tare Place a container over the platform. The scale will show its weight. When pressing the scale will show the “0”...
  • Seite 20: Fixed Tare

    Fixed tare Place a container on the platform. The scale will show its weight. Press two times. The scale will now show the “0” value, subtracting the container’s weight. Now you can place other objects in the container and the display will show its net weight.
  • Seite 21: Using The Tare Memory

    example “ILU 01”). The last two digits indicate the memory slot number.   3. Once the position of the memory slot you wish to use is selected. 4. Press the button, it will appear as a number on the display. 5.
  • Seite 22: Auto-Tare Function

      To confirm press the button. The display will show the value of the memorised tare with a negative sign. Now you can place the product in the platform and the tare will be subtracted from the weight value showing the net weight.
  • Seite 23: Using The Function

    3. Press the button to confirm. Press the button to return to   weighing mode. Using the function 1. Place the container or box on the platform. The scale will perform the function. The display will show 0 and the tare symbol will be activated. 2.
  • Seite 24: Weight Sum Total

      Press the button to select the weighing unit you want to use. Kg or g are shown by default, depending on the unit’s configuration. Place the object on the platform. The display will show the object’s weight. This value must be read when the “stability” symbol is on, in the lower left  ...
  • Seite 25: Individual Counter Function

    Remove the object from the platform. To weigh another object, make sure the display has returned to zero and the stability symbol is on. Press the button again and the second weighing value will also be added (it will be printed on a different ticket if the printer is plugged in and set up)  ...
  • Seite 26: Counting

    must be empty. Press and hold the button until the screen shows “10” or another flashing value. This is the number of pieces you can place on the platform to do the sampling. If the pieces are small, it’s recommended you put more than 10 pieces in order to increase the unit’s precision.
  • Seite 27: Individual Weight Counter

    If you want to return to the individual counter function, and count pieces of the same weight used earlier, press the button several times until the display shows the “PCS” symbol. Individual weight counter Set the display to individual counter mode (“PCS” symbol and stability indicator should be on) and press the button.
  • Seite 28: Weight Test (Control +/-)

    Keep the button pressed to access the memory database and retrieve a   positon. The display will show “CLU XX”. XX is the memory slot. Use the buttons to increase or decrease the flashing digits value. Use the buttons to select the right or left digit. Once the required memory slot is selected, press the button to confirm.
  • Seite 29: Memorising Weight Limits And Response Mode

    warning or control devices. The scale has 20 memory slots assigned to this function. Memorising weight limits and response mode 1. Press the button and the scale will display the message “PLUPro”. Press the button to proceed. The display will show the function’s  ...
  • Seite 30: Warning Mode Selection

    6. Press the button to proceed when ready. 7. Perform the same operation with the bottom increment. This value is usually the same as the top increment. In some cases it can be different and it must be specified. Warning Mode selection Warning mode must be set up for the limit function.
  • Seite 31: Activating The Limit (+/-) Function

      1. No sound. 2. A single “BEEP”. 3. A continuous “BEEEEEEP”. Press the button to confirm the settings and exit with the button. The scale returns to regular weighing mode. Activating the Limit (+/-) function 1. Keep the pressed until seeing the “Hi-Lo X”. “X” indicates if the  ...
  • Seite 32: Product Code (Item)

      5. Confirm the selection pressing the button. Press the button to exit. 6. Place the object on the platform. The scale will illuminate a part of the bottom bar (and the display colour will be green, yellow or red), depending on the weight value and the memorised limits.
  • Seite 33 Press the button. You will see a flashing arrow to the left. The first character is highlighted by a flashing underscore. You can modify it with the buttons to select the one required. The values are shown according to the following order: ABCDEFGHIJKLMNOPQRSTUVWXYZ abcdefghijklmnopqrstuvwxyz 1234567890,’.:-_@...
  • Seite 34: Scanner Function

    Scanner function This device allows uploading an item code through a scanner with a RS232C output, connected to the optional COM2 data input/output. This is a simple function. Once the scanner is connected to the COM2 port proceed to scan the bar code of the product. The scale will now memorise the last 6 digits of the code.
  • Seite 35: Hold Last Weight Value (Auto Hold)

      Press to confirm the selected function. To exit press the button. Hold Last Weight Value (Auto Hold) Press the button to access the function menu. The display will show the “PLU XX” message. button, until the display shows “Hold X”. The “X” digit Press the corresponds to the memorised option.
  • Seite 36: Auto-Off Function

    Auto-Off function To access the function menu, press the button and the display will show “PLU XX”. Press the button until the display shows “AUt-0”. Press the button to proceed. The display will show a digit to the right, according to the following values: 1.
  • Seite 37: Using The Auto Tare

    To activate the function, press the button, then press repeatedly the button until the display shows Aut-t 0. Set the right digit to “1” to activate the function. Use the arrow to set value. Confirm with and exit with Using the Auto Tare Make sure the display is showing “0”...
  • Seite 38: Stability Filter

    Now “MEM 1” is going to appear. Press and then to exit the menu. Now you can set the empty memory slot to zero. Press the button for 4 seconds, and the display will show zero. To avoid incorrect zero settings, it’s recommended to go back to the previous menu.
  • Seite 39: Sound Activation

    To change, press the buttons. Proceed with the button. To exit, press the button. Sound activation The touchpad has an option to enable sound when pressing the buttons. This sound can be disabled if not required. To enable the option, press the button, and then press until you see the “bEEP”...
  • Seite 40: Blocking The Touchpad

    in order to activate or deactivate it. When the procedure is done press the button to get to the “PCS” unit which corresponds to the individual part counter function. Perform the same procedure. When the task is complete confirm the changes with the button.
  • Seite 41: Internal Test

    button, until you see the “ICouNT” message displayed. Press the button to proceed. The screen will show a 6 digit number that will usually be moving up or down. To exit this function, press the button and then press Internal test This function turns on the full display.
  • Seite 42 Choose the required option with the buttons, confirm your selection with The message “Lr-P 0..2” will appear (Port redirection to simple ticket; 0 = deactivated, 1 = send by standard port, 2 = send by port 2, internal use). Select the desired option with the buttons, proceed with The message “ItMP 0..2”...
  • Seite 43: Printing Format

    PRINTINg FORMAT The printer data output can be set up with 5 different printing formats, according to the following versions:     -­‐   -­‐   -­‐   -­‐   -­‐   -­‐   -­‐   -­‐   -­‐   -­‐   -­‐   -­‐   -­‐   -­‐   -­‐   -­‐   -­‐   -­‐   -­‐   -­‐   -­‐   -­‐   -­‐   -­‐   -­‐   -­‐       Format 1  ...
  • Seite 44     -­‐   -­‐   -­‐   -­‐   -­‐   -­‐   -­‐   -­‐   -­‐   -­‐   -­‐   -­‐   -­‐   -­‐   -­‐   -­‐   -­‐   -­‐   -­‐   -­‐   -­‐   -­‐   -­‐   -­‐   -­‐   -­‐       Format 4  ...
  • Seite 45 buttons to modify the adjacent digit. Confirm the final value with the button. The message “Lan” will appear, followed by a number indicating the printing language. Select one of the following numbers for: 0. English 1. Spanish 2. French 3. German Press the buttons to choose the desired language.
  • Seite 46 show, 1 = show). Select the desired option with the buttons, proceed with The message “n tqt 0..1” will appear (Impression of ticket number; 0= Not show, 1 = show). Select the desired option with the buttons, proceed with A ticket number for the first ticket will appear. From there on the ticket numbers will start increasing.
  • Seite 47 The line will appear with the default characters (the factory’s name is printed by default). You can modify these characters. The first character is shown with a flashing underscore. With the button you can modify it according to the next table and in that same order: ABCDEFGHIJKLMNOPQRSTUVWXYZ abcdefghijklmnopqrstuvwxyz...
  • Seite 48 The message “Lin 3..1” will appear (line 1 impression; 0= print, 1 = small letter size, 2 = double height letter size, 3 = Double width letter size, 4 = Double width and double height letter size). Edit the third ticket line as described above. Once the editing is finished pro- ceed with the button.
  • Seite 49 a “zero” between measurements. If this does not happen, the weight’s value will not be printed. To finish the ticket, press the button, then the footer and the subtotal (if it is enabled) will be printed.
  • Seite 50: Guarantee

    This unit’s warranty covers any factory and hardware defects. The warranty is valid for a period of 1 year from the date of delivery. Within the warranty period gRAM PRECISION, SL, will be responsible for the cost of any repairs.
  • Seite 51: Precauciones

    ESPAÑOL PRECAUCIONES • Desconectar la alimentación antes de la instalación o desmontaje. • Antes de su uso, comprobar que el voltaje impreso en la etiqueta de características corresponde con el de la red que se utilizará. Si no correspondiera, no conectar el equipo a la red. •...
  • Seite 52 • 4 unidades de pesada. • Protección IP-67 contra líquidos y polvo. • Conectores de célula, alimentación y opciones herméticos. • Panel frontal reversible. Para su colocación en mesa y pared sin necesidad de ningún accesorio (excepto modelo K3i que necesita el soporte para pared).
  • Seite 53: Opciones

    OPCIONES • Doble salida de datos RS-232C para PC e impresora (opcional en Serie K3T). • Entrada de Tara externa (pedal o pulsador). • Impresión de fecha y hora en ticket (opcional). EMBALAjE • 1 Indicador. • 1 Plataforma de pesada (si se ha adquirido un equipo completo). •...
  • Seite 54: Descripción Del Display

    Colocar el indicador en la parte superior de la columna, de forma que coincidan los tornillos de fijación del soporte. Conectar el cable de célula a la conexión marcada con C1 y el conector de alimentación a la conexión AC/DC. No utilizar otro alimentador distinto del suministrado, ya que puede dañar los circuitos internos del indicador.
  • Seite 55: Descripción Del Teclado

    DESCRIPCIÓN DEL TECLADO Conexión/Desconexión. Al pulsarla, conecta el indicador. Con el indicador conectado, al mantenerla pulsada un segundo aproximadamente, se desconecta. Tecla de cambio de unidad. Al pulsarla cambia la unidad de pesada. En modo menú, tiene la función de salida del menú y retorno a modo normal (Escape).
  • Seite 56: Conexiones

    MR y flecha izquierda. Al pulsarla, muestra el total de peso acumulado. En modo menú, confirma el valor del ajuste seleccionado, y vuelve hacia el menú anterior. M+ y flecha derecha. Al pulsarla, memoriza el valor visualizado en el display y envía a la impresora los datos del ticket en modo ticket. En modo menú, visualiza la función siguiente.
  • Seite 57: Conector De Plataforma 1

    Conector de plataforma 1 Multipin mobile connector. Male chassis socket P700 (7-pines). Load Cell A Load Cell B PIN 1 SIG - Azul Blanco PIN 2 SIG + Marrón Verde PIN 3 MALLA Malla Malla PIN 4 EXC - Negro Negro PIN 5 SENSE -...
  • Seite 58: Puesta A Cero

    PUESTA A CERO Si la plataforma está vacía y el display no visualiza el valor cero, pulsar la tecla para corregirlo. UTILIZACIÓN DE LA TARA Tara normal Colocar un recipiente sobre la plataforma. El indicador visualizará su peso. Al el indicador visualizará el valor “0”, descontando el peso pulsar la tecla del objeto.
  • Seite 59: Tara Fijada

    Tara fijada Colocar un recipiente sobre la plataforma. El indicador visualizará su peso. Pulsar dos veces la tecla el indicador visualizará el valor “0”, descontando el peso del objeto. Ahora se pueden depositar otros objetos dentro del recipiente, y el display visualizará el peso neto de los mismos. Se puede conocer el valor total (peso bruto) pulsando la tecla .
  • Seite 60: Uso De La Memoria De Tara

      3. Una vez seleccionada la posición de memoria que se desea memorizar, pulsar la tecla y aparecerá un número en el display. 4. Para modificarlo e introducir el valor de la tara, utilizar los cursores ó para seleccionar el digito deseado. 5.
  • Seite 61: Función Auto-Tara

      Para confirmarlo, pulsar la tecla . El display mostrará el valor de la tara memorizada con signo negativo. Ahora se puede colocar el producto en la plataforma, y el valor de la tara quedará restado del valor de pesada (muestra el peso neto).
  • Seite 62: Uso De La Función

    Pulsar la tecla para confirmar. Pulsar la tecla para volver al modo   de pesada. Uso de la función 1. Colocar el recipiente o caja en la plataforma. El indicador realizará la función y el display mostrará cero y el símbolo tara se activará. 2.
  • Seite 63: Acumulación De Pesadas

      Pulsar la tecla para seleccionar la unidad de pesada deseada (por defecto se visualiza la unidad “g o kg”, dependiendo de la configuración efectuada). Colocar el objeto a pesar sobre la plataforma. El display visualizará el peso del objeto, que debe ser leído cuando se active el símbolo “stability” en la  ...
  • Seite 64: Función De Cuentapiezas

    Retirar el objeto de la plataforma. Para pesar otro objeto, asegurarse de que el display quede a cero y que el símbolo de estabilidad esté activado. Volver a pulsar la tecla y el segundo valor de pesada queda también acumulado (se imprimirá otra línea de ticket si está conectada y configurada la impresora).
  • Seite 65: Muestreo

    Muestreo Para realizar el muestreo, con el indicador indicando cero y la plataforma de pesada vacía, pulsar y mantener pulsada durante más de un segundo la tecla , hasta que la pantalla visualice “10” u otro valor de forma destellante. Es la cantidad de piezas que se pueden colocar en la plataforma como muestreo.
  • Seite 66: Memoria De Peso Unitario (Cuentapiezas)

    Para volver al modo peso en la unidad de pesada estándar, pulsar la tecla Si deseamos volver al modo cuentapiezas para contar piezas del mismo peso unitario que la última vez, pulsar la tecla varias veces hasta que el display muestre el símbolo “PCS”. Memoria de peso unitario (Cuentapiezas) Con el display en modo cuentapiezas (símbolo “PCS”...
  • Seite 67: Comprobación De Peso (Control +/-)

    Para acceder a la base de datos de la memoria y recuperar una posición, . El display mostrará “CLU XX”, pulsar y mantener pulsada la tecla   donde XX es la posición de memoria. Utilizar los cursores para aumentar ó disminuir el valor del dígito que destella y con las teclas para desplazarse hacia el dígito de la izquierda ó...
  • Seite 68: Memorización De Los Limites De Peso Y Modo De Respuesta

    Lo hace por medio de un pitido y de la indicación acústica. También disponemos de una opción de tarjeta con relés para conexión a elementos externos de aviso o control. El indicador dispone de 20 memorias para esta función. Memorización de los limites de peso y modo de respuesta el indicador visualizará...
  • Seite 69: Selección Del Modo De Aviso

    indicador del display. Realizar la selección utilizando el procedimiento anterior, con las teclas del cursor. Confirmar con la tecla 6. Realizar la misma operación para el incremento inferior, que normalmente es el mismo que el superior, pero en algunos casos puede ser distinto, y debe introducirse.
  • Seite 70: Activación De La Función De Limites (+/-)

      1. Sin sonido. 2. Un solo “BEEP” 3. Un “BEEEEEEP” de forma continua. Pulsar la tecla para confirmar los datos introducidos y salir con la tecla El indicador vuelve al modo normal de uso. Activación de la función de Limites (+/-) 1.
  • Seite 71: Código De Producto (Item)

      5. Confirmar la selección con la tecla y pulsar la tecla para salir. 6. Colocar el objeto sobre la plataforma, y el indicador mostrará encendida una parte de la barra inferior (y el color del display verde, amarillo o rojo), dependiendo del valor de la pesada, respecto a los límites memorizados, y uno de los símbolos (+) o (-).
  • Seite 72 mover el cursor a la derecha o izquierda. De esta forma, seleccionamos un numero de memoria, por ejemplo el numero 1: “001”. Pulsamos . Visualizaremos un cursor intermitente a la izquierda. El primer carácter se muestra con un guion inferior intermitente. Con la tecla se modifica este carácter por el deseado, de acuerdo con la siguiente tabla y en este orden:...
  • Seite 73: Funcionamiento Por Scanner

    podemos seleccionar (siguiendo el procedimiento anterior) el número de artículo que deseemos y este quedará cargado. Cuando tengamos conectada una impresora a la salida de datos, y debidamente configurados los demás parámetros de impresión, obtendremos un tiquet con el código de PLU que tengamos en ese momento.
  • Seite 74: Mantenimiento De Ultima Pesada (Auto Hold)

      Con los cursores seleccionar la opción deseada entre las siguientes: On - Iluminación siempre encendida. Off - Iluminación siempre apagada. Auto - Iluminación automática. Se apaga después de que el indicador de estabilidad se   encienda durante 5 segundos. Pulsar para confirmar la función.
  • Seite 75: Autodesconexión

      1. Función inactiva. 2. Visualiza el valor más alto (valor de pico) 3. Mantiene el valor de la pesada. Pulsar la tecla para desactivarlo. 4. Mantiene el valor en el display hasta que se retira el peso. 5. Mantiene el valor en el display hasta que se coloca otro objeto en la plataforma, indicando el peso del segundo objeto.
  • Seite 76: Auto Tara

      Para cambiarla, pulsar la tecla , confirmar con la tecla Para salir, pulsar la tecla Auto Tara Activación de la función Esta función realiza la tara de forma automática. Tara el recipiente sin necesidad de pulsar ninguna tecla y muestra el peso neto de los objetos colocados posteriormente.
  • Seite 77: Memoria Del Cero (Pesaje De Depósito Y Silos)

    Colocar el objeto dentro de la caja, y el indicador visualizará el valor neto (peso del objeto). Si se retira la caja con el contenido de la plataforma, el indicador anulará la tara e indicará cero. Se puede realizar la operación anterior todas las veces que se necesiten. El indicador siempre realizará...
  • Seite 78: Filtro De Estabilidad

    , aparecerá “NrSt 0”. Pulsar la tecla modificar a “1”, después pulsar para modificar la función a “1” y confirmar. Pulsar la tecla para abandonar el menú. Filtro de estabilidad En condiciones ambientales adversas, o cuando se utiliza el indicador para pesadas inestables, se puede aumentar la estabilidad de pesada con los filtros.
  • Seite 79: Activación Del Sonido

    Activación del sonido El teclado dispone de un sonido al pulsar las teclas. Este sonido se puede desactivar si no se desea. Para realizarlo, pulsar la tecla y luego la tecla hasta visualizar “bEEP” en el display. Pulsar la tecla para confirmar, y con la tecla seleccionar el digito de la derecha de acuerdo con las siguientes opciones:...
  • Seite 80: Bloqueo Del Teclado

    Bloqueo del teclado Es posible bloquear todas las teclas , excepto las teclas que son las teclas que se utilizan habitualmente. De esta forma, el operario no tiene fácil acceso al menú de configuración ni puede modificar la configuración de la balanza accidentalmente. Para bloquear el teclado, pulsar la tecla durante unos 5 segundos, hasta que el display muestre el mensaje “Lock”...
  • Seite 81: Test Interno

    Test interno Esta utilidad muestra todo el display encendido, para comprobar su estado, la capacidad, resolución y versión de software del equipo. En modo de trabajo, pulsar la tecla “CERO” durante dos segundos, y el display mostrará esta información, una después de la otra. Una vez finalizada la visualización, volverá...
  • Seite 82: Formato De Impresión

    Aparecerá el mensaje ItMP 0..2 (Redirección del puerto para tiquet detallado; 0 = desactivado, 1 = enviar por Puerto standar, 2 = enviar por Puerto 2, uso interno). Con las teclas seleccionar la opción deseada, confirmar con Aparecerá el mensaje PC-P 0..2 (Redireccion del puerto para PC –...
  • Seite 83     -­‐   -­‐   -­‐   -­‐   -­‐   -­‐   -­‐   -­‐   -­‐   -­‐   -­‐   -­‐   -­‐   -­‐   -­‐   -­‐   -­‐   -­‐   -­‐   -­‐   -­‐   -­‐   -­‐   -­‐   -­‐   -­‐       Formato 1  ...
  • Seite 84     -­‐   -­‐   -­‐   -­‐   -­‐   -­‐   -­‐   -­‐   -­‐   -­‐   -­‐   -­‐   -­‐   -­‐   -­‐   -­‐   -­‐   -­‐   -­‐   -­‐   -­‐   -­‐   -­‐   -­‐   -­‐   -­‐       Formato 5  ...
  • Seite 85 Pulsar las teclas para seleccionar el idioma deseado y memorizarlo con la tecla Aparecerá el mensaje “tPrn 0.. 1” (Tipo de envio. 0 = al pulsar la tecla Set, 1 = cuando la balanza es estable). Con las teclas seleccionar la opción deseada, Confirmar con Aparecerá...
  • Seite 86 Con las teclas seleccionar la opción deseada, Confirmar con Introducir el número de lote siguiendo las indicaciones del punto anterior. Confirmar con Aparecerá el mensaje “Lin 0..4 ” (Impresión de línea 1; 0= Imprimir, 1 = Tamaño de letra pequeño, 2 = Tamaño de letra doble alto, 3 = Tamaño de letra doble ancho, 4 = Tamaño de letre doble alto y ancho).
  • Seite 87 Para cambiar estos tipos de letra, pulsar la tecla durante la edición y se modificará el tipo de letra (los tipos de letra mayúscula y minúsculas se visualizan siempre igual, para conocer a que tipo corresponde debe comprobarse el número de líneas de la batería). Para moverse hacia los caracteres de derecha o de izquierda utilizar las teclas Seguir las indicaciones anteriores hasta editar todos los...
  • Seite 88 de letra pequeño, 2 = Tamaño de letra doble alto, 3 = Tamaño de letra doble ancho, 4 = Tamaño de letre doble alto y ancho). Seguir las indicaciones anteriores para editar esta tercera línea del tiquet, y una vez finalizado, confirmar con la tecla Pulsar la tecla para salir del menú.
  • Seite 89: Garantía

    Esta balanza está garantizada contra todo defecto de fabricación y de material, por un periodo de 1 año a partir de la fecha de entrega. Durante este periodo, gRAM PRECISION, SL, se hará cargo de la reparación de la balanza.
  • Seite 90: Warnung

    DEUTSCH WARNUNg • Vor Montage oder Demontage, trennen Sie das Gerät von der Stromversorgung. • Vor Benutzung des Gerätes, vergewissern Sie sich, dass der aufgedruckte Spannungswert mit der örtlichen Spannung übereinstimmt. Ist dies nicht der Fall, verbinden Sie die Waage nicht. •...
  • Seite 91: Eigenschaften

    EIgENSCHAFTEN • Großes Display aus Flüssigkristall mit Hintergrundbeleuchtung in wählbarer Farbe. • Menü mit durch Farbe aktivierter Funktionsanzeige. • Kreuzförmige Tastatur für intuitive Benutzung des Menüs. • 4 Wiegeeinheiten. • IP-67-Schutz gegen Flüssigkeiten und Staub. • Hermetische Anschlüsse für Zelle, Stromversorgung Optionsausgänge.
  • Seite 92: Optionen

    • Grenzwertfunktion (LO/OK/HI) mit 3-farbiger, optischer Anzeige sowie akustischem Signal. • Netzadapter mit 3,5 m langem Kabel. • Automatische Abschaltung (programmierbar). OPTIONEN • Akkubetrieb (optional in der Serie K3T). • Doppelter Datenausgang RS-232-C für PC / Drucker (optional in Serie K3T).
  • Seite 93: Montage

    MONTAgE Legen Sie die Wägeplattform auf eine ebene Fläche ohne Gegenstände, die beim Wiegen stören können. Entsperren Sie die Wägeplattform, indem Sie die Blockierungsschrauben entfernen oder lockern, in Übereinstimmung mit der beigefügten Entsperrungsanleitung. Legen Sie das Kabel der Zelle ein und führen Sie es durch das Innere des Stativs, bis es aus dem oberen Teil des Stativs herausragt.
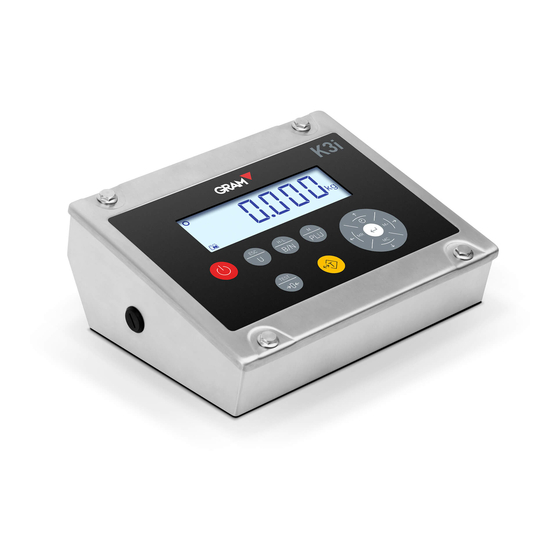
  • Seite 94: Beschreibung Des Displays

    BESCHREIBUNg DES DISPLAyS BESCHREIBUNg DER TASTATUR Einschalten/Ausschalten. Durch Drücken wird die Anzeige eingeschaltet. Wird diese Taste mit eingeschaltetem Anzeigegerät etwa eine Sekunde lang gehalten, schaltet sich dieses aus. Taste zum Wechseln der Einheiten. Durch Drücken wird die Wägeeinheit geändert. Im Modus Menü hat diese die Funktion, Menü verlassen und zurück zum Normalmodus (Escape).
  • Seite 95 Taste PLU. Durch Drücken gelangen Sie in das Menü und ermöglichen es, auf die Speicher von Grenzwerten, für Stückzählen und Tara sowie weitere nützliche Funktionen zuzugreifen. Durch das Gedrückthalten von mehr als einer Sekunde gelangen Sie in den Herstellungsmodus und das Passwort wird nachgefragt (Verwendung nur für autorisierte Nutzer).
  • Seite 96: Anschlüsse

    Eingabe. Bestätigt die im Programmiermodus getätigte Auswahl und sendet die Daten des tatsächlichen Gewichts an den Drucker (einfacher Modus). 5 Sekunden langes Drücken aktiviert die Sperrung/Entsperrung der Tastatur. ANSCHLüSSE AC/DC: Netzstecker. Option: Frei für Optionen. RS-232: Doppelter Datenausgang RS-232-C für PC / Drucker. (optional in Serie K3T).
  • Seite 97 7-poliger Stecker P700 (Wägeplattform 1) Wägezelle A Wägezelle B PIN 1 SIG - Blau Weiß PIN 2 SIG + Braun Grün PIN 3 SHIELD Abschirmung Abschirmung PIN 4 EXC - Schwarz Schwarz PIN 5 SENSE - Blau PIN 6 EXC + PIN 7 SENSE + Gelb...
  • Seite 98: Grundfunktionen

    gRUNDFUNKTIONEN Nullstellung Wenn die Wägeplatte leer ist und das Display nicht den Wert Null anzeigt, drücken Sie die Taste , um es zu korrigieren. Tara-funktion Einfaches Tarieren Stellen Sie einen Behälter auf die Plattform. Die Anzeige zeigt das Gewicht an. Durch Drücken der Taste wird wieder der Wert “0”...
  • Seite 99: Festgelegtes Tarieren

    Maximaler Tara-Bereich: Der Wert des Tara darf die maximale Kapazität der Waage nicht überschreiten. Die verwendbare Kapazität der Plattform ist das Ergebnis zwischen der Höchstkapazität minus des angegebenen Tara. Nutzbare Kap. = max. Kap - Tara. Festgelegtes Tarieren Stellen Sie einen Behälter auf die Plattform. Die Anzeige zeigt das Gewicht an.
  • Seite 100 Drücken Sie die Taste mehrmals, bis das Display “TLUPro” anzeigt.   2. Drücken Sie die Taste . Das Display zeigt den verwendeten Speicher an letzter Stelle (zum Beispiel “ILU 01”). Die letzten Stellen zeigen die   Speichernummer an. 3. Sobald die Speicherposition ausgewählt ist, auf der gespeichert werden soll, drücken Sie die Taste und es wird eine Nummer im Display angezeigt.
  • Seite 101: Verwendung Des Tara-Speichers

    Tara die Meldung “ILUPro”, drücken Sie die Taste , um den Modus zu verlassen und wieder zum Wiegemodus zurückzukehren. Verwendung des Tara-Speichers Im Wiegemodus drücken Sie mit leerer Wägeplatte die Taste länger als eine Sekunde, bis die Meldung “TLU XX” angezeigt wird, wobei XX die letzte Speichernummer des gespeicherten TARA ist.
  • Seite 102: Aktivierung Der Funktion

    und bereitet sich auf das Wiegen des nächsten Produktes im Behälter oder der Kiste vor. Aktivierung der Funktion Um sie zu verwenden, müssen Sie zunächst die Funktion Auto-Tara wie folgt aktivieren: . Auf dem Display wird die Meldung “n Item” 1.
  • Seite 103: Einfaches Wägen

    2. Legen Sie das Objekt oder die Objekte in den Behälter oder die Kiste. Das Display zeigt das Nettogewicht abzüglich des Tara oder Behältergewichts an. 3. Nehmen Sie Objekt und Behälter von der Wägeplattform. Das Display annulliert die Tara und zeigt wieder Null an. 4.
  • Seite 104: Summenfunktion

      Summenfunktion Diese Funktion summiert alle Wiegevorgänge und zeigt den Gesamtwert an. Um die Funktion zu nutzen, legen Sie das zu wiegende Objekt auf die Wägeplatte und während im Display das Stabilitätssymbol angezeigt wird (Stabilisierungskreis leuchtet), drücken Sie die Taste .
  • Seite 105: Funktion Stückzählen

      Drücken Sie die Taste und das Display zeigt das Gesamtgewicht an (mit angeschlossenem und konfiguriertem Drucker wird das Ende des Tickets mit der Fußzeile gedruckt, wenn dies eingeschaltet ist). Es können weitere Gewichtswerte summiert und der Gesamtwert wieder abgerufen werden. Um den Speicher zu löschen, drücken Sie die Taste und der akkumulierte Wert wird gelöscht.
  • Seite 106: Zählen

      Sobald der gewünschte Wert ausgewählt ist, zählen Sie die Anzahl der Teile, die auf der Anzeige dargestellt sind und drücken Sie die Taste . Das Display hört auf zu blinken und zeigt den Wert des Prüfvorgangs an.   Zählen Legen Sie die zu zählenden Teile (sie müssen das gleiche Einzelgewicht haben wie das Muster zuvor) auf die Wägeplatte.
  • Seite 107 Drücken Sie die Taste drei Mal und es wird die Meldung “CLUPro” angezeigt. Die beiden Stellen rechts sind die 100 verfügbaren Speicherpositionen (von 00 bis 99). Verwenden Sie die Cursor , um den gewünschten Wert der blinkenden Stelle auszuwählen und wählen Sie mit den Pfeilen oder andere Stelle.
  • Seite 108: Wägen Mit Toleranzbereich (Plus/Minus Kontrollwägen)

    Drücken Sie die Taste zum Bestätigen, sobald die Speicherposition ausgewählt ist. Die Anzeige ist nun mit dem gewählten Stückspeicher programmiert. Das Zählen der Stücke kann begonnen werden, indem man sie auf die Wägeplatte oder in einen zuvor tarierten Behälter legt. Wägen mit Toleranzbereich (Plus/Minus Kontrollwägen) Diese Funktion ist nützlich, um die Anzahl der Produkte nach Gewicht zu klassifizieren und diejenigen nicht mitzuzählen, die ein bestimmtes Gewicht...
  • Seite 109 Positionsnummer des Speichers der Funktion an.   2. Um auf die gewünschte Speicherposition zuzugreifen, verwenden Sie die Cursor , um die Position zu erhöhen oder zu vermindern, bis Sie die richtige Position gefunden haben. 3. Bestätigen Sie mit der Taste  ...
  • Seite 110: Meldungsmodus Auswählen

    6. Führen Sie die gleiche Handlungsweise für die Erhöhung des unteren Werts vor, der normalerweise der Gleiche ist wie der Obere, sich in manchen Fällen aber unterscheiden kann und eingegeben werden muss. Meldungsmodus auswählen Der Meldungsmodus muss für die Grenzwertfunktion programmiert werden. Die Anzeige meldet durch einen unterbrochenen Piepton, ob das Gewicht innerhalb der markierten Grenzwerte oder außerhalb liegt.
  • Seite 111: Aktivierung Der Funktion Grenzwerte (+/-)

      1. Ohne Ton. 2. Ein einfacher Piepton. 3. Ein kontinuierlicher, langgezogener Piepton. Drücken Sie die Taste zum Bestätigen der eingegebenen Daten und verlassen Sie den Modus mit der Taste Die Anzeige kehrt zum normalen Nutzungsmodus zurück. Aktivierung der Funktion Grenzwerte (+/-) , bis “Hi-Lo X”...
  • Seite 112: Produktcode (Item)

      blinkenden Wert auszuwählen. 5. Bestätigen Sie die Auswahl mit der Taste und drücken Sie die Taste um den Modus zu verlassen. 6. Legen Sie das Objekt auf die Wägeplatte, in der Anzeige leuchtet ein Teil des unteren Balkens (und die Displayfarbe ist grün, gelb oder rot), je nach Wert des Wiegens, hinsichtlich der gespeicherten Werte und einem der Symbole (+) oder (-).
  • Seite 113 jedes Codes von 1 bis 100. Um einen von ihnen zu speichern, verwenden Sie die Tasten des Cursors oder , um jede Stelle auszuwählen und die Tasten , um den Cursor nach rechts oder nach links zu verschieben. So wählen Sie eine Speichernummer, zum Beispiel Nummer 1: “001”.
  • Seite 114: Funktion Mittels Scanner

    Im normalen Nutzungsmodus können wir jetzt den Code eines beliebigen der 100 gespeicherten Artikel laden. Drücken Sie die Taste danach. Wählen Sie jetzt (nach der vorherigen Vorgehensweise) die gewünschte Artikelnummer, die jetzt geladen bleibt. Wenn Sie einen Drucker an den Datenausgang angeschlossen und alle anderen Druckparameter richtig konfiguriert haben, erhalten Sie ein Ticket mit dem PLU-Code, den Sie in diesem Moment haben.
  • Seite 115: Beibehaltung Des Letzten Wägung (Auto-Hold)

      Wählen Sie mit den Cursor die gewünschte Option unter den folgenden: On - Hintergrundbeleuchtung immer eingeschaltet. Off - Hintergrundbeleuchtung immer ausgeschaltet. Auto - Automatische Hintergrundbeleuchtung; sie schaltet sich aus, nachdem die Stabilitätsanzeige 5 Sekunden lang eingeschaltet wurde.   Drücken Sie , um die Funktion zu bestätigen.
  • Seite 116: Automatische Abschaltung

      1. Inaktive Funktion. 2. Zeigt den höchsten Wert an (Spitzenwert). 3. Behält den gewogenen Wert bei. Drücken Sie die Taste , um ihn zu deaktivieren. 4. Behält den Wert der Anzeige bis zur Entnahme des Gewichts bei. 5. Behält den Wert in der Anzeige bei, bis ein weiteres Objekt auf die Plattform gelegt wird, wobei das Gewicht des zweiten Objekts angezeigt wird.
  • Seite 117: Automatisches Tarieren

      Um dies zu ändern, drücken Sie die Taste oder zum Bestätigen mit der Taste Zum Verlassen drücken Sie die Taste Automatisches Tarieren Aktivierung der Funktion Diese Funktion führt die Tara automatisch aus. Sie tariert den Behälter ohne eine Taste drücken zu müssen und zeigt den Nettowert der nachträglich aufgelegten Objekte.
  • Seite 118: Nullspeicher (Wiegen Von Depot Und Silos)

    ausgeführt, wobei der Wert “0” angezeigt wird und die Taraanzeige in der Anzeige erscheint. Legen Sie das Objekt in die Kiste und die Anzeige zeigt den Nettowert (Gewicht des Gegenstands) an. Wenn die Kiste mit dem Inhalt der Wägeplatte entnommen wird, annulliert die Anzeige die Tara und zeigt Null an.
  • Seite 119: Stabilitätsfilter

    Drücken Sie noch einmal , um zu bestätigen und die Taste , um das Menü zu verlassen. Um das Silowägen zu deaktivieren und zum normalen Modus zurückzukehren, drücken Sie die Taste und danach etwa 5 Sekunden lang, bis “Units” , es wird “MEM 0” angezeigt. angezeigt wird.
  • Seite 120: Tonaktivierung

    Zum Verlassen drücken Sie die Taste Tonaktivierung Die Tastatur verfügt über einen Ton beim Drücken der Tasten. Dieser Ton kann deaktiviert werden, wenn gewünscht. Drücken Sie dazu die Taste , bis im Display “bEEP” angezeigt wird. danach die Taste Drücken Sie die Taste zum Bestätigen und wählen Sie die Stelle rechts entsprechend der folgenden Optionen mit dem Pfeil 1.
  • Seite 121: Blockierung Der Tastatur

    Führen Sie die gleiche Vorgehensweise durch und bestätigen Sie bei Fertigstellung die Wechsel mit der Taste . Um das Menü zu verlassen und in den normalen Wiegemodus zurückzukehren, drücken Sie die Taste Wenn Sie jetzt die Taste wiederholt drücken, erscheinen die deaktivierten Einheiten nicht.
  • Seite 122: Interner Test

    danach die Taste bis “iCouNT” angezeigt wird. Drücken Sie die Taste zum Bestätigen. Das Display zeigt eine Zahl aus 6 Ziffern an, die sich normalerweise bewegt und nicht stabil ist. Um die Funktion zu verlassen, drücken Sie die Taste und danach die Taste Interner Test Dieses Programm zeigt das gesamte eingeschaltete Display an, um seinen...
  • Seite 123 br 038 – 38400 Baud br 057 – 56800 Baud br 058 – 115000 Baud Wählen Sie mit den Tasten die gewünschte Option, bestätigen Sie mit Es erscheint die Meldung Lr-P 0..2 (Umleitung des Ports für einfache Tickets; 0 = deaktiviert 1 = über Standardport senden, 2 = über Port 2 senden, interne Verwendung).
  • Seite 124: Druckformat

    Verwendung). Wählen Sie mit den Tasten die gewünschte Option, bestätigen Sie mit Es erscheint die Meldung bC-P-P 0..2 (Barcodeleser; 0 = deaktiviert 1 = über Port 1 senden, nicht verwenden, 2 = über Port 2 senden, Standard). Wählen Sie mit den Tasten die gewünschte Option, bestätigen Sie mit Es erscheint die Meldung Smod 0..2...
  • Seite 125 Format 2 Format 3 Format 4 Format 5...
  • Seite 126 Um das gewünschte Format auszuwählen, drücken Sie bei der sich im Wiegemodus befindender Waage die Taste und drücken Sie die Taste , bis das Display “PrnFrm” anzeigt. Drücken Sie die Taste , um das Druckformat in 1 bis 5 zu ändern, entsprechend der oben gezeigten Modelle.
  • Seite 127 Im Display erscheint die Meldung “hEAd 0.. 1” (Druck der Titelzeile. 0 = Keine Titelzeile wird gedruckt, 1 = Titelzeile wird gedruckt). Wählen Sie mit den Tasten die gewünschte Option, bestätigen Sie mit Es erscheint die Meldung “Sdate 0..1” (Datum und Uhrzeit auf dem Ticket anzeigen;...
  • Seite 128 Geben Sie die Postennummer mit den vorherigen Angaben ein. Bestätigen Sie mit Es erscheint die Meldung “Lin 0..4” (Druck der Zeile 1; 0 = Drucken, 1 = Kleine Buchstaben, 2 = Doppelt so hohe Buchstaben, 3 = Doppelt so breite Buchstaben, 4 = Doppelt hohe und breite Buchstaben).
  • Seite 129 Um diese Zahlentypen zu ändern, drücken Sie die Taste während der Ausgabe und der Buchstabentyp wird geändert (die Zahlentypen in Groß- und Kleinbuchstaben werden immer gleich angezeigt. Um zu erkennen, zu welchem Typ Sie gehören, müssen Sie die Zeilenanzahl des Akkus überprüfen). Um die Zeichen nach links oder rechts zu verschieben, nutzen Sie die Tasten Befolgen Sie die obigen Anweisungen, bis alle Zeichen bearbeitet sind und drücken Sie die Taste...
  • Seite 130 Es erscheint die Meldung “Lin 5..1” (Druck der Zeile 1; 0 = Drucken, 1 = Kleine Buchstaben, 2 = Doppelt so hohe Buchstaben, 3 = Doppelt so breite Buchstaben, 4 = Doppelt hohe und breite Buchstaben). Befolgen Sie die obigen Anweisungen, um die fünfte Zeile des Tickets zu bearbeiten und drücken Sie die Taste , wenn Sie fertig sind.
  • Seite 131: Garantie

    Diese Waage hat eine Garantie auf jegliche Herstellungs- und Materialdefekte während eines Zeitraums von einem Jahr ab Lieferdatum. Innerhalb dieser Zeit übernimmt gRAM PRECISION, SL, die Reparatur der Waage. Diese Garantie schließt keine Schäden durch unsachgemäße Verwendung oder Überlastungen ein.
  • Seite 132 001/08072016 Gram Precision S.L. Travesía Industrial, 11 · 08907 Hospitalet de Llobregat · Barcelona (Spain) Tel. +34 902 206 000 · +34 93 300 33 32 Fax +34 93 300 66 98 gram.es comercial www.gram.es...

Diese Anleitung auch für:

K3i serieK3p serieS3 serieMk3 printer serieS5i serieTcamel 2t serie ... Alle anzeigen

Inhaltsverzeichnis