Herunterladen Inhalt Inhalt Diese Seite drucken
Smartwares SHS-53000 Gebrauchsanleitung
Vorschau ausblenden Andere Handbücher für SHS-53000:
Inhaltsverzeichnis

Werbung

Verfügbare Sprachen

Verfügbare Sprachen

wireless climate control
GEBRUIKERSHANDLEIDING
NL
USER MANUAL
EN
MANUEL D'UTILISATION
FR
GEBRAUCHSANLEITUNG
DE
10.900.43
SHS-53002-EU

Werbung

Inhaltsverzeichnis
loading

Inhaltszusammenfassung für Smartwares SHS-53000

  • Seite 1 wireless climate control GEBRUIKERSHANDLEIDING USER MANUAL MANUEL D’UTILISATION GEBRAUCHSANLEITUNG 10.900.43 SHS-53002-EU...
  • Seite 2: Inhaltsverzeichnis

    Inhoudsopgave Voorwoord ............................3 Inleiding..............................3 2.1 Beschrijving van het product ....................... 3 2.2 Omgevingsinvloeden ........................3 2.3 Gebruikte symbolen ........................3 Voorzorgsmaatregelen en veiligheidsinstructies ................4 Samenstelling van het product ......................4 Belangrijkste onderdelen ......................5 4.2 Accessoires ............................. 6 4.3 Overzicht display ...........................
  • Seite 3: Voorwoord

    2 Inleiding 2.1 Beschrijving van het product De wireless heating controller (SHS-53000) is een slimme radiatorkraan en is bedoeld voor het aansturen van een enkele radiator. Elk ander gebruik dan het hierboven beschreven bedoeld gebruik wordt gezien als onbedoeld gebruik. Smartwares kan niet verantwoordelijk worden gesteld voor eventuele schade veroorzaakt door oneigenlijk, verkeerd of onverstandig gebruik.
  • Seite 4: Voorzorgsmaatregelen En Veiligheidsinstructies

    3 Voorzorgsmaatregelen en veiligheidsinstructies WAARSCHUWING • Monteer het product niet buiten, of op plaatsen waar het nat kan worden. • Het is niet toegestaan om zelf het product open te (laten) maken of te (laten) repareren. In dat geval vervallen garanties. • Gebruik alleen originele accessoires van de fabrikant.
  • Seite 5: Belangrijkste Onderdelen

    4.1 Belangrijkste onderdelen 3 4 5 1 Bevestigingsring 2 LCD display 3 Menu knop Druk op deze knop om te schakelen tussen automatische instellingen (AUTO), handmatige instellingen (Manu) of de vakantiestand. 4 OK knop knop. Deze knop schakelt tussen de 2 instellingen, hoog ( ) en laag ( ). 6 Ventiel bediening 7 Batterijcompartiment 8 Draaiknop...
  • Seite 6: Accessoires

    4.2 Accessoires Deze accessoires zijn van toepassing voor het monteren op een Danfoss ventiel. (Alle handelsmerken en geristreerde handelsmerken zijn het eigendom van hun respectieve eigenaars). 1 Danfoss RA ring 2 Danfoss RAV ring 3 Danfoss RAV dop 4 Danfoss RAVL ring (M30 schroefdraad) 4.3 Overzicht display 1 RF indicator...
  • Seite 7: Het Eerste Gebruik

    5 Het eerste gebruik 5.1 De batterijen plaatsen De slimme radiatorkraan 1 Schuif het batterijdeksel van het product. 2 Plaats 2 AA batterijen (niet meegeleverd). Let op de + en - polariteit! 3 Schuif het batterijdeksel weer op het product. De afstandsbediening Activeer de batterij door het plastic lipje uit het batterijcompartiment te trekken.
  • Seite 8: Montage En Installatie

    6 Montage en installatie Let op! • Doorloop eerst de stappen van hoofdstuk 6 indien u dit nog niet gedaan heeft. • Druk niet op OK voordat het product gemonteerd is op een radiator. • Het water uit het verwarmingssysteem hoeft niet afgetapt te worden wanneer u het product gaat monteren.
  • Seite 9 WAARSCHUWING • Let tijdens installatie op dat uw vinger niet klem komt te zitten tussen de twee delen van een Danfoss ring. Danfoss RA ring 1 Plaats de RA ring om het ventiel van de radiator. Let op! Plaats de Danfoss ring zodanig, dat deze goed klemt in de uitsparing (E) op de radiator.
  • Seite 10: Herinstallatie Van De Slimme Radiatorkraan

    6.4 Herinstallatie van de slimme radiatorkraan Voer de volgende stappen uit om de slimme radiatorkraan te herinstalleren, zonder het geheugen te wissen: 1 Houd de Menuknop ingedrukt tot ‘Pro’ in het display verschijnt. 2 Kies ‘INS’ door aan de draaiknop te draaien. 3 Druk op OK.
  • Seite 11: Programma's Instellen

    7.1.4 Programma’s instellen 7.1.4.1 Een weekprogramma instellen U kunt per dag een verwarmingsprogramma instellen. In de slimme radiatorkraan kunt u 3 verschillende tijdstippen instellen waarop de slimme radiatorkraan naar een bepaalde temperatuur moet schakelen. 1 Houd de Menuknop ingedrukt tot ‘Pro’ in het display verschijnt. 2 Druk op OK.
  • Seite 12: Kinderbeveiliging In- En Uitschakelen

    3 Druk op OK. De datum knippert. 4 Stel de dag in door aan de draaiknop te draaien. 5 Druk op OK. De temperatuur knippert. 6 Stel de gewenste temperatuur tijdens uw vakantie in door aan de draaiknop te draaien. 7 Druk op OK.
  • Seite 13: Een Temperatuurcorrectie Instellen

    Het jaartal verschijnt. 4 Draai aan de draaiknop om het jaar in te stellen. 5 Druk op OK om te bevestigen 6 Draai aan de draaiknop om de maand in te stellen. 7 Druk op OK om te bevestigen. 8 Draai aan de draaiknop om de dag in te stellen. 9 Druk op OK om te bevestigen.
  • Seite 14: Een Hoge En Lage Temperatuur Instellen

    7.2.1 Een hoge en lage temperatuur instellen Let op! De slimme radiatorkraan kan maximaal aan 3 draadloze apparaten (zoals de HomeWizard, een afstandsbediening of een sensor) gekoppeld worden. Wanneer het geheugen vol is, verschijnt in het display (FULL). Raadpleeg hoofdstuk 9 voor meer informatie.
  • Seite 15: Bediening Van De Heating Control Set Met Homewizard

    7.3 Bediening van de heating control set met Homewizard 7.3.1 Hoe voeg ik de slimme radiatorkraan toe aan de Homewizard app? Let op! De slimme radiatorkraan kan maximaal aan 3 externe apparaten gekoppeld worden. Wanneer het geheugen vol is, verschijnt in het display (FULL). Raadpleeg hoofdstuk 9 voor meer informatie.
  • Seite 16: Hoe Schakel Ik De Slimme Radiatorkraan In- Of Uit

    . 10 Garantie Voor dit apparaat geldt een beperkte 2 jarige garantie. Ga voor de garantievoorwaarden naar: www.smartwares.eu. Technische specificaties Benodigde batterijen heating controller 3V DC, 2x 1,5V DC, niet oplaadbare (niet inbegrepen):...
  • Seite 17 Contents Foreword .............................. 18 Introduction ............................18 2.1 Description of product ....................... 18 2.2 Environmental influences ......................18 Precautions and safety instructions ....................18 Composition of product ........................19 Main components ........................19 4.2 Component parts ........................20 4.3 Overview display .......................... 21 First use ..............................
  • Seite 18: Foreword

    2 Introduction 2.1 Description of product The wireless heating controller (SHS-53000) is a smart radiator valve and is intended to control a single radiator. Any other use than the intended use described above is seen as unintended use. Smartwares cannot be held responsible for possible damage caused by improper, incorrect or unwise use.
  • Seite 19: Composition Of Product

    4 Composition of product What’s in the box of the wireless heating control set? 1 Two smart radiator valves 2 A remote control 3 Danfoss fixing rings (2 x) 4.1 Main components 3 4 5 User manual – wireless climate control kit 19...
  • Seite 20: Component Parts

    1 Fixing ring 2 LCD display 3 Menu button Press this button to switch between automatic settings (AUTO), manual settings (Manu) or the holiday position. 4 OK button button This button switches between the 2 settings, high ( ) and low ( ). 6 Valve operation 7 Battery compartment 8 Turn button...
  • Seite 21: Overview Display

    4.3 Overview display 1 RF indicator 2 Day 3 Time 4 Date 5 Holiday position 6 Manual settings 7 Automatic settings 8 Indicator low ( ) and high ( ) temperature 9 The set temperature 10 Window open 11 Battery empty indicator 12 Programme indicator 13 Time indicator 5 First use...
  • Seite 22: Assembly And Installation

    4 Press OK to confirm. On the display the day is flashing. 5 Turn the dial button to set the day. 6 Press OK to confirm. On the display the hour is flashing. 7 Turn the dial button to set the hour. 8 Press OK to confirm. The minutes are flashing on the display. 9 Turn the dial button to set the minutes. 10 Press OK to confirm. The valve turns in the product and ‘ins’ is shown on the display. The product is now ready to be mounted on the radiator.
  • Seite 23: Assembly On A Danfoss Valve

    4 Press the OK button. The valve actuation turns out from the product. ‘AdA’ appears on the display. When properly mounted the home screen appears on the display. With an incorrect assembly, an error code (F1, F2 or F3) appears. See chapter ‘Failure’ for more information. 6.3 Assembly on a Danfoss valve First, determine which of the three Danfoss rings (RA/IPR/RAVL) should be placed on the valve of the radiator.
  • Seite 24: Reinstallation Of The Smart Thermostat Head

    Danfoss RAVL ring 1 Place the RAVL ring around the valve of the radiator. It needs not to be bolted on. 2 Pull out the fixing ring until a ‘CLICK’ is heard. 3 Push the product onto the radiator. 4 Fasten the fixing ring by turning it clockwise. The product is now mounted to the radiator. 5 Press the OK button.
  • Seite 25: Setting A High And Low Temperature

    3 Press the OK button. During the next 30 seconds the smart thermostat head determines the actual temperature. 7.1.3 Setting a high and low temperature Notice! The low temperature needs to be lower than the high temperature. Otherwise, the setting will not be correct. 1 Keep the button pressed until the high temperature appears on the display.
  • Seite 26: Switching Child Lock System On Or Off

    12 Press the OK button. On the display, the time flashes at which the smart thermostat head must switch on for the first time. 13 Repeat the previous 7 steps to set the second and third point in time and the corresponding temperature.. Repeat the above steps when you want to set the other days. • On the home screen, repeatedly press the Menu button until ‘AUTO’ appears. The set week programme now applies.
  • Seite 27: Adjusting The Date And Time

    decrease in temperature of 1.5 °C is detected within 3 minutes, the thermostat head switches to a low temperature. The smart thermostat head remains at this low temperature for a certain amount of time. 1 Keep the Menu button pressed until ‘Pro’ appears on the display. 2 Choose ‘AEr’...
  • Seite 28: Resetting To Factory Settings

    3 Press the OK button. ‘0.0 °C’ appears on the display. 4 Set the preferred offset temperature by turning the dial button. 5 Press OK to confirm. 7.1.9 Resetting to factory settings 1 Keep the Menu button pressed until ‘Pro’ appears on the display. 2 Choose ‘rES’...
  • Seite 29: Operate The Smart Thermostat Head With A Remote Control

    7.2.2 Operate the smart thermostat head with a remote control 1 Set the preferred smart thermostat head to a high and low temperature. See sub-section 7.1.3 for more information. 2 Perform one of the following actions: 3 Press the ON button to connect the smart thermostat head to the high adjusted temperature.
  • Seite 30: How Do I Set The Temperature

    8 Press ‘Radiator valve Name’. Fill in a preferred name for the device and press ‘OK’ (Android) or ‘Ready’ (iOS). 9 Press ‘Code’ and then press ‘Generate new code’. A beep sounds , and the smart thermostat head is linked up with HomeWizard. 10 Press the check mark in the upper right of the screen.
  • Seite 31: Failures

    Disconnect one external device of the smart thermostat head or disconnect all external devices of the smart thermostat head 10 Warranty This device has a limited two-year warranty. For the guarantee conditions go to: www.smartwares.eu. 11 Technical specifications Required batteries heating controller 3V DC, 2x 1,5V DC, non-rechargeable...
  • Seite 32 Eindhalt Vorwort ..............................33 Einführung ............................33 2.1 Beschreibung des Produkts ......................33 2.2 Umgebungseinflüsse ........................33 2.3 Verwendete Symbole ........................33 Vorsichtsmaßnahmen und Sicherheitsanweisungen ..............34 Produktbestandteile ........................... 34 4.1 Wichtigste Komponenten ......................35 4.2 Zubehör ............................36 4.3 Übersicht Display ......................... 36 Die erste Verwendung ........................
  • Seite 33: Vorwort

    Gebrauchsanleitung beschrieben ist. 2 Einführung 2.1 Beschreibung des Produkts Der drahtlose Heizungs-Controller (SHS-53000) ist ein intelligentes Heizkörperventil und ist dazu bestimmt, einen einzelnen Heizkörper anzusteuern. Jede andere Nutzung als die oben beschriebene gilt als unsachgemäße Verwendung. Smartwares kann nicht für eventuelle Schäden verantwortlich gemacht werden, die durch unsachgemäße, falsche oder unvernünftige Nutzung...
  • Seite 34: Vorsichtsmaßnahmen Und Sicherheitsanweisungen

    3 Vorsichtsmaßnahmen und Sicherheitsanweisungen WARNUNG • Bringen Sie das Produkt nicht außen oder an Stellen an, an denen es nass werden kann. • Es ist nicht zulässig, das Produkt selbst zu öffnen bzw. öffnen zu lassen oder zu reparieren bzw. reparieren zu lassen. In diesem Fall verfallen Garantien. • Verwenden Sie nur das Original-Zubehör des Herstellers.
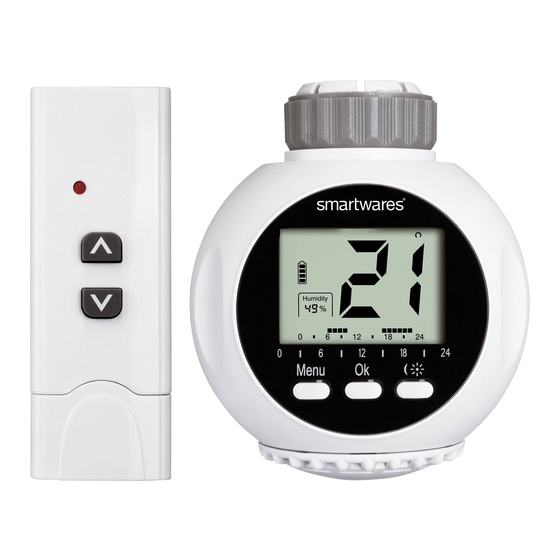
  • Seite 35: Wichtigste Komponenten

    4.1 Wichtigste Komponenten 3 4 5 1 Befestigungsring 2 LCD-Display 3 Menütaste Drücken Sie auf diese Taste, um zwischen den automatischen Einstellungen (AUTO), manuellen Einstellungen (Manu) oder der Urlaubsstand zu wechseln. 4 OK-Taste Taste. Diese Taste schaltet zwischen den beiden Einstellungen, hoch ( ) und niedrig( ). 6 Ventilsteuerung 7 Batteriefach 8 Drehknopf...
  • Seite 36: Zubehör

    4.2 Zubehör Dieses Zubehör gilt für die Montage auf einem Danfoss-Ventil. (Alle Marken und registrierten Marken sind das Eigentum der jeweiligen Inhaber). 4 Danfoss-RA-Ring 5 Danfoss-RAV-Ring 6 Danfoss-RAV-Kappe 7 Danfoss-RAVL-Ring (M30 Gewinde) 4.3 Übersicht Display 1 HF-Anzeige 2 Tag 3 Uhrzeit 4 Datum 5 Urlaubsstand 6 Manuelle Einstellungen...
  • Seite 37: Die Erste Verwendung

    5 Die erste Verwendung 5.1 Die Batterien einlegen Das intelligente Heizkörperventil 1 Schieben Sie den Batteriedeckel vom Produkt. 2 Legen Sie zwei AA-Batterien ein (nicht im Lieferumfang). Achten Sie auf die Polarität mit + und -. 3 Schieben Sie den Batteriedeckel wieder auf das Produkt. Die Fernbedienung Aktivieren Sie die Batterie, indem Sie die Lasche aus dem Batteriefach ziehen.
  • Seite 38: Montage Und Installation

    6 Montage und Installation Achtung! • Durchlaufen Sie zunächst die Schritte aus Kapitel 4, wenn Sie dies noch nicht getan haben. • Drücken Sie nicht auf OK, bevor das Produkt auf einem Heizkörper montiert ist. • Das Wasser aus dem Heizsystem muss nicht abgelassen werden, wenn Sie das Produkt montieren.
  • Seite 39 WARNUNG • Achten Sie während der Installation darauf, dass Ihr Finger zwischen den beiden Teilen eines Danfoss-Rings nicht eingeklemmt wird. Danfoss RA ring 1 Bringen Sie den RA-Ring am Ventil des Heizkörpers an. Achtung! Bringen Sie den Danfoss-Ring so an, dass er in der Aussparung (E) auf dem Heizkörper einwandfrei einrastet.
  • Seite 40: Neuinstallation Des Intelligenten Heizkörperventils

    6.4 Neuinstallation des intelligenten Heizkörperventils Führen Sie die folgenden Schritte aus, um das intelligente Heizkörperventil erneut zu installieren ohne den Speicher zu löschen: 1 Halten Sie die Menütaste eingedrückt, bis „Pro“ im Display angezeigt wird. 2 Wählen Sie „INS“ aus, indem Sie am Drehknopf drehen. 3 Drücken Sie auf OK.
  • Seite 41: Programme Einstellen

    7.1.4 Programme einstellen 7.1.4.1 Ein Wochenprogramm einstellen Sie können pro Tag ein Heizungsprogramm einstellen. Im intelligenten Heizkörperventil können Sie drei unterschiedliche Zeitpunkte einstellen, an denen das intelligente Heizkörperventil auf eine bestimmte Temperatur geschaltet werden muss. 1 Halten Sie die Menütaste eingedrückt, bis „Pro“ im Display angezeigt wird. 2 Drücken Sie auf OK.
  • Seite 42: Kindersicherung Ein- Und Ausschalten

    3 Drücken Sie auf OK. Das Datum blinkt auf. 4 Stellen Sie den Tag ein, indem Sie am Drehknopf drehen. 5 Drücken Sie auf OK. Die Temperatur blinkt auf. 6 Stellen Sie die gewünschte Temperatur während des Urlaubs ein, indem Sie am Drehknopf drehen.
  • Seite 43: Een Temperatuurcorrectie Instellen

    Die Jahreszahl wird angezeigt. 4 Drehen Sie am Drehknopf, um das Jahr einzustellen. 5 Drücken Sie zum Bestätigen auf OK. 6 Drehen Sie am Drehknopf, um den Monat einzustellen. 7 Drücken Sie zum Bestätigen auf OK. 8 Drehen Sie am Drehknopf, um den Tag einzustellen. 9 Drücken Sie zum Bestätigen auf OK.
  • Seite 44: Eine Fernbedienung Koppeln Oder Entkoppeln

    7.2.1 Eine Fernbedienung koppeln oder entkoppeln Achtung! Das intelligente Heizungsventil kann maximal an drei drahtlose Geräte (wie dem HomeWizard, einer Fernbedienung oder einem Sensor) gekoppelt werden. Wenn der Speicher voll ist, erscheint im Display (FULL) (VOLL). Weitere Informationen finden Sie in Kapitel 9. 1 Halten Sie die Menütaste eingedrückt, bis „Pro“ im Display angezeigt wird. 2 Wählen Sie „rFS“...
  • Seite 45: Bedienung Des Heizungssteuerungs-Sets Mit Homewizard

    7.3 Bedienung des Heizungssteuerungs-Sets mit HomeWizard 7.3.1 Wie füge ich das intelligente Heizungsventil der HomeWizard-App hinzu? Achtung! Das intelligente Heizungsventil kann an maximal drei externe Geräte gekoppelt werden. Wenn der Speicher voll ist, erscheint im Display (FULL) (VOLL). Weitere Informationen finden Sie in Kapitel 9.
  • Seite 46: Wie Stelle Ich Die Temperatur Ein

    7.3.2 Wie stelle ich die Temperatur ein? 1 Drücken Sie im Bildschirm der HomeWizard-App auf „Thermostatventil“. Es wird ein Ausklappmenü mit dem von Ihnen hinzugefügten intelligenten Heizungsventil angezeigt. 2 Drücken Sie auf den Namen des gewünschten intelligenten Heizungsventils. Es wird ein Popup angezeigt. 3 Schieben Sie den Finger über den Bildschirm, um die richtige Temperatur auszuwählen.
  • Seite 47: Störungen

    Der Speicher ist voll Entkoppeln Sie ein externes Gerät vom intelligenten Heizungsventil oder entkoppeln Sie alle externen Geräte vom intelligenten Heizungsventil. 10 Garantie Für dieses Gerät gilt eine eingeschränkte zweijährige Garantie. Die Garantiebedingungen finden Sie unter www.smartwares.eu.. 11 Technische Angaben Benötigte Batterien Heizungssteuerung 3V WS, 2x 1,5V WS, nicht aufladbare (nicht im Lieferumfang enthalten): Mignon-Batterien, Typ AA Benötigte Batterie Fernbedienung:...
  • Seite 48 Table des matières Avant-propos ............................49 Introduction ............................49 2.1 Description du produit ....................... 49 2.2 Influences environnementales ....................49 2.3 Symboles utilisés .......................... 49 Mesures de précaution et instructions de sécurité ..............50 Samenstelling van het product ......................50 4.1 Éléments les plus importants ..................... 51 4.2 Accessoires ...........................
  • Seite 49: Avant-Propos

    Le wireless heating controller (SHS-53000) (contrôleur sans fil du chauffage) est une vanne de radiateur intelligente destinée à prendre les commandes de tout radiateur. Tout autre usage que celui décrit ci-dessus est considéré comme inadapté. Smartwares ne peut être considéré comme responsable du dommage éventuel provoqué par une utilisation inadéquate, erronée ou imprudente.
  • Seite 50: Mesures De Précaution Et Instructions De Sécurité

    3 Mesures de précaution et instructions de sécurité AVERTISSEMENT • N’installez pas le produit à l’extérieur ou à des endroits où il pourrait être mouillé. • Il est interdit d’ouvrir (de faire ouvrir) ou de réparer (de faire réparer) le produit. Les garanties sont dans ce cas annulées.
  • Seite 51: Éléments Les Plus Importants

    4.1 Éléments les plus importants 3 4 5 1 Anneau de fixation 2 Affichage LCD 3 Bouton Menu Appuyez sur le bouton pour passer entre les réglages automatiques (AUTO), réglages manuels (Manu) ou position vacance. 4 Bouton OK 5 Bouton Ce bouton passe entre deux réglages, haut ( ) et bas ( ). 6 Commande de la vanne 7 Compartiment de la batterie 8 Bouton rotatif...
  • Seite 52: Accessoires

    4.2 Accessoires Ces accessoires s’appliquent au montage d’une vanne Danfoss. (Toutes les marques commerciales et les marques commerciales enregistrées sont la propriété de leur propriétaire respectif). 1 Anneau Danfoss RA 2 Anneau Danfoss RAV 3 Bouchon Danfoss RAV 4 Anneau Danfoss RAVL ( filet de vis M30) 4.3 Présentation 1 Indicateur RF...
  • Seite 53: Première Utilisation

    5 Première utilisation : 5.1 Installation des batteries La grue intelligente de radiateur 1 Faites glisser le couvercle de la batterie du produit 2 Installez 2 batteries AA (non fournies). Soyez attentif à la polarité + et - ! 3 Faites glisser le couvercle de la batterie sur le produit. La télécommande Activez la batterie en tirant l’onglet en plastic du compartiment de la batterie.
  • Seite 54: Montage Et Installation

    6 Montage et installation Attention! • Passez d’abord les étapes du chapitre 6 si vous ne l’avez pas encore fait. • N’appuyez pas encore sur OK tant que le produit n’est pas monté sur un radiateur. • L’eau dans le système de chauffage ne doit pas être drainée quand vous allez monter le produit.
  • Seite 55 AVERTISSEMENT • Attention pendant l’installation que vos doigts ne se coincent pas entre deux éléments d’un anneau Danfoss. Anneau Danfoss RA 1 Placez l’anneau RA sur la vanne du radiateur. Attention! Placez l’anneau Danfoss de manière à ce qu’il s’imbrique bien dans l’encoche (E) sur le radiateur.
  • Seite 56: Réinstallation De La Vanne De Radiateur Intelligente

    6.4 Réinstallation de la vanne de radiateur intelligente Parcourez les étapes suivantes pour réinstaller la vanne de radiateur intelligente sans effacer la mémoire : 1 Maintenez le bouton Menu enfoncé jusqu’à ce que « Pro » apparaisse dans l’affichage. 2 Choisissez « INS » en faisant tourner le bouton rotatif. 3 Appuyez sur OK. La vanne tourne en avant et en arrière pour trouver le bon réglage. « AdA » apparaît dans l’affichage. 7 Commande 7.1 Commande manuelle du système de contrôle du chauffage 7.1.1 Régler la température manuellement 1 Faites tourner le bouton rotatif jusqu’à...
  • Seite 57: Régler Les Programmes

    7.1.4 Régler les programmes 7.1.4.1 Régler un programme hebdomadaire Vous pouvez régler un programme de chauffage par jour. Dans la vanne de radiateur intelligente, vous pouvez régler trois moments différents auxquels la vanne de radiateur va passer à une température déterminée. 1 Maintenez le bouton Menu enfoncé jusqu’à ce que « Pro » apparaisse dans l’affichage.
  • Seite 58: Mise En/Hors Service De La Sécurité Enfant

    La date clignote. 4 Réglez le jour souhaité en faisant tourner le bouton rotatif. 5 Appuyez sur OK. 6 La température clignote. 7 Réglez la température souhaitée pendant vos vacances en faisant tourner le bouton rotatif. 8 Appuyez sur OK. Astuce! Appuyez sur le bouton Menu pour mettre fin au programme de vacances entretemps.
  • Seite 59: Régler Une Correction De Température

    6 Faites tourner le bouton rotatif pour régler le mois. 7 Appuyez sur OK pour confirmer. 8 Faites tourner le bouton rotatif pour régler le jour. 9 Appuyez sur OK pour confirmer. 10 Faites tourner le bouton rotatif pour régler l’heure. 11 Appuyez sur OK pour confirmer. 12 Faites tourner le bouton rotatif pour régler les minutes. 13 Appuyez sur OK pour confirmer.
  • Seite 60: Lier Ou Supprimer Le Lien Avec Une Télécommande

    7.2.1 Lier ou supprimer le lien avec une télécommande Attention! La vanne intelligente peut au maximum être reliée à 3 appareils sans fil (comme le HomeWizard, une télécommande ou un capteur). Quand la mémoire est remplie, l’affichage (FULL) apparaît. V oir chapitre 9 pour plus d’informations. 1 Maintenez le bouton Menu enfoncé jusqu’à ce que « Pro » apparaisse dans l’affichage. 2 Choisissez « rFS » en faisant tourner le bouton rotatif. Attention! Assurez-vous que vous avez choisi ‘rFS’ et pas ‘rES’. Quand vous choisissez « rES » et que vous suivez les étapes ci-dessous, la vanne intelligente revient aux paramètres d’usine.
  • Seite 61: Commande Du Système De Contrôle Du Chauffage À L'aide Du Homewizard

    7.3 Commande du système de contrôle du chauffage à l’aide du HomeWizard 7.3.1 Comment ajouter la vanne intelligente de radiateur à l’app HomeWizard ? Attention! La vanne intelligente de radiateur peut être raccordée au maximum à 3 appareils externes. Quand la mémoire est remplie, l’affichage (FULL) apparaît. V oir chapitre 9 pour plus d’informations 1 Ouvrez l’app HomeWizard sur votre Smartphone ou votre tablette.
  • Seite 62: Comment Régler La Température

    7.3.2 Comment régler la température ? 1 Appuyez sur l’écran d’Accueil de l’app HomeWizard sur vanne thermostatique. Une menu déroulant apparaît avec la vanne intelligente de radiateur que vous avez ajoutée. 2 Appuyez sur le nom de la vanne intelligente de radiateur souhaitée. Un menu contextuel apparaît.
  • Seite 63: Pannes

    12 VDC, 1 x A23 télécommande: Plage de mesure : 0 ... 29,5°C Plage de réglage : 5 ... 28°C Smartwares safety & lighting Précision de mesure : +/- 0,5°C Broekakkerweg 15 Réglage de température : 1°C ou 2°C réglable...
  • Seite 64 64 Manuel d’utilisation – wireless climate control...

Inhaltsverzeichnis