Herunterladen Inhalt Inhalt Diese Seite drucken
Beurer UB 68 XXL Gebrauchsanweisung
Vorschau ausblenden Andere Handbücher für UB 68 XXL:
Inhaltsverzeichnis

Werbung

Verfügbare Sprachen
  • DE

Verfügbare Sprachen

  • DEUTSCH, seite 1
06.0.43510
Hohenstein
D
Wärme-Unterbett
Gebrauchsanweisung ................ 2
G
Electric underblanket
Instruction for Use ..................... 9
F
Chauffe-matelas
Mode d´emploi .......................... 16
E
Cubrecolchón eléctrico
Instrucciones para el uso ........ 23
BEURER GmbH • Söflinger Str. 218 • 89077 Ulm (Germany)
Tel.: + 49 (0)731 / 39 89-144 • Fax: + 49 (0)731 / 39 89-255
www.beurer.com • Mail: kd@beurer.de
UB 68 XXL
I
Coprimaterasso termico
Instruzioni per l´uso ................. 30
T
Isıtmalı Yatak Altı
Kullanma Talimatı .................. 37
r
Электрическая простыня
Инструкция по применению . 44
Q
Koc/wkład rozgrzewający
Instrukcja obsługi .................... 52

Werbung

Inhaltsverzeichnis
loading

Inhaltszusammenfassung für Beurer UB 68 XXL

  • Seite 1 Koc/wkład rozgrzewający Instrucciones para el uso ..23 Instrukcja obsługi ....52 BEURER GmbH • Söflinger Str. 218 • 89077 Ulm (Germany) Tel.: + 49 (0)731 / 39 89-144 • Fax: + 49 (0)731 / 39 89-255 www.beurer.com • Mail: kd@beurer.de...
  • Seite 2: Inhaltsverzeichnis

    DEUTSCH Inhalt 1. Lieferumfang............3 4.5 Rückschaltautomatik .........6 1.1 Gerätebeschreibung ........3 4.6 Abschaltautomatik ........6 2. Wichtige Anweisungen 4.7 Ausschalten ..........6 Für den späteren Gebrauch aufbewahren ..3 5. Reinigung und Pflege ........7 3. Bestimmungsgemäße Verwendung ....5 6. Aufbewahrung ..........7 4. Bedienung ............5 7.
  • Seite 3: Lieferumfang

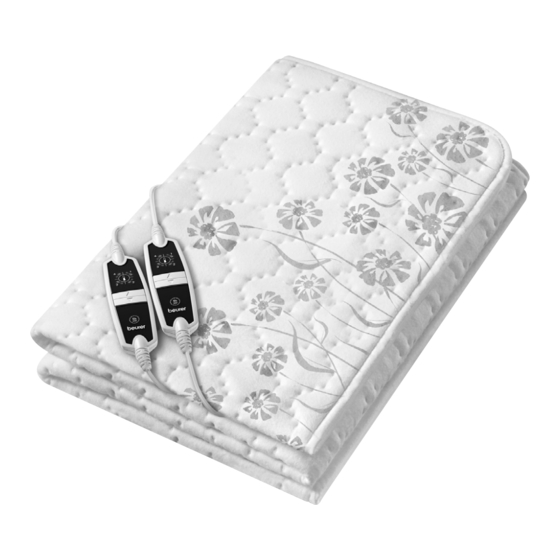
    HINWEIS; Hinweis auf wichtige Informationen. 1. Lieferumfang 1 Wärme-Unterbett 1 Schalter 1 Gebrauchsanweisung 1.1 Gerätebeschreibung 1 Netzstecker 2 Netzleitung 3 Schalter 4 Schieber für EIN/AUS 5 Beleuchtete Temperaturstufen -Taste zur Erhöhung der Temperatur -Taste zur Reduzierung der Temperatur 8 Steckkupplung 2.
  • Seite 4 • Dieses Wärmeunterbett kann von älteren Kindern ab 8 Jahren und da- rüber sowie von Personen mit verringerten physischen, sensorischen oder mentalen Fähigkeiten oder Mangel an Erfahrung und Wissen benutzt werden, wenn Sie beaufsichtigt werden und bezüglich des sicheren Gebrauchs des Wärmeunterbettes unterwiesen wurden und die daraus resultierenden Gefahren verstehen.
  • Seite 5: Bestimmungsgemäße Verwendung

    Sie das Wärme-Unterbett um 180° drehen, so dass die Steckkupplung am Fußende liegt (siehe Abbildung). Damit der Schalter wieder in angenehmer Reichweite der Hand ist, bietet Beurer einen Schalter mit längerer Verbin- dungsleitung an (Art.-Nr. 108.611). Dieser ist direkt beim Beurer Kundenservice zu beziehen...
  • Seite 6: Einschalten

    4.3 Einschalten Stellen Sie den Schieber für EIN/AUS (4) auf die Position EIN (I) um das Wärme-Unterbett einzuschalten (siehe Abb. Schalter). Die Temperaturstufen sind dann beleuchtet. 4.4 Temperatur einstellen Um die Temperatur zu erhöhen, drücken Sie die -Taste (6). Um die Temperatur zu verringern, drücken Sie -Taste (7).
  • Seite 7: Reinigung Und Pflege

    5. Reinigung und Pflege WARNUNG Ziehen Sie vor der Reinigung immer zuerst den Netzstecker aus der Steck- dose. Trennen Sie anschließend die Steckkupplung und somit den Schalter vom Wärme-Unterbett. ACHTUNG • Der Schalter darf niemals mit Wasser oder mit anderen Flüssigkeiten in Kontakt kommen. Er kann sonst beschädigt werden.
  • Seite 8: Entsorgung

    Garantiefalles innerhalb der Garantiezeit ist durch den Kunden der Nachweis des Kaufes zu führen. Die Garantie ist innerhalb eines Zeitraumes von 5 Jahren ab Kaufdatum gegenüber der Beurer GmbH, Söflinger Straße 218, 89077 Ulm, Germany, geltend zu machen. Der Kunde hat im Garantiefall das Recht zur Reparatur der Ware bei unseren eigenen oder bei von uns autorisierten Werkstätten.
  • Seite 9: Explanation Of Symbols

    ENGLISH Contents 1. Items included in the package ......10 4.5 Automatic switch-back ......13 1.1 Description ..........10 4.6 Automatic switch-off........13 2. Important instructions 4.7 Switching off ..........13 Retain for future use ........10 5. Cleaning and care .........13 3. Proper Use.............12 6. Storage ............14 4.
  • Seite 10: Items Included In The Package

    NOTE: Important information. 1. Items included in the package 1 heated underblanket 1 control 1 operating instructions 1.1 Description 1 supply plug 2 supply cord 3 control 4 Slider for ON/OFF 5 Illuminated temperature settings -Button to increase the temperature -Button to decrease the temperature 8 Plug-in coupling 2.
  • Seite 11 • Children shall not play with the heated underblanket. • Cleaning and user maintenance shall not be made by children without supervision. • This heated underblanket is not intended for use in hospitals. • Do not insert pins • Do not use folded or rucked •...
  • Seite 12: Proper Use

    (see illustra- tion). So that the switch is within comfortable reach of your hand, Beurer offers a switch with a longer connection cable (Item no. 108.611). This is available directly from Beurer Customer Services.
  • Seite 13: Selecting The Temperature Setting

    4.4 Selecting the temperature setting To increase the temperature, press the button (6). To decrease the temperature, press the button (7). After switching on the temperature setting is illuminated. Setting 0: Setting 1: minimum heat Setting 2-3: Individual heat Setting 4: maximum heat WARNING If the heated underblanket is used continuously (for several hours) it is...
  • Seite 14: Storage

    CAUTION • The control must never come into contact with water or other liquids, as this may cause damage. To clean the control, use a dry, lint-free cloth. To remove stains from the heated underblanket use a damp cloth and, if necessary, a mild cleaning agent. Do not use cleaning agents containing solvent or scouring agents.
  • Seite 15: In The Event Of Problems

    8. In the event of problems Problem Cause Remedy The temperature settings are not illuminated while The Safety System Send the heated un- - The switch is fully connected to the electric under- switched off the heated derblanket together blanket underblanket irreversible with the switch to the - The mains plug is connected to a working socket...
  • Seite 16: Explication Des Symboles

    FRANÇAIS Sommaire 1. Livraison ............17 4.5 Réinitialisation automatique.....20 1.1 Description de l’appareil ......17 4.6 Arrêt automatique ........20 2. Consignes importantes 4.7 Mise hors tension ........20 À conserver pour un usage ultérieur ! ....17 5. Nettoyage et entretien ........20 3. Utilisation conforme aux recommandations ..19 6.
  • Seite 17: Livraison

    ATTENTION: Remarque de sécurité relative à la possibilité de dommages sur l’appareil/ les accessoires. REMARQUE: Remarque relative à des informations impor- tantes. 1. Livraison 1 chauffe-matelas 1 interrupteur 1 mode d'emploi 1.1 Description de l’appareil 1 Prise 2 Cordon d'alimentation 3 Interrupteur 4 Commutateur coulissant MARCHE/ARRÊT 5 Niveaux de température lumineux...
  • Seite 18 • Ce chauffe-matelas peut être utilisé par les enfants de plus de 8 ans ainsi que par les déficients physiques, sensoriels ou mentaux et les personnes ayant peu de connaissances ou d'expérience à la condition qu'ils soient surveillés ou sachent comment l'utiliser en toute sécurité et en comprennent les risques.
  • Seite 19: Utilisation Conforme Aux Recommandations

    à 180° afin que la fiche secteur soit située à l'extrémité des pieds. Afin que l'interrupteur soit facilement à portée de main, Beurer propose un interrupteur avec un câble de raccordement plus long (réf. 108.611). Vous pouvez vous le procurer directement auprès du service client Beurer.
  • Seite 20: Réglage De La Température

    4.4 Réglage de la température Pour augmenter la température, appuyez sur la touche (6). Pour baisser la température, appuyez sur la touche (7). Niveau 0 : éteint Niveau 1 : chaleur minimale Niveaux 2-3 : chaleur personnalisée Niveau 4 : chaleur maximale AVERTISSEMENT Lorsque vous utilisez le chauffe-matelas pendant plusieurs heures, il est...
  • Seite 21: Rangement

    ATTENTION • L‘interrupteur ne doit jamais entrer en contact avec de l‘eau ou d‘autres liquides. Il peut être endommagé. Pour le nettoyage de l‘interrupteur, utilisez un chiffon sec non pelucheux. N’utilisez pas de produit abrasif ou autre détergent. Vous pouvez nettoyer les petites tâches du chauffe-matelas à l'aide d'un chiffon humide et un peu de lessive liquide pour linge délicat.
  • Seite 22: Que Faire En Cas De Problèmes

    8. Que faire en cas de problèmes ? Problème Cause Solution Les niveaux de température ne sont pas éclairés Le système de sécu- Envoyez le chauffe-ma- quand : rité a désactivé le telas et l'interrupteur au - l'interrupteur est connecté au chauffe-matelas chauffe-matelas de service après-vente.
  • Seite 23: Explicación De Los Símbolos

    ESPAÑOL Contenido 1. Artículos suministrados .........24 4.5 Retroceso automático ......27 1.1 Descripción del aparato ......24 4.6 Desconexión automática ......27 2. Indicaciones importantes 4.7 Apagar .............27 Consérvelas para futuras consultas....24 5. Limpieza y cuidado ........27 3. Uso correcto del aparato .......26 6.
  • Seite 24: Artículos Suministrados

    ATENCIÓN: Instrucción de seguridad relativa a posibles daños del aparato/accesorios. INDICACIÓN: Señala informaciones importantes. 1. Artículos suministrados 1 Cubrecolchón eléctrico 1 Interruptor 1 Instrucciones de uso 1.1 Descripción del aparato 1 Enchufe 2 Cable de alimentación 3 Interruptor 4 Deslizador para encender/apagar 5 niveles de temperatura iluminados 6 Tecla para subir la temperatura...
  • Seite 25 • Este calientacamas eléctrico puede ser utilizado por niños mayores de 8 años, así como por personas con facultades físicas, sensoriales o mentales limitadas, o con poca experiencia o conocimientos, siem- pre que estén vigilados o se les indique cómo usarlo de forma segura y entiendan los peligros que conlleva.
  • Seite 26: Uso Correcto Del Aparato

    (véase el dibujo). Para que el interruptor quede en ese caso al alcance de la mano cómodamente, Beurer ofrece un interruptor con un cable de conexión más largo (ref. 108.611) que se puede solicitar directamente al servicio de atención al cliente de Beurer.
  • Seite 27: Ajuste De La Temperatura

    4.4 Ajuste de la temperatura Para subir la temperatura, pulse la tecla (6). Para bajar la temperatura, pulse la tecla (7). Nivel 0: Nivel 1: calor mínimo Nivel 2-3: calor individual Nivel 4: calor máximo ADVERTENCIA Si el calientacamas eléctrico se utiliza durante varias horas, recomen- damos ajustar el nivel de temperatura más bajo en el interruptor para evitar un sobrecalentamiento del usuario.
  • Seite 28: Conservación

    ATENCIÓN • El interruptor no debe entrar nunca en contacto con agua o con otros líquidos, ya que podría dañarse. Para limpiar el interruptor, utilice únicamente un paño seco y sin pelusas. No emplee ningún producto de limpieza químico ni abrasivo. Las pequeñas manchas del calientacamas pueden eliminarse con un paño húmedo y en su caso un poco de detergente líquido suave.
  • Seite 29: Resolución De Problemas

    8. Resolución de problemas Problema Causa Solución Los niveles de temperatura no se iluminan El sistema de seguridad Envíe el calientaca- mientras ha desconectado de mas y el interruptor al - el interruptor está completamente conectado con forma irreversible el cali- servicio de atención al el calientacamas eléctrico entacamas eléctrico.
  • Seite 30: Spiegazione Dei Simboli

    ITALIANO Indice 1. Fornitura ............31 4.5 Dispositivo di riduzione automatica ..34 1.1 Descrizione dell'apparecchio ....31 4.6 Dispositivo di arresto automatico ..... 34 2. Indicazioni importanti 4.7 Spegnimento ..........34 Conservare per utilizzo futuro ......31 5. Pulizia e cura ..........34 3.
  • Seite 31: Fornitura

    NOTA: Indicazione di informazioni importanti. 1. Fornitura 1 coprimaterasso termico 1 interruttore 1 manuale di istruzioni 1.1 Descrizione dell'apparecchio 1 Spina di alimentazione 2 Cavo di alimentazione 3 Interruttore 4 Regolatore per accensione/spegnimento 5 Livelli di temperatura illuminati 6 Pulsante per aumentare la temperatura 7 Pulsante per ridurre la temperatura...
  • Seite 32 esclusivamente sotto supervisione oppure se sono stati istruiti in merito alle misure di sicurezza e comprendono i rischi ad esse correlati. • I bambini non devono giocare con il coprimaterasso termico. • La pulizia e la manutenzione a cura dell'utente non devono essere eseguite da bambini, a meno che non siano sorvegliati.
  • Seite 33: Uso Conforme

    (vedere la fi- gura). Per fare in modo che l'interruttore sia comodamente a portata di mano, Beurer propone un interruttore con un cavo di collegamento più lungo (cod. art. 108.611). Esso può essere ordinato direttamente al Servizio clienti Beurer.
  • Seite 34: Dispositivo Di Riduzione Automatica

    AVVERTENZA Se il coprimaterasso termico viene utilizzato per diverse ore, si consiglia di impostare il livello di temperatura più basso per evitare il surriscalda- mento. NOTA: • Per fare in modo che il coprimaterasso termico si riscaldi il più rapidamente possibile, impostare innanzitutto il livello di temperatura più...
  • Seite 35: Conservazione

    ATTENZIONE • Il coprimaterasso termico non può essere lavato a secco, strizzato, asciugato in asciugatrice, manganato o stirato. Questo coprimaterasso termico può essere lavato in lavatrice. Impostare un programma di lavaggio particolarmente delicato a 30°C (programma per la lana). Utilizzare un detergente per capi delicati e dosarlo secondo le indicazioni del produttore. ATTENZIONE •...
  • Seite 36: Che Cosa Fare In Caso Di Problemi

    8. Che cosa fare in caso di problemi? Problema Causa Soluzione I livelli di temperatura non sono illuminati quando Il sistema di sicurezza ha Spedire il copri- - l'interruttore è correttamente collegato al copri- spento definitivamente il materasso termico e materasso termico coprimaterasso termico.
  • Seite 37: Şekillerin Anlamı

    TÜRKÇE İçindekiler 1. Teslimat kapsamı ...........38 4.6 Otomatik kapanma ........41 1.1 Cihaz Açıklaması ........38 4.7 Kapatma ..........41 2. Önemli bilgiler 5. Temizlik ve bakım ..........41 Daha sonra kullanmak üzere muhafaza edin .38 6. Saklama ............42 3. Amaca uygun kullanım ........40 7.
  • Seite 38: Teslimat Kapsamı

    DİKKAT: Cihazda / aksesuarlarda söz konusu olabilecek hasarlar ile ilgili bilgi. BİLGİ/NOT: Önemli bilgilere dikkat çekilmesi. 1. Teslimat kapsamı 1 Elektrikli battaniye 1 Şalter 1 Kullanım kılavuzu 1.1 Cihaz Açıklaması 1 Elektrik fişi 2 Güç kablosu 3 Şalter 4 AÇMA/KAPAMA sürgülü şalteri 5 Işıklı...
  • Seite 39 bilgilendirilmiş olmaları ve cihazın kullanımı sonucu ortaya çıkabilecek tehlikelerin bilincinde olmaları koşuluyla kullanılabilir. • Çocuklar elektrikli battaniyeyle oynamamalıdır. • Temizlik ve kullanıcı bakımı, gözetim altında olmadıkları sürece çocuklar tarafından yapılmamalıdır. • Bu elektrikli battaniye hastanelerde kullanım için tasarlanmamıştır. • İğne batırmayın •...
  • Seite 40: Amaca Uygun Kullanım

    (şekle bakın). Bu durumda da şaltere elinizle rahatça uzanabilmeniz için, Beurer daha uzun bir bağlantı kablosu olan bir şalter sunmaktadır (Ürün no. 108.611). Bu şalteri doğrudan Beurer müşteri hizmet- lerinden temin edebilirsiniz. 4.3 Açma Elektrikli battaniyeyi açmak için AÇIK/KAPALI sürgüsünü (4) AÇIK (I) konuma getirin (bkz. şalter resmi).
  • Seite 41: Otomatik Kademe Azaltma

    UYARI Eğer elektrikli battaniye birkaç saat boyunca kullanılacaksa kullanıcının aşırı ısınmasını önlemek için en düşük sıcaklık kademesini ayarlamanızı öneririz. BİGLİ/NOT • Elektrikli battaniyenin en hızlı şekilde ısınması için önce en yüksek sıcaklık kademesine ayarlamanız gerekir. • Elektrikli battaniyeyi yatağa girmeden yaklaşık 30 dakika önce açmanızı ve ısının kaçmaması için üzerini yorganla örtmenizi öneririz.
  • Seite 42: Saklama

    DİKKAT • Elektrikli battaniyenin kimyasal yöntemlerle temizlenmemesi, sıkılmaması, makinede kurutulmaması, pres ütüyle veya normal ütüyle ütülenmemesi gerektiğine dikkat edin. Bu elektrikli battaniye makinede yıkanabilir. Çamaşır makinesini 30 °C’de özel narin yıkama moduna ayarlayın. Bir yumuşak deterjanı üretici tarafından belirtilen dozaja göre kullanın. DİKKAT •...
  • Seite 43: Пояснение Символов

    РУССКИЙ Содержание 1. Комплект поставки ........44 4.5 Автоматическое переключение на более низкую температуру ......47 1.1 Описание прибора .........44 4.6 Автоматическое отключение ....47 2. Важные указания 4.7 Выключение ...........48 Сохраните для последующего использования! ..........44 5. Очистка и уход ..........48 3. Использование по назначению ....46 6.
  • Seite 44: Комплект Поставки

    ВНИМАНИЕ! Предостережение о возможных повреждениях прибора/ принадлежностей. УКАЗАНИЕ: Указание на важную информацию. 1. Комплект поставки 1 электрическая простыня 1 переключатель 1 инструкция по применению 1.1 Описание прибора 1. Штекер 2. Кабель 3. Переключатель 4. Ползунок для включения и выключения 5. Индикатор температурных режимов с подсветкой...
  • Seite 45 • Данную электрическую простыню запрещается использовать детям (в возрасте 3–8 лет), за исключением тех случаев, когда переключатель предварительно настроен родителями или другими взрослыми, несущими ответственность за ребенка, а также если ребенок был обучен безопасному использованию электрической простыни. • Допускается использование электрической простыни детьми старше...
  • Seite 46: Применение ..................................................46 7. Утилизация

    использования электрической простыни нагреваются. Поэтому запрещается накрывать переключатель или класть его на электрическую простыню, когда она включена. • С дополнительными вопросами по применению приборов Beurer обращайтесь в нашу сервисную службу. • Обязательно следуйте указаниям по применению (глава 4), очистке и уходу (глава 5) и хранению (глава 6).
  • Seite 47: Включение ..............................................47 9. Технические Характеристики

    то Вы можете повернуть электрическую простыню на 180°, чтобы штепсельный разъем находился со стороны ног (см. рисунок). Для обеспечения удобного расположения выключателя фирма Beurer предлагает выключатель с удлиненным соединительным проводом (№ арт. 108.611). Его можно заказать непосредственно в сервисной службе Beurer.
  • Seite 48: Сохраните Для Последующего 4.7 Выключение

    4.7 Выключение Установите ползунок ВКЛ./ВЫКЛ. (4) в положение ВЫКЛ. (I), чтобы выключить электрическую простыню. Тогда индикаторы температурных режимов погаснут. УКАЗАНИЕ Если электрическая простыня не будет использоваться в течение нескольких дней, переведите ползунок в положение ВЫКЛ. ( 0 ) и выньте сетевой штекер из розетки. 5.
  • Seite 49: Хранение

    6. Хранение Если электрическая простыня не используется длительное время, рекомендуется хранить ее в оригинальной упаковке. ВНИМАНИЕ Сначала дайте электрической простыне остыть. В противном случае это может привести к повреждению электрической простыни. Во избежание образования острых перегибов ничего не кладите на электрическую простыню во...
  • Seite 50 Фирма-изготовитель: Бойрер Гмбх, Софлингер штрассе 218, 89077-УЛМ, Германия Фирма-импортер: OOO Бойрер, 109451 г. Москва, ул., Перерва 62, корп. 2, офис 3 Сервисный центр: 109451 г. Москва, ул. Перерва 62, корп. 2 Тел(факс) 495—658 54 90, bts-service@ctdz.ru Дата продажи Подпись продавца Штамп...
  • Seite 51 POLSKI Spis treści 1. Zawartość opakowania .........52 4.5 Automatyczne przełączanie na niższy poziom temperatury .........55 1.1 Opis urządzenia ........52 4.6 Automatyczne wyłączanie .......55 2. Ważne wskazówki 4.7 Wyłączanie ..........55 Zachować do późniejszego użytku ....52 5. Czyszczenie i konserwacja ......55 3. Użytkowanie zgodne z przeznaczeniem ..54 6.
  • Seite 52: Zawartość Opakowania

    UWAGA: Wskazówka dot. możliwości powstania szkód w urządzeniu lub osprzęcie. WSKAZÓWKI: Wskazówka dot. ważnych informacji. 1. Zawartość opakowania 1 wkład rozgrzewający 1 przełącznik 1 instrukcja obsługi 1.1 Opis urządzenia 1 Wtyczka 2 Przewód zasilający 3 Przełącznik 4 Suwak WŁ/WYŁ 5 Podświetlane poziomy temperatury zwiększający temperaturę...
  • Seite 53 • Wkład rozgrzewający może być używany przez dzieci od 8 roku życia oraz osoby z ograniczoną sprawnością fizyczną, sensoryczną i umysłową lub brakiem doświadczenia i wiedzy tylko wtedy, gdy znajdują się one pod nadzorem lub otrzymały instrukcje, w jaki sposób bezpiecznie korzystać...
  • Seite 54: Użytkowanie Zgodne Z Przeznaczeniem

    Be- urer ma w swojej ofercie przełącznik z dłuższym prze- wodem łączącym (nr art. 108.611). Można go zamówić bezpośrednio w serwisie Beurer. 4.3 Włączanie Ustaw przełącznik do włączania/wyłączania (4) w pozycji WŁ (I), aby włączyć wkład rozgrzewający (patrz rys.
  • Seite 55: Ustawianie Temperatury

    4.4 Ustawianie temperatury Aby zwiększyć temperaturę, naciśnij przycisk (6). Aby zmniejszyć temperaturę, naciśnij przycisk (7). Poziom 0: WYŁ Poziom 1 : minimalne ogrzewanie Poziom 2-3 : indywidualne ogrzewanie Poziom 4 : maksymalne ogrzewanie OSTRZEŻENIE Jeśli wkład rozgrzewający będzie używany przez wiele godzin, zalecamy ustawienie najniższej temperatury na przełączniku, aby uniknąć...
  • Seite 56: Przechowywanie

    UWAGA • Przełącznik nie powinien mieć jakiegokolwiek kontaktu z wodą ani innymi cieczami. W przeciwnym razie może nastąpić uszkodzenie przełącznika. Do czyszczenia przełącznika należy używać suchej, niepozostawiającej włókien ściereczki. Nie należy stosować środków chemicznych ani szorujących. Niewielkie plamy na wkładzie rozgrzewającym można usuwać za pomocą wilgotnej szmatki lub niewielkiej ilości delikatnego środka myjącego.
  • Seite 57: Rozwiązywanie Problemów

    8. Rozwiązywanie problemów Problem Przyczyna Rozwiązanie Poziomy temperatury nie są podświetlane, gdy: System Wkład rozgrzewający i - przełącznik został prawidłowo połączony z wkładem bezpieczeństwa nie- przełącznik należy odesłać rozgrzewającym odwracalnie wyłączył do serwisu. - zasilacz jest połączony z prawidłowo działającym wkład rozgrzewający.

Inhaltsverzeichnis