BURY CC 9068 Kurzanleitung
Vorschau ausblenden
Andere Handbücher für CC 9068:
- Kurzanleitung (2 Seiten) ,
- Anleitung (35 Seiten) ,
- Kurzanleitung (66 Seiten)

Verwandte Anleitungen für BURY CC 9068


Inhaltszusammenfassung für BURY CC 9068
- Seite 1 CC 9068 / CC 9068 App KURZANLEITUNG QUICK USER GUIDE STRUČNŶ NÁVOD OVERSIGTSVEJLEDNING GUÍA RÁPIDA GUIDE DE DÉMARRAGE GUIDA RAPIDA BEKNOPTE HANDLEIDING KRÓTKA INSTRUKCJA BREVE MANUAL КРАТКАЯ ИНСТРУКЦИЯ ÖVERSIKTSINSTRUKTION ÖZET KILAVUZ...
-
Seite 2: Introductory Information
Du har erhvervet et håndfrit installationssæt af mærket BURY og dermed bestemt dig for et produkt af høj kvalitet med maksimal betjeningskomfort. Estimado Cliente: Usted ha adquirido un kit de telefonía manos libres de la marca BURY, optando con ello por un producto de alta calidad y máximo confort de manejo. Chère cliente, cher client, Vous venez d’acheter un kit mains-libres de la marque BURY et avez ainsi choisi un produit de haute... - Seite 3 Вы приобрели автомобильный комплект громкой связи марки BURY и тем самым Вы выбрали высококачественный продукт, гарантирующий пользователю высокий комфорт обслуживания. Bästa kund! Du har köpt en handsfree av märket BURY och därmed bestämt dig för en produkt av hög kvalitet med maximal användningskomfort. Sayın müşterimiz, BURY marka eller serbest araç...
- Seite 4 Installation of the hands-free car kit CC 9068 Lieferumfang CC 9068 Scope of supply Rozsah dodávky Leveringsomfang Alcance de suministro Fourniture Contenuto della fornitura Leveringsomvang Zawartość Âmbito de fornecimento Комплектность Leveransomfattning Sevkiyatın İçeriği...
- Seite 5 Beschreibung der Komponenten: Scope of delivery: 1. Elektronikbox 1. Electronic box 2. Multifunktionsdisplay mit Halterung und 2. Multifunction display with cradle and mount, Montagefuß, Schraube für Halterung und screws for the holder and rubber cover, adhe- Gummiabdeckung, Klebestreifen sive tape 3.
- Seite 6 Installation of the hands-free car kit CC 9068 Contenido: Contenu de la livraison : 1. Caja electrónica 1. Boîtier électronique 2. Pantalla multifuncional con soporte y pie de 2. Écran multifonctionnel avec support et pied de montaje, tornillo para el soporte y cubierta de...
- Seite 7 W komplecie: Material fornecido: 1. Centralka elektroniczna 1. Caixa electrónica 2. Monitor wielofunkcyjny z uchwytem i stopką 2. Visor multifunções com suporte & pé de montującą, śruba do uchwytu i nakładka montagem, parafuso para o suporte gumowa, taśma mocująca e cobertura de borracha, fita adesiva 3.
- Seite 8 Installation of the hands-free car kit Paket kapsamı: 1. Elektronik kutusu 2. Tutma elemanlı & montaj ayaklı çok fonksiyonlu ekran, kızak sabitleme civatası, tutma elemanı ve lastik kapak civatası, Yapışkan şerit 3. Mikrofon 4. ISO Kablo grubu 5. Uzatma kablosu 6.
- Seite 9 Installation of the hands-free car kit CC 9068 App CC 9068 App...
- Seite 10 Installation of the hands-free car kit CC 9068 App Beschreibung der Komponenten: Scope of delivery: 1. Elektronikbox 1. Electronic box 2. Halter - BURY ChargingCradle Universal 2. Cradle - BURY ChargingCradle Universal 3. Justiereinlagen 3. Alignment inserts 4. Dash Mount Adapter 4.
- Seite 11 Contenido: Contenu de la livraison : 1. Caja electrónica 1. Boîtier électronique 2. Soporte - BURY ChargingCradle Universal 2. Support - BURY ChargingCradle Universal 3. Insertos de ajuste 3. Inserts d‘ajustement 4. Dash Mount Adapter 4. Dash Mount Adapter 5. Antena plana pequeña 5.
-
Seite 12: Valfritt Tillbehör
Installation of the hands-free car kit CC 9068 App W komplecie: Material fornecido: 1. Centralka elektroniczna 1. Caixa electrónica 2. Uchwyt - BURY ChargingCradle Universal 2. Suporte - BURY ChargingCradle Universal 3. Narożniki justujące 3. Acessórios de alinhamento 4. Dash Mount Adapter 4. - Seite 13 Paket kapsamı: 1. Elektronik kutusu 2. Tutucu - BURY ChargingCradle Universal 3. Yuva adaptörleri 4. Dash Mount Adaptörü 5. GSM anteni (Fakra) 6. Mikrofon 7. ISO Kablo grubu 8. Uzatma kablosu 9. AUX-In kablosu 10. Micro-USB şarj kablosu 11. Özet kılavuz Opsiyonel aksesuar: 12.
- Seite 14 Installation of the hands-free car kit Inbouwoverzicht Einbauübersicht Installation overview Schemat montażu Nákres instalace Plano geral de montagem Monteringsoversigt Монтажная схема Plano general de montaje Monteringsöversikt Vue d’ensemble du montage Montaj hakkında özet bilgi Sommario del montaggio...
- Seite 15 Anschlüsse an der Elektronikbox: Mini-USB Stromversorgung/Stummschaltung über ISO-Kabelbaum Mikrofon LINE-IN Multifunktionsdisplay Connections on the electronics box: Mini-USB Power supply/Muting using Mute via ISO cable tree Microphone LINE-IN Multifunction display Připojení elektronické skříňky: Tilslutning af elektronikboks: Mini USB Mini-USB Napájení proudem/Ztlumení zvuku Strømforsyning/Stille radio på...
- Seite 16 Installation of the hands-free car kit Conexiones en la caja electrónica: Connexions au boîtier électronique : Mini USB Mini-USB Suministro de corriente/Silenciamiento Alimentation/Mise en sourdine via a través del mazo de cables ISO le harnais de câbles ISO Micrófono Microphone LINE-IN LINE-IN Pantalla multifuncional...
- Seite 17 Подсоединение электронного блока: Anslutning av elektronikdosan: Mini-USB Mini-USB Электропитание/Отключение звука Strömförsörjning/Ljudlösinställning с помощью кабельной разводки via ISO-kabel согласно ISO Mikrofon Микрофон LINE-IN LINE-IN Multifunktionsdisplay Мультифункциональный дисплей Elektronik Kutusundaki Bağlantılar: Mini USB Elektrik beslemesi/ISO kablo kanalı üzerinden sessize alma Mikrofon LINE-IN Fonksiyonlu ekran...
- Seite 18 Installation of the hands-free car kit CC 9068 Montage des Systems Montage van het systeem Installation of the system Montaż systemu Montáž systému Montagem do sistema Installation af systemet Монтаж системы Montaje del sistema Montering av handsfree-enheten Montage du système Eller serbest araç...
- Seite 20 Installation of the hands-free car kit CC 9068 App So passen Sie Ihren BURY ChargingCradle Universal Halter an Ihr Handy an: 1. Wählen Sie die geeigneten Justiereinlagen und passen Sie die Tiefe des Halters an Ihr Handy an. Um einen für einen bestimmten Modell des Mobiltelefons / Smartphones geeignete Typ der Eckhalter zu wählen, ma-...
- Seite 21 3. Drücken Sie die 3 Entriegelungsstifte und ziehen Sie die Ecken vom Halter weg. Option Nokia Pin 2mm Mikro-USB 4. Setzen Sie Ihr Mobiltelefon in den Halter ein.
- Seite 22 Installation of the hands-free car kit CC 9068 App 5. Stellen Sie nun die gewünschte Höhe oder Tiefe Ihres Handys ein. Lösen Sie dann die Entriegelungsstifte, um die Positionen beizubehalten. 6. Um einen sicheren Halt zu gewährleisten, passen Sie nun noch die Eckelemente an die Höhe an.
- Seite 23 Adapting the BURY ChargingCradle Universal to the mobile phone 1. Select appropriate corner inserts and adjust out to depth of phone. To be able to select the suitable type of corner fastener for a certain model of mobile phone / smartphone, please familiarize yourself with the corresponding compatibility list.
- Seite 24 Installation of the hands-free car kit CC 9068 App Takto přizpůsobíte svůj univerzální stojan BURY ChargingCradle Universal svému mobilnímu telefonu: 1. Zvolte vhodnou přizpůsobovací vložku a přizpůsobte hloubku stojanu svému mobilnímu telefonu. Abyste pro určitý model mobilního telefonu / chytrého telefonu zvolili správný typ rohového stojanu, seznamte se s příslušným seznamem kompatibility.
- Seite 25 Sådan tilpasses BURY ChargingCradle Universalholderen til din mobiltelefon: 1. Vælg de egnede justeringsindlæg og tilpas dybden af holderen til din mobiltelefon. For at vælge en egnet hjørneholder til en bestemt type mobiltelefon/smartphone kan du bruge den tilsvarende kompatibilitetsliste. Denne liste finder du under downloads for produktet på vores hjemmeside: www.bury.com.
- Seite 26 Installation of the hands-free car kit CC 9068 App Cómo adaptar el soporte BURY ChargingCradle Universal al teléfono móvil: 1. Seleccione las piezas de ajuste apropiadas y adapte la profundidad del soporte a su móvil. Para seleccionar el tipo de soporte angular adecuado para un determinado modelo de teléfono móvil / Smar- tphone, consulte la lista de compatibilidad correspondiente.
- Seite 27 Comment ajuster votre support BURY ChargingCradle Universal votre téléphone portable : 1. Choisissez les inserts d’ajustement appropriés et ajustez la profondeur du support à votre téléphone portable. Afin de choisir un support d’angle de type approprié pour un certain modèle de téléphone mobile / smartphone, consultez la liste de compatibilité...
- Seite 28 Installation of the hands-free car kit CC 9068 App Ecco come adattare il supporto BURY ChargingCradle Universal al telefono cellulare: 1. Selezionare il dispositivo di regolazione più adatto e regolare la profondità del supporto al proprio telefono cellulare. Per scegliere un tipo di sostegno angolare adatto ad un determinato modello di telefono cellulare / smartphone, consultare la relativa lista di compatibilità.
- Seite 29 Zo past u uw BURY ChargingCradle Universal-houder aan uw mobiele telefoon aan: 1. Kies de geschikte kalibreerinleggers en pas de diepte van de houder aan uw mobiele telefoon aan. Als u een bepaalde hoekhouder wilt kiezen die geschikt is voor uw model mobiele telefoon / smartphone, dan dient u zich vertrouwd te maken met de betreffende compatibiliteitslijst.
- Seite 30 Installation of the hands-free car kit CC 9068 App Dopasowanie uchwytu BURY ChargingCradle Universal do telefonu/smartfona: 1. Wybrać odpowiednie końcówki trzymające i dopasować do grubości telefonu. Aby wybrać właściwy typ końcówek trzymających do określonego modelu smartfona/telefonu komórkowego, należy zapoznać się z odpowiednią listą kompatybilności. Lista ta jest dostępna na naszej stronie internetowej www.bury.com w obszarze plików do pobrania danego produktu.
- Seite 31 Deste modo adapta o suporte BURY ChargingCradle Universal ao seu telemóvel: 1. Seleccione as entradas de ajuste adequadas e adapte a profundidade do suporte ao seu telemóvel. Para escolher um tipo de canto de encaixe adequado para um determinado modelo de telemóvel / Smartphone, familiarize-se com a correspondente lista de compatibilidade.
- Seite 32 Installation of the hands-free car kit CC 9068 App Адаптацию Вашего держателя BURY ChargingCradle Universal к Вашему мобильному телефону Вы выполните следующим образом: 1. Выберите подходящие юстировочные прокладки и настройте глубину держателя на Ваш мобильный телефон. Чтобы выбрать тип угловых элементов, подходящий к определенной модели мобильного или телефона / смартфона, познакомьтесь...
- Seite 33 1. Välj ägnade justeringsinlägg och anpassa hållarens djup till din mobiltelefonen. För att välja en passande typ av hörnfäste för en bestämd mobiltelefon/smartphone-modell bör du konsultera kompabilitetslistan. Denna lista finner du på vår hemsida i produktens nedladdningsmeny: www.bury.com. Obs: Alla hörnfästesset har en bokstavsbeteckning på hörnfästets insida.
- Seite 34 1. Cep telefonunuza uygun yuva adaptörlerini seçin ve tutucunun derinliğini telefonunuza göre ayarlayın. Belli bir cep telefonuna / akıllı telefona uygun köşe desteği seçmek için, ilgili uygunluk listesini yakından inceleyin. Bu listeyi, internet sayfamızda yer alan ürünün yükleme bölümünde bulabilirsiniz: www.bury.com. Dikkat: Her köşe desteği seti, köşe desteğinin iç...
- Seite 35 For the fixing of the Dash Mount Adapter, depending on the type and brand of your car, specific attach- ment systems (consoles or other assembly aids) can be purchased from local retailers. Push the BURY ChargingCradle Universal in the Dash Mount Adapter until you can feel it click into place. BURY ChargingCradle Universal spojte s Dash Mount Adapter.
- Seite 36 Pour fixer l’adaptateur Dash Mount, quel que soit le type ou la marque du véhicule, vous pouvez faire l’acquisition de certains systèmes d’installation (consoles ou autres aides au montage) auprès de votre revendeur. Insérer le BURY ChargingCradle Universal dans le système Dash Mount Adapter jusqu’à ce qu’il s’enclenche.
- Seite 37 Ön panel montaj adaptörünün montajı için - araç tipine ve markasına bağlı olarak - uzman satıcılardan belirli montaj sistemleri (konsollar ya da başka montaja yardımcı gereçler) alınabilir. ‘BURY ChargingCrad- le Universal’ı, tutucu hissedilir bir tıklamayla yerine oturana kadar adaptörün üstüne bastırın.
- Seite 38 Installation of the hands-free car kit PWR/LSP/LINE OUT Schritt 1: Ziehen Sie die ISO-Stecker hinten am Radio ab und ersetzen Sie diese durch die Stecker des ISO-Kabelbaums. Die nun freien ISO-Stecker verbinden Sie bitte mit den beiden Buchsen vom ISO-Kabelbaum (siehe Abbildung).
- Seite 39 Möchten Sie die Musik oder die Sprache über die vier LINE-Kabel übertragen, dann sind diese entsprechend an das jeweilige Radio und dessen Anschlüsse (PHONE-IN bzw. AUX-IN) zu adaptieren. Entsprechende Adapter sind im Fachhandel erhältlich. Schritt 2: Die FSE unterstützt die Radio-Stummschaltfunktion, falls diese ebenfalls vom Radio unterstützt wird. Das Stummschaltsignal wird über das gelbe Kabel des ISO-Kabelbaums an das Radio ausgegeben.
- Seite 40 Installation of the hands-free car kit - 12V Power - 12/24V Ignition - Ground - Line-out 1 - Line-out 2 1-Line L + / Phone L + 1-Line R + / Phone R + 2-Line L - / Phone L - 2-Line R - / Phone R - Anschlussplan für ISO-Kabelbaum...
- Seite 41 - Micro Molex 24 - ISO - connection to the electronic box (HFCK) - connection to the vehicle’s speakers - connection to the vehicle’s power supply - connection to the car radio - connection to the car radio 1 - Mute 3 2 - Mute 2 3 - Mute 1 4 - Ignition...
- Seite 42 Installation of the hands-free car kit PWR/LSP/LINE OUT Step 1: Pull the ISO jacks at the back of the radio off and replace them with the jacks at the ISO cable harness. Connect the now free ISO jacks with both sockets from the ISO cable harness (see picture). If you want music or voice signals to be fed via the four LINE cables, you must adjust them accordingly to the respective type of radio and its connections (PHONE-IN or AUX-IN).
- Seite 43 PWR/LSP/LINE OUT Krok 1: Odpojte konektor ISO na zadní straně rádia a místo něj připojte konektor z kabelového svazku ISO. Nyní volný konektor ISO připojte k oběma zdířkám kabelového svazku ISO (viz obrázek). Pokud chcete přenášet hudbu nebo hlas po čtyřech kabelech LINE, musíte je upravit podle daného rádia a jeho připojení...
- Seite 44 Installation of the hands-free car kit PWR/LSP/LINE OUT Trin 1: Træk ISO-stikket ud bag på radioen, og udskift dette med stikket fra ISO-kabelsættet. Det nu ledige ISO-stik skal du forbinde med de to bøsninger fra ISO-kabelsættet (se figur). Hvis du vil overføre musik eller tale gennem de fire LINE-kabler, skal disse forsynes med adaptere, der passer til den pågældende radio og dennes tilslutninger (PHONE-IN eller AUX-IN).
- Seite 45 PWR/LSP/LINE OUT Paso 1: Retire el conector ISO de detrás de la radio y sustitúyalo por el conector del arnés de cables ISO. Conecte el conector ISO que ha quedado libre con las dos hembrillas del arnés de cables ISO (véase figura). Si desea transferir música o voz a través de los cuatro cables LINE, estos deberán adaptarse a la radio corres- pondiente y a sus conectores (PHONE-IN o AUX-IN).
- Seite 46 Installation of the hands-free car kit PORT PWR/LSP/LINE OUT Étape 1 : Retirez le connecteur ISO à l’arrière de l’autoradio et remplacez-le avec le connecteur du faisceau de câbles ISO. Le connecteur ISO est maintenant libre. Veuillez le connecter avec les deux ports du faisceau de câbles ISO (voir la figure).
- Seite 47 PWR/LSP/LINE OUT Fase 1: Estrarre i connettori ISO dietro alla radio e sostituirli con i connettori del fascio di cavi ISO. Collegare quindi i connettori ISO con le due prese del fascio di cavi ISO (v. figura). Se volete trasmettere musica o voce attraverso i quattro cavi LINE, questi devono essere adatti alla vostra radio e alle relative prese di collegamento (PHONE-IN o AUX-IN).
- Seite 48 Installation of the hands-free car kit PWR/LSP/LINE OUT Stap 1: Trek de ISO-stekers achter op de radio eruit en vervang deze door de stekers van de ISO-bedrading. De nu vrije ISO-stekers verbindt u met de beide bussen van de ISO-bedrading (zie afbeelding). Mocht u de muziek of de spraak via de vier LINE-kabels willen overdragen, dan moeten deze dienovereenkomstig aan de betreffende radio en de aansluitingen ervan (PHONE-IN resp.
- Seite 49 PWR/LSP/LINE OUT Krok 1: Proszę wyciągnąć wtyczki ISO podłączone do radia, na tylnej ściance i zastąpić je wtyczkami od wiązki kabla ISO. Wolne wtyczki ISO proszę połączyć z obydwoma gniazdami od wiązki kabla ISO (patrz rysunek). Jeśli muzyka i głos mają być transmitowane poprzez 4 kable LINE, to należy je podłączyć za pomocą adaptera do radia i jego gniazd (PHONE-IN lub AUX-IN).
- Seite 50 Installation of the hands-free car kit PWR/LSP/LINE OUT Passo 1: Retirar a ficha ISO da parte de trás do rádio e substituí-la pela ficha da cablagem ISO. Ligar as fichas ISO agora livres aos dois conectores da cablagem ISO (ver figura). Caso deseje transferir música e voz pelos quatro cabos LINE, deve adaptar os cabos correspondentes ao res- pectivo rádio e suas portas (PHONE-IN adequado a AUX-IN).
- Seite 51 PWR/LSP/LINE OUT Шаг 1: Извлеките штекеры ISO на задней панели радиоприемника и вставьте вместо них штекеры кабельного жгута ISO. Отсоединенные штекеры ISO вставьте в оба гнезда кабельного жгута ISO (см. рисунок). Для передачи аудио или голоса по четырем кабелям с маркировкой LINE подсоедините их к соответ- ствующим...
- Seite 52 Installation of the hands-free car kit PWR/LSP/LINE OUT Steg 1: Dra ur ISO-anslutningen på radions baksida och ersätt den med kontakten för ISO-kablaget. Den nu lösa ISO- anslutningen kopplar du ihop med de båda anslutningarna från ISO-kablaget (se bild). Om du vill överföra musik eller tal över de fyra LINE-kablarna skall dessa anslutas på motsvarande sätt till den aktuella radion och dess anslutningar (PHONE-IN resp.
- Seite 53 PWR/LSP/LINE OUT 1. adım: Radyonun arkasında bulunan ISO fişlerini çıkartın ve bunları ISO kablo demetinde bulunan fişler ile değiştirin. Açıkta bulunan ISO fişlerini, ISO kablo demetinde bulunan iki yuvaya bağlayın (bkz. resim). Müziği ya da konuşma sesini dört adet LINE kablosu üzerinden aktarmak istiyorsanız, bunları ilgili radyoya ve radyo bağlantılarına uygun bir şekilde bağlayın (PHONE-IN veya AUX-IN).
- Seite 54 Nawiązanie połączenia Bluetooth Navázání spojení pomocí technologie Estabelecer uma ligação Bluetooth Bluetooth Oprettelse af Bluetooth -forbindelse Создать соединение Bluetooth Ansluta Bluetooth Establecer una conexión Bluetooth Bluetooth bağlantısı kurma Etablir une connexion Bluetooth Stabilire un attacco Bluetooth „CC 9068“ PIN: 1234...
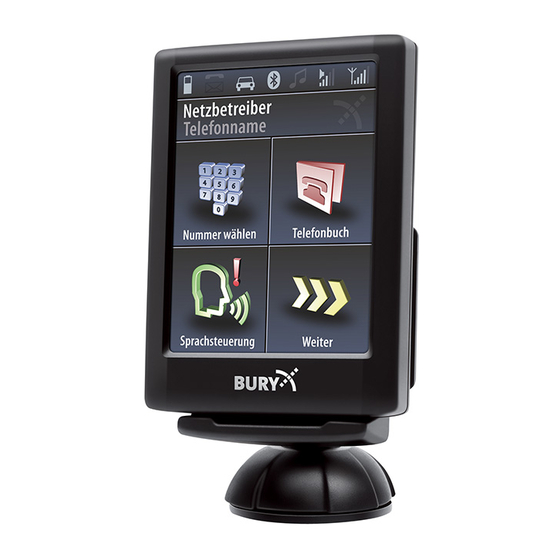
- Seite 55 Hier können Sie eine Telefonnummer eingeben Hier können Sie das Telefonbuch öffnen You can enter a telephone number here You can open the telephone book here Zde můžete zadat telefonní číslo Zde můžete otevřít telefonní seznam Her kan indtastes et telefonnummer Her åbnes telefonbogen Aquí...
- Seite 56 Operating guideline Tutaj można wybierać numer telefonu Tutaj można przejść do innych funkcji Aqui pode introduzir um número de telefone Aqui pode abrir a agenda telefónica Здесь Вы можете ввести номер телефона Здесь Вы можете открыть телефонную книгу Här kan du slå in ett telefonnummer Här kan du öppna telefonboken Burada bir telefon numarası...
- Seite 57 Bedienung via Touchscreen Die Navigation erfolgt über die ggfs. vorhandenen Pfeiltasten. Mit den roten Symbolen können Sie Akti- onen abbrechen oder einen Schritt zurückgehen bzw. wenn Sie etwas länger drücken, kommen Sie direkt ins Hauptmenü zurück. Mit den grünen Symbolen werden Aktionen bestätigt oder ausgeführt.
- Seite 58 Operating guideline Bediening via touchscreen Navigeren kunt u via de evt. aanwezige pijlknoppen. Met de rode symbolen kunt u handelingen afbreken of een stap teruggaan. Als u de knop iets langer ingedrukt houdt, komt u direct terug in het hoofdmenu. Met de groene symbolen worden handelingen bevestigd of uitgevoerd.
- Seite 59 Zurück zur Sprache auswählen Weiter -> Einstellungen -> Gerät -> Sprache Back to choose language More -> Settings -> Device -> Language Zpět na volbu jazyka Dalši -> Nastaveni -> Přistroj -> Jazyk Tilbage til Vælg Sprog Videre -> Indstillinger -> Apparat -> Sprog Volver a la selección de idioma Siguiente ->...
-
Seite 60: Further Information
Une notice d‘utilisation détaillée pour CC 9068, CC 9068 App est disponible sur notre site Internet à l‘adresse : www.bury.com Nous vous souhaitons un bon voyage ! Le istruzioni per l‘uso complete per il CC 9068, CC 9068 App sono contenute nel nostro sito internet, all‘indirizzo: www.bury.com Vi auguriamo buon viaggio. - Seite 61 Een uitvoerige handleiding voor de CC 9068, CC 9068 App vindt u op onze website: www.bury.com Wij wensen u een goede reis. Dokładna instrukcja obsługi CC 9068, CC 9068 App dostępna jest na naszej stronie interne- towej: www.bury.com Życzymy Państwu szerokiej drogi.
- Seite 62 EXPRESS WARRANTY AGAINST DEFECTS – AUSTRALIA EFFECTIVE 1st JANUARY, 2012 This product if imported by Point to Point Technology Pty Ltd is warranted in Australia to be free from any defect in material and workmanship, subject to the following terms and conditions. Who provides this warranty: POINT TO POINT TECHNOLOGY PTY LTD 2/2 KEYSBOROUGH CLOSE, KEYSBOROUGH VIC 3173...
-
Seite 63: Warranty Exclusions
return of the faulty product. If you choose do not wish to proceed with the warranty claim, you must return the replacement uni to us using the pre-paid return bag. Failure by the customer to return either unit within 14 days may incur a charge for the cost of the replacement unit. Warranty Exclusions Failure to provide a proof of purchase will result in your warranty claim being rejected. - Seite 65 Version 07/2012 60.0797.0-02-270712...