Herunterladen Inhalt Inhalt Diese Seite drucken
Panasonic HX015E Bedienungsanleitung

Panasonic HX015E Bedienungsanleitung

Interchangeable lens for digital camera
Inhaltsverzeichnis

Werbung

Verfügbare Sprachen
  • DE

Verfügbare Sprachen

  • DEUTSCH, seite 12
Operating Instructions
INTERCHANGEABLE LENS FOR DIGITAL CAMERA
H-X015
Model No.
Please read these instructions carefully before using this product, and save this manual for future use.
E
SQT0244
F0414KD0

Werbung

Inhaltsverzeichnis
loading

Inhaltszusammenfassung für Panasonic HX015E

  • Seite 1 Operating Instructions INTERCHANGEABLE LENS FOR DIGITAL CAMERA H-X015 Model No. Please read these instructions carefully before using this product, and save this manual for future use. SQT0244 F0414KD0...
  • Seite 2: Inhaltsverzeichnis

    Contents ≥ It cannot be mounted on the Four Thirds mount specification camera. Information for Your Safety........2 ≥ The digital camera illustrations in these operating Precautions............3 instructions show DMC-GM1 as an example. Supplied Accessories ..........4 ≥ The appearance and specifications of products described Names and Functions of Components ....
  • Seite 3: Precautions

    ENGLISH -If you see this symbol- Precautions Disposal of Old Equipment ∫ Lens Care Only for European Union and countries with ≥ Sand and dust can damage the lens. Make recycling systems sure that no sand or dust gets inside the lens This symbol on the products, or the terminals when using the lens on a packaging, and/or accompanying...
  • Seite 4: Supplied Accessories

    Supplied Accessories ∫About Condensation (Fogging of the Lens) ≥ Condensation occurs when there are differences [Inspection to be performed when you unpack in temperature and humidity as described below. the unit] Condensation can cause the lens to become dirty When removing the unit from its packing box, check and lead to mold and malfunctioning, so exercise that the main unit and the supplied accessories are caution in the following situations:...
  • Seite 5: Names And Functions Of Components

    Names and Functions of 1 Lens Pouch 4 Lens Cap Components 2 Lens Hood 5 Lens Rear Cap A: Black B: Silver 3 Lens Hood Cap 6 Decoration ring A: Black A: Black B: Silver B: Silver ≥ The lens cap, lens rear cap, and decoration ring are attached to the lens at the time of purchase.
  • Seite 6: Attaching/Detaching The Lens

    • Check that the lens is attached correctly. ≥ The aperture can be adjusted with the aperture • Be sure to remove the lens cap when recording. ring only when a Panasonic digital camera is attached to the lens. (As of April 2014) SQT0244...
  • Seite 7 ∫Detaching the Lens 3 Rotate the lens hood in the direction of the arrow until it clicks into place, and While pressing on the align the stop position E on the lens lens release button B, hood with the index on the tip of the lens. rotate the lens toward the arrow until it stops and then remove.
  • Seite 8 ∫ Attaching Filters ∫Attaching the decoration ring ≥ Vignetting may occur if using 2 or more ≥ Before attaching the decoration ring, make MC protectors (optional: DMW-LMC46), PL filters sure to remove the lens cap. (optional: DMW-LPL46) or ND filters (optional: DMW-LND46), or if using thick protectors and/or 1 Align the mounting position G on the filters.
  • Seite 9: Cautions For Use

    Cautions for Use – Inside a vehicle ≥ Refer also to the operating instructions of the digital camera. ≥ When the unit is not going to be used for a prolonged Take care not to drop or knock the lens. Also period, we recommend storing with a desiccant (silica take care not to put a lot of pressure on the lens.
  • Seite 10: Specifications

    Specifications Specifications are subject to change without notice. INTERCHANGEABLE LENS FOR DIGITAL CAMERA “LEICA DG SUMMILUX 15 mm/F1.7 ASPH.” Focal length f=15 mm (35 mm film camera equivalent: 30 mm) Aperture type 7 diaphragm blades/circular aperture diaphragm Maximum aperture F1.7 Minimum aperture value Lens construction 9 elements in 7 groups (3 aspherical lenses)
  • Seite 11: Limited Warranty (Only For Australia)

    SQT0244...
  • Seite 12: Informationen Für Ihre Sicherheit

    Inhalt aus. Nehmen Sie den Akku heraus und/oder trennen Sie das Netzadapter ab. Setzen Sie den Informationen für Ihre Sicherheit ......12 Akku dann wieder ein und/oder stecken Sie das Vermeidung von Störungen ........ 14 Netzadapter wieder ein und schalten Sie die Beiliegendes Zubehör...........
  • Seite 13 DEUTSCH ≥ Four Thirds™ und die für Four Thirds -Bedeutung des nachstehend abgebildeten Symbols- verwendeten Logos sind Markenzeichen oder Entsorgung von Altgeräten eingetragene Markenzeichen der Olympus Nur für die Europäische Union und Länder mit Imaging Corporation in Japan, den USA, der EU Recyclingsystemen und anderen Ländern.
  • Seite 14: Vermeidung Von Störungen

    ∫ Hinweise zu Kondensation (Beschlagen Vermeidung von Störungen des Objektivs) ∫Objektivpflege ≥ Kondensation entsteht, wenn sich ≥ Sand und Staub können das Objektiv beschädigen. Umgebungstemperatur oder Luftfeuchte wie unten Achten Sie darauf, dass kein Sand oder Staub auf beschrieben ändern. Da Kondensation zu Flecken Objektiv oder Anschlüsse gelangt, wenn Sie die auf dem Objektiv, Pilzbefall und Fehlfunktionen Kamera im Freien, z.B.
  • Seite 15: Beiliegendes Zubehör

    Beiliegendes Zubehör 1 Objektivbeutel 4 Objektivdeckel 2 Gegenlichtblende 5 Hinterer [Kontrollen, die beim Entfernen der Verpackung A: Schwarz Objektivdeckel des Geräts vorzunehmen sind] B: Silber Prüfen Sie beim Entnehmen des Gerätes aus seinem Karton, ob das Hauptgerät und sein beiliegendes 3 Gegenlichtblendend 6 Dekorationsring Zubehör vorhanden sind.
  • Seite 16: Bezeichnungen Und Funktionen Der Einzelnen Kamerateile

    ≥ Überprüfen Sie, wenn der Blendenring aktiviert ist, ≥ Die Blende kann nur dann mit dem Blendenring geregelt ob sich der Blendenwert nach dem Anbringen oder werden, wenn eine Digitalkamera von Panasonic am Entfernen des Dekorationsrings verändert hat. Objektiv angebracht ist. (Stand: April 2014)
  • Seite 17: Objektiv Ansetzen/Abnehmen

    Objektiv ansetzen/abnehmen ∫ Das Objektiv abnehmen Drehen Sie beim Betätigen der Objektivfreigabetaste Stellen Sie sicher, dass die das Objektiv in Pfeilrichtung Kamera ausgeschaltet ist. bis zum Anschlag und ≥ Entfernen Sie den hinteren entfernen Sie es. • Setzen Sie den hinteren Objektivdeckel vom Objektiv.
  • Seite 18: Anbringen Des Dekorationsrings

    3 Drehen Sie die Gegenlichtblende in ∫ Anbringen des Dekorationsrings Pfeilrichtung, bis sie einrastet, und richten Sie ≥ Entfernen Sie vor dem Anbringen des Dekorationsrings den Objektivdeckel. die Stopp-Position E an der Gegenlichtblende mit der Markierung am Rand des Objektivs aus. 1 Richten Sie die Befestigungsposition G am Dekorationsring mit einer etwa 90x von der Objektiv-Befestigungsmarkierung F...
  • Seite 19: Filter Aufsetzen

    ∫Filter aufsetzen ≥ Achten Sie auch darauf, dass die Tasche, in der Sie das Objektiv aufbewahren, nicht herunterfällt, ≥ Ein Vignettierungseffekt kann auftreten, wenn 2 oder mehr MC-Schutzfilter (Sonderzubehör: denn das Objektiv könnte sonst schwer DMW-LMC46), PL-Filter (Sonderzubehör: DMW- beschädigt werden. Unter Umständen funktioniert LPL46) oder ND-Filter (Sonderzubehör: DMW- dann auch die Kamera nicht mehr und kann keine LND46) verwendet werden, oder wenn dicke...
  • Seite 20: Fehlerbehebung

    – Bei direktem Sonnenlicht oder im Sommer an der ≥ Nehmen Sie das Gerät nicht auseinander und Küste nehmen Sie keine Veränderungen daran vor. – An Orten mit hohen Temperaturen und hoher Verwenden Sie zur Reinigung der Geräte kein Feuchtigkeit, bzw. wo starke Änderungen bei Waschbenzin, Alkohol oder ähnliche Temperatur und Feuchtigkeit erfolgen Reinigungsmittel.
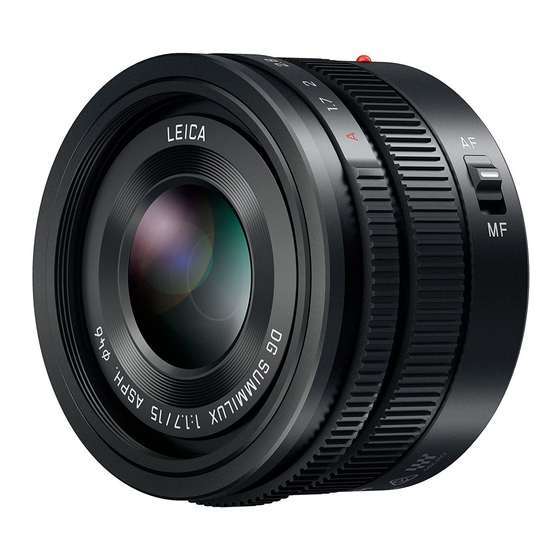
  • Seite 21: Spezifikationen

    Spezifikationen Die Spezifikationen können ohne Ankündigung geändert werden. WECHSELOBJEKTIV FÜR DIGITAL-KAMERA “LEICA DG SUMMILUX 15 mm/F1.7 ASPH.” Brennweite f=15 mm (Kleinbild-Äquivalent: 30 mm) Blende 7 Blendenlamellen/runde Öffnungsblende Maximale Blendenöffnung F1.7 Minimale Blende Objektivaufbau 9 Elemente in 7 Gruppen (3 asphärische Linsen) Nano-Oberflächenbeschichtung Ja Schärfebereich 0,2 m bis ¶...
  • Seite 22: Précautions À Prendre

    Table des matières L’objectif peut être utilisé de pair avec un appareil photo numérique compatible avec la monture Précautions à prendre ......... 22 d’objectif standard prise en charge par le système Précautions ............24 Accessoires fournis ..........25 “ Micro Four Thirds System”.
  • Seite 23 FRANÇAIS ≥ G MICRO SYSTEM est un système appareil -Si vous voyez ce symbole- photo numérique du type à échange d’objectif de L’élimination des équipements usagés LUMIX basé sur un standard Micro Four Thirds. Applicable uniquement dans les pays ≥ LEICA est une marque déposée de Leica membres de l’Union européenne et les pays Microsystems IR GmbH.
  • Seite 24: Précautions

    ∫ À propos de la condensation (Objectif Précautions embué) ∫Entretien de l’objectif ≥ Il y a formation de condensation lorsque la ≥ Le sable et la poussière peuvent endommager température et l’humidité changent comme suit. La l’objectif. Aussi, convient-il de protéger et condensation peut salir l’objectif, entraîner de la l’objectif et les contacts de la monture contre moisissure et des problèmes de fonctionnement.
  • Seite 25: Accessoires Fournis

    Accessoires fournis 1 Poche pour objectif 4 Capuchon d’objectif 2 Parasoleil 5 Capuchon arrière de [La vérification doit être effectuée lorsque vous A : Noir l’objectif sortez l’appareil de l’emballage] B : Argent En retirant l’appareil de son emballage, vérifiez la présence de l’appareil principal et de tous ses 3 Capuchon du 6 Bague de décoration...
  • Seite 26: Noms Et Fonctions Des Composants

    ≥ Lorsque la bague d'ouverture est active, contrôlez uniquement si l'objectif est installé sur un appareil photo si la valeur d'ouverture a été changée après avoir numérique Panasonic. (A compter d'avril 2014) installé ou retiré la bague de décoration. SQT0244...
  • Seite 27: Fixation/Retrait De L'objectif

    Fixation/Retrait de l’objectif ∫ Retrait de l’objectif Tout en appuyant sur la Vérifiez que l’appareil photo touche de déverrouillage est éteint. de l’objectif B, tournez ≥ Retirez le capuchon d'objectif l’objectif dans le sens de arrière de l'objectif. la flèche jusqu’à ce qu’il s’arrête puis retirez-le.
  • Seite 28 3 Tournez le parasoleil dans le sens de la flèche ∫ Pour installer la bague de décoration jusqu'à ce qu'il s'enclenche, puis alignez la ≥ Avant d'installer la bague de décoration, position d'arrêt E présente sur le parasoleil assurez-vous d'avoir retiré le capuchon avec l'encoche située à...
  • Seite 29: Précautions D'utilisation

    Précautions d’utilisation ∫Fixation de filtres ≥ Un effet de vignetage peut survenir en utilisant 2 protecteurs MC ou plus (en option: DMW-LMC46), Prenez soin de ne pas faire tomber ni de cogner l’objectif. De plus ne mettez pas trop de pression filtres PL (en option: DMW-LPL46) ou filtres ND dessus.
  • Seite 30: Dépannage

    N’utilisez pas de benzène, d’alcool ni aucun – Dans des endroits ayant des niveaux de température et d’humidité élevés ou dans des autre produit nettoyant similaire pour nettoyer endroits où les changements de température et l’appareil. d’humidité sont prononcés ≥ L’emploi de solvants peut endommager l’objectif –...
  • Seite 31: Spécifications

    Spécifications Ces caractéristiques peuvent subir des changements sans avis préalable. OBJECTIF INTERCHANGEABLE POUR APPAREIL PHOTO NUMÉRIQUE “LEICA DG SUMMILUX 15 mm/F1.7 ASPH.” Distance focale f=15 mm (Équivalent à un film de 35 mm: 30 mm) Type d’ouverture 7 lamelles de diaphragme/diaphragme à ouverture ronde Ouverture maximale F1.7 Valeur d’ouverture minimum...
  • Seite 32: Información Para Su Seguridad

    Índice El objetivo puede usarse con una cámara digital compatible con el estándar de montaje de objetivos Información para su seguridad ......32 del “Micro Four Thirds System”. ≥ No se puede montar en una cámara con estándar Prevención contra las averías ......34 Accesorios suministrados ........
  • Seite 33 ESPAÑOL ≥ LEICA es una marca registrada de Leica -Si ve este símbolo- Microsystems IR GmbH. SUMMILUX es una Eliminación de Aparatos Viejos marca registrada de Leica Camera AG. Los Solamente para la Unión Europea y países con objetivos LEICA DG se fabrican usando sistemas de reciclado.
  • Seite 34: Prevención Contra Las Averías

    ∫ Acerca de la condensación Prevención contra las averías (Empañamiento del objetivo) ∫Atención del objetivo ≥ La condensación ocurre cuando se encuentra una ≥ La arena y el polvo pueden dañar el objetivo. diferencia en la temperatura y humedad como se Cuando usa el objetivo en una playa, tenga describe abajo.
  • Seite 35: Accesorios Suministrados

    Accesorios suministrados 1 Estuche de la lente 4 Tapa del objetivo 2 Visera del objetivo 5 Tapa trasera del [Controles a realizar cuando va a desembalar la unidad] A: Negro objetivo Al quitar la unidad de su embalaje, compruebe que se B: Plateado encuentren la unidad principal y los accesorios suministrados.
  • Seite 36: Nombres Y Funciones De Los Componentes

    ≥ La abertura se puede ajustar con el anillo de si ha cambiado el valor de apertura después de apertura sólo cuando se une al objetivo una cámara conectar o retirar el anillo de la decoración. digital Panasonic. (A partir de abril de 2014) SQT0244...
  • Seite 37: Unir Y Quitar El Objetivo

    Unir y quitar el objetivo ∫ Separación del objetivo Mientras presiona el botón de liberación de Compruebe que la cámara la lente B, gire la esté apagada. lente hacia la flecha ≥ Saque la tapa trasera de la hasta que se detenga lente.
  • Seite 38 3 Gire la visera de la lente en la dirección de la ∫ Colocación del anillo de decoración flecha hasta que se coloque en su sitio y ≥ Antes de colocar el anillo de decoración, alinee la marca de tope E en la visera de la asegúrese de retirar la tapa de la lente.
  • Seite 39: Precauciones Para El Uso

    Precauciones para el uso ∫Unión de los filtros ≥ La viñetas pueden ocurrir si se usan 2 o más protectores MC (opcional: DMW-LMC46), filtros Tenga cuidado de no hacer caer el objetivo ni le choque contra. Asimismo tenga cuidado de no PL (opcional: DMW-LPL46) o filtros ND (opcional: presionarlo demasiado.
  • Seite 40: Búsqueda De Averías

    – En lugares donde haya altas temperaturas o altos ≥ El hecho de usar disolventes puede dañar el niveles de humedad o bien donde sean repentinos objetivo y hacer desconchar su barniz. los cambios de temperatura y humedad ≥ Quite cualquier indicio de polvo o huellas –...
  • Seite 41: Especificaciones

    Especificaciones Las especificaciones están sujetas a cambio sin previo aviso. ÓPTICA INTERCAMBIABLE PARA CÁMARA DIGITAL “LEICA DG SUMMILUX 15 mm/F1.7 ASPH.” Longitud focal f=15 mm (Igual a una cámara de película de 35 mm: 30 mm) Tipo de abertura 7 aspas de diafragma/Diafragma de apertura circular Apertura máxima F1.7 Valor de abertura mínimo...
  • Seite 42: Informazioni Per La Sua Sicurezza

    Indice L’obiettivo può essere utilizzato con una fotocamera digitale dotata di un supporto dell’obiettivo Informazioni per la sua sicurezza ......42 compatibile con lo standard “Micro Four Thirds Prevenzione guasti ..........44 System”. Accessori in dotazione.......... 45 Nomi e funzioni dei componenti......46 ≥...
  • Seite 43 ITALIANO ≥ G MICRO SYSTEM è un sistema di fotocamera -Se vedete questo simbolo- digitale LUMIX del tipo a più obiettivi basato sullo Smaltimento di vecchie apparecchiature standard Micro Four Thirds System. Solo per Unione Europea e Nazioni con sistemi ≥...
  • Seite 44: Prevenzione Guasti

    ∫ Informazioni sulla condensa Prevenzione guasti (Appannamento dell’obiettivo) ∫Custodia dell’obiettivo ≥ La condensa si forma quando si verificano ≥ Sabbia e polvere possono danneggiare l’obiettivo. differenze di temperatura e umidità come quelle Evitare che sabbia o polvere penetrino all’interno descritte sotto. La condensa può causare dell’obiettivo o dei terminali quando si utilizza l’appannamento dell’obiettivo e portare alla l’obiettivo su una spiaggia, ecc.
  • Seite 45: Accessori In Dotazione

    Accessori in dotazione 1 Borsa per l'obiettivo 4 Copriobiettivo 2 Paraluce 5 Copriobiettivo [Controlli da effettuare quando si disimballa l’unità] A: Nero posteriore Quando si estrae il flash dalla confezione, controllare B: Argentato che siano presenti l’unità principale e gli accessori in dotazione.
  • Seite 46: Nomi E Funzioni Dei Componenti

    è cambiato dopo ≥ È possibile utilizzare l'apposita ghiera per regolare l'apertura solo quando l'obiettivo è installato su l'installazione o la rimozione dell'anello decorativo. una fotocamera digitale Panasonic. (Informazioni 4 Ghiera di messa a fuoco aggiornate ad aprile 2014) SQT0244...
  • Seite 47: Installazione/Rimozione Dell'obiettivo

    Installazione/Rimozione ∫ Disinstallazione dell’obiettivo dell’obiettivo Tenendo premuto il pulsante di sblocco dell’obiettivo B, ruotare l’obiettivo nella Controllare che la fotocamera sia spenta. direzione indicata dalla freccia finché non si arresta, ≥ Rimuovere il copriobiettivo posteriore dall'obiettivo. quindi rimuoverlo. • Installare il copriobiettivo posteriore per evitare di graffiare il punto di contatto.
  • Seite 48 3 Ruotare il paraluce nella direzione della freccia ∫ Installazione dell'anello decorativo sino a che fa click in posizione, ed allineare la ≥ Prima di fissare l'anello decorativo, accertarsi posizione di arresto E sul paraluce con il di rimuovere il copriobiettivo. segno sull'estremità...
  • Seite 49: Installazione Dei Filtri

    Precauzioni per l’uso ∫Installazione dei filtri ≥ È possibile che si verifichi un effetto vignetta se si utilizzano 2 o più protezioni MC (opzionale: Fare attenzione a non lasciar cadere o a non DMW-LMC46), filtri PL (opzionale: DMW-LPL46) urtare l’obiettivo. Evitare inoltre di esercitare una o filtri ND (opzionale: DMW-LND46), o se si forte pressione sull’obiettivo.
  • Seite 50: Ricerca Guasti

    – Esposta alla luce del sole, o in spiaggia d’estate ≥ L’utilizzo di solventi può danneggiare l’obiettivo o – Temperatura e umidità elevate o soggette a provocare il distacco di vernice. grossi sbalzi ≥ Rimuovere la polvere o le impronte digitali –...
  • Seite 51: Specifiche

    Specifiche È possibile che le specifiche subiscano delle modifiche senza preavviso. LENTI INTERCAMBIABILI PER FOTOCAMERA DIGITALE “LEICA DG SUMMILUX 15 mm/F1.7 ASPH.” Lunghezza focale f=15 mm (equivalente per fotocamera con pellicola da 35 mm: 30 mm) Tipo di apertura 7 lamelle diaframma/diaframma con apertura circolare Apertura massima F1.7 Valore minimo dell’apertura...
  • Seite 52: 安全注意事項

    ≥ 無法安裝到 4/3™(Four Thirds™) 接口規格的相機 目錄 上。 安全注意事項 ........52 ≥ 本使用說明書中的數位相機圖例以 DMC-GM1 為例 故障預防 ........53 進行說明。 操作部中文表示對照表 ......54 ≥ 由於產品的不斷改進,本說明書中所描述的產品外 提供的附件 ........54 觀和規格可能與實際所購買的產品有所不同。 元件的名稱及功能 ......55 ≥ Micro Four Thirds™ 和 Micro Four Thirds 標誌是 取下鏡頭 ........ 56 安裝...
  • Seite 53: 故障預防

    中 文 - 如果看到此符號的話 - 故障預防 歐盟以外國家的棄置資訊 ∫ 鏡頭保養 本符號只適用於歐盟國家 。 ≥ 沙子及塵土會損壞鏡頭 。 在沙灘等地方使用鏡頭 如欲丟棄本產品,請聯絡當地 時 , 請勿讓沙子或塵土進入到鏡頭或端子中 。 政府單位或經銷商,洽詢正確 ≥ 本鏡頭既不防水也不防濺 。 如果水滴濺到鏡頭上 , 的棄置方法。 請用乾布擦拭鏡頭 。 ≥ 請勿用力按壓鏡頭。 ≥ 當鏡頭表面有污垢 (水、油和手印等)時,相片 可能會受到影響。 拍攝前後,請用一塊軟乾布輕輕 擦拭鏡頭表面。 ≥ 請勿將鏡頭支座朝下放置。 請勿使鏡頭支座接觸點 1 變髒。...
  • Seite 54: 操作部中文表示對照表

    ∫關於水汽凝結 (鏡頭的霧化) 提供的附件 ≥ 當周圍環境溫度和濕度如下變化時,會發生水汽凝 結。 水汽凝結可能會使鏡頭變髒,產生霉菌及發生 [ 請在打開包裝取出本裝置時進行檢查 ] 故障,因此在下列情況時請注意: 當從其包裝盒中取出本裝置時 , 請檢查是否包含主機 – 在寒冷的天氣裡將相機從室外帶到室內時 及其提供的附件 , 還要檢查它們的外觀和功能 , 以確保 – 將相機帶到開著空調的車內時 它們在配送和運輸過程中沒有損壞 。 – 空調等設備的冷風直接吹向鏡頭時 如果發現有問題 , 請在使用本產品前連繫您的銷售商 。 – 在潮濕的地方 產品號碼截至 2014 年 4 月為準 。 此後可能會有變更 。 ≥...
  • Seite 55: 元件的名稱及功能

    元件的名稱及功能 1 鏡頭袋 4 鏡頭蓋 2 鏡頭遮光罩 5 鏡頭後蓋 A: 黑色 B: 銀色 3 鏡頭遮光罩蓋 6 裝飾環 A: 黑色 A: 黑色 B: 銀色 B: 銀色 ≥ 購買時,鏡頭蓋、鏡頭後蓋和裝飾環安在鏡頭上。 此外,鏡頭遮光罩蓋安在鏡頭遮光罩上。 1 2 3 4 1 鏡頭表面 2 裝飾環 使用鏡頭遮光罩時 , 請取下此蓋 。 3 光圈環...
  • Seite 56: 安裝 / 取下鏡頭

    的。 使用鏡頭遮光罩時,這種情況可能會更差。 ≥ 在非常安靜的情況下,在動態影像錄製過程中可能會 鏡頭 , 直到發出喀噠聲 錄製上自動對焦的工作音。 這並非故障。 在這種情況 為止 。 下,切換到手動對焦會改善該狀況。 ≥ 僅當將 Panasonic 數位相機安裝到本鏡頭上時,才 • 安裝鏡頭時 , 請勿按鏡頭 可以用光圈環調整光圈。 (截至 2014 年 4 月) 釋放按鈕 B 。 • 請勿將鏡頭以傾斜的狀態安裝到相機上 , 否則 , 鏡 頭接座會被劃傷 。 • 檢查鏡頭是否安裝正確 。...
  • Seite 57 ∫取下鏡頭 3 朝箭頭指示的方向轉動鏡頭遮光罩直到發出 喀噠聲到位為止,將鏡頭遮光罩上的停止位 按鏡頭釋放按鈕 B 的同 置 E 對準鏡頭頂端的標記。 時 , 朝箭頭指示的方向轉 動鏡頭直到停止為止 , 然 後取下 。 • 請蓋上鏡頭後蓋 , 這樣就 不會劃傷鏡頭支座觸點 。 • 將機身蓋安裝到相機上 , 以防止污物或灰塵進入 機身內部 。 ∫安裝鏡頭遮光罩 (提供的附件) ≥ 安裝鏡頭遮光罩前 , 請務必取 下鏡頭蓋 。 除非取下鏡頭蓋 , 否 則無法安裝鏡頭遮光罩...
  • Seite 58 ∫ 安裝濾鏡 ∫安裝裝飾環 ≥ 如果使用 2 個以上的 MC 保護鏡 (可選件: ≥ 安裝裝飾環前 , 請務必取下鏡頭蓋 。 DMW-LMC46) 、PL 偏光鏡 (可選件:DMW- LPL46)或 ND 濾鏡 (可選件:DMW-LND46) , 1 將裝飾環上的安裝位置 G 對準離鏡頭安裝標 或者如果使用厚的保護鏡和 / 或濾鏡,可能會出現 記 F 約 90x 的位置將裝飾環固定到位。 暈影。 2 朝箭頭指示的方向轉動裝飾環將裝飾環上的 ≥ 如果擰得過緊,可能無法取下濾鏡。因此,請不要 太用力地擰它。...
  • Seite 59: 使用時的注意事項

    ≥ 也請參閱數位相機的使用說明書。 使用時的注意事項 ≥ 準備長時間不使用本裝置時,建議在存放時放入一 些乾燥劑 (矽膠) 。 否則,可能會由於發霉等原因 請務必小心 , 切勿跌落或撞擊鏡頭 。 還要務必小心 , 切 而導致性能出現故障。 建議在使用前先檢查本裝置 勿在鏡頭上施加過多壓力 。 是否能夠正常運行。 ≥ 請注意不要讓裝有鏡頭的包跌落,因為這樣可能會損 ≥ 請勿讓鏡頭與橡膠或塑料製品長時間接觸。 壞鏡頭。相機可能會停止正常操作,可能無法繼續拍 ≥ 請勿觸摸本裝置的電觸點。 這樣做可能會導致本裝 攝圖片。 置發生故障。 ≥ 在安裝著鏡頭的狀態下攜帶數位相機時,請將數位 ≥ 請勿拆卸或改裝本裝置。 相機和鏡頭都握住。 在相機周圍使用殺蟲劑或其他揮發性的物質時 , 請勿 請勿使用汽油 、 稀釋劑 、 酒精或其他類似的清潔劑清潔 使其接觸到鏡頭...
  • Seite 60 規格 規格如有變更 , 恕不另行通知 。 數位相機用可替換鏡頭 “LEICA DG SUMMILUX 15 mm/F1.7 ASPH.” f=15 mm 焦距 (相當於 35 mm 菲林相機 : 30 mm) 7 片控光片 / 圓形虹膜光圈 光圈類型 F1.7 最大光圈 最小光圈值 9 件 7 組 (3 片非球面鏡片) 鏡頭結構 奈米表面塗層 是 In focus (焦點對準) 距離 0.2 m 至...
  • Seite 61: Информация Для Вашей Безопасности

    РУССКИЙ ЯЗЫК Содержание тока. Затем снова вставьте батарею и/или снова подключите сетевой адаптер Информация для вашей безопасности ....61 переменного тока и включите камеру. Правила эксплуатации ...........63 Объектив может использоваться с цифровой Принадлежности, входящие в комплект ....64 камерой, совместимой со стандартом крепления Названия...
  • Seite 62 ≥ G MICRO SYSTEM является системой -Если Вы увидите такой символ- объективов сменного типа для цифровых Информация по обращению с отходами для камер LUMIX, разработанной на основе стран, не входящих в Европейский Союз стандарта Micro Four Thirds System. Действие этого символа ≥...
  • Seite 63: Правила Эксплуатации

    ∫ О конденсации (Запотевании Правила эксплуатации объектива) ∫Уход за объективом ≥ Конденсация происходит при разнице в ≥ Песок и пыль могут привести к повреждению температуре и влажности, как описано ниже. объектива. При использовании объектива на Конденсация может привести к загрязнению пляже...
  • Seite 64: Принадлежности, Входящие В Комплект

    Принадлежности, 1 Чехол для 4 Крышка объектива входящие в комплект объектива 2 Бленда объектива 5 Крышка задней [Комплектность необходимо проверять при A: черного цвета части объектива распаковке устройства] B: серебристого При изъятии устройства из оригинальной упаковки проверьте наличие основного устройства и его цвета...
  • Seite 65: Названия И Функции Составных Частей

    ≥ Настройка диафрагмы с помощью кольца прикрепления или снятия декоративного кольца. диафрагмы возможна только в случае 4 Кольцо фокусировки прикрепления объектива к цифровой Поворачивайте для наведения фокуса при выполнении фотокамере Panasonic. (По состоянию на снимков в режиме ручной фокусировки (MF). апрель 2014 г.) SQT0244...
  • Seite 66: Установка/Снятие Объектива

    Установка/Снятие объектива ∫ Снятие объектива Удерживая нажатой Убедитесь, что камера кнопку B проверните выключена. объектив до упора в направлении стрелки, ≥ Снимите заднюю крышку а потом снимите. объектива. • Прикрепите заднюю крышку объектива, ∫Установка объектива чтобы избежать царапин монтажной поверхности объектива. Совместите...
  • Seite 67 3 Поверните бленду объектива до щелчка в ∫ Прикрепление декоративного кольца направлении, указанном стрелкой. При этом ≥ Прежде чем прикреплять декоративное кольцо, метка остановки E на бленде объектива обязательно снимите крышку объектива. должна совпасть с меткой на краю объектива. 1 Совместите положение крепления G на декоративном...
  • Seite 68: Установка Фильтров

    Предосторожности при ∫Установка фильтров ≥ При использовании двух или более многослойных использовании фотокамеры защитных фильтров (поставляются отдельно: DMW-LMC46), поляризационных фильтров Старайтесь не ронять и не ударять объектив. (поставляются отдельно: DMW-LPL46) или Также старайтесь не подвергать объектив фильтров ND (поставляются отдельно: DMW- чрезмерному...
  • Seite 69: Устранение Неисправностей

    – Под воздействием прямых солнечных лучей ≥ Запрещается разбирать или вносить или на пляже летом изменения в аппарат. – В местностях с высокой влажностью воздуха и Не используйте бензин, растворитель, спирт высокими температ урами, или с резкими и другие подобные моющие средства для перепадами...
  • Seite 70: Технические Характеристики

    Технические характеристики Технические характеристики могут быть изменены без уведомления. СМЕННЫЙ ОБЪЕКТИВ ДЛЯ ЦИФРОВОЙ ФОТОKAMEРЫ “LEICA DG SUMMILUX 15 мм/F1.7 ASPH.” Фокусное расстояние f=15 мм (Эквивалент 35 мм пленочной камеры: от 30 мм) Тип диафрагмы 7 лепестки диафрагмы/диафрагма с круглым отверстием Максимальный...
  • Seite 71 Установленный производителем в порядке п. 2 ст. 5 федерального закона РФ “О защите прав потребителей” срок службы данного изделия равен 7 годам с даты производства при условии, что изделие используется в строгом соответствии с настоящей инструкцией по эксплуатации и применимыми техническими стандартами. SQT0244...
  • Seite 72 Manufactured by: Panasonic Corporation Kadoma, Osaka, Japan Importer for Europe: Panasonic Marketing Europe GmbH Panasonic Testing Centre Winsbergring 15, 22525 Hamburg, Germany Panasonic Corporation Web Site: http://panasonic.net  Panasonic Corporation 2014...

Diese Anleitung auch für:

Lumix h-x015

Inhaltsverzeichnis