NORAUTO NO3174 Bedienungsanleitung
Inhaltsverzeichnis
Verfügbare Sprachen
Verfügbare Sprachen
Quicklinks
ALARME ANTIVOL
AUTO ALARMANLAGE
ANTIDIEFSTAL ALARM
ALARMA ANTIRROBO
ANTI THIEF ALARM
ALLARME ANTIFURTO
ALARME ANTIRROUBO
ART: 2382383-NO3174
FR - Manuel d'utilisation et informations sur la sécurité
DE - Hinweise zur Bedienung und Sicherheit
NL - Handleiding en veiligheidsinformatie
ES - Manual e información en materia de seguridad
EN - Manual and security information
IT
- Manuale e informazioni di sicurezza
PT - Manual e informações de segurança
Inhaltsverzeichnis

Verwandte Anleitungen für NORAUTO NO3174


Inhaltszusammenfassung für NORAUTO NO3174
- Seite 1 ALARMA ANTIRROBO ANTI THIEF ALARM ALLARME ANTIFURTO ALARME ANTIRROUBO ART: 2382383-NO3174 FR - Manuel d’utilisation et informations sur la sécurité DE - Hinweise zur Bedienung und Sicherheit NL - Handleiding en veiligheidsinformatie ES - Manual e información en materia de seguridad...
-
Seite 2: Avant-Propos
MODE D'EMPLOI AVANT PROPOS Nous vous remercions d’avoir choisi notre produit. Il est conçu selon les normes de qualité les plus élevées pour vous apporter entière satisfaction. Veuillez lire attentivement le manuel d’utilisation avant d’utiliser le produit. Respectez tous les avertissements. Si vous confiez l’appareil à quelqu’un, veuillez également lui remettre ce manuel d’utilisation. -
Seite 3: Consignes De Sécurité
CONSIGNES DE SÉCURITÉ 1. Toute mauvaise utilisation du produit peut endommager le produit ou les produits qui lui sont associés. Arrêtez immédiatement d'utiliser l'appareil en cas d'anomalie ou de défaillance. 2. AVERTISSEMENT : Cet appareil n’est pas adapté à une utilisation dans des endroits où... - Seite 4 CONSIGNES RELATIVES À LA SÉCURITÉ DES PILES 1. Évitez de recharger les piles non rechargeables. 2. Retirez les piles si les appareils ne doivent pas être utilisés pendant longtemps. 3. Évitez de court-circuiter les bornes d’alimentation. 4. Utilisez exclusivement les taille et type de piles spécifiés dans le mode d’emploi.
-
Seite 5: Présentation De La Télécommande
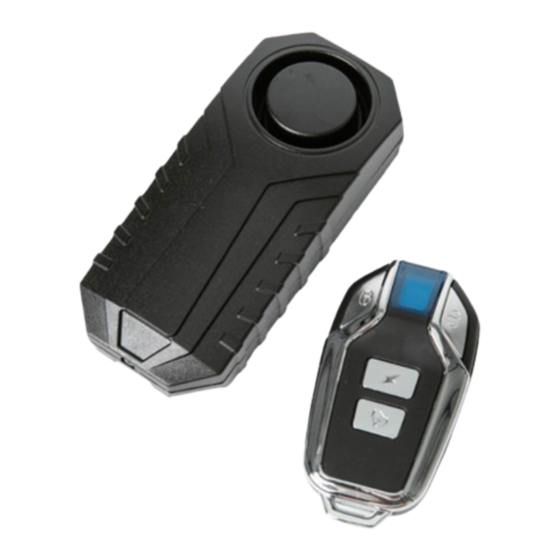
PRÉSENTATION DE LA TÉLÉCOMMANDE 1. Activer l’alarme Activer/désactiver le mode de réglage de la sensibilité 2. Désactiver l’alarme Régler la sensibilité (uniquement après l’activation du mode de réglage de la sensibilité) 3. Sonnerie/Commuter 4. Sirène INSTRUCTIONS DE MONTAGE Fixation des attaches Cet appareil peut être installé... - Seite 6 MONTAGE DANS UNE VOITURE Vous pouvez aussi monter ce produit dans le compartiment de moteur d’une voiture. Dans certains cas, le produit peut être fixé à travers les trous ou les conduites. UTILISATION ACTIVATION OU DÉSACTIVATION DE L’ALARME • Pour activer la fonction d’alarme (ARMER), appuyez une fois sur le bouton de la télécommande.
-
Seite 7: Réglage De La Sensibilité
RÉGLAGE DE LA SENSIBILITÉ Les notes musicales comportent 7 niveaux de sensibilité : Do, Ré, Mi, Fa, Sol, La et Si. « Do » ayant la sensibilité la plus élevée et « Si » la plus basse. « Do » est le réglage par défaut. - Seite 8 COUPLAGE ET RÉINITIALISATION DE LA TÉLÉCOMMANDE • La télécommande et l’alarme sont livrées précouplées. • Une alarme peut être couplée avec un maximum de 8 télécommandes. - Pour coupler la première télécommande à une alarme, suivez les étapes ci-dessous : 1.
-
Seite 9: Remplacement Des Piles
REMPLACEMENT DES PILES INDICATEUR DE PILE FAIBLE • Lorsque la pile de la télécommande est faible, cela réduit la portée de la télécommande, et le voyant LED ne s’allume pas ou s’allume uniquement brièvement quand vous appuyez sur un bouton. Remplacez la pile. •... -
Seite 10: Spécifications Techniques
REMPLACEMENT DES PILES DE L’ALARME À l’achat du produit, les piles sont préinstallées dans l’alarme. Retirez la languette d’isolation avant la toute première utilisation. 1. À l’aide d’un tournevis cruciforme, dévissez la vis située dans la partie inférieure de l’alarme. 2. - Seite 11 Ce produit est conforme à toutes les exigences réglementaires de base applicables de l’UE. Collecte sélective des déchets électriques et électroniques. Les produits électriques ne doivent pas être mis au rebut avec les produits ménagers. Selon la Directive européenne 2012/19/ UE pour le rebut des matériels électriques et électroniques et de son exécution dans le droit national, les produits électriques usagés doivent être collectés séparément et...
-
Seite 12: Vorbemerkung
BEDIENUNGSANLEITUNG VORBEMERKUNG Vielen Dank, dass Sie sich für unser Produkt entschieden haben. Es wurde für Sie unter Einhaltung der höchsten Qualitätsstandards konzipiert. Lesen Sie sich die Bedienungsanleitung sorgfältig durch, bevor Sie das Produkt verwenden. Beachten Sie alle Warnhinweise. Wenn Sie das Gerät an Dritte weitergeben, geben Sie unbedingt auch diese Bedienungsanleitung mit. -
Seite 13: Sicherheitshinweise
SICHERHEITSHINWEISE 1. Ein unsachgemäßer Gebrauch dieses Produkts kann zu Schäden an diesem Produkt oder an daran angeschlossenen Geräten führen. Sehen Sie im Falle eines Defekts oder einer Betriebsstörung von der weiteren Verwendung des Produkts unbedingt ab. 2. WARNUNG: Dieses Gerät ist nicht für die Verwendung an Orten geeignet, an denen sich Kinder aufhalten könnten. -
Seite 14: Sicherheitsanweisungen Für Batterien
das Produkt niemals in Wasser oder andere Flüssigkeiten. 11. Lassen Sie das Gerät nicht aus großen Höhen fallen, um Schäden und sich daraus ergebende Fehlfunktionen zu vermeiden. 12. Servicearbeiten müssen von einer qualifizierten Kundendienststelle oder vom Hersteller durchgeführt werden. 13. Trennen Sie das Gerät während eines Gewitters oder bei längerem Nichtgebrauch stets von der Klinkenbuchse und dem Ladegerät. -
Seite 15: Aufbau Der Fernbedienung
einer Explosion führen. 12. Bewahren Sie Akkus nicht in Umgebungen auf, die äußerst hohe Temperaturen aufweisen, da dies eine Explosion oder das Austreten von entzündlichen Flüssigkeiten oder Gasen nach sich ziehen könnte. 13. Setzen Sie Akkus keinem äußerst niedrigen Luftdruck aus, da dies eine Explosion oder das Austreten von entzündlichen Flüssigkeiten oder Gasen nach sich ziehen könnte. -
Seite 16: Montage In Einem Fahrzeug
fädeln Sie die Kabelbinder durch die Laschen auf der Rückseite der Alarmanlage und binden Sie sie um den gewünschten Gegenstand. MONTAGEORT • Wenn Sie die Alarmanlage an einem versteckten Ort anbringen, kann sich die Lautstärkestufe der Alarmanlage verringern. • Installieren Sie die Alarmanlage nicht in der Nähe von Metallteilen. -
Seite 17: Verwendung
VERWENDUNG AKTIVIEREN UND DEAKTIVIEREN DER ALARMANLAGE • Um die Alarmfunktion zu aktivieren (Schärfen), drücken Sie einmal der Fernbedienung. Sie hören ein „Do, Re, Mi“ und nach 5 Sekunden ein „Bi“. HINWEIS: Die Alarmanlage wird 2 Sekunden aktiviert, nachdem das Fahrzeug berührt, bewegt oder angestoßen wurde. Wenn Sie das Fahrzeug innerhalb von 2 bis 12 Sekunden erneut berühren, bewegen oder anstoßen, wird die Alarmanlage erneut für 30 Sekunden eingeschaltet (ein Klingelton für 2 Sekunden und 6 Klingeltontypen für 30 Sekunden mit automatischer... -
Seite 18: Sos-Funktion
SOS-FUNKTION • Die SOS-Funktion ist im Standardmodus ausgeschaltet. • Die SOS-Funktion reagiert auf eine Neigung von 45° aus ihrer Ausgangsposition nach einigen Sekunden, wenn die Funktion aktiviert ist. (Zum Beispiel, wenn ein Fahrrad umfällt). 1. So schalten Sie die SOS-Funktion ein •... -
Seite 19: Anzeige Für Niedrigen Batteriestand
- So setzen Sie die Alarmanlage zurück (Entfernen aller mit der Alarmanlage gekoppelten Fernbedienungen) 1. Entschärfen Sie die Alarmanlage. 2. Halten Sie ungefähr 6 Sekunden gedrückt. 3. Drücken Sie und die Alarmanlage gibt 3 Signaltöne aus, um anzuzeigen, dass alle Fernbedienungen entkoppelt sind. KLINGEL- UND SUCHFUNKTION Drücken Sie , um Ihr Motorrad/Fahrrad leicht zu finden. -
Seite 20: Austausch Der Batterien Der Alarmanlage
Sie sie ab. 3. Nehmen Sie die verbrauchte Batterie mit Hilfe eines spitzen Gegenstandes heraus. 4. Setzen Sie eine neuen Batterie ein. Der Pluspol (+) der Batterie muss nach oben gerichtet sein. 5. Stellen Sie sicher, dass die Gummidichtung um den Rahmen korrekt angebracht ist. -
Seite 21: Technische Daten
TECHNISCHE DATEN Frequenzbereich 433.980MHz Maximale Ausgangsleistung 1.36 dBm Batterie der Fernbedienung 1 x CR2032 3V Batterie der Alarmanlage 3 x AAA 1,5V Umgebungstemperatur bei Betrieb -20 ~ +40 ˚C Umgebungsluftfeuchtigkeit bei Betrieb rF < 80 % Lagerungstemperatur -30˚C ~ +70 ˚C Dieses Produkt erfüllt alle grundlegenden und für das Produkt relevanten regulatorischen Anforderungen der EU. -
Seite 22: Beoogd Gebruik
HANDLEIDING VOORWOORD We bedanken u voor uw aankoop van dit product. Het is voor u ontworpen volgens de hoogste kwaliteitsnormen. Lees de handleiding zorgvuldig door voordat u het apparaat gebruikt en bedient. Neem alle waarschuwingen in acht. Als het apparaat aan iemand anders wordt doorgegeven, dan moet deze handleiding er worden bijgeleverd. -
Seite 23: Veiligheidsinstructies
VEILIGHEIDSINSTRUCTIES 1. Onjuist gebruik kan het apparaat of gekoppelde apparaten beschadigen. Stop onmiddellijk met het gebruik van het apparaat bij afwijkingen of storingen. 2. WAARSCHUWING: Deze apparatuur is niet geschikt voor gebruik op locaties waar vaak kinderen aanwezig zijn. 3. Vermijd contact van het apparaat met water of vocht van welke aard dan ook. - Seite 24 VEILIGHEIDSINSTRUCTIES M.B.T. BATTERIJEN 1. Niet-oplaadbare batterijen mogen niet worden opgeladen. 2. Als de apparatuur gedurende een lange tijd ongebruikt worden opgeborgen, dienen de batterijen te worden verwijderd. 3. Zorg ervoor dat de contacten niet worden kortgesloten. 4. Gebruik uitsluitend batterijen van de maat en het type voorgeschreven in deze gebruikshandleiding.
- Seite 25 OPMAAK VAN DE AFSTANDSBEDIENING 1. Alarm activeren Instellingsmodus voor de gevoeligheid openen/sluiten 2. Alarm deactiveren Gevoeligheid aanpassen (alleen nadat de instellingsmodus voor de gevoeligheid is geopend) 3. Beltoon/schakelaar 4. Bel MONTAGEHANDLEIDING Dit apparaat kan worden gemonteerd door Beugel voor de dubbelzijdige tape of de kabelbinders te kabelbinder gebruiken.
-
Seite 26: Montage In Een Auto
MONTAGE IN EEN AUTO U kunt dit product ook in de motorruimte van een auto monteren, op een plek waar het product vast kan worden gezet via de gaten of vastgebonden aan de buis. GEBRUIK HET ALARM ACTIVEREN EN DEACTIVEREN •... - Seite 27 GEVOELIGHEIDSINSTELLING Er zijn 7 gevoeligheidsniveaus beschikbaar, gemeten in muzieknoten: Do, Re, Mi, Fa, Sol, La en Ti. Hierbij is ‘Do’ de hoogste en ‘Ti’ de laagste gevoeligheid. "Do" is de standaard instelling. 1. Houd ongeveer 6 seconden ingedrukt. De led zal uitschakelen en opnieuw inschakelen en er klinken 3 pieptonen tussendoor.
- Seite 28 • De afstandsbediening en het alarm zijn bij levering al gekoppeld. • Een enkel alarm kan met tot 8 afstandsbedieningen worden gekoppeld. - Ga als volgt te werk om de eerste afstandsbediening met een alarm te koppelen. 1. Haal de batterijen uit het alarm en plaats deze na 30 seconden weer terug.
-
Seite 29: Batterij Van De Afstandsbediening Vervangen
VERVANGEN VAN DE BATTERIJ INDICATOR LAAG BATTERIJNIVEAU • Als de batterij van de afstandsbediening bijna leeg is, wordt het bereik van de afstandsbediening kleiner en gaat de led niet of slechts kort branden als er op een toets wordt gedrukt. Vervang de batterij. •... -
Seite 30: Technische Gegevens
BATTERIJEN VAN HET ALARM VERVANGEN De batterijen zijn al geïnstalleerd in het alarm wanneer u het product aanschaft. Verwijder vóór het eerste gebruik het isolatielaagje. 1. Gebruik een kruiskopschroevendraaier om de schroef op de onderkant van het alarm te verwijderen. 2. - Seite 31 Dit product voldoet aan alle van toepassing zijnde EU- richtlijnen. Selectieve ophaling van het elektrisch en elektronisch afval. Elektrische apparaten mogen niet worden weggeworpen met het huishoudafval. Volgens de Europese Richtlijn 2012/19/ EU voor het afdanken van elektrische en elektronische materialen en de uitvoering ervan in het nationale recht moeten versleten elektrische producten afzonderlijk worden ingezameld en worden afgedankt in speciaal voorziene...
-
Seite 32: Uso Previsto
MANUAL DE USUARIO PRÓLOGO Gracias por comprar nuestro producto. Su diseño cumple con las más exigentes normas de calidad. Lea atentamente el manual de usuario antes de encender y utilizar la unidad. Acate todas las advertencias. Si transfiere el dispositivo a otro usuario, entréguele también este manual. Conserve este manual para poder consultarlo ulteriormente. -
Seite 33: Instrucciones De Seguridad
INSTRUCCIONES DE SEGURIDAD 1. Este producto se puede dañar si se usa incorrectamente, así como también los dispositivos conectados. Deje de utilizar el dispositivo inmediatamente en caso de fallo o anomalía. 2. ADVERTENCIA: Este equipo no es apto para su uso en sitios donde pueda haber niños presentes. - Seite 34 INSTRUCCIONES DE SEGURIDAD DE LA PILA 1. Las pilas no recargables no se deben recargar. 2. Si no va a utilizar el dispositivo durante un largo periodo de tiempo, debe retirar las pilas. 3. Los terminales integrados no se deben cortocircuitar. 4.
- Seite 35 DISEÑO DEL MANDO A DISTANCIA 1. Armar alarma Habilitar/inhabilitar el modo de ajuste de sensibilidad 2. Desarmar alarma Ajustar la sensibilidad (solo cuando el modo de ajuste de sensibilidad se haya habilitado) 3. Tono/cambiar 4. Timbre INSTRUCCIONES DE MONTAJE Este dispositivo se puede colocar utilizando Soporte de banda cinta de doble cara o bandas de sujeción.
-
Seite 36: Ajustes De Sensibilidad
MONTAJE EN COCHE También puede colocar el producto en el compartimento del motor de un coche en algún lugar donde se pueda fijar a través de los orificios o atar al tubo. UTILIZACIÓN ACTIVACIÓN Y DESACTIVACIÓN DE LA ALARMA • Para activar (ARMAR) la función de alarma, pulse una vez en el mando a distancia. -
Seite 37: Ajuste De Volumen
2. Pulse una vez y sonará desde «do» hasta el ajuste de sensibilidad actual. 3. Pulse repetidamente hasta que oiga la nota musical deseada. 4. Una vez confirmada la sensibilidad deseada, pulse una vez para salir de los ajustes. AJUSTE DE VOLUMEN 1. -
Seite 38: Sustitución De La Pila
- Para emparejar el primer mando a distancia con una alarma, siga los pasos a continuación: 1. Retire las pilas de la alarma y póngalas de nuevo pasados 30 segundos. 2. Mantenga pulsado durante aproximadamente 6 segundos. 3. Pulse el botón ARMAR o DESARMAR. La alarma pitará 2 veces indicando que se han emparejado. -
Seite 39: Sustitución De La Pila Del Mando A Distancia
• Cuando la energía de la pila de la alarma sea baja y mientras el dispositivo se esté armando o desarmando, se oirá un leve «du, du» 2 veces seguidas. Cambie las pilas. SUSTITUCIÓN DE LA PILA DEL MANDO A DISTANCIA La pila ya está... -
Seite 40: Información Técnica
SUSTITUCIÓN DE LA PILA DE LA ALARMA Las pilas ya están instaladas en la alarma al adquirir el producto. Retire la lámina de aislamiento antes del primer uso. 1. Con el destornillador de estrella, retire el tornillo de la parte inferior de la alarma. - Seite 41 Este producto cumple con todas las normativas de la UE pertinentes. Recogida selectiva de residuos eléctricos y electrónicos. Los equipos eléctricos no se deben desechar con los residuos domésticos. Según la Directiva Europea 2012/19/ UE sobre desecho de materiales eléctricos y electrónicos y su transposición a la legislación nacional, los productos eléctricos se deben recoger por separado y desechar en los puntos designados a tal efecto.
-
Seite 42: Intended Use
USER MANUAL FOREWORD We thank you for choosing our product. It is designed for you according to the highest quality standards. Please read the operation manual carefully before using and operating the product. Heed all warnings. If the device is passed on to another person, this manual must be handed over to the user along with it. -
Seite 43: Battery Safety Instructions
SAFETY INSTRUCTIONS 1. Improper use of this product may result in damage to it or attached devices. Stop using the device immediately in case of an abnormality or failure. 2. WARNING: This equipment is not suitable for use in locations where children are likely to be present. -
Seite 44: Remote Control Layout
3. The supply terminals are not to be short-circuited. 4. Only use the size and type of batteries specified in this user manual. 5. Insert the batteries properly. Follow the symbols showing the correct way to position the batteries' positive (+) and negative (-) ends. 6. -
Seite 45: Mounting Instructions
MOUNTING INSTRUCTIONS This device can be mounted using double- Tie wrap sided tape or tie wraps. bracket 1. Thoroughly clean and dry the desired surface to which the alarm is to be stick double attached. sided tape 2. Stick the double-sided tape on the rear here of the alarm on the designated recesses. -
Seite 46: Activating And Deactivating The Alarm
USAGE ACTIVATING AND DEACTIVATING THE ALARM • To activate (ARM) alarm function, press on the remote control once. You wil hear a "Do, Re, Mi", and after 5 seconds a "Bi" sound. NOTE: The alarm will sound for 2 seconds after the vehicle is touched, moved, or hit. - Seite 47 1. To turn on SOS funtion • Press and hold for about 6 seconds. The LED will turn off and back on and there will be 3 beeps in between. • Press and the alarm will beep 1 time and then, there will be 5 another beeps to indicate SOS is on.
-
Seite 48: Remote Control Battery Replacement
BATTERY REPLACEMENT LOW BATTERY LEVEL INDICATOR • When the remote control's battery is weak, the remote control range becomes shorter, and the LED does not light up or light up only briefly when a button is pressed. Replace the battery. •... -
Seite 49: Technical Data
ALARM BATTERY REPLACEMENT The batteries is already installed in the alarm decive when purchasing the product. Remove the isolation sheet before first use. 1. Using a cross-head screwdriver, remove the screw on the bottom of the alarm. 2. Using a provided triangular plate, insert it into the groove between the alarm's frame to separate the front panel from the rear cover. - Seite 50 This product meets all the basic EU regulatory requirements relevant to it. Selective collection of waste electrical and electronic equipment. Electrical equipment must not be disposed of with household waste. Pursuant to European Directive 2012/19/ EU on waste electrical and electronic equipment, and its transposition into national law, waste electrical equipment must be collected separately and disposed of in designated collection points.
- Seite 51 MANUALE D'USO INTRODUZIONE Grazie per aver scelto un nostro prodotto. È stato progettato nel rispetto dei più elevati standard di qualità. Leggere attentamente il manuale di utilizzo prima di attivare e utilizzare il prodotto. Seguire tutte le avvertenze. Se il dispositivo viene ceduto ad un'altra persona, il manuale dovrà accompagnare il dispositivo.
-
Seite 52: Istruzioni Di Sicurezza
ISTRUZIONI DI SICUREZZA 1. Un uso improprio del prodotto può causare danni al prodotto stesso o ad altri dispositivi ad esso collegati. Sospendere immediatamente l'uso del dispositivo in caso di anomalia o di guasto. 2. AVVERTENZA: Questo dispositivo non è adatto all'uso in luoghi in cui è probabile la presenza di bambini. - Seite 53 3. Non cortocircuitare i terminali di alimentazione. 4. Utilizzare esclusivamente le dimensioni e il tipo di batterie specificate in questo manuale dell’utente. 5. Inserire correttamente le batterie. Rispettare i simboli che indicano la corretta polarità positiva (+) e negativa (-) delle batterie. 6.
-
Seite 54: Descrizione Del Telecomando
DESCRIZIONE DEL TELECOMANDO 1. Inserimento dell’allarme Attiva/disattiva la modalità di regolazione della sensibilità 2. Disinserimento dell’allarme Regola la sensibilità (solo dopo avere attivato la modalità di regolazione della sensibilità) 3. Suoneria / Interruttore 4. Campanello ISTRUZIONI DI MONTAGGIO Questo dispositivo può essere montato con Staffa per del nastro biadesivo o con delle fascette. -
Seite 55: Montaggio In Auto
MONTAGGIO IN AUTO È possibile montare questo dispositivo anche nel vano motore dell'auto, in un punto in cui può essere fissato attraverso i fori o legato al tubo. ATTIVAZIONE E DISATTIVAZIONE DELL’ALLARME • Per attivare (INSERIRE) la funzione di allarme, premere una volta telecomando. -
Seite 56: Regolazione Del Volume
3. Premere ripetutamente finché non si sente la nota musicale desiderata. 4. Una volta confermata la sensibilità desiderata, premere una volta uscire dall'impostazione. REGOLAZIONE DEL VOLUME 1. Premere e tenere premuto per circa 6 secondi. Il LED si spegne e si riaccende, intervallato da 3 segnali acustici. -
Seite 57: Sostituzione Della Batteria
- Per associare il primo telecomando a un allarme, procedere come segue: 1. Rimuovere le batterie dell'allarme e reinserirle dopo 30 secondi. 2. Premere e tenere premuto per circa 6 secondi. 3. Premere il pulsante di INSERIMENTO o DISINSERIMENTO. L’allarme emette 2 segnali acustici per indicare che l’associazione è... -
Seite 58: Sostituzione Della Batteria Del Telecomando
SOSTITUZIONE DELLA BATTERIA DEL TELECOMANDO La batteria è già installata nel telecomando al momento dell'acquisto del prodotto. Rimuovere la linguetta di isolamento prima del primo utilizzo. 1. Utilizzando il cacciavite a croce fornito in dotazione, rimuovere la vite sul coperchio posteriore del telecomando. -
Seite 59: Dati Tecnici
SOSTITUZIONE DELLA BATTERIA DELL'ALLARME Le batterie sono già installate nel dispositivo di allarme al momento dell'acquisto del prodotto. Rimuovere la linguetta di isolamento prima del primo utilizzo. 1. Utilizzando il cacciavite a croce fornito in dotazione, rimuovere vite nella parte inferiore dell’allarme. - Seite 60 Questo apparecchio soddisfa tutti i requisiti normativi fondamentali dell'UE ad esso applicabili. Smaltimento selettivo dei rifiuti da apparecchiature elettriche ed elettroniche. I prodotti elettrici non devono essere smaltiti con i rifiuti domestici. Secondo la Direttiva Europea 2012/19/UE sullo smaltimento dei rifiuti da apparecchiature elettriche ed elettroniche e delle relative norme nazionali di recepimento, i rifiuti da apparecchiature elettriche ed elettroniche devono essere raccolti separatamente e smaltiti...
-
Seite 61: Utilização Prevista
MANUAL DO UTILIZADOR APRESENTAÇÃO Agradecemos-lhe por ter escolhido o nosso produto. É concebido para si de acordo com os mais elevados padrões de qualidade. Leia atentamente o manual de operação antes de utilizar e operar o produto. Preste atenção a todos os avisos. Se o dispositivo for transmitido a outra pessoa, este manual deve ser entregue ao utilizador juntamente com o mesmo. -
Seite 62: Instruções De Segurança
INSTRUÇÕES DE SEGURANÇA 1. O uso indevido deste produto pode resultar em danos a este ou a dispositivos associados. Suspenda imediatamente a utilização do dispositivo em caso de anomalia ou avaria. 2. ADVERTÊNCIA: Este equipamento não é adequado para utilização em locais onde é... - Seite 63 INSTRUÇÕES DE SEGURANÇA DAS PILHAS 1. As pilhas não recarregáveis não devem ser recarregadas. 2. Se os dispositivos tiverem de ser armazenados sem utilização durante um longo período, as pilhas devem ser removidas. 3. Os terminais de abastecimento não devem estar em curto-circuito. 4.
-
Seite 64: Instruções De Montagem
ESQUEMA DE CONTROLO REMOTO 1. Armar alarme Ativar/desativar o modo de ajuste da sensibilidade 2. Desarmar o alarme Ajustar a sensibilidade (apenas após o modo de ajuste da sensibilidade ter sido ativado) 3. Toque / Comutar 4. Campainha INSTRUÇÕES DE MONTAGEM Este dispositivo pode ser montado usando Suporte de fita dupla-face ou abraçadeiras. - Seite 65 MONTAGEM NUM CARRO Também se pode montar este produto no compartimento do motor de um carro, em alguns locais o produto pode ser fixado através dos furos ou amarrado a um tubo. UTILIZAÇÃO ATIVAR E DASATIVAR O ALARME • Para ativar a função de alarme (ARMAR), prima uma vez no controlo remoto.
-
Seite 66: Ajuste De Volume
2. Prima uma vez, e soará de "Dó" até à sua presente configuração de sensibilidade. 3. Prima repetidamente até ouvir a nota musical desejada. 4. Uma vez confirmada a sensibilidade desejada, prima uma vez para sair da configuração. AJUSTE DE VOLUME 1. -
Seite 67: Substituição Das Pilhas
2. Prima e mantenha durante cerca de 6 segundos. 3. Prima o botão ARMAR ou DESARMAR. O alarme soará 2 vezes para indicar que estão emparelhados. - Para adicionar mais controlos remotos ao alarme, siga as etapas abaixo: 1. Desarmar o alarme. 2. - Seite 68 SUBSTITUIÇÃO DA PILHA DO CONTROLO REMOTO A pilha já está instalada no controlo remoto ao adquirir o produto. Retire a folha de isolamento antes da primeira utilização. 1. Utilizando uma chave Phillips fornecida, remova o parafuso na tampa traseira do controlo remoto.
-
Seite 69: Dados Técnicos
SUBSTITUIÇÃO DA PILHA DO ALARME As pilhas já estão instaladas no dispositivo de alarme quando se compra o produto. Retire a folha de isolamento antes da primeira utilização. 1. Utilizando uma chave Phillips, remova o parafuso no fundo do alarme. 2. - Seite 70 Este produto cumpre todos os requisitos regulamentares básicos da UE relevantes para o mesmo. Recolha seletiva de resíduos elétricos e eletrónicos. Os produtos elétricos não devem ser descartados em conjunto com o lixo doméstico. De acordo com a Diretiva Europeia 2012/19/UE relativa aos resíduos de equipamentos elétricos e eletrónicos e respetiva transposição para o direito nacional, os produtos elétricos domésticos devem ser separados e...
-
Seite 71: Vereinfachte Eu-Konformitätserklärung
Internet siguiente : www.MGTS.com. SIMPLIFIED EU DECLARATION OF CONFORMITY Norauto, declares that the radio equipment type : 33226 - 2382383 - NO3174 - 3501361317204 / Anti thief alarm is in compliance with Directive 2014/53/EU. The full text of the EU declaration of conformity is available at the following internet address: www.MGTS.com. - Seite 72 2A boulevard Van Gogh 59650 Villeneuve d'Ascq France Distribué par / Distributed by / Vertrieben von: Norauto France 2A boulevard Van Gogh 59650 Villeneuve d'Ascq France Auto 5 Bld Paepsem 20 -1070 ANDERLECHT BELGIQUE A.T.U Auto-Teile-Unger Handels GmbH & Co.KG, Dr.-Kilian-Str.