Inhaltsverzeichnis
Werbung
2017.05
D Die vollständige Bedienungsanleitung
finden Sie im Internet unter:
G A full version of the operating instruction
manual is available in the Internet under:
I Le istruzioni d uso complete sono
disponibili su internet visitando:
http://www.olympiavertrieb.de/
Happy II
Art.-Nr. : 2213
D Kurzanleitung
G Quick Reference
I Istruzioni sommarie
Werbung
Inhaltsverzeichnis

Verwandte Anleitungen für Olympia Happy II


Inhaltszusammenfassung für Olympia Happy II
- Seite 1 Happy II D Kurzanleitung G Quick Reference 2017.05 Art.-Nr. : 2213 I Istruzioni sommarie D Die vollständige Bedienungsanleitung finden Sie im Internet unter: G A full version of the operating instruction manual is available in the Internet under: I Le istruzioni d uso complete sono disponibili su internet visitando: http://www.olympiavertrieb.de/...
-
Seite 2: Sicherheitshinweise
Sicherheitshinweise Sicherheitshinweise Bewahren Sie sich vor körperlichen Schäden und beachten Sie die Hinweise! Warnung: Es besteht die Gefahr eines elektrischen Schlags! Niemals selbst Gerät und Zubehör öffnen oder reparieren. Niemals blanke Kontakte mit metallischen Gegenständen berühren. Niemals mit nassen Händen den Ladeadapter stecken oder lösen. Warnung: Es besteht Erstickungsgefahr! Von Kindern fernhalten! Halten Sie Verpackungs- und Schutzfolien von Kindern fern. - Seite 3 Sicherheitshinweise Vorsicht: Explosionsgefahr durch unsachgemäßes Austauschen oder Entnehmen der Lithium-Batterie! Ersetzen Sie die Lithium-Batte rie nur durch einen vom Hersteller freigegebenen Typ. Vorsicht: Schädigung des Gehörs möglich! Der Rufton wird über den Laut sprecher wiedergegeben. Nehmen Sie zuerst den Anruf an und hal ten Sie dann das Mobiltelefon an das Ohr.
- Seite 4 Sicherheitshinweise Vermeiden Sie Sachschäden an Ihrem Gerät und beachten Sie die Hinweise! Schützen Sie Ihr Gerät gegen Nässe, Staub, Flüssigkeiten, Chemikalien, Dämpfe, Hitze und direkte Sonneneinstrahlung. Ihr Mobiltelefon ist nicht wasserdicht, halten Sie es trocken. Verwenden Sie ausschließlich das Originalzubehör. Schließen Sie nur vom Hersteller freigegebenes Zubehör an.
-
Seite 5: Nicht Bestimmungsgemäße Verwendung
Bestimmungsgemäße Verwendung Schützen Sie die Umwelt durch achtsamen Umgang und beachten Sie die Hin weise! Vermeiden Sie unnötigen Stromverbrauch. Entfernen Sie den Ladeadapter bei Nichtbenutzung aus der Steckdose. Laden Sie Ihr Gerät nicht an ungenutz ten Computern. Akkupack enthält Lithium-Batterien. Verbrauchte Lithium-Batterien nicht im Hausmüll entsorgen. - Seite 6 Übersicht Hörmuschel Display Navigation hoch / runter Softkey links Annehmen Softkey rechts Auflegen Kamera SOS (Notruf) Kopfhöreranschluss Ladebuchse Ladekontakte Taschenlampe (LED) Tastatur 12 13...
-
Seite 7: Erste Schritte
Erste Schritte Erste Schritte Lesen Sie die Bedienungsanleitung aufmerksam und gehen Sie wie beschrieben vor. So können Sie alle Funktionen zu Ihrer Zufriedenheit nutzen. Hinweis: Lesen und beachten Sie die Sicherheitshinweise vor der Inbetriebnahme. Lieferumfang 1 Mobiltelefon 1 Ladeadapter 1 Lithium-Ionen-Akku 1 USB-Anschlusskabel 1 Kurzanleitung 1 Ladeschale... -
Seite 8: Sim-Karte Einlegen
Erste Schritte SIM-Karte einlegen Bevor Sie Ihr Mobiltelefon verwenden können, müssen Sie Ihre SIM-Karte (nicht im Lieferumfang enthalten) in Ihr Mobiltelefon einlegen. 1. Nehmen Sie die Akkufachabdeckung ab. Tipp: Nutzen Sie die Aussparung (1) auf der Unterseite des Mobiltelefons. 2. Legen Sie die SIM-Karte (2) wie abgebildet ein. Tipp: Die Form des Fachs verhindert ein falsches Ein... -
Seite 9: Microsd-Speicherkarte Einlegen
Erste Schritte microSD-Speicherkarte einlegen Optional können Sie eine microSD-Speicherkarte (nicht im Lieferumfang enthalten) in Ihr Mobiltelefon einlegen. Diese erhöht die Menge an Daten, die auf dem Mobiltele fon gespeichert werden können. 1. Schieben Sie die Metallspange (1) mit leichtem Druck nach rechts. -
Seite 10: Akku Einlegen
Erste Schritte Akku einlegen Bevor Sie Ihr Mobiltelefon verwenden können, müssen Sie den Akku in Ihr Mobiltelefon einlegen. 1. Legen Sie den Akku (2) wie abgebildet ein. Tipp: Die Form des Faches verhindert ein falsches Ein legen. 2. Setzen Sie die Akkufachabdeckung (1) auf. Akku einlegen... -
Seite 11: Akku Aufladen Mit Ladeadapter
Erste Schritte Akku aufladen mit Ladeadapter 1. Schließen Sie den Ladeadapter wie abgebildet an. Hinweis: Entfernen Sie den Akku nicht, während das Mo biltelefon geladen wird. Das Mobiltelefon kann dadurch beschädigt werden. Akku aufladen mit Ladeschale 1. Schließen Sie den Ladeadapter wie abgebildet an. Akku aufladen mit Ladeadapter 2. -
Seite 12: Hinweise Zur Navigation
Hinweise zur Navigation Hinweise zur Navigation Drücken Sie die Softkeys (links und rechts) sowie die Navigationstasten , um durch die Menüs Ihres Mobiltelefons zu navigieren und Aktionen durchzuführen. Bedienen Anruf annehmen Drücken Sie die Taste Annehmen , um einen eingehenden Anruf anzunehmen. -
Seite 13: Rufnummern Und Zeichen Eingeben
Bedienen Rufnummern und Zeichen eingeben Drücken Sie die Tasten , um Rufnummern / Zeichen einzugeben. Drücken Sie auf Zurück , um Eingaben zu löschen. Sprache einstellen 1. Navigieren Sie zum Menüpunkt Menü à Einstellungen à Telefoneinstellungen à Sprache . 2. Wählen Sie Ihre Sprache aus. Datum und Uhrzeit einstellen 1. - Seite 14 Bedienen Anrufen 1. Geben Sie die Rufnummer ein. Wählen Sie Löschen , um Eingaben zu löschen. Tipp: 2. Drücken Sie auf die Taste Annehmen . Die Rufnummer wird gewählt. Kontakte Kontakte zum Telefonbuch hinzufügen 1. Navigieren Sie zum Menüpunkt Menü à Telefonbuch à Neuen Kontakt hinzufügen à Auswahl .
-
Seite 15: Kontakte Aus Dem Telefonbuch Anrufen
Bedienen Kontakte aus dem Telefonbuch anrufen 1. Navigieren Sie zum Menüpunkt Menü à Telefonbuch . Hinweis: Drücken Sie alternativ die Taste Navigation runter , um das Telefon buch zu öffnen. 2. Wählen Sie den gewünschten Kontakt. 3. Drücken Sie auf die Taste Annehmen . -
Seite 16: Bluetooth Einschalten
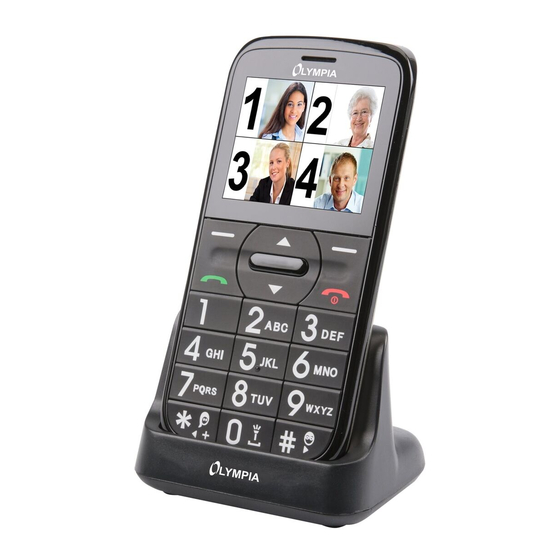
Bedienen Bluetooth Mit der Bluetooth-Funktion, einem Standard zur Datenübertragung über Funk, können Sie mit anderen Bluetooth-fähigen Geräten kostenlos Daten austauschen. Bluetooth einschalten 1. Navigieren Sie zum Menüpunkt Menü à Einstellungen à Bluetooth à Ein-/Ausschalten . Die Funktion Bluetooth wird eingeschaltet. Wählen Sie Ein-/Ausschalten ein weiteres Mal, wird die Funktion Bluetooth wieder aus... - Seite 17 Bedienen Bildwahl Weisen Sie Ihren favorisierten Kontakten Bilder zu. Diese Bilder werden dann im Bildwahl-Menü angezeigt. Durch Auswählen dieser Bilder wird die dem Kontakt zugeordnete Rufnummer gewählt. Kontakt zur Bildwahl hinzufügen 1. Wählen Sie Bildw . 2. Drücken und halten Sie die Taste eines freien Bildwahl-Speicherplatzes. 3.
- Seite 18 Bedienen 3. Wählen Sie den Menüpunkt Bearbeiten . 4. Wählen Sie den dritten Menüpunkt. 5. Suchen Sie Ihr gewünschtes Motiv. Übertragen Sie das Bild alternativ von einem Computer auf Ihr Mobiltelefon. Tipp: Weitere Informationen entnehmen Sie der vollständigen Bedienungs anleitung. 6.
-
Seite 19: Sos-Taste (Notruf-Funktion)
Bedienen SOS-Taste (Notruf-Funktion) Sie können mit der SOS-Taste einen Notruf auslösen. Zuerst ertönt ein Alarmsig nal. Dann werden Notruf-SMS an die für diesen Zweck gespeicherten Rufnum mern gesendet. Anschließend werden diese im Freisprechmodus nacheinander angerufen. Der Notruf-Funktion können bis zu 4 Rufnummern zugewiesen werden. Hinweis: Weisen Sie keine offiziellen Notrufnummern zu. -
Seite 20: Konformitätserklärung
Anhang Anhang Konformitätserklärung Hiermit erklärt die Olympia Business Systems Vertriebs GmbH, Zum Kraftwerk 1, 45527 Hattingen, dass sich dieses Gerät in Übereinstimmung mit den grund legenden Anforderungen und den anderen relevanten Vorschriften der Richtlinie 2014/53/EG befindet. Das CE-Kennzeichen auf dem Gerät bestätigt die Konformität. Die Kon... -
Seite 21: Garantie
Anhang Garantie Die Garantiezeit beträgt 24 Monate. Die Garantiezeit beginnt ab Kaufdatum. Bitte bewahren Sie den Kaufbeleg und die Originalverpackung auf. Sollte ein Problem auftreten, wenden Sie sich an unseren Service-Partner Transimex Service GmbH Krabbenweg 14 26388 Wilhelmshaven Telefon 0180 5 007514 (Kosten aus dem dt. - Seite 22 Anhang Entsorgung Wollen Sie Ihr Gerät entsorgen, bringen Sie Ihr Gerät zur Sammelstelle Ihres kommunalen Entsorgungsträgers (z. B. Wertstoffhof). Nach dem Elektro- und Elektronikgerätegesetz sind Besitzer von Altgeräten gesetz lich verpflichtet, alte Elektro- und Elektronikgeräte einer getrennten Abfallerfassung zuzuführen. Das Symbol bedeutet, dass Sie das Gerät auf keinen Fall in den Hausmüll werfen dürfen! Gefährdung von Gesundheit und Umwelt durch Akkus! Akkus nie öffnen, beschädigen, verschlucken oder in die Umwelt gelangen lassen.
- Seite 23 Anhang Technische Eigenschaften Merkmal Wert Frequenzband GSM: 850 / 900 / 1800 / 1900 Mhz Bluetooth: 2,402 - 2,480 GHz Sendeleistung (max.) GSM: 1,9 W Bluetooth: 2,6 mW Stromversorgung Eingang: 100 - 240 V, 50 - 60 Hz, 200 mA Ausgang: 5 V, 500 mA Akku 3,7 V, 600 mAh, bis zu 120 h Stand-by, bis zu...
-
Seite 24: Safety Instructions
Safety Instructions Safety Instructions Pay attention to the information to prevent any personal injuries! Warning: Risk of electric shock! Never attempt to open and repair the device or accessories yourself. Never touch bare contacts with metallic objects. Never plug-in or unplug the charging adapter when your hands are wet. - Seite 25 Safety Instructions Caution: Risk of explosion through improper replacement or removal of the lithium battery! Only replace the lithium battery by a type ap proved by the manufacturer. Caution: Risk of hearing damage! The ringing tone is issued via the loud speaker.
- Seite 26 Safety Instructions Avoid the risk of property damage to your device and observe the information! Protect the device from moisture, dust, liquids, chemicals, vapours, heat and direct sunlight. The phone is not waterproof; therefore, keep it dry. Only use original accessories. Only connect accessories approved by the manufacturer.
-
Seite 27: Unintended Use
Intended Use Protect the environment by acting responsibly and observing the following informa tion! Avoid any unnecessary consumption of power. Remove the charging adapter from the power socket when the phone is not in use. Do not charge the device on computers which are not in use. The power pack contains lithium batteries. - Seite 28 Overview Earpiece Display Navigation, up / down Softkey, left Call key Softkey, right On-hook key Camera SOS (emergency call) Headphone socket Charging socket Charge contacts Torch lamp (LED) Keypad 12 13...
-
Seite 29: First Steps
First Steps First Steps Read the instruction manual carefully and proceed as described. This will enable you to use all the functions to your full satisfaction. Note: Read the safety instructions carefully and pay attention to the information before starting up. Scope of Delivery 1 mobile phone 1 charging adapter... -
Seite 30: Inserting The Sim Card
First Steps Inserting the SIM Card Before you can start to use the mobile phone, you must insert your SIM card (not included in the equipment sup plied) in the phone. 4. Remove the battery compartment cover. Tip: Use the notch (1) on the underside of the mobile phone. - Seite 31 First Steps Inserting the MicroSD Memory Card A microSD memory card (not included in the equipment supplied) can be inserted, as an option, in the mobile phone. This increases the quantity of data which can be stored on the mobile phone. 1.
-
Seite 32: Inserting The Battery
First Steps Inserting the Battery Before you can use the mobile phone, you must insert the battery in the mobile phone. 1. Insert the battery (2) as illustrated. Tip: The shape of the compartment ensures the battery cannot be inserted incorrectly. 2. - Seite 33 First Steps Charging the Battery with the Charging Adapter 1. Connect the charging adapter as illustrated. Note: Do not remove the battery while the mobile phone is being charged. This could damage the phone. Charging the Battery with the Charging Cradle 1.
-
Seite 34: Operation
Information on Navigation Information on Navigation Press the softkeys (left and right) as well as the navigation keys to navigate through the menus and start functions provided on the mobile phone. Operation Taking a Call Press the Call key to take an incoming call. Rejecting a Call Press the On-hook key to reject an incoming call. -
Seite 35: Setting The Language
Operation Entering Phone Numbers and Characters Press the keys to enter phone numbers / characters. Press the Back key to delete incorrect input. Setting the Language 1. Navigate to the Menu à Settings à Phone settings à Language menu option. 2. -
Seite 36: Making A Call
Operation Making a Call 1. Enter the required phone number. Select Clear to delete entries. Tip: 2. Press the Call key. The phone number is dialled. Contacts Add Contact to Phone Book 1. Navigate to the Menu à Phonebook à Add new contact à Selection mode menu option. 2. - Seite 37 Operation Dialling Contacts from the Phone Book 1. Navigate to the Menu à Phonebook menu option. Note: Alternatively, press the Navigation, down key to open the phone book. 2. Select the required contact. 3. Press the Call key. The phone number is dialled. Dialling from the Call Center 1.
- Seite 38 Operation Bluetooth The Bluetooth function, a standard for wireless data transfer, can be used to ex change data with other Bluetooth-capable devices free of charge. Activating Bluetooth 1. Navigate to the Menu à Settings à Bluetooth à Power menu option. The Bluetooth function is activated.
- Seite 39 Operation Dialling Via Pictures Assign pictures to your favourite contacts. These pictures are then displayed in the picture selection menu. On selecting a picture, the phone number of the contact assigned to the picture is dialled. Adding Contacts to Picture Selection 1.
- Seite 40 Operation 3. Select the Edit menu option. 4. Select the third menu option. 5. Search for the picture you require. Alternatively, transfer the picture from a computer to the mobile phone. Tip: Further information is available in the full instruction manual. 6.
-
Seite 41: Sos Key (Emergency Call Function)
Operation SOS Key (Emergency Call Function) You can initiate an emergency call by using the SOS key. An alarm signal is is sued first of all. Then the SOS text is sent to the phone numbers saved for this purpose. These numbers are then dialled in succession in Handsfree mode. Up to 4 phone numbers can be assigned for the SOS function. -
Seite 42: Declaration Of Conformity
Appendix Appendix Declaration of Conformity Olympia Business Systems Vertriebs GmbH, Zum Kraftwerk 1, 45527 Hattingen hereby declares that this device in fulfils the basic requirements and other relevant provisions stipulated in the Directive 2014/53/EC. The CE mark on the devices confirm their conformity. The Declaration of Conformity for this product is available at http://productip.com/?f=5d19b. - Seite 43 Appendix Guarantee Dear Customer, we are pleased that you have chosen this equipment. In the case of a defect, please return the device together with the receipt and origi nal packing material to the point-of-sale.
- Seite 44 Appendix Disposal In order to dispose of your device, take it to a collection point provided by your local public waste authorities (e.g. recycling centre). According to laws on the disposal of electronic and electrical devices, owners are obliged to dispose of old electronic and electrical devices in a separate waste container.
- Seite 45 Appendix Technical Properties Feature Value Frequency band GSM: 850 / 900 / 1800 / 1900 Mhz Bluetooth: 2,402 - 2,480 GHz Sending power (max.) GSM: 1.9 W Bluetooth: 2.6 mW Power supply Input: 100 - 240 V, 50 - 60 Hz, 200 mA Output: 5 V, 500 mA Battery 3.7 V, 600 mAh, up to 120 h standby, up to 4 h...
-
Seite 46: Indicazioni Di Sicurezza
Indicazioni di sicurezza Indicazioni di sicurezza Evitare lesioni fisiche e osservare le indicazioni! Avviso: Pericolo di scosse elettriche! Non aprire o riparare mai autonomamente l apparecchio o gli accessori. Non sfiorare mai i contat ti a nudo con oggetti metallici. Non introdurre mai mani bagnate nell adattatore di carica, né... - Seite 47 Indicazioni di sicurezza Attenzione: Pericolo di esplosione dovuto alla sostituzione o all estrazione non corretta della batteria al litio! Sostituire la batteria al litio solo con un tipo di batteria consigliato dal produttore. Attenzione: Pericolo di danni all udito! Il segnale di chiamata è riprodotto dal l'altoparlante.
- Seite 48 Indicazioni di sicurezza Evitare danni materiali all apparecchio ed osservare le indicazioni! Proteggere l'apparecchio da umidità, polvere, liquidi, sostanze chimiche, vapori, calore e raggi solari diretti. Il telefonino non è a tenuta d acqua, mantenerlo asciutto. Utilizzare esclusivamente accessori e dotazioni originali. Collegare solo gli accessori consigliati dal produttore.
-
Seite 49: Impiego Conforme Agli Usi Previsti
Impiego conforme agli usi previsti Proteggere l ambiente e osservare le indicazioni! Evitare qualsiasi spreco di energia elettrica. Se non utilizzato, scollegare l adattatore di carica dalla presa di corrente. Evitare di caricare l apparecchio collegandolo ad un computer non in uso. La batteria ricaricabile è... -
Seite 50: Vista Generale
Vista generale Ricevitore Display Navigazione in alto/in basso Softkey a sinistra Accettare Softkey a destra Riagganciare Fotocamera SOS (chiamata d emergenza) Presa per auricolare Connettore di ricarica Contatti di carica Torcia (LED) Tastiera 12 13... -
Seite 51: Primi Passi
Primi passi Primi passi Leggere attentamente e osservare le istruzioni d'uso. In questo modo sarà possibi le usufruire di tutte le funzioni in modo soddisfacente. Nota: Leggere e osservare le indicazioni di sicurezza prima ancora di procedere alla messa in funzione. Oggetto di fornitura 1 telefonino 1 adattatore di carica... -
Seite 52: Inserire La Scheda Sim
Primi passi Inserire la scheda SIM Prima di poter utilizzare il telefonino è necessario inserire la propria scheda SIM (non inclusa nella confezione) nel telefonino. 4. Rimuovere il coperchio del vano batteria. Suggerimento: Utilizzare la rientranza (1) sul lato inferiore del telefonino. - Seite 53 Primi passi Inserire la scheda memoria microSD Il telefonino prevede l inserimento di una scheda memoria microSD supplementare (non inclusa nella confezione). Il suo uso aumenta la capacità di archiviazione di dati sul proprio telefonino. 1. Spingere la graffetta metallica (1) con lieve pressione a destra.
-
Seite 54: Inserire La Batteria
Primi passi Inserire la batteria Prima di poter utilizzare il telefonino è necessario inserire la batteria nel telefonino. 1. Inserire la batteria (2) come raffigurato. Suggerimento: La forma del vano è tale da escludere un inserimento errato della batteria. 2. Applicare il coperchio del vano batteria (1). Inserire la batteria... - Seite 55 Primi passi Caricare la batteria con adattatore di carica 1. Collegare l adattatore di carica come raffigurato. Nota: Non rimuovere la batteria mentre il telefonino è in fase di carica. Un simile intervento potrebbe dan neggiare il telefonino. Caricare la batteria con basetta di ricarica 1.
- Seite 56 Indicazioni sulla navigazione Indicazioni sulla navigazione Premere i tasti softkey (sinistra e destra) e i tasti di navigazione per navigare nel menu del proprio telefonino ed accedere alle rispettive fun zioni. Esercizio Accettare la chiamata Premere il tasto Accettare per accettare una chiamata in arrivo. Respingere la chiamata Premere il tasto Riagganciare per respingere una chiamata in arrivo.
- Seite 57 Esercizio Inserire numeri telefonici e segni Premere i tasti per inserire numeri telefonici / segni. Premere Indietro per cancellare le immissioni. Impostare la lingua 1. Navigare fino alla voce di menu Menu à Impostazioni à Configurazione Telefono à Lingua . 2.
- Seite 58 Esercizio Telefonare 1. Inserire il numero di chiamata. Selezionare Cancella per cancellare le immissioni. Dritta: 2. Premere il tasto Accettare . Il numero di chiamata è selezionato. Contatti Aggiungere contatti alla rubrica 1. Navigare alla voce di menu Menu à Rubrica telefonica à Aggiungi nuova voce à Modalità...
- Seite 59 Esercizio Chiamare contatti presenti in rubrica 1. Navigare alla voce di menu Menu à Rubrica telefonica . Nota: Premere in alternativa il tasto Navigazione giù per aprire la rubrica. 2. Selezionare il contatto richiesto. 3. Premere il tasto Accettare . Il numero di chiamata è selezionato. Chiamare contatti presenti nell elenco chiamate 1.
- Seite 60 Esercizio Bluetooth Con la funzione Bluetooth, uno standard della trasmissione di dati via radio, è pos sibile eseguire lo scambio gratuito di dati con altri dispositivi compatibili Bluetooth. Attivare la funzione Bluetooth 1. Navigare alla voce di menu Menu à Impostazioni à Bluetooth à Alimentazione . La funzione Bluetooth è...
- Seite 61 Esercizio Funzione di chiamata contatto con foto Abbinare un' immagine ad ognuno dei propri contatti preferiti. Le foto interessate sono quindi visualizzate nel menu Chiamata con foto. Alla selezione di queste foto corrisponde la composizione del numero telefonico rispettivamente abbinato. Aggiungere il contatto alla chiamata contatto con foto 1.
- Seite 62 Esercizio 3. Selezionare la voce di menu Modifica . 4. Selezionare la terza voce di menu. 5. Cercare la foto desiderata. Trasferire altrimenti l immagine da un computer al proprio telefonino. Per Dritta: ulteriori informazioni si vedano le istruzioni d uso complete. 6.
- Seite 63 Esercizio Tasto SOS (funzione di chiamata d emergenza) Premendo sul tasto SOS è possibile lanciare una chiamata d emergenza. Prima si avverte un segnale di allarme. Il telefonino invia quindi un SMS d emergenza ai numeri telefonici precedentemente salvati a tale scopo. I numeri telefonici memorizzati sono chiamati uno dopo l altro con vivavoce inserito.
-
Seite 64: Dichiarazione Di Conformità
Appendice Appendice Dichiarazione di conformità Olympia Business Systems Vertriebs GmbH, Zum Kraftwerk 1, 45527 Hattingen dichiara che il presente apparecchio è conforme ai requisiti essenziali e alle altre norme pertinenti stabiliti dalla Direttiva 2014/53/CE. Il marchio CE sugli apparecchi attesta la conformità dei prodotti. La dic... -
Seite 65: Garanzia
Appendice Garanzia Caro cliente, ci congratuliamo con Lei per aver scelto questo apparecchio. In caso di difetti la preghiamo di ritornare l'apparecchio, completo di imballo origi nale e scontrino di acquisto, al punto vendita dove è stato effettuato l'acquisto. - Seite 66 Appendice Smaltimento Per smaltire l'apparecchio, consegnarlo in un punto di raccolta istituito dalla propria società di smaltimento rifiuti comunale (ad es. centro di riciclo materiali). Secondo quanto previsto dalla legge sugli apparecchi elettrici ed elettronici, i proprietari di apparecchi esauriti sono per legge tenuti alla consegna di tutti gli apparecchi elettrici ed elettronici presso un centro di rilievo rifiuti in raccolta differenziata.
- Seite 67 Appendice Dati tecnici Caratteristica Valore Banda di frequenza GSM: 850 / 900 / 1800 / 1900 Mhz Bluetooth: 2,402 - 2,480 GHz Potenza di trasmis GSM: 1,9 W sione (max.) Bluetooth: 2,6 mW Alimentazione elettrica Entrata: 100 - 240 V, 50 - 60 Hz, 200 mA Uscita: 5 V, 500 mA Batteria 3,7 V, 600 mAh, fino a 120 h in stand-by, fino a 4 h di...
- Seite 68 Wir behalten uns inhaltliche und technische Änderungen vor. Subject to change without prior notice. Con riserva di modifiche tecniche e al contenuto. Art. Nr. 2213 / Version 2017.05 www.olympia-vertrieb.de...