ENERMAX LIQTECH XTR Bedienungsanleitung
Inhaltsverzeichnis
Quicklinks
LIQTECH XTR
A L L - I N - O N E L I Q U I D C P U C O O L E R
Follow ENERMAX on social media for the latest informa�on and show us your build with
hashtag #ENERMAX
Facebook: h�ps://www.facebook.com/OfficialENERMAX
Instagram: h�ps://www.instagram.com/OfficialENERMAX
Twi�er: h�ps://twi�er.com/OfficialENERMAX
YouTube: h�ps://www.youtube.com/@OfficialENERMAX
U se r Ma nu a l
Inhaltsverzeichnis

Verwandte Anleitungen für ENERMAX LIQTECH XTR


Inhaltszusammenfassung für ENERMAX LIQTECH XTR
- Seite 1 A L L - I N - O N E L I Q U I D C P U C O O L E R U se r Ma nu a l Follow ENERMAX on social media for the latest informa�on and show us your build with hashtag #ENERMAX Facebook: h�ps://www.facebook.com/OfficialENERMAX...
-
Seite 2: Inhaltsverzeichnis
14 languages: Chinese Simplified, Chinese Tradi�onal, English, French, German, Indonesian, Italian, Japanese, Korean, Polish, Russian, Spanish, Thai and Turkish. Please scan the QR code to download, or visit the LIQTECH XTR English product webpage and download it from the Download sec�on: h�ps://www.enermax.com/en/products/liqtech-xtr-360mm-liquid-cooler... -
Seite 3: Limited Warranty
5. ENERMAX is only liable for limited warranty service of ENERMAX product. ENERMAX is not liable for other damage or loss of �me, interest, commercial opportunity due to using defect product of ENERMAX. -
Seite 4: Enermax Warranty Tr
AMBALAJ İÇİN UYARI! Ulusal Çevre Mevzuatımız gereği ambalajlar, geri dönüştürülebilir malzemelerden Enermax işlemci soğutucuları, masaüstü bilgisayar işlemcilerinin ürettiği çalışma ısısını güvenli üretilmiştir. Ambalajların normal ev çöpüne atılmaması, yerel yönetimlerin belirttiği sınırlar içinde tutarak işlemciden kullanım ömrünün sonuna kadar faydalanmanızı sağlar. -
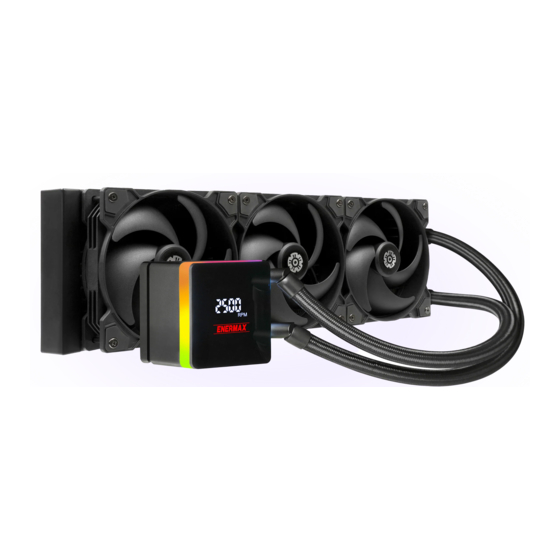
Seite 5: Specifica�On
Specifica�on Model ELC-LTXTR360 Intel® LGA 4677 CPU Socket AMD® TR5 (sTR5/ sTRX5/ sWRX9), SP6, sWRX8 / sTRX4 / TR4 / SP3 Radiator Dimension 395 x 120 x 27mm Tube Length 400mm 500 W+ Cold Plate Copper Material Radiator Aluminum Tube Rubber Speed 700 - 3000 RPM ±... -
Seite 6: Part List
Part List (LIQTECH XTR 360) Cooler x 1 Fan x 3 Intel Bracket x1 Thermal Grease x 2 Intel Spring Screw x 4 Fan Screw x 12 AMD Screw x4 Case Screw x 12 PWM Y Cable x1 SATA Adapter x 1... -
Seite 7: Intel Installa�On
Intel Installa�on Intel Installa�on Step 1 EN Install the bracket to the pump by sliding the bracket into the slot un�l secure. DE Mon�eren Sie die Halterung an der Pumpe. FR Installez et fixez les clips à la pompe. JP ポンプにクリップを取り付けます。 TW 將支架安裝於水泵上。... - Seite 8 Intel Installa�on Step 4 EN Apply the thermal grease evenly on the CPU surface. DE Verteilen Sie gleichmäßig eine dünne Schicht Wärmeleitpaste auf der CPU-Oberfläche. FR Appliquez une couche uniforme de pâte thermique sur la surface du processeur. JP サーマルグリスをCPUの表面に均一になるよう薄く塗 って下さい。...
-
Seite 9: Amd Installa�On
AMD Installa�on Step 1 Install the bracket to the pump by sliding the bracket into the slot un�l secure. Mon�eren Sie die Halterung an der Pumpe. Installez et fixez les clips à la pompe. ポンプにクリップを取り付けます。 將支架安裝於水泵上。 将支架安装于水泵上。 클립(C)을 이미지와 같이 워터 블록에 체결하세요. İşlemcinizle uyumlu bağlan�... -
Seite 10: Radiator Installa�On
Radiator Installa�on Step 1 Step 2 A�ach the fan and radiator to the chassis. Befes�gen Sie den Lü�er und den Kühler am Gehäuse. Fixez le ven�lateur et le radiateur sur le châssis. ファンとラジエーターをケースに取り付けます。 將風扇及水冷排安裝於機殼上。 将风扇及水冷排安装于机壳上。 팬(B)을 팬 스크류(M)를 이용해 라디에이터에 체결한 후 케이스에 라디에이터 장착 위치에 맞춰 케이스 스크류(N)를 이용하여 고정하세요. Soğutucu fanları, fan vidaları... -
Seite 11: Pump And Fan Installa�On
Pump and Fan Installa�on Step 1 Step 2 PWM Y cable 4 pin Pump Pump 4 pin 3 pin Use a PWM Y-spli�er cable to connect the fan and water pump to the motherboard. Verwenden Sie ein PWM-Y-Verteilerkabel, um den Lü�er und die Wasserpumpe mit dem Motherboard zu verbinden. U�lisez un câble PWM en Y pour connecter le ven�lateur et la pompe à... -
Seite 12: Noise Reducer Installa�On
Noise Reducer Noise Reducer adaptor for reducing the speed and noise of radiator fans. Installa�on PWM Y Cable Noise Reducer 4 pin Max Fan Speed 2400 RPM ± 10% Max Fan Air Flow 76.4 CFM Max Fan Sta�c Pressure 2.96 mm-H2O Max Fan Maximum Noise 26 dBA -10-... -
Seite 13: Usb And Rgb Control
USB and RGB Control 5V D G Addressable RGB * Please ensure it is properly the connector to the motherboard. A�ach the ARGB and USB headers from the water block to the corresponding headers on the motherboard. Verbinden Sie die ARGB- und USB-Anschlüsse des Wasserblocks mit den entsprechenden Anschlüssen auf der Hauptpla�ne. Reliez les connecteurs ARGB et USB du waterblock aux connecteurs correspondants de la carte-mère. -
Seite 14: Change The Digital Display Orienta�On
Change the Digital Display Orienta�on Step 1 Step 2 Step 3 EN Detach the magne�c cover and rotate the digital display to your preferred viewing angle. DE Nehmen Sie die magne�sche Abdeckung ab und drehen Sie die Digitalanzeige in den von Ihnen bevorzugten Blickwinkel. FR Détachez le couvercle magné�que, puis faites pivoter l'écran numérique pour obtenir l'angle de vue qui vous convient. -
Seite 15: Enermax Tuner So�Ware User Manual
ENERMAX Tuner So�ware User Manual Connec�ng the Hardware Connect the digital signal cable (9-pin) of the LIQTECH XTR to any USB 2.0 port on your motherboard to complete the connec�on. Installing the ENERMAX Tuner So�ware Visit the ENERMAX LIQTECH XTR product webpage or scan the QR code to download and install the ENERMAX Tuner so�ware. - Seite 16 ,并按照指示即可完成安装。 ENERMAX Tuner 功能介绍 重要:本软件使用说明将介绍软件界面中所提供的功能,与实际软件界面设计可能略有 不同。 하드웨어 연결하기 LIQTECH XTR의 디지털 단일 케이블(9핀)을 마더보드에 있는 아무 USB 2.0 포트에나 연결하여 연결을 완료합니다. ENERMAX Tuner 소프트웨어 설치하기 ENERMAX LIQTECH XTR 제품 웹페이지를 방문하거나 QR 코드를 스캔하여 ENERMAX Tuner 소프트웨어를 다운로드하고 설치합니다.
- Seite 17 Desain antarmuka perangkat lunak yang sebenarnya mungkin sedikit berbeda. Connessione dell’hardware Collegare il cavo del segnale digitale (9 pin) di LIQTECH XTR a una porta USB 2.0 sulla scheda madre per completare il collegamento. Installazione del so�ware ENERMAX Tuner Visitare la pagina web del prodo�o ENERMAX LIQTECH XTR o eseguire la scansione...
- Seite 18 ENERMAX Tuner So�ware User Manual Conexión del hardware Conecte el cable de señal digital (9 contactos) de su LIQTECH XTR a cualquier puerto USB 2.0 de la placa base para completar la conexión. Instalación del so�ware ENERMAX Tuner Visite la página web del producto ENERMAX LIQTECH XTR o escanee el código QR para descargar e instalar el so�ware ENERMAX Tuner.
- Seite 19 Language: Select your preferred language: English, Tradi�onal Chinese, or Simplified Chinese. Please restart the so�ware a�er changing the language. Auto-start: Enable or disable the automa�c startup of ENERMAX Tuner when your computer powers on. Temperature Unit: Choose between Celsius and Fahrenheit.
- Seite 20 Langue : Sélec�onnez votre langue préférée : anglais, chinois tradi�onnel ou chinois simplifié. Veuillez redémarrer le logiciel après avoir changé de langue. Démarrage automa�que: Ac�vez ou désac�vez le démarrage automa�que d'ENERMAX Tuner lors de la mise sous tension de votre ordinateur.
- Seite 21 언어: 원하는 언어를 선택하십시오. 영어, 중국어(번체), 중국어(간체) 언어를 변경한 후 소프트웨어를 다시 시작하십시오. 자동 시작: 컴퓨터가 켜졌을 때 ENERMAX Tuner의 자동 시작을 활성화 또는 비활성화합니다. 온도 단위: 섭씨 및 화씨 중에 선택합니다. 데이터 회전 시간 표시: 워터 블록 화면에 여러 옵션이 표시될 경우 다른 데이터가 돌아가며...
- Seite 22 Idioma: seleccione su idioma preferido: inglés, chino tradicional o chino simplificado. Reinicie el so�ware después de cambiar el idioma. Inicio automá�co: habilite o deshabilite el inicio automá�co del ENERMAX Tuner cuando su PC se haya iniciado. Unidad de temperatura: elija entre Celsius y Fahrenheit.
- Seite 23 1. Ustawienia ogólne Język: Wybierz preferowany język: Angielski, Tradycyjny Chiński lub Uproszczony Chiński. Po zmianie języka uruchom ponownie oprogramowanie. Autostart: Włączenie lub wyłączenie automatycznego uruchamiania ENERMAX Tuner po włączeniu komputera. Jednostka temperatury: Wybór pomiędzy stopniami Celsjusza i Fahrenheita. Wyświetlanie czasu rotacji danych: Jeśli na ekranie bloku wodnego wyświetlanych jest wiele opcji, można ustawić...
- Seite 24 © 2024 ENERMAX TECHNOLOGY CORPORATION. All right reserved. Specifica�ons are subject to change without prior no�ce. Some trademarks may be claimed as the property of others. This is printed 100% recyclable paper with non-toxic vegetable oil based ink. Nov. 2024...