Herunterladen Inhalt Inhalt Diese Seite drucken
AEG Electrolux FAVORIT AAAUTO Benutzerinformation
Vorschau ausblenden Andere Handbücher für FAVORIT AAAUTO:
Inhaltsverzeichnis

Werbung

Verfügbare Sprachen

Verfügbare Sprachen

FAVORIT AAAUTO
Návod k použití
User manual
Benutzerinformation
Dishwasher
Dishwasher
Dishwasher

Werbung

Inhaltsverzeichnis
loading

Inhaltszusammenfassung für AEG Electrolux FAVORIT AAAUTO

  • Seite 1 FAVORIT AAAUTO Návod k použití Dishwasher User manual Dishwasher Benutzerinformation Dishwasher...
  • Seite 2: Inhaltsverzeichnis

    Obsah Děkujeme, že jste si vybrali jeden z našich vysoce kvalitních výrobků. Přečtěte si prosím pozorně tento návod k použití, abyste zajistili optimální a správný chod svého spotřebiče. Najdete v něm rady k dokonalému a co nejúčinnějšímu používání spotřebiče. Doporučujeme vám, abyste návod uložili na bezpečném místě, a mohli ho kdykoliv znovu použít.
  • Seite 3: Provozní Pokyny

    Bezpečnostní informace Provozní pokyny Bezpečnostní informace Přečtěte si pečlivě tento návod ještě před instalací spotřebiče a jeho prvním použitím k zajištění bezpečného a správného provozu. Tento návod k použití vždy uchovejte spolu se spotřebičem, i při případném stěhování nebo prodeji. Uživatelé...
  • Seite 4: Instalace

    Popis spotřebiče • Všechny mycí prostředky uložte na bezpečné místo. Nedovolte dětem, aby se dotýkaly mycích prostředků. • Jsou-li dveře myčky otevřené, nedovolte dětem, aby se k ní přibližovaly. Instalace • Ujistěte se, že se spotřebič při dopravě nepoškodil. Poškozený spotřebič nezapojujte.
  • Seite 5: Ovládací Panel

    Ovládací panel Nastavení tvrdosti vody Zásobník na sůl Dávkovač mycího prostředku Dávkovač leštidla Typový štítek Filtry Dolní ostřikovací rameno Horní ostřikovací rameno Pracovní deska Ovládací panel Tlačítka pro volbu programu Tlačítko Multitab (3 in 1) Kontrolky Tlačítko Zap/Vyp Digitální displej Tlačítko Odložený...
  • Seite 6: Tlačítka Volby Programu

    Ovládací panel Kontrolky Kontrolka se rozsvítí, když probíhá mycí nebo oplachovací fáze. Kontrolka se rozsvítí, když probíhá sušící fáze. Kontrolka se rozsvítí, když mycí program skončí. Kontrolka se rozsvítí, je-li nutné doplnit zásobník na sůl. Řiďte se pokyny v části „Použití...
  • Seite 7: Režim Nastavení

    Před prvním použitím Režim nastavení Spotřebič musí být v režimu nastavení při následujících postupech: • Nastavení mycího programu. • Nastavení změkčovače vody. • Vypnutí/zapnutí dávkovače leštidla: Stiskněte tlačítko Zap/Vyp. Spotřebič je v režimu nastavení, když: – Se rozsvítí všechny kontrolky programů. Stiskněte tlačítko Zap/Vyp.
  • Seite 8: Ruční Nastavení

    Nastavení změkčovače vody Tvrdost vody Nastavení tvrdosti vody °dH °TH mmol/l Clarkovy ručně elektronicky stupně 43 - 50 76 - 90 7,6 - 9,0 53 - 63 37 - 42 65 - 75 6,5 - 7,5 46 - 52 29 - 36 51 - 64 5,1 - 6,4 36 - 45...
  • Seite 9: Použití Soli Do Myčky

    Použití soli do myčky 6. Stiskněte tlačítko funkce A ke zvýšení nastavení změkčovače vody o jeden stupeň. 7. Stisknutím tlačítka Zap/Vyp postup uložte. Použití soli do myčky POZOR Používejte pouze sůl pro myčky. Všechny ostatní druhy soli, které nejsou určené do myčky, poškozují změkčovací zařízení. POZOR Zrnka soli a slaná...
  • Seite 10: Seřízení Dávkování Leštidla

    Použití lešticího prostředku 1. Stiskněte uvolňovací tlačítko (A) k otevření dávkovače leštidla. 2. Naplňte dávkovač leštidla lešticím prostředkem. Značka "max." ukazu‐ je maximální hladinu leštidla. 3. Rozlité leštidlo setřete savým hadříkem, aby se při následujícím mycím programu netvořilo přílišné množství pěny. 4.
  • Seite 11: Vkládání Příborů A Nádobí

    Vkládání příborů a nádobí Vkládání příborů a nádobí Užitečné rady a tipy POZOR Myčku používejte jen k mytí domácího nádobí určeného pro mytí v myčkách. Nepoužívejte myčku k mytí předmětů, které nasávají vodu (houby, savé utěrky apod.). • Před vložením nádobí a příborů do myčky: –...
  • Seite 12: Košíček Na Příbory

    Vkládání příborů a nádobí Řady držáků v dolním koši lze lehce sklopit a získat tak místo k uložení hrnců, pánví a velkých mís. Košíček na příbory UPOZORNĚNÍ Nože s dlouhým ostřím nestavte svisle, aby se nikdo nemohl zranit. Dlouhé a ostré...
  • Seite 13: Košíček Na Nože

    Vkládání příborů a nádobí Košíček na nože Košíček na nože se nachází v zadní části horního koše. Do košíčku na nože dávejte dlouhé a ostré příbory. Horní koš Horní koš je určen pro talíře (maximálně 24 cm v průměru), podšálky, misky na salát, šálky, sklenice, hrnky a pokličky.
  • Seite 14: Použití Mycího Prostředku

    Použití mycího prostředku POZOR Při seřizování výšky musí být horní koš prázdný. Maximální výška nádobí horní koš dolní koš Vyšší poloha 20 cm 31 cm Nižší poloha 24 cm 27 cm Horního koš přesunete do vyšší polohy následovně: 1. Vysuňte přední zarážky (A) ven. 2.
  • Seite 15 Použití mycího prostředku 1. Otevřete víčko dávkovače mycího prostředku. 2. Naplňte dávkovač mycího prostředku ( A) mycím prostředkem. Značka ukazuje dávkování: 20 = přibližně 20 g mycího prostředku 30 = přibližně 30 g mycího prostředku. 3. U programu s předmytím přidejte další...
  • Seite 16: Funkce Multitab

    Funkce Multitab Funkce Multitab Funkce Multitab je určena pro kombinované mycí tablety Multitab. Tyto tablety obsahují mycí prostředek, leštidlo a změkčovací sůl. Některé dru‐ hy tablet mohou obsahovat ješte další přísady. Přesvědčte se, že jsou mycí tablety vhodné pro místní tvrdost vody. Řiďte se pokyny výrobce.
  • Seite 17: Mycí Programy

    Mycí programy Chcete-li opět použít normální mycí prostředek: 1. Vypněte funkci Multitab. 2. Doplňte opět zásobník soli a leštidla. 3. Seřiďte stupeň tvrdosti vody na nejvyšší stupeň. 4. Spusťte mycí program bez nádobí. 5. Seřiďte změkčovač vody na základě tvrdosti vody ve vašem bytě. 6.
  • Seite 18: Volba A Spuštění Mycího Programu

    Volba a spuštění mycího programu Tyto hodnoty se mohou měnit v závislosti na tlaku a teplotě vody, na kolísání v dodávce proudu a na množství nádobí. Volba a spuštění mycího programu Mycí program nastavte s lehce pootevřenými dveřmi. Mycí program se spustí až...
  • Seite 19: Nastavení A Spuštění Programu S Odloženým Startem

    Volba a spuštění mycího programu Nastavení a spuštění programu s odloženým startem 1. Stiskněte tlačítko Zap/Vyp. 2. Nastavte mycí program. 3. Stiskněte tlačítko odloženého startu, až na displeji začne blikat potřebný počet hodin odložení mycího programu. – Kontrolka Odložený start se rozsvítí. 4.
  • Seite 20: Čištění A Údržba

    Čištění a údržba Čištění a údržba UPOZORNĚNÍ Před čištěním myčky ji musíte nejdříve vypnout. Čištění filtrů POZOR Nepoužívejte myčku bez filtrů. Zkontrolujte, zda jsou filtry správně umístěné. Nesprávná instalace filtrů má za následek nedostatečné umytí nádobí a může myčku poškodit. Je-li to nutné, filtry vyčistěte.
  • Seite 21: Čištění Vnějších Ploch

    Co dělat, když... 12. Zablokujte ho otočením držadla mikrofiltru (B) doprava, až zacva‐ kne do správné polohy. 13. Dolní koš vraťte zpět. 14. Zavřete dvířka. Ostřikovací ramena nevyjímejte. Jestliže se otvory v ostřikovacích ra‐ menech zanesou nečistotami, odstraň‐ te je párátkem. Čištění...
  • Seite 22 Co dělat, když... Poruchový kód a porucha Možná příčina a řešení • na digitálním displeji se zo‐ • Kolík sifonu je zablokovaný. brazí Vyčistěte kolík sifonu. Myčka nevypouští vodu • Vypouštěcí hadice je nesprávně připojena. Hadi‐ ce může být někde přehnutá nebo stisknutá. Zkontrolujte, zda je připojení...
  • Seite 23: Technické Údaje

    Technické údaje Nádobí není dobře umyté Nádobí je vlhké a matné. • Nebylo použito leštidlo. • Dávkovač leštidla je prázdný. Na nádobí a skle jsou • Snižte dávkování leštidla. šmouhy, mléčné skvrny nebo modravý potah. Na nádobí a skle jsou •...
  • Seite 24: Horní Desku Myčky Odstraníte Takto

    Instalace Umístěte spotřebič v blízkosti přívodu vo‐ dy a odpadu. Chcete-li myčku umístit pod dřez nebo kuchyňskou pracovní desku, odstraňte horní desku myčky. Zkontroluj‐ te, zda rozměry výklenku souhlasí s da‐ nými rozměry. Horní desku myčky odstraníte takto: 1. Vyšroubujte zadní šrouby (1). 2.
  • Seite 25: Vodovodní Přípojka

    Vodovodní přípojka Vodovodní přípojka Přívodní hadice Připojte myčku k přívodu horké (max. 60°) nebo studené vody. Pokud odebíráte horkou vodu z alternativních zdrojů, které jsou šetrnější k životnímu prostředí (např. solární či fotovoltaické panely, nebo větrná energie), použijte horkou vodu ke snížení spotřeby energie. Přívodní...
  • Seite 26: Vypouštěcí Hadice

    Připojení k elektrické síti Vypouštěcí hadice 1. Vypouštěcí hadici připojte ke kolíku sifonu a připevněte ji pod pracovní plo‐ chou. Tím se zabrání toku vypuštěné vody z dřezu zpět do myčky. 2. Vypouštěcí hadici připojte ke stoupacímu odpadnímu potrubí s průduchem (minimální...
  • Seite 27: Poznámky K Ochraně Životního Prostředí

    Poznámky k ochraně životního prostředí Poznámky k ochraně životního prostředí Symbol na výrobku nebo jeho balení udává, že tento výrobek nepatří do domácího odpadu. Je nutné odvézt ho do sběrného místa pro recyklaci elektrického a elektronického zařízení. Zajištěním správné likvidace tohoto výrobku pomůžete zabránit negativním důsledkům pro životní...
  • Seite 28 Contents Thank you for choosing one of our high-quality products. To ensure optimal and regular performance of your appliance please read this instruction manual carefully. It will enable you to navigate all processes perfectly and most efficiently. To refer to this manual any time you need to, we recommend you to keep it in a safe place.
  • Seite 29: Operating Instructions

    Safety information Operating instructions Safety information For your safety and correct operation of the appliance, read this manual carefully before installation and use. Always keep these instructions with the appliance even if you move or sell it. Users must fully know the operation and safety features of the appliance. Correct use •...
  • Seite 30: Installation

    Product description Installation • Make sure that the appliance is not damaged because of transport. Do not connect a damaged appliance. If necessary, contact the supplier. • Remove all packaging before first use. • A qualified and competent person must do the electrical installation. •...
  • Seite 31: Control Panel

    Control panel Rating plate Filters Lower spray arm Upper spray arm Worktop Control panel Programme selection buttons Multitab button (3 in 1) Indicator lights On/off button Digital display Delay start button Function buttons Indicator lights The indicator light comes on when the washing phase or the rinsing phase operates.
  • Seite 32: Programme Selection Buttons

    Control panel Indicator lights The indicator light comes on when the washing programme is completed. The indicator light comes on when it is necessary to fill the salt container. Refer to the chapter 'Use of dishwasher salt'. The salt indicator light can stay on for some hours, but it does not have an unwanted effect on the operation of the appliance.
  • Seite 33: Use Of The Appliance

    Use of the appliance Press the on/off button. The appliance is in setting mode when: – All the programme indicator lights come on. Press the on/off button. The appliance is not in setting mode when: – Only one programme indicator light comes on –...
  • Seite 34: Manual Adjustment

    Use of dishwasher salt Water hardness Water hardness setting °dH °TH mmol/l Clarke manually electronically 11 - 14 19 - 25 1,9 - 2,5 13 - 17 4 - 10 7 - 18 0,7 - 1,8 5 - 12 < 4 <...
  • Seite 35: Use Of Rinse Aid

    Use of rinse aid CAUTION! Grains of salt and salty water on the bottom of the appliance can cause corrosion. Fill the appliance with salt before you start a washing programme to prevent corrosion. Do these steps to fill the salt container: 1.
  • Seite 36: Adjusting The Rinse Aid Dosage

    Loading cutlery and dishes 2. Fill the rinse aid dispenser with rinse aid. The mark 'max.' shows the maximum level. 3. Remove the spilled rinse aid with an ab- sorbent cloth to prevent too much foam during the subsequent washing pro- gramme.
  • Seite 37: Lower Basket

    Loading cutlery and dishes – Load hollow items (e.g. cups, glasses and pans) with the opening down. – Make sure that water does not collect in the container or in a deep base. – Make sure that cutlery and dishes do not lie inside one another. –...
  • Seite 38: Cutlery Basket

    Loading cutlery and dishes The rows of prongs in the lower basket can be flat to load pots, pans and bowls. Cutlery basket WARNING! Do not put long-bladed knives in a vertical position. Arrange long and sharp cutlery hori- zontally in the upper basket. Be careful with sharp items. Put forks and spoons with the handles down.
  • Seite 39: Upper Basket

    Loading cutlery and dishes Upper basket The upper basket is for plates (maximum 24 cm in diameter), saucers, salad bowls, cups, glasses, pots and lids. Arrange the items to let water touch all surfaces. Prevent to put plates in the first three sectors in the front part of the basket.
  • Seite 40: Use Of Detergent

    Use of detergent 1. Move the front runner stops (A) out. 2. Pull the basket out. 3. Put the basket in the upper position. 4. Put back the front runner stops (A) in their initial position. CAUTION! If the basket is in the upper position, do not put cups on the cup racks.
  • Seite 41: Multitab Function

    Multitab function 3. If you use a washing programme with pre- wash phase, put more detergent in the prewash detergent compartment (B). 4. If you use detergent tablets, put the de- tergent tablet in the detergent dispenser (A). 5. Close the lid of the detergent dispenser. Press the lid until it locks into position.
  • Seite 42: Washing Programmes

    Washing programmes To activate the multitab function: • Press the multitab button. The multitab indicator light comes on. To deactivate the multitab function: • Press the multitab button. The multitab indicator light goes off. Do these steps if the drying results are not satisfactory: 1.
  • Seite 43: Setting And Starting A Washing Programme

    Setting and starting a washing programme Programme Degree of soil Type of load Programme description Crockery, cutlery, Prewash AUTOMATIC pots and pans Main wash up to 45°C or 70°C 1 or 2 intermediate rinses Final rinse Drying Normal or Crockery and cut- Main wash up to 60°C 30 MIN light soil...
  • Seite 44: Cancelling A Washing Programme

    Setting and starting a washing programme – The phase indicator light for the washing programme is on. When the washing programme operates, you cannot change the programme. Cancel the washing programme. WARNING! Only interrupt or cancel a washing programme if necessary. CAUTION! Open the door carefully.
  • Seite 45: End Of The Washing Programme

    Care and cleaning End of the washing programme Switch off the appliance in these conditions: • The appliance stops automatically. • The display shows 0. • The end-of-programme indicator light comes on. 1. Press the on/off button. 2. Open the door. 3.
  • Seite 46: External Cleaning

    Care and cleaning To unlock the filter system, turn the han- dle on the microfilter (B) approximately 1/4 anticlockwise. Remove the filter system. Hold the coarse filter (A) by the handle with the hole. Remove the coarse filter from the mi- crofilter.
  • Seite 47: What To Do If

    What to do if… What to do if… The appliance does not start or stops during operation. If there is a fault, first try to find a solution to the problem yourself. If you cannot find a solution to the problem yourself, contact the Service Force Centre. CAUTION! Switch off the appliance before you do the below suggested corrective actions.
  • Seite 48: Technical Data

    Technical data Model description : ..Product number : ..Serial number : ..The cleaning results are not satisfactory The dishes are not clean • The selected washing programme is not applicable for the type of load and soil. •...
  • Seite 49: Do These Steps To Remove The Appliance Worktop

    Installation Put the appliance adjacent to a water tap and a water drain. Remove the appliance worktop to install it under a sink unit or a kitchen worktop. Make sure that the dimensions of the recess agree with the given dimensions. Do these steps to remove the appliance worktop: 1.
  • Seite 50: Water Connection

    Water connection Water connection Water inlet hose Connected the appliance to a hot (max. 60°) or cold water supply. If the hot water comes from alternative sources of energy that are more environmentally friendly (e.g. solar or photovoltaic panels and aeolian), use a hot water supply to decrease energy consumption.
  • Seite 51: Electrical Connection

    Electrical connection 2. Connect the water drain hose to a stand pipe with vent-hole (minimum internal di- ameter 4 cm). Make sure that the drain hose is not bent or squashed to prevent that the water drains does max 85 cm not drain correctly.
  • Seite 52 Environment concerns and human health, which could otherwise be caused by inappropriate waste handling of this product. For more detailed information about recycling of this product, please contact your local council, your household waste disposal service or the shop where you purchased the product.
  • Seite 53 Inhalt Danke, dass Sie sich für eines unserer hochqualitativen Produkte entschieden haben. Lesen Sie für eine optimale und gleichmäßige Leistung Ihres Gerätes diese Benutzerinformation bitte sorgfältig durch. Sie wird Ihnen helfen, alle Vorgänge perfekt und äußerst effizient zu steuern. Damit Sie diese Benutzerinformation bei Bedarf stets zur Hand haben, empfehlen wir Ihnen, sie an einem sicheren Ort aufzubewahren.
  • Seite 54: Gebrauchsanweisung

    Sicherheitshinweise Gebrauchsanweisung Sicherheitshinweise Lesen Sie diese Bedienungsanleitung bitte sorgfältig durch, bevor Sie das Gerät anschließen und benutzen, um Gefahren zu vermeiden und einen korrekten Betrieb des Geräts zu ge- währleisten. Bewahren Sie diese Bedienungsanleitung in der Nähe des Geräts auf, auch wenn Sie dieses anderswo aufstellen.
  • Seite 55: Installation

    Gerätebeschreibung • Halten Sie das Verpackungsmaterial von Kindern fern. Andernfalls besteht Erstickungs- gefahr. • Bewahren Sie alle Reinigungsmittel an einem sicheren Ort auf. Achten Sie darauf, dass Reinigungsmittel nicht in die Hände von Kindern gelangen. • Halten Sie Kinder vom geöffneten Geschirrspüler fern. Installation •...
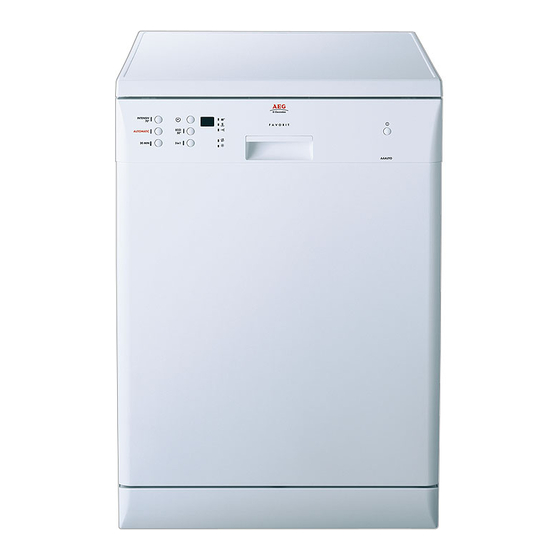
  • Seite 56: Bedienblende

    Bedienblende Oberkorb Anzeige der Wasserhärtestufe Salzbehälter Behälter für Reinigungsmittel Dosiergerät für Klarspüler Typenschild Filter Unterer Sprüharm Oberer Sprüharm Arbeitsplatte Bedienblende Programmwahltasten Multitab-Taste (3 in 1) Kontrolllampen Ein-/Aus-Taste Digital-Display Zeitvorwahltaste Funktionstasten...
  • Seite 57: Programmwahltasten

    Bedienblende Kontrolllampen Die Kontrolllampe leuchtet während der Spül- phase oder der Klarspülphase. Die Kontrolllampe leuchtet während der Trock- nungsphase. Die Kontrolllampe leuchtet auf, wenn das Spül- programm zu Ende ist. Die Kontrolllampe leuchtet auf, wenn der Salz- behälter aufgefüllt werden muss. Siehe Ab- schnitt „Gebrauch von Salz für Geschirrspüler“.
  • Seite 58: Einstellmodus

    Vor der ersten Inbetriebnahme Einstellmodus Das Gerät muss sich für folgende Einstellungen im Einstellmodus befinden: • Zum Einstellen eines Spülprogramms. • Zum Einstellen des Wasserenthärter-Härtegrads. • Zum Ein-/Ausschalten des Klarspüldosierers. Drücken Sie die Ein/Aus-Taste. Das Gerät ist im Einstellmodus, wenn: –...
  • Seite 59: Manuelle Einstellung

    Einstellen des Wasserenthärters Wasserhärte Einstellung des Wasserenthärters °dH °TH mmol/l Clarke-Wer- Manuell Elektronisch 43 - 50 76 - 90 7,6 - 9,0 53 - 63 37 - 42 65 - 75 6,5 - 7,5 46 - 52 29 - 36 51 - 64 5,1 - 6,4 36 - 45...
  • Seite 60: Gebrauch Von Salz Für Geschirrspüler

    Gebrauch von Salz für Geschirrspüler 6. Drücken Sie die Funktionstaste A einmal, um die Einstellung des Wasserenthärters um jeweils eine Stufe zu erhöhen. 7. Drücken Sie die Ein-/Aus-Taste, um die Einstellung zu speichern. Gebrauch von Salz für Geschirrspüler VORSICHT! Verwenden Sie ausschließlich Geschirrspülsalz. Andere Salzarten, die nicht auf Geschirr- spüler ausgelegt sind, können den Wasserenthärter beschädigen.
  • Seite 61: Einstellung Des Klarspüldosierers

    Gebrauch von Klarspülmittel 1. Drücken Sie die Entriegelungstaste (A), um den Klarspüldosierer zu öffnen. 2. Füllen Sie den Klarspüldosierer mit Klar- spüler. Der maximale Füllstand wird durch die Markierung "max".angezeigt. 3. Wischen Sie verschütteten Klarspüler mit einem saugfähigen Tuch auf, um zu große Schaumbildung beim nächsten Spülpro- gramm zu vermeiden.
  • Seite 62: Laden Von Besteck Und Geschirr

    Laden von Besteck und Geschirr Laden von Besteck und Geschirr Hilfreiche Hinweise und Tipps VORSICHT! Spülen Sie in diesem Gerät ausschließlich spülmaschinengeeignete Haushaltsutensilien. Spülen Sie in diesem Gerät keine Wasser absorbierenden Gegenstände (Schwämme, Ge- schirrtücher usw.). • Bevor Sie Geschirr und Besteck ins Gerät einordnen, gehen Sie folgendermaßen vor: –...
  • Seite 63: Unterkorb

    Laden von Besteck und Geschirr Unterkorb Stellen Sie Töpfe, Deckel, Teller, Salatschüsseln und Besteck in den Unterkorb. Ordnen Sie Servierplat- ten und große Deckel am Rand des Unterkorbs an. Die Stachelreihen am Unterkorb können flach um- geklappt werden, um Töpfe, Pfannen und Schüs- seln einzuordnen.
  • Seite 64: Messerkorb

    Laden von Besteck und Geschirr Stellen Sie Messer mit den Griffen nach oben ein. Mischen Sie Löffel mit anderem Besteck, so können sie nicht zusammenkleben. Verwenden Sie das Besteckgitter. Wenn die Beste- ckabmessungen die Verwendung des Besteckgit- ters nicht zulassen, kann es entfernt werden. Messerkorb Der Messerkorb befindet sich im hinteren Teil des Oberkorbs Legen Sie langes oder scharfes Besteck...
  • Seite 65: Höhenverstellung Des Oberkorbs

    Laden von Besteck und Geschirr Langstielige Gläser können mit dem Stiel nach oben in die Tassenablagen gestellt werden. Klap- pen Sie die Tassenablagen für höheres Geschirr nach oben. Höhenverstellung des Oberkorbs Wenn Sie sehr große Teller oder Servierplatten in den Unterkorb einordnen möchten, müs- sen Sie gegebenenfalls die Höhe des Oberkorbs verstellen.
  • Seite 66: Gebrauch Von Spülmittel

    Gebrauch von Spülmittel Gebrauch von Spülmittel Verwenden Sie ausschließlich Spülmittel (Pulver, Flüssigspülmittel oder Geschirrspüler- Tabs) speziell für Geschirrspüler. Richten Sie sich nach den Angaben auf der Verpackung: • Vom Hersteller empfohlene Dosierung. • Empfehlungen für die Lagerung. Verwenden Sie nicht mehr als die angegebene Spülmittelmenge, um die Umweltbelastung möglichst gering zu halten.
  • Seite 67: Funktion "Multitab

    Funktion "Multitab" 4. Wenn Sie Geschirrspüler-Tabs verwenden, legen Sie diese in den Reinigungsmittel- behälter ( A). 5. Schließen Sie den Deckel des Spülmittel- behälters. Drücken Sie auf den Deckel, bis er einrastet. Spülmittel unterschiedlicher Marken lösen sich unterschiedlich schnell auf. Einige Ge- schirrspüler-Tabs erbringen bei kurzen Spülprogrammen keine optimalen Ergebnisse.
  • Seite 68: Spülprogramme

    Spülprogramme Gehen Sie bei nicht zufriedenstellenden Trocknungsergebnissen wie folgt vor: 1. Füllen Sie den Klarspüldosierer mit Klarspüler. 2. Schalten Sie den Klarspüldosierer ein. 3. Stellen Sie den Klarspüldosierer auf Stufe 2 ein. • Das Ein- oder Abschalten des Klarspüldosierers ist nur bei aktivierter Funktion Multitab möglich.
  • Seite 69: Auswählen Und Starten Eines Spülprogramms

    Auswählen und Starten eines Spülprogramms Programm Verschmut- Spülgut Programmbeschreibung zungsgrad Beliebig Geschirr, Besteck, Vorwaschen AUTOMATIC Töpfe und Pfan- Hauptspülgang bis zu 45 °C oder 70 °C 1 oder 2 Zwischenspülgänge Klarspülgang Trocknen Normal/leicht Geschirr und Be- Hauptspülgang bis zu 60 °C 30 MIN verschmutzt steck...
  • Seite 70: Abbruch Eines Spülprogramms

    Auswählen und Starten eines Spülprogramms – Im Digital-Display blinkt die Programmdauer. – Die Kontrolllampe für die einzelnen Spülgänge beginnt zu blinken. 4. Schließen Sie die Tür. – Das Spülprogramm beginnt automatisch. – Die Kontrolllampe für die einzelnen Spülgänge leuchtet. Wenn ein Spülprogramm bereits läuft, können Sie kein anderes Programm wählen. Brechen Sie das Spülprogramm stattdessen ab.
  • Seite 71: Ende Des Spülprogramms

    Reinigung und Pflege So löschen Sie die Zeitvorwahl: 1. Halten Sie die Funktionstasten B und C gedrückt, bis alle Programmkontrolllampen aufleuchten. – Wenn Sie eine Zeitvorwahl löschen, wird auch das gewählte Spülprogramm gelöscht. 2. Wählen Sie ein neues Spülprogramm. Sie können das Spülprogramm und die Zeitvorwahl auch bei geschlossener Tür wählen. Wenn Sie eine Programmtaste drücken, haben Sie nur 3 Sekunden Zeit, um ein anderes Spülprogramm oder eine Zeitverzögerung zu wählen.
  • Seite 72 Reinigung und Pflege 1. Grobfilter (A) 2. Mikrofilter (B) 3. Filtersieb Gehen Sie wie folgt vor, um die Filter zu reinigen: Öffnen Sie die Tür. Entfernen Sie den Unterkorb. Um das Filtersystem zu entriegeln, dre- hen Sie den Griff des Mikrofilters (B) et- wa 1/4 Drehung gegen den Uhrzeiger- sinn.
  • Seite 73: Reinigung Der Außenseiten

    Was tun, wenn … Reinigung der Außenseiten Reinigen Sie die Außenseiten und die Bedienblende des Geräts mit einem weichen feuchten Tuch. Verwenden Sie dazu ausschließlich Neutralreiniger. Verwenden Sie keine Scheuer- mittel, Scheuerschwämmchen oder Lösungsmittel (Azeton, Trichloräthylen usw.) Frostschutzmaßnahmen VORSICHT! Stellen Sie das Gerät nicht an einer Stelle auf, an der die Temperatur unter 0 °C absinken kann.
  • Seite 74 Was tun, wenn … Fehlercode und Störung Mögliche Ursachen und Abhilfe Das Programm startet nicht • Die Tür des Geräts ist nicht geschlossen. Schließen Sie die Tür. • Der Netzstecker ist nicht eingesteckt. Stecken Sie den Netzstecker in die Netzsteckdose. •...
  • Seite 75: Technische Daten

    Technische Daten Technische Daten Abmessungen Breite in cm Höhe in cm Tiefe in cm Elektrischer Anschluss - An- Die Daten der elektrischen Anschlusswerte befinden sich auf dem schlussspannung - Gesamtleis- Typenschild am Innenrand der Geschirrspülertür. tung - Sicherung Wasserdruck Mindestdruck 0,5 bar (0,05 MPa) Höchstdruck 8 bar (0,8 MPa)
  • Seite 76: Gehen Sie Wie Folgt Vor, Um Die Arbeitsplatte Des Gerätes Zu Entfernen

    Wasseranschluss Gehen Sie wie folgt vor, um die Arbeitsplatte des Gerätes zu entfernen: 1. Lösen Sie die hinteren Schrauben (1). 2. Ziehen Sie die Arbeitsplatte hinter dem Gerät vor. 3. Heben Sie die Arbeitsplatte an und bewe- gen Sie sie aus den vorderen Schlitzen he- raus.
  • Seite 77: Ablaufschlauch

    Wasseranschluss Der Wasserdruck muss innerhalb des in den "Technische Daten" aufgeführten Bereichs liegen. Informieren Sie sich bei Ihrem Wasserversorger über den durchschnittlichen Was- serdruck in Ihrer Region. Achten Sie darauf, dass der Wasserzulaufschlauch nicht geknickt oder gequetscht wird oder sich irgendwo verfängt. Achten Sie darauf, dass die Klemmmutter korrekt sitzt, damit kein Wasser austreten kann.
  • Seite 78: Elektrischer Anschluss

    Elektrischer Anschluss Achten Sie darauf, dass der Wasserablaufschlauch nicht geknickt oder eingeklemmt wird, um sicher- max 85 cm zustellen, dass das Wasser stets gut ablaufen kann. Nehmen Sie den Spülbeckenstöpsel aus dem Be- cken, während das Gerät das Wasser abpumpt, um min 40 cm zu verhindern, dass das Wasser wieder in das Gerät zurückfließt.
  • Seite 79: Umwelttipps

    Umwelttipps Umwelttipps Das Symbol auf dem Produkt oder seiner Verpackung weist darauf hin, dass dieses Produkt nicht als normaler Haushaltsabfall zu behandeln ist, sondern an einem Sammelpunkt für das Recycling von elektrischen und elektronischen Geräten abgegeben werden muss. Durch Ihren Beitrag zum korrekten Entsorgen dieses Produkts schützen Sie die Umwelt und die Gesundheit Ihrer Mitmenschen.
  • Seite 80 www.electrolux.com www.aeg-electrolux.cz Benötigen Sie Zubehör, Verbrauchsmaterial und Ersatzteile? Dann besuchen Sie bitte unseren Onlineshop unter: www.aeg-electrolux.de...

Inhaltsverzeichnis