Seite 1
KYDE 1. DEUTSCH - AT, DE, CH 2. ENGLISH - GB, US 3. FRANÇAIS - FR 4. NEDERLAND - NL...
Seite 2
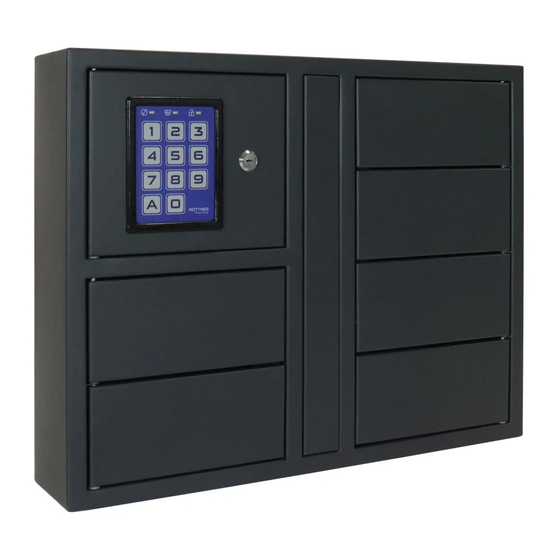
DEUTSCH BEDIENUNGSANLEITUNG KYDE !!ACHTUNG Bitte lesen Sie diese Bedienungsanleitung sorgfältig durch, b e v o r Sie das Elektronikschloss betätigen, einen neuen Code speichern oder das KeyDepot montieren. Wir übernehmen kei- nerlei Haftung, weder für Funktionsstörungen, bedingt durch fehlerhaftes Umstellen bzw. Ge- waltanwendung oder unsachgemäße Behandlung, noch bei Sach- oder Vermögensschäden,...
Seite 3
1 Umstellknopf 4 Befestigungslöcher 7 Zylinderschloss 2 Zylinderschloss – 5 Anschluss für Netz- 8 Netzgerät Verriegelung gerät 3 Batteriefach 6 Tastatur Tastatur 1. INBETRIEBNAHME MIT BATTERIEN Stecken Sie einen der beiden mitgelieferten Zylinderschlüssel in das Schloss (7). Drehen Sie den Schlüssel gegen den Uhrzeigersinn bis zum Anschlag. Öffnen sie die Tür.
Seite 4
2. INBETRIEBNAHME MIT NETZGERÄT !!ACHTUNG!! Bei der Verwendung des Netzgerätes dürfen keine Batterien in das Batteriefach eingelegt sein! Stecken Sie das Netzgerät (8) an eine 220 Volt Steckdose. Stecken Sie das mitgelieferte Netzgerät (8) an den Steckeranschluss (5) an. Das Elektronikschloss ist nun programmierbereit. 3.
Seite 5
6. ÄNDERN DES MASTERCODES (Der von Ihnen gewählte Mastercode bleibt bei einem Batteriewechsel erhalten) Öffnen Sie die Tür mittels Schlüssel. Drücken Sie kurz zweimal die Taste „0“ an der Tastatur. Drücken Sie kurz den Umstellknopf (1). Es ertönt ein akustischer Signalton und die gelbe LED leuchtet. Geben Sie den aktuellen Mastercode (bei Auslieferung 1 –...
Seite 6
Geben sie die Fachnummer und den gewählten Gästecode (mindesten 4 max. 6 Ziffern) ein. z.B.: 2 (für Fachnummer 2) 6 – 5 – 4 – 3 – 2 – 1 (Gästecode) Drücken Sie zur Bestätigung die Taste „A“. Die grüne LED leuchtet zweimal auf und es ertönt ein Doppelsignal. Ertönt während des Programmiervorganges ein vierfaches akustisches Signal und leuchtet die gelbe LED viermal auf, ist der Programmiervorgang abgebrochen –...
Seite 7
11. DEAKTIVIEREN DER TASTATURBELEUCHTUNG Geben Sie den aktuellen Mastercode (bei Auslieferung 1 – 5 – 9 – 1) ein. Drücken Sie zur Bestätigung die Taste „A“. Drücken Sie die Taste „9“. Drücken Sie zur Bestätigung die Taste „A“. Die Tastaturbeleuchtung ist deaktiviert. 12.
Seite 8
15. WANDMONTAGE (SIEHE ABB. 8) Aus Sicherheitsgründen muss die Montage an einen Massivbauteil (Beton) erfolgen. Die nach- folgende Montageanleitung bezieht sich ausschließlich für die Montage mittels beigelegten Montagematerial. Markieren Sie die Montagepunkte mittels der beiliegenden Bohrschablone am Verwendungsplatz. Bohren Sie die Montagelöcher ø 8 mm, Mindesttiefe 50 mm (8) in einen Massivbauteil (Beton).
Seite 9
ENGLISH USER MANUAL KYDE !!ATTENTION Please read these operating instructions carefully before operating the electronic lock, saving a new code or installing the KeyDepot. We accept no liability whatsoever, neither for malfuncti- ons caused by incorrect adjustment or the use of force or improper handling, nor for material or financial damage caused, for example, by improper locking, installation or similar.
Seite 10
1 Switch button 4 Mounting holes 7 Cylinder lock 2 Cylinder lock – lo- 5 Connection for power 8 Power supply cking supply 3 Battery compartment 6 Keypad Keypad 1. COMMISSIONING WITH BATTERIES Insert one of the two supplied cylinder keys into the lock (7). Turn the key anti-clockwise until it stops.
Seite 11
2. COMMISSIONING WITH POWER SUPPLY !!ATTENTION!! When using the power supply unit, no batteries must be inserted in the batte- ry compartment ! Plug the power supply (8) into a 220 volt socket. Connect the supplied power supply unit (8) to the plug connection (5). The electronic lock is now ready to be programmed.
Seite 12
6. CHANGING THE MASTER CODE (The master code you have chosen will remain the same when you change the battery receive) Open the door with the key. Briefly press the “0” key on the keypad twice. Briefly press the changeover button (1). An acoustic signal sounds and the yellow LED lights up.
Seite 13
Enter the compartment number and the selected guest code (at least 4, max. 6 digits). e.g.: 2 (for compartment number 2) 6 – 5 – 4 – 3 – 2 – 1 (guest code) Press the “A” button to confirm. The green LED flashes twice and a double signal sounds.
Seite 14
11. DISABLING THE KEYPAD LIGHT Enter the current master code (delivery default is 1 – 5 – 9 – 1). Press the “A” button to confirm. Press the “9” key. Press the “A” button to confirm. The keyboard lighting is deactivated. 12.
Seite 15
15. WALL MOUNTING (SEE FIG. 8) For safety reasons, the installation must be carried out on a solid component (concrete). The following installation instructions refer exclusively to installation using the enclosed installation material. Mark the mounting points at the place of use using the enclosed drilling template. Drill the mounting holes ø...
Seite 16
FRANÇAIS MANUEL DE L’UTILISATEUR KYDE ATTENTION Veuillez lire attentivement ce mode d‘emploi avant d‘utiliser la serrure électronique, d‘enre- gistrer un nouveau code ou d‘installer le KeyDepot. Nous déclinons toute responsabilité pour les dysfonctionnements dus à un mauvais réglage, à l‘usage de la force ou à une manipulation incorrecte, ainsi que pour les dommages matériels ou financiers causés, par exemple, par un...
Seite 17
1 Bouton de commande 4 Trous de fixation 7 Serrure à cylindre 2 Serrure à cylindre/ 5 Raccordement de 8 Alimentation verrouillage l'alimentation électrique électrique 3 Compartiment à piles 6 Clavier Clavier 1. MISE EN SERVICE AVEC BATTERIES Introduire l‘une des deux clés cylindriques fournies dans la serrure (7). Tourner la clé...
Seite 18
2. MISE EN SERVICE AVEC ALIMENTATION ÉLECTRIQUE ATTENTION ! Lors de l‘utilisation du bloc d‘alimentation, aucune pile ne doit être insérée dans le compartiment à piles ! Branchez le bloc d‘alimentation (8) sur une prise de 220 volts. Branchez le bloc d‘alimentation fourni (8) sur le connecteur (5). La serrure électronique est maintenant prête à...
Seite 19
La LED verte clignote deux fois et un double signal sonore retentit. Introduisez à nouveau le code maître que vous avez choisi (min. 4, max. 8 chiffres). Appuyez sur la touche « A » pour confirmer. La LED verte clignote deux fois et un double signal sonore retentit. Le code maître que vous avez sélectionné...
Seite 20
ATTENTION Vérifiez que le code invité que vous avez choisi fonctionne correctement. Pour programmer un code invité pour des compartiments supplémentaires, procédez comme indiqué ci-dessus et sélectionnez le numéro de compartiment correspondant (3, 4, 5, 6) au point e. 8. OUVRIR AVEC LE CODE MAÎTRE Chaque compartiment peut être ouvert avec le code maître.
Seite 21
12. VÉRIFICATION DU BON FONCTIONNEMENT DU CLAVIER ET DE L’ÉLECTRONIQUE Introduire le code maître actuel (le défaut de livraison est 1 - 5 - 9 - 1). Appuyer sur la touche « A » pour confirmer. Appuyer sur la touche « 8 ». Appuyez sur la touche «...
Seite 22
15. MONTAGE MURAL (VOIR FIG. 8) Pour des raisons de sécurité, l‘installation doit être effectuée sur un élément solide (béton). Les instructions d‘installation suivantes se réfèrent exclusivement à l‘installation à l‘aide du matériel d‘installation fourni. Marquez les points de fixation sur le lieu d‘utilisation à l‘aide du gabarit de perçage fourni.
Seite 23
NEDERLAND HANDLEIDING KYDE !!LET OP Lees deze gebruiksaanwijzing zorgvuldig door voordat u het elektronische slot bedient, een nieuwe code opslaat of het KeyDepot installeert. Wij aanvaarden geen enkele aansprakelijkheid, noch voor storingen die worden veroorzaakt door een verkeerde afstelling of het gebruik van geweld of onjuiste behandeling, noch voor materiële of financiële schade die...
Seite 24
1 Schakelknop 4. Montagegaten 7. Zylinderschloss 2. Cilinder Slot – 5. Anschluss für 8. Voeding vergrendeling Netzgerät 5. Aansluiting voor 6. Toetsenbord Toetsenbord 1. INBEDRIJFSTELLING MET BATTERIJEN Steek één van de twee meegeleverde cilindersleutels in het slot (7). Draai de sleutel tegen de klok in tot hij stopt. Open de deur.
Seite 25
2. INBEDRIJFSTELLING MET STROOMVOORZIENING !!LET OP!! Bij gebruik van de elektrische voeding mogen er geen batterijen in het batterijvak- je zitten! Steek de voedingseenheid (8) in een 220 volt stopcontact. Sluit de meegeleverde voedingseenheid (8) aan op de stekkeraansluiting (5). Het elektronische slot is nu gereed om geprogrammeerd te worden.
Seite 26
6. HET WIJZIGEN VAN DE MASTERCODE (DE DOOR U GEKOZEN MASTERCODE BLIJFT HETZELFDE WANNEER U DE BATTERIJ VAN DE ONTVANGER VERVANGT) Open de deur met de sleutel. Druk twee keer kort op de toets “0” op het toetsenbord. Druk kort op de omschakelknop (1). Er klinkt een akoestisch signaal en de gele led gaat branden.
Seite 27
Voer het vaknummer en de geselecteerde gastcode in (minimaal 4, max. 6 cijfers). bijv.: 2 (voor vaknummer 2) 6 – 5 – 4 – 3 – 2 – 1 (gastcode) Druk op de knop “A” om te bevestigen. De groene LED knippert twee keer en er klinkt een dubbel signaal. Als er tijdens het programmeren een viervoudig akoestisch signaal klinkt en de gele LED vier keer oplicht, is het programmeren afgebroken.
Seite 28
11. HET TOETSENBORDVERLICHTING UITSCHAKELEN a. Voer de huidige mastercode in (standaard levering is 1 – 5 – 9 – 1). b. Druk op de knop “A” om te bevestigen. c. Druk op de toets “9”. d. Druk op de knop “A” om te bevestigen. De toetsenbordverlichting is uitgeschakeld.
Seite 29
15. WANDMONTAGE (ZIE AFB. 8) Om veiligheidsredenen moet de installatie op een vast ondergrond (beton) worden uitgevoerd. De volgende installatie-instructies hebben uitsluitend betrekking op de installatie met behulp van het meegeleverde installatiemateriaal. a. Markeer de bevestigingspunten op de plaats van gebruik met behulp van de meege- leverde boormal.