
Verwandte Anleitungen für Medion LIFE P64026


Inhaltszusammenfassung für Medion LIFE P64026
- Seite 1 Sistema de audio de diseño en formato micro CD/MP3 Mikrosystem audio CD/MP3 MEDION LIFE ® ® P64026 (MD 82315) Manual de Instruccion User's guide Bedienungsanleitung Instrukcja obs³ugi...
-
Seite 2: Inhaltsverzeichnis
Índice Esquema del aparato ........5 Aparato principal y altavoces . - Seite 3 Radio ..........23 Sintonización de las emisoras .
-
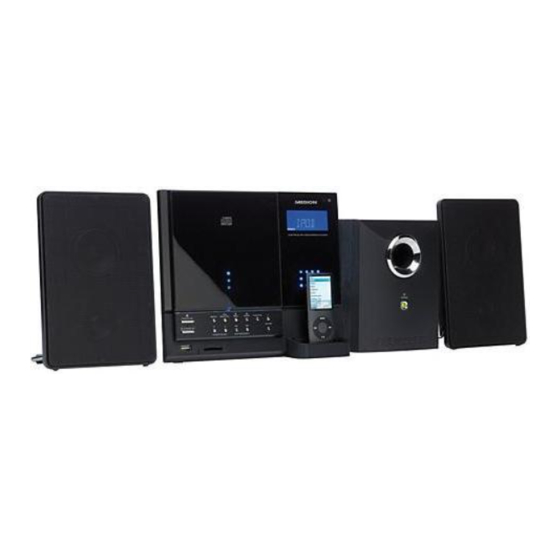
Seite 4: Esquema Del Aparato
Esquema del aparato Aparato principal y altavoces Parte frontal y laterales 1. Ranuras de ventilación; ¡NO TAPARLAS! FM ANTENNE : toma de conexión a antena de 75 ohmios AUX R : entrada AUX derecha AUX L : entrada AUX izquierda iPod/MEM/C-ADJ. - Seite 5 SKIP TUNE : salto de título hacia delante; TUNE : búsqueda de emisoras hacia delante; SEARCH : avance rápido FUNCTION : seleccionar el modo de funcionamiento: CARD (tarjeta de memoria), IPOD TUNER (radio) VOLUME – : control de volumen hacia abajo 18.
- Seite 6 Parte posterior del aparato principal y subwoofer 28.Bocallaves para el montaje sobre pared 29.Compartimento para las pilas para la memoria de funcionamiento (función de Backup) 30.Indicador de standby (rojo) e indicador de funcionamiento (verde) 31.Interruptor de funcionamiento: conectar el aparato al modo standby y/o desconectarlo FROM MAIN : toma para el cable de conexión suministrado (aparato principal –...
-
Seite 7: Mando A Distancia
Mando a distancia STANDBY : conectar el aparato desde el modo Standby y volver a ponerlo en el modo Standby MUTE : función sin sonido PRESET UP : acceder a la memoria de emisoras en orden ascendente; FOLDER UP : búsqueda de carpetas en orden ascendente (modo MP3) PRESET DN : acceder a la memoria de... -
Seite 8: La Pantalla
TIMER : acceder al modo de temporizador 20.Teclas numéricas para la introducción de números La pantalla Las siguientes indicaciones en pantalla son posibles: 1. Indicador del volumen 2. Indicación de la hora en el modo standby, de la frecuencia en el modo de radio así... -
Seite 9: Instrucciones De Seguridad
Instrucciones de seguridad Acerca de las presentes instrucciones ¡Antes de la primera puesta en funcionamiento, lea atentamente este manual de instrucciones y respete ante todo las instrucciones de seguridad! Todos los trabajos en y con este aparato deben realizarse tal y como están descritos en este manual de instrucciones. Guarde este manual de instrucciones para su uso en el futuro. -
Seite 10: Ventilación
que el aparato no esté expuesto a fuentes directas de calor (p. ej., la calefacción); que el aparato no esté expuesto a la luz solar directa; que el aparato no entre en contacto con agua o humedad; que no se encuentren fuentes de fuego (p. ej. velas encendidas) cerca o sobre el aparato;... -
Seite 11: El Reproductor De Cds
No intente en ningún caso abrir y/o arreglar Usted mismo el aparato. ¡Existe riesgo de descarga eléctrica! Con el fin de evitar accidentes, en caso de mal funcionamiento del aparato diríjase al Medion Service Center o a otro taller especializado. El reproductor de CDs El reproductor de CDs es un producto láser de Clase 1. -
Seite 12: Nota Sobre Carga Electroestática
Antes de colocar las pilas, limpie los contactos de las pilas y del aparato en caso de que sea necesario. Tenga en cuenta la polaridad de las pilas. Preste atención a que los polos positivos (+) y negativos (-) estén colocados correctamente para evitar cortocircuitos. -
Seite 13: Puesta En Funcionamiento
Puesta en funcionamiento Desembalar Retire todos los materiales de embalaje. Cuando abra el compartimento para CDs, retire la protección de transporte. ¡ATENCIÓN! No permita que los niños pequeños jueguen con el plástico. ¡Existe peligro de asfixia! Compruebe el volumen de suministro Compruebe que el suministro está... -
Seite 14: Colocar Las Pilas En El Aparato
Colocar las pilas en el aparato En la parte inferior del aparato principal se encuentra un compartimento para pilas para tres pilas R03/LR 03/ AAA/Micro de 1,5 V (no incluidas en el suministro). Cuando se desconecta el aparato completamente, se deben encontrar colocadas las pilas si se desea mantener el ajuste de la hora y los ajustes de la memoria. -
Seite 15: Colocar El Aparato
Colocar el aparato Uso como aparato de sobremesa Para el uso como aparato de sobremesa los elementos del sistema están equipados con pies de goma. Para colocar los altavoces abata los pies de la parte posterior. Montaje sobre la pared Se pueden fijar el aparato principal y los dos altavoces en una pared. -
Seite 16: Conexiones
Conexiones Conectar los altavoces y el subwoofer Antes de realizar las conexiones, ponga el interruptor de funcionamiento de la parte trasera del subwoofer . No conecte aún el sistema a la corriente eléctrica. Conecte las clavijas cinch de los altavoces con las OUT SPEAKERS tomas de color correspondientes lado posterior del subwoofer (1). -
Seite 17: Toma De Antena
Toma de antena En la parte izquierda del aparato principal se encuentra FM ANT la entrada para la toma de antena ( ). El suministro incluye una antena de cable. Ajuste la antena de cable para una recepción óptima. Para la recepción de FM, alternativamente se puede conectar un cable de antena de 75 ohmios (no suministrado) a la toma de la antena. -
Seite 18: Conectar Los Auriculares
FUNCTION, Pulse la tecla la función “ ” aparece en la pantalla. Ahora se reproduce la señal de audio de su aparato externo. Conectar los auriculares En la parte derecha del aparato principal se PHONES encuentra la toma para auriculares ( Retire el cable de conexión al subwoofer. -
Seite 19: Funciones Básicas
Funciones básicas Encender/Apagar - POWER El aparato se conecta con el interruptor de ON/OFF funcionamiento del lado posterior del subwoofer. Ahora el aparato se encuentra en el modo Standby. El indicador POWER del subwoofer se ilumina de color rojo. En la pantalla parpadeará la hora mientras todavía no esté... -
Seite 20: Apagado Automático - Sleep
Apagado automático – SLEEP Se puede ajustar una hora a la que el aparato conmuta automáticamente al modo standby. SLEEP Pulse la tecla del mando a distancia para ajustar la hora deseada: 90 minutos > 80 minutos > 70 minutos etc. hasta 10 minutos. En la pantalla aparecerá... -
Seite 21: Ajustes De Sonido
TIMER , Vuelva a pulsar la tecla para ajustar la hora de desconexión. Aparece la indicación y la cifra de hora parpadea. Pulse para ajustar la hora. TIMER Vuelva a pulsar la tecla . En pantalla parpadea la indicación de los minutos. Ajuste con los minutos. -
Seite 22: Radio
Radio El aparato solamente puede recibir la banda de frecuencia FM (UKW). Conecte el aparato y seleccione la función de radio FUNCTION “ TUNER ” con la tecla Sintonización de las emisoras SKIP/TUNE/SEARCH Pulse repetidas veces para ajustar manualmente una frecuencia determinada. -
Seite 23: Funcionamiento Cd/Usb/Tarjeta De Memoria
Funcionamiento CD/USB/tarjeta de memoria Soportes de datos reproducibles Los soportes de datos reproducibles son: CDs de Audio, CD-Rs, CD-RWs. USB-Memory-Stick o reproductor MP3 (USB-Version 1.1). Rogamos que observe que no se puede garantizar al cien por cien la compatibilidad con todos los Memory Sticks. -
Seite 24: Introducir Y Extraer Los Cds
Con la función MP3 de su aparato se pueden leer estos ID3-Tags y hacer que aparezcan en la pantalla. Introducir y extraer los CDs Advertencias relativas al compartimento para CDs No coloque objetos extraños en el compartimento para CDs, dado que podrían dañar su mecanismo. -
Seite 25: Conexión De Aparatos Usb
Conexión de aparatos USB Conecte el USB-Stick o un reproductor MP3 en la toma USB del lado frontal del aparato. STANDBY Conecte el aparato con y seleccione con FUNCTION la función “ ”. Se leen los títulos y la pantalla muestra el número total de los álbumes y títulos en el modo de parada. - Seite 26 Carpetas en formato MP3/WMA Para cambiar de carpeta en un soporte de datos PRESET/FOLDER MP3/WMA, pulse la tecla ó Si los títulos existentes están grabados en formato ID3, puede permitirse que se muestre la información almacenada. ID3/MONO/ST. Pulse y en la pantalla aparecerá .
-
Seite 27: Programación Del Orden De Reproducción
Programación del orden de reproducción Se puede programar un orden de reproducción de hasta 32 títulos en el modo CD y 64 títulos en el modo MP3/WMA. Para ello, el aparato debe encontrarse en el modo de parada. Detenga la reproducción para que STOP aparezca en la pantalla. -
Seite 28: Modo Ipod
Modo iPod Reproducción Coloque el reproductor iPOD en la estación Docking (bahía) También se pueden utilizar bahías adaptadoras usuales en el comercio para estaciones Docking para iPod. Ponga el aparato en el modo Standby y seleccione FUNCTION con la tecla el modo iPOD. -
Seite 29: Navegar Por El Menú Ipod
Navegar por el menú iPOD iPod/MEM/C-ADJ Pulse para abrir el modo de iPOD. En la pantalla del aparato aparece iPOD MENU MENU Pulse para abrir el menú en el iPod. SKIP/TUNE/SEARCH se puede acceder a las entradas de menú en el menú de iPod. ENTER se activa el punto de menú... -
Seite 30: Especificaciones Técnicas
Especificaciones técnicas Alimentación Tensión: 230 V ~ 50 Hz Consumo de energía: 85 vatios Potencia de salida: 2 x 5 vatios RMS + 30 vatios RMS Pilas de seguridad del aparato principal:3 x 1,5 V R03/LR 03/AAA/Micro Pilas del mando a distancia: 2 x 1,5 V R03/LR 03/AAA/Micro Radio Banda FM:... -
Seite 31: Eliminación
Copyright © 2009. Reservados todos los derechos. El copyright pertenece a la empresa Medion®. Marcas registradas: Las marcas registradas pertenecen a sus respectivos propietarios. Sujeto a posibles modificaciones técnicas o de imagen y a eventuales errores de... - Seite 32 Contents Overview of the equipment ....... . . 5 Main device and speakers ......... 5 Remote control .
- Seite 33 Radio mode ..........23 Tuning .
-
Seite 34: Overview Of The Equipment
Overview of the equipment Main device and speakers Front and sides 1. Vents; DO NOT COVER! FM AERIAL : 75 ohm antenna connection AUX R : AUX input right AUX L : AUX input left iPod/MEM/C-ADJ. : iPod mode, memory mode, clock setting mode REPEAT : Select repeat mode OPEN/CLOSE... - Seite 35 FUNCTION CARD IPOD : Select operating mode: (memory card), TUNER (radio) VOLUME – : Reduce volume level 18. iPOD cradle: “Docking station” for an iPod device VOLUME + : Increase volume level : Playback, Pause; ENTER : Enter for iPod : Stop playback;...
- Seite 36 Main device (rear) and subwoofer 28.Keyhole notches for wall mounting 29.Battery compartment for memory backup function 30.Standby light (red) and power light (green) 31.Operating switch: Switches device to standby mode and to off again FROM MAIN : Socket for the supplied connecting cable (main device – subwoofer) 33.Outputs for the speakers supplied...
-
Seite 37: Remote Control
Remote control STANDBY : Switch appliance from standby to on and from on to standby MUTE : Mute PRESET UP : Call up programme memory upwards; FOLDER UP : Folder search upwards (MP3 operation) PRESET DN : Call up programme memory upwards;... -
Seite 38: The Display
The display The following displays are possible: 1. Volume display 2. Time display in standby mode, frequency in radio mode and title and playback type in CD/MP3 mode 3. Sleep timer set 4. Random playback active 5. Playback of MP3 or WMA tracks 6. -
Seite 39: Safety Instructions
Safety instructions About these instructions Please read these operating instructions thoroughly, paying special attention to the safety notices, before using the appliance for the first time. This appliance should only be used as designated and described in these instructions. Please keep these instructions in a safe place for future reference. -
Seite 40: Ventilation
Never try to open and/or repair the device yourself. Danger of electric shock! If there is a fault contact the Medion Service Centre or other suitable specialist workshop. -
Seite 41: The Cd Player
The CD player The CD player is a class 1 laser product. The device has a safety system that prevents dangerous laser rays escaping during normal use. In order to avoid injury to the eyes, never tamper with or damage the unit’s safety system. -
Seite 42: Information On Electrostatic Charge
Remove the batteries from the device if you do not intend to use it for a long period of time. Replace all the old batteries in an appliance with new batteries of the same type. Cover the contacts of the batteries with sticky tape if you want to store or dispose of them. -
Seite 43: Start-Up
Start-up Unpacking Remove all packaging materials. Open the CD compartment and remove the transport protection insert. WARNING! Do not let children play with the plastic wrapping. There is a risk of suffocation! Checking the package contents Please check your purchase to ensure all items are included and contact us within 14 days of purchase if any components are missing. -
Seite 44: Insert Batteries Into The Appliance
Insert batteries into the appliance A battery compartment for three 1.5V (type R03/LR 03/ AAA/micro) batteries (not included) is located on the underside of the main device. If you wish to keep the clock settings and station settings when you switch off the device completely, batteries must be inserted. -
Seite 45: Positioning And Setup
Positioning and setup Tabletop use The components have rubber feet so that the system can be used as a tabletop device. To set up the speakers, fold down the bases on the back. Wall mounting You can attach the main device and both speakers to a wall. -
Seite 46: Connections
Connections Connecting the speakers and subwoofer Before connecting, set the operating switch on the back of the subwoofer to . Do not connect the system to the mains yet. Connect the speaker cinch plug to the right colour OUT SPEAKERS coded sockets on the back of the subwoofer (1). -
Seite 47: Aerial Connection
Aerial connection The antenna socket input is on the left of the main FM ANT device ( ). Wire aerial is included. Adjust the wire aerial for optimum reception. Alternatively, for VHF reception you can connect a 75 ohm antenna cable (not included) to the antenna socket. -
Seite 48: Connecting Headphones
Connecting headphones There is a headphone connection on the right side of PHONES the main device ( Disconnect the connecting cable from the subwoofer. Connect the headphones with a 3.5 mm jack plug. This deactivates the speakers automatically. Reconnect the connecting cable to the subwoofer. WARNING! Excessive volume when using headphones or earphones can damage your hearing. -
Seite 49: Basic Functions
Basic functions Switching on/off – POWER ON/OFF Use the operating switch on the back of the subwoofer to switch the device on. The device is now in standby mode. The POWER light on the subwoofer will be red. The time display flashes until the time is set. STANDBY To switch on the device press the button... -
Seite 50: Automatic Switch-Off - Sleep
Automatic switch-off – SLEEP You can set a time after which the device will automatically switch into standby mode. SLEEP Press the button on the remote control repeatedly, to set the required time: 90 minutes > 80 minutes > 70 minutes or up to 10 minutes. The bed symbol will appear on the display to show that the SLEEP timer has been set. -
Seite 51: Sound Settings
TIMER Press the button again. Now use TUNER > CD > USB > CARD select the music source: > iPod TIMER Press the button. Now use To set the volume at which the appliance should switch on. TIMER Press the button again. -
Seite 52: Radio Mode
Radio mode The device only receives the waveband FM. Switch the device on and select the radio function FUNCTION TUNER “ ” using the button Tuning SKIP/TUNE/SEARCH Press the repeatedly to set a certain frequency manually. If you press for a little longer, it will trigger an automatic search. -
Seite 53: Cd/Usb/Memory Card Operation
CD/USB/memory card operation Playback media Playback media are: Audio CDs, CD-Rs, CD-RWs USB memory stick or MP3 player (USB version 1.1). Please note the not all memory sticks can be guaranteed to have 100 percent compatibility. SD/MMC memory card. The playback functions for these media are largely identical and have therefore been described together in these instructions. -
Seite 54: Inserting And Removing Cds
Inserting and removing CDs Information on the CD compartment Never insert foreign objects into the CD compartment as this could destroy the mechanism. To prevent dust from accumulating, do not leave the CD compartment open for long periods of time. Never touch the lens in the CD compartment. -
Seite 55: Connecting A Usb Device
Connecting a USB device Insert the USB stick or MP3 player into the USB socket on the front of the device. STANDBY Switch the device on using and use FUNCTION to select the function of the “ ”. The tracks are read and the display shows the total number of albums and tracks in stop mode. - Seite 56 Folder in MP3/WMA format To change folder in MP3/WMA media, press PRESET/FOLDER If the tracks are written in ID3 format, you can display the information stored. ID3/MONO/ST. Press ID3 ON will appear on the display. The information appears in scrolling text:“ TITLE ”...
-
Seite 57: Programming The Playing Order Of Titles
Programming the playing order of titles You can set a playing order for up to 32 tracks in CD mode and 64 tracks in MP3/WMA mode. The unit must be in stop mode before programming can begin. Stop playback so that STOP appears on the display. -
Seite 58: Ipod Mode
iPod mode Play Place the iPOD player in the “Docking Station” (cradle). You can use conventional adapter cradles for iPod docking stations. Switch the device to standby mode and use the FUNCTION button to select iPOD mode. iPOD will appear on the display. ENTER Press to start iPod playback. -
Seite 59: Navigating In The Ipod Menu
Navigating in the iPod menu iPod/MEM/C-ADJ iPOD Press to open iPod mode. MENU appears on the display. MENU Press to open the menu in the iPod. SKIP/TUNE/SEARCH Use the : to select the menu entries in the iPod menu. ENTER to activate the selected menu item. -
Seite 60: Technical Data
Technical Data Power supply Voltage: 230V ~ 50Hz Power consumption: approx. 85 W Output power: 2 x 5 watt RMS + 30 W RMS Backup batteries for main device:3 x 1.5V R03/LR 03/AAA/micro Remote control batteries: 2 x 1.5V R03/LR 03/AAA/Micro Radio FM band: 87.5–108 MHz... -
Seite 61: Disposal
Copyright © 2009. All rights reserved. The company Medion® owns the copyright. Trademarks: Other trademarks are the property of their respective owners. Subject to technical and optical changes as well as printing errors. - Seite 62 Inhalt Geräteübersicht ......... . . 5 Hauptgerät und Lautsprecher .
- Seite 63 Radiobetrieb ..........23 Sender einstellen .
-
Seite 64: Geräteübersicht
Geräteübersicht Hauptgerät und Lautsprecher Vorderseite und Seiten 1. Lüftungsschlitze; NICHT ABDECKEN! FM ANTENNE : 75 Ohm-Antennenanschlussbuchse AUX R : AUX-Eingang rechts AUX L : AUX-Eingang links iPod/MEM/C-ADJ. : iPod-Modus, Memorymodus, Uhreinstellungsmodus REPEAT : Wiederholungsmodus wählen OPEN/CLOSE : CD-Fach öffnen/schließen 8. Standby-LED STANDBY : Gerät vom Standby-Modus ein und wieder in den Standby- Modus schalten... - Seite 65 SKIP TUNE : Titelsprung vorwärts; TUNE : Sendersuche vorwärts; SEARCH : Schnelllauf vorwärts FUNCTION : Betriebsart wählen: CARD (Speicherkarte), IPOD TUNER (Radio) VOLUME – : Lautstärkeregelung nach unten 18. iPOD-Schale: „Docking Station“ für ein iPod-Gerät VOLUME + : Lautstärkeregelung nach oben : Wiedergabe, Pause;...
-
Seite 66: Hauptgerätrückseite Und Subwoofer
Hauptgerätrückseite und Subwoofer 28.Schlüssellöcher für die Wandmontage 29.Batteriefach für den Betriebsspeicher (Backup-Funktion) 30.Standbyanzeige (rot) und Betriebsanzeige (grün) 31.Betriebsschalter: Gerät in den Standby-Modus und ausschalten FROM MAIN : Buchse für das mitgelieferte Verbindungskabel (Hauptgerät – Subwoofer) 33.Ausgänge für die mitgelieferten Lautsprecher 34.Netzkabel 35.Subwoofer Lautsprecher (Vorder- und Rückseite) -
Seite 67: Fernbedienung
Fernbedienung STANDBY : Gerät vom Standby-Modus ein und wieder in den Standby-Modus schalten MUTE : Stummschaltung PRESET UP : Senderspeicher aufrufen aufwärts; FOLDER UP : Ordnersuche aufwärts (MP3- Betrieb) PRESET DN : Senderspeicher aufrufen aufwärts; FOLDER DN : Ordnersuche abwärts (MP3- Betrieb) SKIP : Titelsprung zurück;... -
Seite 68: Das Display
Das Display Folgende Displayanzeigen sind möglich: 1. Lautstärkeanzeige 2. Anzeige der Uhrzeit im Standby-Modus, der Frequenz im Radiomodus, sowie Titel und Wiedergabearten im CD-/MP3-Modus 3. Sleep-Timer ist eingestellt 4. Zufallswiedergabe aktiv 5. Wiedergabe von MP3- oder WMA-Titeln 6. Anspielfunktion aktiv 7. -
Seite 69: Sicherheitshinweise
Sicherheitshinweise Zu dieser Anleitung Lesen Sie vor der ersten Inbetriebnahme diese Bedienungsanleitung gründlich durch und befolgen Sie vor allen Dingen die Sicherheits- hinweise! Alle Tätigkeiten an und mit diesem Gerät dürfen nur soweit ausgeführt werden, wie sie in dieser Bedienungsanleitung beschrie- ben sind. -
Seite 70: Belüftung
kein direktes Sonnenlicht auf das Gerät trifft; der Kontakt mit Feuchtigkeit, Wasser oder Spritzwas- ser vermieden wird; keine offenen Brandquellen (z.B. brennende Kerzen) in der Nähe oder auf dem Gerät stehen; keine mit Flüssigkeit gefüllten Gefäße (Vasen oder ähnliches) auf ein Geräteteil gestellt werden; das Gerät nicht in unmittelbarer Nähe von Magnet- feldern (z. -
Seite 71: Der Cd-Spieler
Versuchen Sie auf keinen Fall, das Gerät selber zu öffnen und/oder zu reparieren. Es besteht die Gefahr des elek- trischen Schlags! Wenden Sie sich im Störungsfall an das Medion Service Center oder eine andere geeignete Fachwerkstatt, um Gefährdungen zu vermeiden Der CD-Spieler Der CD-Spieler ist ein Laserprodukt der Klasse 1. -
Seite 72: Hinweis Zur Elektrostatischen Aufladung
Batterie und Gerätekontakte vor dem Einlegen bei Bedarf reinigen. Vertauschen Sie niemals die Polarität. Achten Sie darauf, dass die Pole Plus (+) und Minus (-) korrekt eingesetzt sind, um Kurzschlüsse zu vermei- den. Vermischen Sie keine neuen und alten Batterien oder Batterien unterschiedlichen Typs. -
Seite 73: Inbetriebnahme
Inbetriebnahme Auspacken Entfernen Sie sämtliches Verpackungsmaterial. Wenn Sie das CD-Fach öffnen, entfernen Sie den ein- gelegten CD-Fach-Transportschutz. ACHTUNG! Lassen Sie kleine Kinder nicht mit Folie spie- len. Es besteht Erstickungsgefahr! Lieferumfang prüfen Bitte überprüfen Sie die Vollständigkeit der Lieferung und benachrichtigen Sie uns bitte innerhalb von 14 Ta- gen nach dem Kauf, falls die Lieferung nicht komplett ist. -
Seite 74: Batterien In Das Gerät Einlegen
Batterien in das Gerät einlegen Auf der Unterseite des Hauptgeräts befindet sich ein Batteriefach für drei 1,5 V-Batterien R03/LR 03/AAA/ Micro (nicht mitgeliefert). Es müssen Batterien eingelegt sein, wenn die Uhr- zeiteinstellung und Speichereinstellungen erhal- ten bleiben sollen, wenn das Gerät ganz ausge- schaltet wird. -
Seite 75: Das Gerät Aufstellen
Das Gerät aufstellen Verwendung als Tischgerät Für die Verwendung als Tischgerät sind die Teile des Sy- stems mit Gummifüßen ausgestattet. Um die Lautsprecher aufzustellen, klappen Sie die Standfüße auf der Rückseite herunter. Wandmontage Sie können das Hauptgerät und die beiden Lautspre- cher an einer Wand befestigen. -
Seite 76: Anschlüsse
Anschlüsse Lautsprecher und Subwoofer anschließen Bevor Sie Anschlüsse vornehmen, stellen Sie den Be- triebsschalter an der Rückseite des Subwoofers auf . Verbinden Sie das System noch nicht mit dem Stromnetz. Verbinden Sie die Lautsprecher Cinchstecker mit den farblich entsprechend gekennzeichneten Buchsen OUT SPEAKERS auf der Rückseite des Subwoofers (1). -
Seite 77: Antennenanschluss
Antennenanschluss Auf der linken Seite des Hauptgeräts befindet sich der FM ANT Antennenbuchsen-Eingang ( ). Eine Wurfan- tenne ist mitgeliefert. Justieren Sie die Wurfantenne für den optimalen Empfang. Für den UKW-Empfang können Sie alternativ ein 75- Ohm-Antennenkabel (nicht mitgeliefert) an die An- tennensteckdose anschließen. -
Seite 78: Kopfhörer Anschließen
STANDBY Schalten Sie Ihr Gerät mit der Taste ein. FUNCTION, Drücken Sie die Taste die Funktion „ “ im Display angezeigt wird. Das Audiosignal Ihres ex- ternen Gerätes wird jetzt wiedergegeben. Kopfhörer anschließen An der rechten Seite des Hauptgeräts finden Sie den PHONES Kopfhöreranschluss ( Nehmen Sie das Verbindungskabel zum Subwoofer... -
Seite 79: Grundfunktionen
Grundfunktionen Ein-/Ausschalten – POWER ON/OFF Mit dem Betriebsschalter an der Rückseite des Subwoofer schalten Sie das Gerät ein. Das Gerät befin- det sich nun im Standby-Modus. Die POWER-Anzeige am Subwoofer leuchtet rot. Im Display blinkt die Uhr- zeit, solange die Uhrzeit noch nicht eingestellt ist. Drücken Sie zum Einschalten des Geräts die Taste STANDBY am Gerät oder an der Fernbedienung. -
Seite 80: Automatisches Ausschalten - Sleep
Automatisches Ausschalten – SLEEP Sie können eine Zeit einstellen, nach der das Gerät au- tomatisch in den Standby-Modus schaltet. SLEEP Drücken Sie die Taste an der Fernbedienung wiederholt, um die gewünschte Zeit einzustellen: 90 Minuten > 80 Minuten > 70 Minuten usw. bis 10 Minuten. -
Seite 81: Klangeinstellungen
Drücken Sie auf oder , um die Stunde einzustel- len. TIMER Drücken Sie die Taste erneut. Im Display blinkt die Minutenanzeige. Stellen Sie mit oder die Minuten ein. TIMER Drücken Sie die Taste erneut. Wählen Sie nun TUNER > CD > USB oder die Musikquelle: >... -
Seite 82: Radiobetrieb
Radiobetrieb Das Gerät empängt nur das Freqenzband FM (UKW). Schalten Sie das Gerät ein und wählen Sie die Radio- FUNCTION TUNER funktion „ “ mit der Taste Sender einstellen SKIP/TUNE/SEARCH Drücken Sie oder wieder- holt, um manuell eine bestimmte Frequenz einzu- stellen. -
Seite 83: Cd-/Usb-/Speicherkartenbetrieb
CD-/USB-/Speicherkartenbetrieb Abspielbare Datenträger Abspielbare Datenträger sind: Audio-CDs, CD-Rs, CD-RWs. USB-Memory-Stick oder MP3-Player (USB-Version 1.1). Bitte beachten Sie, dass die Kompatibilität mit allen Memory Sticks nicht zu 100 Prozent gewährlei- stet werden kann. Speicherkarte SD/MMC. Die Abspielfunktionen für diese Datenträger sind weitgehend identisch und werden in die- ser Anleitung daher zusammen beschrieben. -
Seite 84: Cds Einlegen Und Entnehmen
CDs einlegen und entnehmen Hinweise zum CD-Fach Legen Sie keine fremden Gegenstände in das CD-Fach, da hierdurch die Me- chanik zerstört werden kann. Um Verschmutzung durch Staub zu vermeiden, lassen Sie den Deckel des CD-Fachs nicht für längere Zeit offen stehen. Berühren Sie auf keinen Fall die Linse im CD-Fach. -
Seite 85: Usb-Gerät Einsetzen
USB-Gerät einsetzen Stecken Sie den USB-Stick oder einen MP3-Player in die USB-Buchse auf der Vorderseite des Geräts. STANDBY Schalten Sie das Gerät mit ein und wählen FUNCTION Sie mit die Funktion „ “. Die Titel werden eingelesen und das Display zeigt die Gesamtzahl der Alben und Titel im Stoppmodus. -
Seite 86: Ordner Im Mp3-/Wma-Format
Ordner im MP3-/WMA-Format Um bei einem MP3-/WMA-Datenträger den Ordner PRESET/FOLDER zu wechseln, drücken Sie die Taste oder Wenn die vorhandenen Titel im ID3-Format geschrie- ben sind, können Sie sich die hinterlegten Informatio- nen anzeigen lassen. ID3/MONO/ST. Drücken Sie die und im dem Display erscheint ID3 ON . -
Seite 87: Abspielreihenfolge Programmieren
Abspielreihenfolge programmieren Sie können eine Abspielreihenfolge für bis zu 32 Titel im CD-Modus und 64 Titel im MP3-/WMA-Modus pro- grammieren. Das Gerät muss sich hierfür im Stopp-Mo- dus befinden. Stoppen Sie die Wiedergabe, so dass STOP im Display erscheint. iPod/MEM/C-ADJ Drücken Sie die Taste am Gerät oder auf der Fernbedienung. -
Seite 88: Ipod-Betrieb
iPod-Betrieb Wiedergabe Setzen Sie den iPOD-Player in die „Docking-Station“ (Schale). Sie können auch handelsübliche Adapterschalen für iPod-Docking Stations benutzen. Schalten Sie das Gerät in den Standby-Modus und FUNCTION wählen Sie mit der Taste den iPOD-Mo- dus. Im Display erscheint die iPOD Anzeige. -
Seite 89: Im Ipod-Menü Navigieren
Im iPOD-Menü navigieren iPod/MEM/C-ADJ Drücken Sie , um den iPOD-Modus zu öffnen. Im Display des Geräts erscheint iPOD MENU MENU Drücken Sie die , um das Menü im iPod zu öff- nen. SKIP/TUNE/SEARCH oder dönnen Sie Me- nüeinträge im iPod-Menü anwählen. ENTER aktivieren Sie den gewählten Me- nüpunkt. -
Seite 90: Technische Daten
Technische Daten Spannungsversorgung Spannung: 230 V ~ 50 Hz Leistungsaufnahme: ca. 85 W Ausgangsleistung: 2 x 5 Watt RMS + 30 W RMS Backup-Batterien Hauptgerät: 3 x 1,5 V R03/LR 03/AAA/Micro Batterien Fernbedienung: 2 x 1,5 V R03/LR 03/AAA/Micro Radio UKW-Band: 87,5 –... -
Seite 91: Entsorgung
Sie sich in Ihrer Stadt- oder Gemein- deverwaltung nach Möglichkeiten einer umwelt- und sachgerechten Entsorgung. Copyright © 2009. Alle Rechte vorbehalten. Das Copyright liegt bei der Firma Medion®. Warenzeichen: Warenzeichen sind Eigentum ihrer jeweiligen Besitzer. Technische und optische Änderungen sowie Druckfehler vorbehalten. - Seite 92 Spis treści Widok urządzenia ......... 5 Urządzenie główne i głośniki .
- Seite 93 Radio ..........23 Ustawianie stacji .
-
Seite 94: Widok Urządzenia
Widok urządzenia Urządzenie główne i głośniki Przód i boki 1. Otwory wentylacyjne: NIE ZASŁANIAĆ! FM ANTENNE : Gniazdko anteny 75 omów AUX R : Wejście dodatkowe AUX prawe AUX L : Wejście dodatkowe AUX lewe iPod/MEM/C-ADJ. : Tryb iPoda, tryb pamięci, tryb ustawiania zegara REPEAT : Wybieranie trybu powtarzania OPEN/CLOSE... - Seite 95 SKIP TUNE : Przeskok do następnego tytułu; TUNE : Szukanie stacji naprzód; SEARCH : Szybkie przewijanie do przodu FUNCTION CARD IPOD : Wybór trybu roboczego: (karta pamięci), TUNER (radio) VOLUME – : Zmniejszanie poziomu głośności 18.Gniazdo iPODa: „port“ do podłączania iPoda VOLUME + : Zwiększanie poziomu głośności : Odtwarzanie, pauza;...
- Seite 96 Tył urządzenia głównego i głośnik niskotonowy 28.Otwory do montażu ściennego 29.Wnęka baterii zabezpieczającej pamięć operacyjną 30.Wskaźnik stanu gotowości (czerwony) i pracy (zielony) 31.Włącznik wyłącznik: przełączanie urządzenia w tryb gotowości i wyłączanie FROM MAIN : Gniazdko dla dostarczonego z urządzeniem kabla łączącego (urządzenie główne –...
-
Seite 97: Pilot
Pilot STANDBY : Włączanie urządzenia z trybu gotowości i wracanie do trybu gotowości MUTE : Wyłączanie dźwięku PRESET UP : Przewijanie pamięci stacji w górę; FOLDER UP : Szukanie folderów w górę (tryb MP3) PRESET DN : Przewijanie pamięci stacji w górę;... -
Seite 98: Wyświetlacz
Wyświetlacz Wyświetlacz może pokazywać następujące treści: 1. Wskazanie głośności 2. Wskazanie godziny w trybie gotowości, częstotliwości w trybie radia oraz tytułu i rodzaju odtwarzania w trybach CD/MP3 3. Ustawienie zegara przełącząjacego w stanie uśpienia 4. Aktywne jest odtwarzanie przypadkowe 5. Odtwarzanie utworów MP3 lub WMA 6. -
Seite 99: Zasady Bezpieczeństwa
Zasady bezpieczeństwa O instrukcji obsługi Przed pierwszym uruchomieniem urządzenia dokładnie przeczytaj tę instrukcję obsługi i zastosuj się przede wszystkim do zawartych w niej zasad bezpieczeństwa! Wszystkie czynności wykonywane przy tym urządzeniu oraz przy jego używaniu wolno wykonywać tylko w sposób opisany w niniejszej instrukcji obsługi i w podanym tu zakresie. -
Seite 100: Wentylacja
na urządzenie nie działały żadne bezpośrednie źródła ciepła (np. kaloryfery); na urządzenie nie padało bezpośrednie światło słoneczne; urządzenie nie stykało się z wilgocią i lejącą się lub pryskającą wodą; w pobliżu urządzenia ani na urządzeniu nie stały żadne otwarte źródła ognia (np. palące się świece). na urządzeniu ani żadnej z jego części nie były stawiane naczynia napełnione wodą... -
Seite 101: Odtwarzacz Płyt Cd
Grozi to porażeniem prądem elektrycznym! Aby uniknąć niebezpieczeństwa, w razie wystąpienia jakichkolwiek usterek zwróć się do Centrum Serwisowego firmy Medion lub innego, odpowiedniego warsztatu. Odtwarzacz płyt CD Odtwarzacz płyt CD jest produktem laserowym klasy 1. Urządzenie jest wyposażone w system bezpieczeństwa, który zapobiega wydostawaniu się... -
Seite 102: Wskazówki Dotyczące Ładunków Elektrostatycznych
Unikaj silnych uderzeń i wstrząsów. W razie potrzeby przed włożeniem baterii do urządzenia oczyść zestyki baterii i urządzenia. Nigdy nie zmieniaj biegunowości zainstalowanych baterii. Uważaj, żeby bieguny dodatni (+) i ujemny ( ) znajdowały się w odpowiednich pozycjach, w przeciwnym razie możesz spowodować zwarcie. Nie mieszaj nowych i starych baterii ani baterii różnych typów. -
Seite 103: Pierwsze Użytkowanie
Pierwsze użytkowanie Rozpakowywanie urządzenia Usuń opakowanie. Po otworzeniu wnęki CD usuń umieszczone w niej zabezpieczenie transportowe. UWAGA! Nie pozwalaj małym dzieciom na zabawę folią. Niebezpieczeństwo uduszenia! Kontrola zawartości opakowania Prosimy o sprawdzenie zawartości opakowania i poinformowanie o ewentualnych brakach w ciągu 14 dni od daty zakupu. - Seite 104 Baterie muszą zostać zainstalowane, jeżeli po całkowitym wyłączeniu urządzenia mają zostać zachowane ustawienia zegara i pamięci. Odsuń pokrywę wnęki baterii, osuwając zatrzask w kierunku wskazywanym przez strzałkę. Włóż baterie w taki sposób, by bieguny ujemne baterii przylegały do sprężynek. Nasuń pokrywę na wnękę baterii.
-
Seite 105: Ustawianie Urządzenia
Ustawianie urządzenia Ustawianie na blacie Części systemu posiadają nóżki gumowe, chroniące powierzchnię blatu. Aby ustawić głośniki, rozłóż ich tylne stopy. Montaż ścienny Urządzenie główne i oba głośniki można zamontować na ścianie. W tym celu należy umieścić w ścianie po dwie śruby (z łbami pasującymi do znajdujących się... -
Seite 106: Złącza
Złącza Podłączanie głośników i głośnika niskotonowego Przed wykonaniem połączeń ustaw włącznik wyłącznik z tyłu głośnika niskotonowego na Nie łącz jeszcze systemu z siecią elektryczną. Połącz wtyczki współosiowe głośników z gniazdkami oznaczonymi odpowiednimi kolorami OUT SPEAKERS z tyłu głośnika niskotonowego (1). Gniazdko (prawy) jest przeznaczone dla czerwonej wtyczki głośnika, gniazdko... -
Seite 107: Złącze Anteny
Złącze anteny Po lewej stronie urządzenia głównego znajduje się gniazdko anteny (FM ANT). Z urządzeniem została dostarczona antena rzutowa. Ustaw antenę rzutową w pozycji zapewniającej optymalny odbiór. Do odbioru UKF możesz też użyć kabla antenowego 75 omów (nie jest dostarczony razem z urządzeniem). -
Seite 108: Podłączanie Słuchawek
FUNCTION, Naciśnij przycisk aż na wyświetlaczu pojawi się funkcja „ “. Urządzenie odtwarza teraz ścieżkę audio z urządzenia zewnętrznego. Podłączanie słuchawek W prawej części urządzenia głównego znajduje się PHONES gniazdko słuchawek ( Wyjmij kabel łączący urządzenie z głośnikiem niskotonowym. Podłącz słuchawki wtyczką kątową 3,5 mm. Głośniki wyłączą... -
Seite 109: Funkcje Podstawowe
Funkcje podstawowe Włączanie/wyłączanie – POWER Włącznik wyłącznik ON/OFF z tyłu głośnika niskotonowego służy do włączania i wyłączania urządzenia. Urządzenie znajduje się teraz w trybie gotowości. Dioda POWER na głośniku niskotonowym świeci kolorem czerwonym. W wyświetlaczu miga wskazanie godziny (dopóki nie nastąpi ustawienie aktualnej godziny). -
Seite 110: Ustawienie W Stanie Czuwania - Sleep
iPOD/MEM/C-ADJ. Ponownie naciśnij Godzina jest ustawiona, cyfry przestają migać. Ustawienie w stanie czuwania – SLEEP Możesz ustawić czas, po którym urządzenie automatycznie przejdzie w tryb gotowości. SLEEP Naciskaj przycisk pilota, aby ustawić żądany czas. 90 minut > 80 minut > 70 minut itd. do 10 minut. -
Seite 111: Ustawienia Dźwięku
TIMER Naciśnij przycisk ponownie aby ustawić czas wyłączenia. Pojawia się wskazanie i zaczyna migać godzina. W ciągu 6 sekund naciśnij , aby ustawić godzinę. TIMER Naciśnij przycisk ponownie. W wyświetlaczu migają minuty. Przyciskami albo ustaw wartość minut. TIMER Naciśnij przycisk ponownie. -
Seite 112: Radio
Radio Urządzenie odbiera tylko fale radiowe w paśmie UKF (FM). TUNER Włącz urządzenie i wybierz funkcję radia („ “) FUNCTION przyciskiem Ustawianie stacji SKIP/TUNE/SEARCH Naciskaj przycisk albo aby ustawić ręcznie żądaną częstotliwość. Jeżeli przyciski albo będą naciskanie nieco dłużej, spowoduje to rozpoczęcie automatycznego wyszukiwania stacji. -
Seite 113: Tryb Odtwarzania Z Płyty Cd/Pendriva/Karty Pamięci
Tryb odtwarzania z płyty CD/pendriva/ karty pamięci Obsługiwane nośniki danych Obsługiwane nośniki danych to: Płyty audio CD, CD R, CD RW. Pendrivy lub odtwarzacze MP3 (protokół USB w wersji 1.1). Pamiętaj, że nie jest możliwe zagwarantowanie 100 procentowej kompatybilności z wszystkimi dostępnymi na rynku pendrivami. -
Seite 114: Władanie I Wyjmowanie Płyt Cd
Władanie i wyjmowanie płyt CD Wskazówki dotyczące wnęki płyt CD Nie wkładaj żadnych przedmiotów do wnęki płyt CD, może to spowodować zniszczenie elementów mechanicznych wnęki. Aby zapobiec zanieczyszczeniu przez pył, nie zostawiaj pokrywy wnęki płyt CD przez dłuższy czas otwartej. Nigdy nie dotykaj soczewki wewnątrz wnęki płyt CD. -
Seite 115: Używanie Pendriva
Używanie pendriva Podłącz pendriva lub odtwarzacz MP3 do portu USB z przodu urządzenia. STANDBY Włącz urządzenie przyciskiem i wybierz FUNCTION przyciskiem funkcję „ “. Utwory zostaną wczytane, urządzenie pokaże w trybie zatrzymania łączną ilość albumów i utworów. Używanie karty Włóż kartę pamięci, ze ściętym narożnikiem z przodu i z prawej strony i stykami skierowanym w dół, do gniazda kart z przodu urządzenia. - Seite 116 Foldery w formacie MP3/WMA Aby w przypadku nośnika MP3/WMA zmienić folder, PRESET/FOLDER naciśnij przycisk albo Jeżeli zapisane utwory mają format ID3, można wyświetlić zapisane informacje o nich. ID3/MONO/ST. Naciśnij przycisk , w wyświetlaczu ID3 ON pojawia się . Informacje są wyświetlane TITLE ARTIST ruchomą...
-
Seite 117: Programowanie Kolejności Odtwarzania
INTRO Naciśnij przycisk w pilocie jeszcze raz; urządzenie przejdzie do trybu normalnego odtwarzania. Programowanie kolejności odtwarzania Możesz zaprogramować kolejność odtwarzania maksymalnie 32 utworów w trybie CD i 64 utworów w trybach MP3/WMA. Urządzenie musi się znajdować w trybie zatrzymania. Zatrzymaj odtwarzanie, w wyświetlaczu musi się STOP pojawić... -
Seite 118: Korzystanie Z Ipoda
Korzystanie z iPoda Odtwarzanie Podłącz iPODa do „portu“ (gniazda). Możesz też użyć dostępnych w handlu gniazd adaptacyjnych do iPodów. Przełącz urządzenie w tryb gotowości i wybierz FUNCTION przyciskiem tryb iPODa. W wyświetlaczu iPOD pojawia się informacja ENTER Naciśnij , zacznie się odtwarzanie plików z iPODa. -
Seite 119: Nawigacja W Menu Ipoda
Nawigacja w menu iPODa iPod/MEM/C-ADJ Naciśnij , aby uaktywnić tryb iPoda. W wyświetlaczu pojawia się iPOD MENU MENU Naciśnij , aby otworzyć menu w iPodzie. SKIP/TUNE/SEARCH Przyciskiem albo możesz wybierać pozycje menu iPoda. ENTER Przycisk aktywuje wybrany punkt menu. MENU Przyciskiem cofasz się... -
Seite 120: Dane Techniczne
Dane techniczne Zasilanie Zasilanie: 230 V ~ 50 Hz Pobór mocy: 85 W Moc wyjściowa: 2 x 5 W RMS + 30 W RMS Baterie zabezpieczające, urządzenie:3 x 1,5 V R03/LR 03/AAA/Micro Baterie, pilot: 2 x 1,5 V R03/LR 03/AAA/Micro Radio Zakres UKF: 87,5 –... -
Seite 121: Utylizacja
środowiska utylizacji urządzenia. Copyright © 2009. Wszelkie prawa zastrzeżone. Prawa autorskie należą do firmy Medion®. Znaki towarowe: Znaki towarowe są własnością odpowiednich podmiotów. Zmiany techniczne i optyczne oraz błędy w druku zastrzeżone. - Seite 122 Medion Service Center Visonic S.A. c/ Miguel Faraday, 6 Parque Empresarial "La Carpetania", N-IV Km. 13 28906 Getafe, Madrid España Hotline: 902196437 Fax: 914604772 service-spain@medion.com www.medion.es Medion Service Center Infolinia konusmenta: 022 / 397 4335 Po³¹czenie lokalne (telefon stacjonarny i komórkowy) service-poland@medion.com...