Ceag Stabex M0 Betriebsanleitung
Explosionsgeschützte handleuchte
Inhaltsverzeichnis
Verfügbare Sprachen
Verfügbare Sprachen
Quicklinks
Betriebsanleitung
Explosionsgeschützte Hand-
leuchte Stabex M0
Zielgruppe: Elektrofachkräfte
Operating instructions
Explosion protected torch
Stabex M0
Target group: Skilled electricians
Mode d'emploi
Lampe torche pour atmosphère
explosive Stabex M0
Groupe Cible: Électriciens qualifiés
3 1350 000 165 (A)
Crouse-Hinds
Inhaltsverzeichnis

Verwandte Anleitungen für Ceag Stabex M0

Inhaltszusammenfassung für Ceag Stabex M0
- Seite 1 Betriebsanleitung Explosionsgeschützte Hand- leuchte Stabex M0 Zielgruppe: Elektrofachkräfte Operating instructions Explosion protected torch Stabex M0 Target group: Skilled electricians Mode d’emploi Lampe torche pour atmosphère explosive Stabex M0 Groupe Cible: Électriciens qualifiés 3 1350 000 165 (A) Crouse-Hinds...
- Seite 2 Montagebilder Illustrations for mounting Illustrations du montage Das Auswechseln der Batterie Replacing the battery Remplacement de la batterie Monozellen in Metallhülse Metallhülse und Monozellen Dry batteries in metal tube Metal tube and dry batteries Piles à gaine métallique Gaine métallique et piles Das Auswechseln der Glühlampe Blub replacement Remplacement de l’ampoule...
-
Seite 3: Sicherheitshinweise
Reparaturen, die den verpackung: -40°C bis +60°C Explosionsschutz betreffen Schutzart nach EN 60529 (s. ElexV), dürfen nur von (IEC 529): IP 65 CEAG oder einer qualifizier- Schutzklasse nach ten ,,EIektrofachkraft“ mit EN 60598: anschließender Prüfung Abmessungen durch einen ,,Sachverstän- (mm): L 200, Ø... -
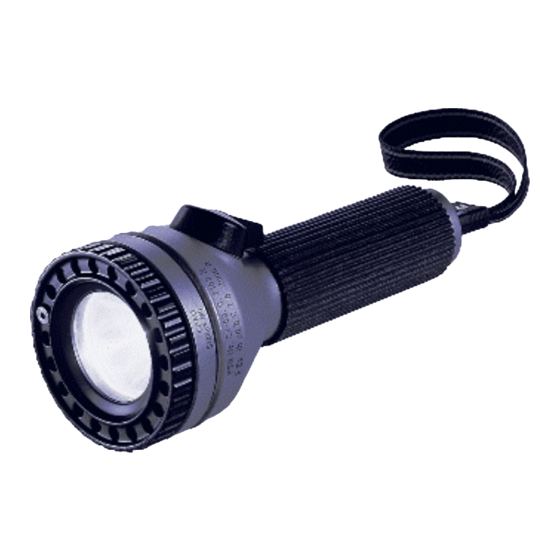
Seite 4: Beschreibung Und Anwendung
4. Beschreibung und Erstinbetriebnahme: Anwendung 1. Innensechskantschraube lösen und Leuchte durch Die Sicherheitsstableuchte Linksdrehen des Stabex MO ist besonders für Verschraubungsringes Kontroll-, Wartungs- und öffnen. Der Lichtaustritt soll Inspektionsarbeiten im Ge- dabei nach unten weisen fahrenbereich „Zone 0“ konzi- (Bild 1/1a/1b). piert. - Seite 5 Lampenwechsel öffnen. Der Lichtaustritt soll Der Lampenwechsel darf dabei nach unten weisen nur im „nicht explosions- (Bild 1/1a/1b). gefährdeten Bereich“ durch- 2. Batteriehülse entnehmen geführt werden! (Bild 2). 1. Innensechskantschraube 3. Wechseln der Zellen lösen und Leuchte durch entsprechend der Kenn- Linksdrehen des Verschrau- zeichnung auf der Hülse, bungsringes öffnen.
- Seite 19 CEAG" "Se desiderate la traduzione del "Montagevejledningen kan manuale operativo in un altra oversættes til andre EU-sprog lingua della Comunità Europea og rekvireres hos Deres CEAG potete richiederla al vostro leverandør" rappresentante CEAG" "Tarvittaessa tämän "Indien noodzakelijk kan de käyttöohjeen käännös on...