Herunterladen Diese Seite drucken

Werbung

Verfügbare Sprachen
  • DE

Verfügbare Sprachen

9Qben
Entertainment
Projector
VIO Projector

Werbung

loading

Inhaltszusammenfassung für YABER V10

  • Seite 1 9Qben Entertainment Projector VIO Projector...
  • Seite 3 LANGUAGE English . 01 Franqais Italian — Espanol Deutsche —...
  • Seite 4 Support@yabertech.com CONTENTS YABER Lifetime Professional Support TIPS PACKAGE PROJECTOR SPECIFICATIONS PROJECTOR OVERVIEW REMOTE CONTOL INSTALLATION 1 .lnstallation Method„ 2.Projection Distance and Size, 3 Install on the Ceiling. STARTING PROJECTORR IMAGEADJUSTMENT 1.Focus Adjustment. 2.Digital 4D Keystone Correction SETTING UP THE PROJECTOR 1 Select The nput Signal Source.
  • Seite 5 YABER Lifetime Professional Support Dear customer, Thank you very much for supporting YABER! Please read this manual thoroughly before using the projector. If you have any issues, email your order number and the problem to Support@yabertech.com We will provide a fast solution in 24 hours...
  • Seite 6 Support@yabertech.com PACKAGE LIST VIO Projector* I Remote Control* Power Cord* Cleaning kit* 1 HDMI Cable*l 3-in-l AV Cable Cleaning Cloth* 1 User Manual* PROJECTOR SPECIFICATIONS Model Native Keystone Manual Vertical & 1920*1080P Resolution Correction Horizontal Display Light Source Technology Color Game 16.7M Full...
  • Seite 7 Support@yabertech.com PROJECTOR OVERVIEW...
  • Seite 8 Support@yabertech.com Yaber logo Yaber Nameplate Project lens Optica coated glass ens When the power is connected, the projector Power indicator power indicator lights up red Power Cord Port Power Cord Port IR window Infrarot-SignaIempfänger Port USB portl/USB port2 Port Audio input...
  • Seite 9 Support@yabertech.com REMOTE CONTOL Power Source Arrow keys 4. Menu Homepape 6 Volume 7. Volume 8 Mute Picture flip 10. Confirmation key (Play and Pause) Return 12. Previous 13. Next Turn on/off the power Select the input signal source Used to adjust the parameter of the projector in the menu mode Press once: Back to the menu interface Press twice in succession:...
  • Seite 10 Support@yabertech.com Note: l).lnstall 2 pieces of AAA batteries into the remote before using it. Do not combine new batteries with old ones in remote controller, which can cause operation failure due to insufficient power supply. 2) When using the remote controller, please make sure that the signal transmitter of the remote controller aims at infrared...
  • Seite 11 Support@yabertech.com 2. Projection Distance and Size Aspect Ratio: 16:9 Distance (ft.) Screen Size 50" 100" 120" 150" The recommended projection distance is about 9ft,the shortest projection distance is 4.5ft The image size depends on the distance between projector and screen, there may be 3% deviation among above...
  • Seite 12 Support@yabertech.com STARTING PROJECTOR 1)Press the power key on the remote or projector, the indicator light will turn Green; 2)Adjust the focus ring on the left side of the projector to get the best image performance; (If it is still blurry, please try to adjust the projection distance.) 3)Use the 4D keystone function of the projector to get a rectangle projection screen;...
  • Seite 13 Support@yabertech.com Rotate the focus ring or lens slowly. At the same time, check the focus point carefully. The best focus point for the lens would be where the image most clear. Note: If it is still blurry, please try to adjust the projection distance 2.Digital 4D Keystone Correction.
  • Seite 14 Support@yabertech.com 2.USB Disk Input Mode 2.1 Play Movie/Music/Photo/Office Suite in the USB Disk Input Mode 1).lnput the USB Disk, select [ Office Suite ] on the homepage and enter; 2).Select the option [ Movie/Music/Photo/Offce Suite] 3).Select the desired file (or folder to enter the subfolder) in the USB disk, then press the [ 0K ] button to play it.
  • Seite 15 Modify the picture Contrast Picture Mode User/StandardNivid/Soft parameters in the Saturation range 0-100 Sharpness 120Hz 500Hz Modify the sound Standard/News/Music/ Sound Mode parameters in the 1.5KHz Movie/Sport/User range 0-100 5KHz 1 OKHz 2 3 Office Suite Play Interface YABER.docx < Read-only >...
  • Seite 16 (2) Make sure your mobile device is close to the projector when using wireless connection. A distance within I meter is recommended. O Some mobile devices may not support screen mirroring due to the compati- bility. Any questions, please feel free to email YABER via Support@yabertech.com.
  • Seite 17 Support@yabertech.com 3.1 .iOS Cast (for iOS Devices) I .G O tohome page — Select the[O ] menu — Select the[WiFi S etting ] menu - Open the WiFi function —Select your home WiFi from the list —Connect the VIC) projector to your home WiFi. 00:07 Miracast 2.Back to home page —...
  • Seite 18 Support@yabertech.com 3.2.Miracast (for Android Devices) I Go to home page — Select the [ Miracast ] menu — Press the 0K button to enter the [ Miracast Setting ] Menu Miracast 00:07 •e Officesuit, 2.Select the [ Settings ] menu on your Android device - Select the [ Screen mirroring ] function Select your Miracast receiver named [ VIO-An- Cast-XXXX ] - your Android device screen will be displayed on the projec...
  • Seite 19 I. The VIO projector is compatible with the Bluetooth headsets, Bluetooth speakers and Airpods, but not the Bluetooth keyboards or Bluetooth phones 2. If you have any question, please feel free to email YABER via: support@y- abertech.com 5.Projector Image Setting 5.1 .Projector Mode Goto home page —Select the[ @ ] menu —...
  • Seite 20 Support@yabertech.com 1 Desktop front projection 2. Desktop rear projection 3.Celling front projection 4 Celling rear projection 5.2 Four Point Keystone Correction When the Projection screen is not rectangular,it can be adjusted by 4-ponit keystone correction. Step 1: Go to home page Select the[ ]menu —Select the [Keystone Correction] Menu;...
  • Seite 21 Support@yabertech.com :Keep pressing the 0K button on the remote control or projector, 0K Pick point until the positioning icon appears at the point desired, then release the button immediately. Adjustment :Press the arrow keys on the remote control or projector to adjust the horizontal or vertical parameters -5 Back .
  • Seite 22 Support@yabertech.com tte MEW to reset 6.System Update Stepl :contact Yaber to get the latest file update (Support@yabertech com), download the software Step 2: Copy the software<update ziP> to the root directory of the U disk, then insert the U disk into the projector and turn on the power switch. After booting up, go to settings, system upgrades, select the U disk storing update.zip, click to confirm the upgrade, it will automatically...
  • Seite 23 Support@yabertech.com 7.0ther Setting Settings Menu Function About System Detailed information about the system Set to open the home page or HDMI signal Boot Settings interface when powering on Restore user operation application configuration Restore and system setting...
  • Seite 24 Support@yabertech.com 8.Date Stepl :Go to home page —Select ]menu —Select the [Date] Menu,then Press the[OK]button to enter the submenu Step2:By pressing the button on the remote or projector, you can adjust the time date. Settings 9.About Content Menu System Version VIO-351 2021-05-13 MAC Addressr...
  • Seite 25 Support@yabertech.com SIGNAL LINES CONNECTION YABER VIO projector has 7 interfaces,HDMl ports*2/ USB ports*2/ 3 5mm headphone output/ AV output/ VGA interface* I. Please select the correct connecting port to connect your device(PC,Phone, DVD PlayerSound etc.) I.Connect Disk 1) Insert the U disk into either of the two usb input ports;...
  • Seite 26 Support@yabertech.com 3.Connect to the DVD Player Use the 3-in -1 AV cable in the package I) Turn on your DVD player and the projector; 2) Connect the colorful female connectors to your DVD player's RCA cable with the 3-in-l AV cable in the package; 3) Connect the black connector to the AV port of the projector, enter the home page to select [AV ] as the signal source O Video...
  • Seite 27 Support@yabertech.com TROUBLESHOOTING Problems listed below might occur during the operation of your projector. Please refer to the possible factors which might cause the issue to do troubleshooting 1. When turning on the power switch, the indicator light does not work. 1) The power might not be connected well 2) Check the over-heat protection system...
  • Seite 28 Support@yabertech.com CONTE-NU Assistance professionnel e YABER å vie . 24 CONSEILS LISTE DES PAQUETS SPÉCIFICATIONS DU PROJECTEUR APERCU DIJ PROJECTEUR TÉLÉCOMMANDE • 28 INSTALLATION • 29 1. Méthode d'installation • 29 2. Distance et taille de projection... 3. Installer au plafond PROJECTEUR DE DÉMARRAGE...
  • Seite 29 Nous garantissons que nous vous fournirons une solution satisfaisante. Merci pour votre compréhension. Équipe de service YABER CONSEILS: 1 .Ne placez pas Ie projecteur dans une piéce trop chaude ou trop froide, car la température élevée ou la température basse réduiront la durée de vie de...
  • Seite 30 La lentille sale doit étre essuyée avec un chiffon en coton doux pour Ia surface de Ia lentille en verre. Aucun chiffon dur ou abrasif ne doit étre utilisé LISTE PAQUETS Yaber VIO Projecteur *1 Télécommande*l Cordon d'alimentation*l Trousse de nettoyage*l Cäble HDMI*I 3-in-l Cäble...
  • Seite 31 Support@yabertech.com APERCU DU PROJECTEUR...
  • Seite 32 Support@yabertech.com Logo Yaber Plaque signalétique Yaber Objectif du projecteur Lentille en verre å revétement optique Lorsque "alimentation est connectée, le témoin Témoin d'alimentation d'alimentation du projecteur s'allume en rouge Port du cordon d'alimentation Port du cordon d'alimentation Récepteur de signal infrarouge...
  • Seite 33 Support@yabertech.com TÉLÉCOMMANDE D'alimentation Bouton Source de signal 3 Touches directionnelles Menu Page d'accueil 6 Volume 7 Volume 8. Muet Image flip 10. Touche de confirmation (lecture et pause) 11. Revenir Précédent Prochaint Allumer / éteindre l'alimentation Sélectionnez la source du signal d'entrée Utilisé...
  • Seite 34 Support@yabertech.com Remarque: I). Installez 2 piles AAA dans la télécommande avant de 'utiliser. Ne combinez pas de nouvelles piles avec d'anciennes dans la télécommande, car cela pourrait entrainer une panne de fonctionnement en raison d'une alimentation électrique insuffisante 2). Lorsque vous utilisez la télécommande, assurez-vous que l'émetteur de signal de la télécommande vise Ie récepteur de signal infrarouge du project- eur.
  • Seite 35 Support@yabertech.com Maintenez le projecteur å une hauteur oü sa lentille est en symétrie axiale par rapport l'écran. Si cela n'est pas possible, utilisez la fonction de correc- tion trapézoidale pour régler l'image de projection. 2. Distance et taille de projection Si vous souhaitez obtenir un écran de projection gratuit, veuillez nous contacter via Support@yabertech.com Rapport hauteur / largeur:...
  • Seite 36 Support@yabertech.com PROJECTEUR DE DÉMARRAGE 1) Appuyez sur la touche d'alimentation de la télécommande ou du project eur, le voyant deviendra vert; 2) Ajustez la bague de mise au point sur le cöté gauche du projecteur pour obtenir Ies meilleures performances d'image; (S'il est toujours flou, essayez d'ajuster la distance de projection.) 3) Utilisez la fonction trapézoidale 4D du projecteur pour obtenir un écran de projection rectangle;...
  • Seite 37 Support@yabertech.com Tournez lentement la bague de mise au point. En méme temps, vérifiez soigneusement Ie point AF. Le meilleur point de mise au point pour l'objectif serait l'endroit oü l'image est la plus claire Remarque: s'il est toujours flou, essayez d'ajuster la distance de projection 2.Correction de la distorsion trapézoidale...
  • Seite 38 Support@yabertech.com 1 .Sélectionnez la source du signal d'entrée Sélectionnez la source de signal d'entrée souhaitée (HDMI 1 / HDM12 / AV) sur la page d'accueil 2.Mode d'entrée du disque 2.1.Jouez un film I musique I photo I Office Suite en mode d'entrée disque I) -Entrez le disque USB, sélectionnez [Office Suite] sur la page d'accueil et...
  • Seite 39 Support@yabertech.com Settings Contenu Menu Mode Fonction Luminosité Modifiez Contraste Utilisateur / Standard Mode image paramétres d'image Vif / Doux Saturation dans la plage 0-100 Acuité 120Hz 500Hz Modifiez Standard / Actualités Mode son paramétres sonores Musique / Film / Sport / 1 5KHz dans la plage 0 100 Utilisateur...
  • Seite 40 Support@yabertech.com En appuyant sur Ie bouton de la télécommande pour accéder aux menus. (Remarque: la version Office peut étre automatiquement mise å jour, puis Ies fonctions mises å jour peuvent changer. En raison de droits d'auteur, certaines fonctions sont temporairement indisponibles.
  • Seite 41 (4) Pour toute question, n'hésitez envoyer un e-mail YABER Support@yabertech.com. 3.1.iOS Cast (pour les appareils iOS) 1 .Accédez la page d'accueil - Sélectionnez le menu Sélectionnez...
  • Seite 42 Support@yabertech.com 4.0uvrez Ie [Centre de contröle] sur votre appareil iOS - Sélectionnez fonction [Screen Mirroring] - Sélectionnez et connectez Ie récepteur Cast nommé [VI O-iOSCast-xxxx] - I'écran de votre appareil iOS sera affiché sur Ia projection I'écran apres 3 secondes. 3.2.Miracast (pour les appareils Android) I.
  • Seite 43 Bluetooth, haut-parleurs Bluetooth et Ies Airpods, mais pas les claviers Bluetooth ou les téléphones Bluetooth 2.Si vous avez des questions, n'hésitez envoyer un e-mail YABER via: support@yabertech.com 5. Réglage de l'image du projecteur 5.1 .Mode de projection...
  • Seite 44 Support@yabertech.com Alle lapage d'accueil - Sélectionnez lemenu " @ " - Sélectionnez l'option [Direction de projection] puis sélectionnez Ies quatre directions de projection que vous aimez. 1 Support de plafond de projection 2 Support de plafond de projection avant arriére 3 Support de table de projection 4 Support de table de projection avant...
  • Seite 45 Support@yabertech.com Continuez appuyer sur Ie bouton 0K de la télécomande 0K seleccionar puntos ou du projecteur, jusqu'å ce que l'icöne de positionnement apparaisse l'endroit souhaité, puis relächez immédiatement le bouton :Appuyez sur les touches fléchées de Ia télécommande ou du projecteur pour régler les paramétres horizontaux ou verticaux.
  • Seite 46 Support@yabertech.com 6.Mise jour du systéme Schrittl :Wenden Sie sich an Yaber, um das neueste Datei-Update erhalten (Support@yabertech.com). Laden Sie die Software herunter. Schritt 2: Kopieren Sie die Software <update.zip> in das Stammverzeichnis der U-Diskette, legen Sie die U-Diskette in den Projektor ein und schalten Sie den Netzschalter ein.
  • Seite 47 Support@yabertech.com 7. Autre paramétre Paramétres fonction Menu A propos du systéme Informations détaillées sur e systéme Paramétres Réglez pour ouvrir Ia page d'accueil ou I'interface démarrage de signal HDMI lors de la mise sous tension Restaurer la configuration de l'application d'opé...
  • Seite 48 Support@yabertech.com 8. Datum Étap 1:Aller lapage d'accueil - Sélectionnez lemenu "@"-Sélection nez le menu "Date", puis appuyez sur le bouton "0K" pour accéder au sous-menu. Étape 2: En appuyant sur Ie boutonde la télécommandeou du projecteur, vous pouvez rég er l'heure et la date. Paramétres 9.
  • Seite 49 Support@yabertech.com CONNEXION I-IGNES SIGNAL Le projecteur YABER VIO dispose de 7 interfaces, ports HDMI * 2 / ports USB * Sortie casque 2 / 3,5 mm / sortie AV / interface VGA * 1 Veuillez sélectionner le port de connexion approprié...
  • Seite 50 Support@yabertech.com 3. Connectez-vous lecteur Utilisez le cäble AV 3 en -I dans I'emballage I) Allumez votre lecteur DVD et Ie projecteur; 2) Connectez les connecteurs femelles colorés au cäble RCA de votre lecteur DVD avec le cäble AV 3 en I dans l'emballage; 3) Connectez le connecteur noir au port AV du projecteur, accédez page d'accueil pour sélectionner...
  • Seite 51 Support@yabertech.com de 3 ans pour le projecteur VI 0. Si vous avez des questions, n'hésitez pas å nous contacter via Support@yabertech.com. DÉPANNAGE Les problémes répertoriés ci-dessous peuvent survenir pendant fonctionnement de votre projecteur. Veuillez vous référer aux facteurs possibles qui pourraient causer le probléme pour effectuer le dépannage. I.Lors de la mise sous...
  • Seite 52 Support@yabertech.com 8. Impossible de trouver des périphériques 'ors de la connexion avec un disque dur ou un lecteur flash. Check if the device is broken 9. Auto-off apres avoir travaillé pendant un certain temps. 1) La ventilation du projecteur est bloquée 2) La tension n'est pas stable 3) Le systéme de protection contre la surchauffe...
  • Seite 53 Support@yabertech.com SOMMARIO Supporto professionale a vita YABER • 48 SUGGERIMENTI . 48 LISTA PACCHETTI . 49 SPECIFICHE PROIETTORE • PANORAMICA DEL PROIETTORE Telecomando • 52 INSTALLAZIONE 1 Metodo di installazione • 53 2.Distanza e dimensioni di proiezione 3.1nstallare sul soffitto •...
  • Seite 54 Support@yabertech.com Supporto professionale a vita YABER Caro cliente, Woohoo! II tuo proiettore é giå nelle tue mani! Iniziamo! Hai domande su come funziona? Leggere attentamente questo manuale prima di utilizzare proiettore. Sei soddisfatto del tuo proiettore? In caso di problemi, inviare per e-mail il numero dell'ordine e la descrizione del problema a: Support@y abertech.com.
  • Seite 55 La lente sporca deve essere pulita con un panno di cotone morbido per la lente di vetro superficie. Non utilizzare panni duri o abrasivi. LISTA PACCHETTI YABER Proiettore Power Cavo Telecomando Kit di pulizia*l Manuale di istruzioni Cavo AV 3 in 1 *...
  • Seite 56 Support@yabertech.com PANORAMICA PROIETTORE...
  • Seite 57 Support@yabertech.com Yaber logo Targhetta Yaber Obiettivo del proiettore Lente in vetro rivestimento ottico Quando "alimentazione co legata, I'indicatore di Indicatore di energia alimentazione del proiettore si accende in rosso Porta del cavo Porta del cavo di alimentazione alimentazione Finestra Ricevitore di segnali a infrarossi...
  • Seite 58 Support@yabertech.com Telecomando Potenza Fonte Tasti freccia Menu Homepape Volume Volume Muto Capovolgimento dell'immagine Tasto di conferma(Riproduci metti in pausa) Ritorno 13. Avanti Accendi / spegni l'alimentazione Seleziona a sorgente del segnale di ingresso Utilizzato per regolare il parametro del proiettore in Apri il menu Entra nella home page Alza...
  • Seite 59 Support@yabertech.com Nota: 1) .Installare 2 batterie AAA nel telecomando prima di utilizzarlo. Non combin- are le nuove batterie con quelle vecchie nel telecomando, che possono causare problemi di funzionamento a causa di un'alimentazione insufficiente 2) .Quando si utilizza il telecomando, assicurarsi che il segnale il trasmettitore del telecomando punta al ricevitore del segnale a infrarossi del proiettore...
  • Seite 60 Support@yabertech.com 2.Distanza e dimensioni del proiettore Proporzioni: 16:9 Distance (m.) Screen Size 1 70 50" 70" 3.32 100" 3.93 120" 5.00 1 50" La distanza di proiezione consigliata di circa 100 pollici, la distanza proiezione piü breve é di 3 m La dimensione dell'immagine dipende...
  • Seite 61 Support@yabertech.com AVVIAMENTO PROIETTORE 1) Premere il tasto di accensione sul telecomando o sul proiettore, l'indicatore luminoso diventerå verde; 2) Regolare l'anello di messa a fuoco sul lato sinistro del proiettore per ottene- re le migliori prestazioni di immagine; (Se ancora sfocato, prova a regolare la distanza di proiezione.) 3) Utilizzare la funzione Keystone 4D del proiettore per ottenere uno schermo di proiezione rettangolare;...
  • Seite 62 Support@yabertech.com Ruotare lentamente I'anello di messa a fuoco. Allo stesso tempo, controlla il punto AF accuratamente. II miglior punto di messa a fuoco per l'obiettivo sarebbe quello in cui I'immagine é piü nitida. Nota: se é ancora sfocato, provare a regolare Ia distanza di proiezione. 2.Correzione trapezoidale digitale...
  • Seite 63 Support@yabertech.com 2.ModaIitå di input disco USB 2.1 Riproduzione di film I musica I foto I Office Suite in modalitå input 1). Immettere il disco USB, selezionare [Office Suite] nella home page e accedere; 2). Seleziona l'opzione [Film / Musica / Foto / Suite per ufficio] 3).
  • Seite 64 Saturazione nell'intervallo 0-100 Nitidezza 120Hz 500Hz Modifica i parametri Modalitå Standard / Notizie / Musical del suono nell'intervallo audio Film / Sport / Utente 1.5KHz 0-100 5KHz 10KHz 2.3 Interfaccia di riproduzione di Office Suite YABER docx < Read-only >...
  • Seite 65 I'uso connessione senza fili. Si consiglia una distanza entro 1 metro. (3) Alcuni dispositivi mobili potrebbero non supportare il mirroring dello schermo a causa di Compatibilitå Per qualsiasi domanda, non esitare a inviare un'e-mail a YABER tramite Support@yabertech.com...
  • Seite 66 Support@yabertech.com 3.1 Cast iOS (per dispositivi iOS) 1.Vaiallahomepage Selezionail menu[O] - Selezionail menu[Impostazi- oni WiFi] - Apri la funzione WiFi - Seleziona il tuo WiFi domestico dall'elenco Collega il proiettore VIO al tuo WiFi domestico. irnposlaboni 00:07 Miracast 2.Torna alla home page - Seleziona il menu [iOS Cast] - Premi il pulsante 0K per accedere al menu [iOS Cast] 0000 3.Selezionare il menu [Impostazioni] sul dispositivo iOS - Attivare la funzione...
  • Seite 67 Support@yabertech.com 3.2 Miracast (per dispositivi Android) 1 Vai alla home page - Seleziona il menu [Miracast] - Premi il pulsante 0K per accedere al menu [Impostazioni Miracast] 00:47 •e Miracast Officesuit, 2.Seleziona il menu [Impostazioni] sul tuo dispositivo Android - Seleziona funzione [Mirroring schermo] - Seleziona...
  • Seite 68 Bluetooth, altoparlanti Bluetooth e Airpod, ma non con tastiere Bluetooth o telefoni Bluetooth. 2.1n caso di domande, non esitare a inviare un'e-mail a YABER tramite: support@yabertech.com 5.1mpostazione dell'immagine di proiezione 5.1 Modalitå di proiezione Vai alla home page - Seleziona il menu [ ] - Seleziona l'opzione [Modalitå...
  • Seite 69 Support@yabertech.com I .Proiezione frontale del desktop 2. Desktop retroproiezione 3. Proiezione frontale a soffitto 4 Celling retroproiezione 5.2 Correzione trapezoidale a quattro punti Quando 10 schermo di proiezione rettangolare, pub essere regolato mediante la correzione trapezoidale a 4 punti Passaggio I: vai alla home page - Seleziona il menu [ ] - Seleziona menu [Correzione...
  • Seite 70 Support@yabertech.com :Keep pressing the 0K button on the remote control or projector, 0K Pick point until the positioning icon appears at the point desired, then release the button immediately. Adjustment :Press the arrow keys on the remote control or projector to adjust the horizontal or vertical parameters.
  • Seite 71 Support@yabertech.com i tan vustra detra p. irorana•. 6.Aggiornamento del sistema Passaggio I: contatta Yaber per ottenere l'ultimo aggiornamento del file (Support@yabertech.com), scarica il software Passaggio 2: copiare il software <update.zip> nella directory principale del disco U, quindi inserire il disco U nel proiettore e accendere l'interruttore alimentazione.
  • Seite 72 Support@yabertech.com 7.AItre impostazioni impostazioni Menü Funzione Informazioni Informazioni dettagliate sul sistema sistema Impostazioni di Impostare per aprire la home page o l'interfaccia avvio del segnale HDMI all'accensione Ripristina la configurazione dell'applicazione Ristabilire operativa dell'utente e le impostazioni di sistema...
  • Seite 73 Support@yabertech.com 8.Date Passaggi 1:andare allahome page - Selezionare il menu [ @ ] Selezionare il menu [Data], quindi premere il pulsante [0K] per accedere al sottomenu. Passaggio 2: premendo il pulsante sul telecomando o sul proiettore, possibile regolare l'ora e la data impostazioni 9.1nformazioni Content...
  • Seite 74 Support@yabertech.com COLLEGAMENTO LINE-E Dl SEGNALE II proiettore YABER VIO ha 7 interfacce, porte HDMI * 2 / porte USB * 2 / uscita cuffie da 3,5 mm / uscita AV / interfaccia VGA * 1.SeIezionare la porta di connessione corretta...
  • Seite 75 Support@yabertech.com 3.Collegati al lettore DVD Utilizzare il cavo AV 3 in -I nella confezione 1) Accendi il tuo lettore DVD e il proiettore; 2) Collega i connettori femmina colorati al cavo RCA del tuo lettore DVD con il cavo AV 3 in I incluso nella confezione; 3) Collegare il connettore nero alla porta AV del proiettore, accedere alla home page per selezionare [AV] come sorgente del segnale @Video...
  • Seite 76 Support@yabertech.com RISOLUZIONE PROBLEMI problemi elencati di seguito potrebbero verificarsi durante il funzionamento del proiettore Fare riferimento ai possibili fattori che potrebbero causare il problema risoluzione dei problemi. I. Quando si accende l'interruttore di alimentazione, la spia non funzio- I) L'alimentazione potrebbe non essere collegata correttamente 2) Controllare il sistema di protezione da surriscaldamento.
  • Seite 77 Support@yabertech.com 10. Spegnimento automatico dopo aver lavorato per un po I) La ventilazione del proiettore é bloccata 2) La tensione non stabile 3) II sistema di protezione dal surriscaldamento.
  • Seite 78 Support@yabertech.com CONTENIDO Soporte profesional de por vida de YABER Consejos Lista de empaque Especificaciön del proyector • 73 Resumen del proyector Resumen del Remote Control INSTALACIÖN • 77 1 .Método de instalaciön • 77 2.Distancia y tamaäo de proyecciön 3 Instalar...
  • Seite 79 Profesional de Por Vida YABER Estimado cliente, iMuchas gracias por apoyar a YABER! Lea este manual detenidamente antes de utilizar el proyector. Si tiene algün problema, envie un correo electrönico con su nümero de pedido y el proble- support@yabertech.com. Brindaremos una soluciön...
  • Seite 80 Support@yabertech.com 5. No coloque el proyector en una habitaciön que esté demasiado caliente o demasiado fria, ya que las temperaturas altas o bajas acortarån Ia vida ütil de la unidad. EI ambiente de trabajo seria de 5 C —35C 6. Si hay puntos negros en a pantalla de proyecciån, no se preocupe, comuniquese con support@yabertech.com por correo electrönico, podem- os enviarle...
  • Seite 81 Support@yabertech.com Resumen del proyector...
  • Seite 82 Support@yabertech.com Yaber logo Identificaciön de Yaber Lente de proyecto Lente de vidrio con revestimiento Optico cuando Ia alimentaciön estå conectada, el indicador Indicador de alimentaciön de alimentaciön del proyector se ilumina en rojo Puertos para cable de Conecte eI cable de alimentaciön...
  • Seite 83 Support@yabertech.com Resumen Remoto Control Poder 2 Fuente 3. Tecla direccional 4 Menü 5 Ama de casa 6. Volumen Volumen 8. Silencio Voltear imagen 10 Confirmar/Reproducir pausar el video 11 Regreso Un abrazo 13 El siguiente. Encender/a a ar eI ro ector Seleccione la fuente de entrada (HDMI 1, HDMI 2,AV)
  • Seite 84 Support@yabertech.com Nota: I.lnstale 2 baterias en el control remoto antes usar. combine baterias nuevas y Viejas en el control remoto, ya que esto puede causar un funcionamiento debido a una fuente de alimentaciön insuficiente. 2.Cuando use eI control remoto, asegürese de que el transmisor de sefial del control remoto apunte al receptor...
  • Seite 85 Support@yabertech.com La lente del proyector debe instalarse en los ejes de simetria izquierdo y derecho de Ia pantalla para evitar la distorsiön trapezoidal de las imågenes izquierda y derecha 2.La distancia entre el proyector y la pantall Si desea obtener un tela de proyecciön gratuita, contåctenos...
  • Seite 86 Support@yabertech.com A. Compre un soporte universal con tornillo M4 para instalar el proyector el techo B. Instale el proyector en el soporte a través de los orificios para tornillos en a parte inferior del proyector. Encender eI proyector A.Presione eI botön en el control remoto o proyector, el indicador LED se pondrå...
  • Seite 87 Support@yabertech.com Lentamente gire el anillo de enfoque. A1mismo tiempo, verifique cuidadosa- mente el punto de enfoque, el mejor punto de enfoque para la lente seria donde la imagen sea més clara Nota: Si todavia estå borroso, intente ajustar Ia distancia de proyecciön 2.Correcci6n trapezoidal 4D digital (måximo ajustable...
  • Seite 88 Support@yabertech.com 2.Modo entrada de disco 2.1 .Reproducir pelicula/müsica/foto/Office Suite en eI modo de entrada de disco l).lnserte eI disco Office Suite; 2).Seleccione la opciön "Pelicula/Müsica/Foto/Office Suite"; 3).Seleccione el archivo deseado (o a carpeta para ingresar a la subcar peta) en el disco USB, luego presi- one eI boton "0K"...
  • Seite 89 Modifique los Contrast paråmetros de la Picture Mode User/StandardNivid/Soft imagen en eI rango Saturation 0-100 Sharpness 120Hz 500Hz Modificar Standard/News/Music/ Sound Mode paråmetros de sonido 1 5KHz Movie/Sport/User en eI rango 0-100 5KHz 10KHz 2.3.Interfaz lectura Office Suite YABER.d0CX Read-only >...
  • Seite 90 Support@yabertech.com Pulsando el boton del mando a distancia para acceder a los menüs. (Nota: la versiÖn de Office puede actualizarse automåticamente, luego las funciones actualizadas pueden cambiar. Debido a los derechos de autor, algunas funciones no estån disponibles temporalmente. Consulte la versiön real) Menü...
  • Seite 91 Algunos dispositivos möviles pueden no admitir Ia duplicaciön de pantalla debido a Ia compatibilidad. @CuaIquier pregunta, no dude en ponerseen contacto con YABER a través de Support@yabertech.com. 3.1.iOS de Cast (para Dispositivos iOS) I. Vay a lapagina deinicio - Seleccione elmenü [O] - Seleccione elmenü...
  • Seite 92 Support@yabertech.com 4. Abra el [Centro de control] en su dispositivo iOS - Seleccione la funciön [Screen Mirroring] - Seleccione y conecte eI nombre del dispositivo [VIO-iOSCast-xxxx] - La pantalla de su dispositivo iOS se mostrarå en la proyecciön pantalla después de 3 segundos. 3.2.Miracast (para dispositivos Android)
  • Seite 93 Support@yabertech.com Nota: 1 Las diferentes marcas de teléfonos Android tienen diferentes operaciones para seleccionar. Pantalla duplicada de pantalla, consulte el manual de su teléfono. [Pantalla mültiple / Pantalla inalåmbrica / Pantalla WLAN / Duplicaciön de pantalla / Proyecciön inalåmbrica / Vista inteligente, etc.] 2.
  • Seite 94 Support@yabertech.com 2.Si tiene alguna pregunta, no dude en enviar un correo electrönico a YABER a través de support@yabertech com 5.Configuraciön de Imagen del Proyector 5.1 .Modo de Proyecci6n Iralapagin deinicio - Seleccione eImenü [O] -Seleccione laopciön [ Modo proyector] - luego seleccione la direcciön de proyecciön que desee...
  • Seite 95 support 01@yaberauto.com 5.2.Correcciön trapezoidal de cuatro puntos Cuando la pantalla de proyecciön no es rectangular, se puede ajustar mediante la correcciön trapezoidal de 4 puntos I: Vaya a lapagina d einicio - Seleccione eImenü [ @]-Seleccione el menü [Correcciön trapezoidal]. Paso 2: Presione eI botön para seleccionar el menü...
  • Seite 96 50% 6. Actualizacion Sistema Paso 1: pöngase en contacto con el servicio de Yaber para obtener la ültima actualizaciön del archivo (Support@yabertech com), descargue el software Paso 2: Copie el software <update.zip> al directorio raiz del disco U, luego inserte eI disco U en el proyector y encienda el interruptor de encendido.
  • Seite 97 Support@yabertech.com 7.Ajustes Avanzados Configuraciones Funciön Menü Informaciön detallada sobre el sistema Ajustes del sistema Configuraciones Configure para abrir la pågina de inicio o la interfaz encendido de sefial HDMI al encender Restaurar la configuraciön de la aplicaciön Restaurar operaciön del usuario y la configuraciön del sistema...
  • Seite 98 Support@yabertech.com 8.Fecha Paso 1: Vaya a la pagina de inicio - Seleccione eI menü el menü [Fecha], luego presione el boton [0K] para ingresar al submenü Paso 2: A1 presionar el botön del control remoto o del proyector, puede ajustar Ia fecha y la hora Configuraciones 9.Acerca Menü...
  • Seite 99 Otros Dispositivos EI YABER VIO proyector tiene 6 interfaces, puertos HDMI * 2 / puertos USB * 2 / 3.5mm auriculares output/ AV output/ VGA interface* 1. Seleccione el puerto de conexiön correcto para conectar su dispositivo (PC, Teléfono, Reproductor de DVD, Barra de Sonido, USB, PS4, etc.)
  • Seite 100 Support@yabertech.com 2.Conecte los Dispositivos a través de Ios puertos HDMI I) Conecte su TV stick o computadora portåtil a cualquier puerto HDMI del proyector; 2) Ingrese a la pagina de inicio para seleccionar el HDMII o HDM12 correspondiente como fuente de serial 3.Conecte al reproductor de DVD...
  • Seite 101 Support@yabertech.com 4.Conecte la Barra de Sonido I Altavoz Si su altavoz tiene un puerto AUX, utilice su cable de audio de 3,5 mm para conectar el proyector y el altavoz como muestra la imagen, ingrese a la pågina de inicio para seleccionar [AV] como fuente de sefial Audio AUX port...
  • Seite 102 Support@yabertech.com 2) d-as pilas del mando a distancia estån agotadas? 3) Algo que obstruye la serial entre eI control remoto e IR 4) Luz fuerte en IR directamente 3. No hay imagen en la pantalla. correcta la configuraciön del canal? 2) &Hay sefial de entrada? 3) &Estå...
  • Seite 103 Support@yabertech.com KATALOG LEBENSLANGE PROFESSIONELLE UNTERSTÜTZUNG VON YABER. TIPPS LISTE PAKETE BEAMER SPEZ FIKATIONEN BEAMER UBERSICHT FERNBEDIENUNG INSTALLATION • 101 1 .lnstallation Method„ • 101 2.Projektionsabstand und größe 3 Montage an der Decke PROJEKTOR STARTEN IMAGE ADJUSTMENT 1.Focus Adjustment. 2.Digitale 4D-Trapezkorrektur...
  • Seite 104 Wenn Sie irgendwelche Probleme haben, kontaktieren Sie uns bitte, damit das Problem behoben werden kann. Und geben Sie uns die Chance, uns zu verbessern. Wir garantieren Ihnen eine zufriedenstellende Lösung Vielen Dank für Ihr Verständnis! Yaber Service Team Tipps: I. Stellen Beamer nicht in einem...
  • Seite 105 Support@yabertech.com menhang mit der Schärfe und Wirkung des Bildes. Zu viel Staub kann die Bildqualität beeinträchtigen. Schmutzige Linsen Wischen Sie die Oberfläche der Glaslinse mit einem weichen Baumwolltuch ab. Verwenden Sie keine harten Tücher Oder Schleifmittel Liste Pakete VIO Beamer* Fernbedienung * 1 Netzkabel HDMI...
  • Seite 106 Support@yabertech.com Übersicht der Beameren...
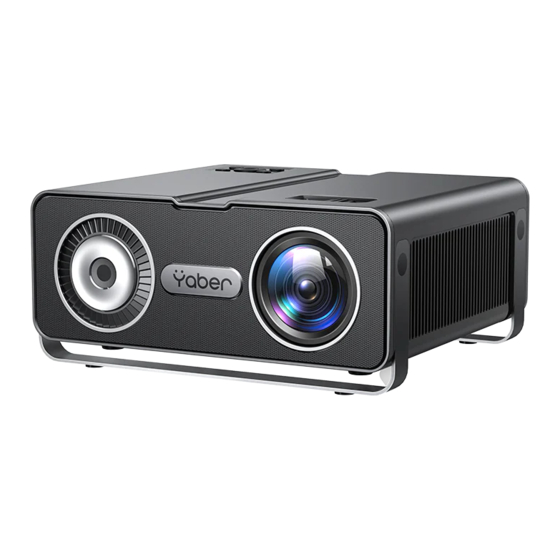
  • Seite 107 Support@yabertech.com Yaber logo Yaber Typenschild Projektlinse Optische beschichtete Glaslinse Wenn die Stromversorgung angeschlossen ist, Power anzeiger leuchtet die Projektor-Betriebsanzeige Netzkabelanschluss Anschlüsse für Stromkabel Infrared signal receiver Anschluss Anschluss 1 / USB Anschluss2 AV Anschluss Audioeingang HDMI Anschlüsse HDMI 1 Eingang, HDM12 Eingang...
  • Seite 108 Support@yabertech.com Fernbedienung Netzschalter 2. Quelle Schlüssel Pfeil 4. Speisekarte 5 Startseite Lautstärke Lautstärke 8 Stumm Bild drehen 10. Bestätigen / Spielen Oder Video anhalten 11. Rückkehr 12. Bisherige 13. Nächster Ein-/Ausschalten der Stromversor un Wählen Sie eine Eingangssignalquelle Parameter zur Einstellung des Beamers im Menümodus Ziehen Menü...
  • Seite 109 Support@yabertech.com Anmerkungen: 1). Vor Gebrauch 2 AAA-Batterien an die Fernbedienung anbringen. Kombinieren keine neue Batterie mit einer alten Batterie an der Fembedi- enung, da eine unzureichende Stromversorgung zu einem Betriebsausfall führen kann 2). Achten Sie bei Verwendung der Fernbedienung darauf, dass der Signalge- ber der Fernbedienung auf den Infrarot-Signalempfänger des Beamers zielt.
  • Seite 110 Support@yabertech.com Halten Sie den Beamer in einer Höhe, in der seine Linse axialsymmetrisch zur Leinwand ist. Wenn dies nicht möglich ist, verwenden Sie die Keystone-Kor- rekturfunktion, um das projizierte Bild anzupassen. 2.Projektionsabstand und größe Wenn Sie eine kostenlose Projektionswand wünschen, kontaktieren Sie uns bitte unter Support@yabertech.com.
  • Seite 111 Support@yabertech.com A.Bitte kaufen Sie einen UniversalBeamer für die Deckenmontage; B. Entfernen vier Gummimatten an der Unterseite Beamers Sie werden die Schraubenlöcher sehen, montieren Sie die Decke mit M4 Schrauben montieren Sie. Starten Beamer 1)Drücken Sie die Power-Taste auf der Fernbedienung Oder dem Beamer und die Anzeigeleuchte Wird grün.
  • Seite 112 Support@yabertech.com Drehen Sie den Fokusring Oder die Linse langsam Zur gleichen Zeit, überprüfen Sie sorgfältig die wichtigsten Punkte. Der beste Fokus des Objektivs Wird sein, wo das Bild am schärfsten ist. Hinweis: Versuchen Sie, den Projektionsabstand anzupassen, wenn er noch unscharf ist.
  • Seite 113 Support@yabertech.com 1. Wählen Sie die Eingangssignalquelle Wählen Sie auf der Homepage die gewünschte Eingangsquelle (HDMII/HD M12/AV) aus 2. USB Disk Input Mode 2.1. Abspielen von Filmen/Musik/Fotos/Office-Suiten im USB-Stick-Inp ut-Modus 1). Geben Sie die USB-Festplatte ein, wählen Sie [Office Suite] auf der Startseite und geben Sie ein;...
  • Seite 114 Funktionsweise Hell Ändem Sie die Kontrast Benutzer/Standard/Vivid/ Bildmodus Bildparameter Software Sättigung Bereich 0 bis 100 Scharf 120Hz 500Hz Änderung der Standards/Nachrichten/ Sound Mode Klangparameter 1 5KHz Musik/FiIm/Sports/Benutzer Bereich 0-100 5KHz 1 OKHz 2.3. Office Suite Playback Interface YABER.d0CX Read-only >...
  • Seite 115 Support@yabertech.com Gehen Sie zum Menü, indem Sie die Taste auf der Fernbedienung drücken. (Hinweis: Die Office-Version kann automatisch aktualisiert werden und die Funktionen, dann aktualisiert werden, können sich ändern. Einige Funktionen sind urheberrechtlichen Gründen vorübergehend nicht verfügbar. Bitte haben Sie Vorrang vor der aktuellen Version. ) Funktionen Menu Inhalt...
  • Seite 116 Support@yabertech.com ($)Aufgrundder Kompatibilität unterstützen einige mobile Geräte die Bild- schirmspiegelung möglicherweise nicht. (4)Bei Fragenwenden Sie sich bitte an Yaber per E-Mail an support@yabertech.com 3.1 .•OS Cast (für iOS Geräte) 1 . Gehe SiezuHome- Wählen Sie[O] Wählen S ie[Wi-Fi-Einstellungen -Öffnen Sie die Wi-Fi-Funktionen-Wählen...
  • Seite 117 Support@yabertech.com 3.2. Miracast (für Android-Geräte) 1.Gehen Sie zur Startseite-wählen Sie das Menü [Miracast]-drücken Sie die Schaltfläche 0K, um das Menü [Miracast Einstellungen] zu öffnen. Miracast Office Suite 2. Wählen Sie das Menü [Einstellungen] auf Ihrem Android-Gerät-wählen die Funktion [Screen Mirror]-wählen Sie Ihren Miracast-Empfänger mit dem Namen...
  • Seite 118 Bluetooth-Headsets, Bluetooth-Laut- sprechern und Airpods, aber nicht mit Bluetooth -Tastaturen Oder Bluetooth -Telefonen. 2. Wenn Sie Fragen haben, wenden Sie sich bitte an Yaber per E-Mail an: support@yabertech.com 5. Beamer Bildeinstellung 5.1. Direction de projection ZurHomepag gehen — Wählen S iedasMenü [O ] — Wählen S iedieOption [Projektion srichtung] Option---Wählen Sie dann die vier Projektionsrichtun-...
  • Seite 119 Support@yabertech.com I. Desktop-Frontprojektion 2. Desktop-Rückprojektion 4. Decken rück projektion 3. Decken front projektion 5.2 Four Point Keystone Correction When the Projection screen is not rectangular,it can be adjusted by 4-ponit keystone correction Schrittl :Zur Homepage gehen — Wählen Sie das Menü[ Wählen Sie das Menü[Trapez korrektur];...
  • Seite 120 Support@yabertech.com :Keep pressing the 0K button on the remote control or Punkte projector, unti t e positioning icon appears at the point desired, then release the button immediately. :Drücken Sie die Pfeiltasten auf der Fernbedienung Oder dem Einstellung Beamer, um die horizontalen Oder vertikalen Parameter anzupassen...
  • Seite 121 Support@yabertech.com 6.System Update Schrittl :Wenden Sie sich an Yaber, um das neueste Datei-Update erhalten (Support@yabertech.com). Laden Sie die Software herunter. Schritt 2: Kopieren Sie die Software <update.zip> in das Stammverzeichnis der U-Diskette, legen Sie die U-Diskette in den Projektor ein und schalten Sie den Netzschalter ein.
  • Seite 122 Support@yabertech.com 7. Erweiterte Einstellungen die Einstellungen Menu Funktion Über das System Detaillierte Informationen zum System Stellen Sie diese Option ein, um die Startseite Oder Start einstellungen die HDMI-Signalschnittstellebeim Einschaltenzu öffnen Stellen Sie die Fabrik Stellen Sie die Konfiguration der Benutzerbetriebs- anwendung und die Systemeinstellung wieder her wieder...
  • Seite 123 Support@yabertech.com 8. Datum Schritt :Zur Homepag gehen — Wählen S iedasMenü[ @ ]--Wählen S ie das Menü [Datum],drücken Sie dann die Taste [0K], um das Untermenü aufzurufen Schritt2:Durch Drücken der Taste auf der Fernbedienung Oder dem Projektor können Uhrzeit Datum einstellen.
  • Seite 124 Support@yabertech.com Signalleitungsanschluss Der YABER VI O-Projektor verfügt über 7 Schnittstellen, HDMI Anschlüsse * 2 / USB Anschlüsse * 2 / 3,5-mm Kopfhörerausgang / AV-Ausgang VGA-SchnittsteIle * I.Bitte wählen Sie den richtigen Anschluss für den Anschluss Ihres Geräts (PC, Telefon, DVD Player,Sound Leiste, USB, PS4 etc.)
  • Seite 125 Support@yabertech.com 3.AnschIuss an DVD-Player Verwenden Sie das im Lieferumfang enthaltene 3-in-1AV-Kabel I )Schalten Sie Ihren DVD-Player und Beamer ein; 2)Verbinden Sie den farbigen weiblichen Stecker mit dem Cinch-Kabel des DVD-Players mit dem 3-ZoII-IAV-KabeI im Paket; Schließen Sie den schwarzen Stecker an den AV-Port des Beamers an, gehen Sie zur Startseite und wählen Sie "AV"...
  • Seite 126 Support@yabertech.com Troubleshooting Die unten aufgeführten Probleme können während des Betriebs Ihres Beam- ers auftreten. Bitte beziehen Sie sich auf mögliche Faktoren, die zu Proble- men bei der Fehlerbehebung führen können. 1. Die Anzeige funktioniert nicht, wenn der Netzschalter eingeschaltet ist. 1) Die Stromversorgung kann schlecht angeschlossen sein.
  • Seite 127 Support@yabertech.com • 124 • 125 • 125 • 126 1.4DåYRiE • 128 2. USBÄhE-— • 128 • 132 3.2. Miracast (AndroidiJ • 132 4. Bluetooth • 5.1. • • 5.3.5 Jl.'Ä—L • • • • • 140 • 141 • 141 •...
  • Seite 128 Support@yabertech.com Amazon...
  • Seite 129 Support@yabertech.com 5 tot <...
  • Seite 130 Support@yabertech.com (1000/0#fRä) 3 in 1 :VI O 1920*1080P z:ryF3ÄF 16.7M Full 1 8-2.7m 1 37m ACIOO-240V 1 8KG JPG/JPEG/BMP /PNG HeadphonejacWAV AVI/.MP4/.MKV/.FLV/.MOV/.3GP/.MPEG1/MPEG2/H264/XVlD AAC/MP2/MP3/PCWFLAC...
  • Seite 131 Support@yabertech.com -jay —gg13C)$iBh...
  • Seite 132 Support@yabertech.com IJSB*— USB*— Fl / USB*— t input HDMI*— HDMI 1 input / HDMI 2 input * —i 4 *Output 3.5mrnt—i4 VGAÄfiz*55 3. OK;fi57 ±/T/E-/G {SS-Y—R "E-s-Y —7 x—maxz...
  • Seite 133 Support@yabertech.com QY155 —5...
  • Seite 134 Support@yabertech.com -jay Support @ yabertech.com...
  • Seite 135 Support@yabertech.com zryF3ÄF: 16:9 *WA-MX 50" 70" 100" 120" 150" 2.7m Screw holes (ihi61tM4)0...
  • Seite 136 Support@yabertech.com...
  • Seite 137 Support@yabertech.com -jQYx55—t-EØJ 0118 Office Suite HDMII / HDM12 2.USBX*JE-— 2.1.USBÄhæ—...
  • Seite 138 Support@yabertech.com TVSetting (T VH...
  • Seite 139 Support@yabertech.com 120Hz 500Hz 1.5KHz 5KHz YABERd0CX Read-ony >...
  • Seite 140 Support@yabertech.com F 34 3.WlFi&E 155—1c-...
  • Seite 141 Support@yabertech.com 3.1 iOS F(iOS-F/ 00:07 Miracast ccrios 0000 suite 3. iOS-FJ 3.2 Miracast (AndroidiJ 70%)
  • Seite 142 Support@yabertech.com Miracast STEP 2: Android-i/ 10:27 .•SIOO(Android/ Android-Fl rWi-FiJ...
  • Seite 143 Support@yabertech.com 4.Bluetooth Bluetooth r -7 / —5 'Y Bluetooth 7/ Vf Ä 00:07 B'D * Miracast AirpordsØ*å BluetoothÄ...
  • Seite 144 Support@yabertech.com stepl Step2 :...
  • Seite 145 Support@yabertech.com I)-EYF stepl: step2 : [OKFfi5> step3 :...
  • Seite 146 Support@yabertech.com 6.YÄiL77 Stepl : YaberT7 (Support@yabertech.com) Step2 : Y 7 Ä5D)V— e—cx update.zip&fRFC...
  • Seite 147 Support@yabertech.com...
  • Seite 148 Support@yabertech.com Stepl: step2: VI 0-351: 2021-05-13 MAC r...
  • Seite 149 Support@yabertech.com VI O — in/Audio PS4t&) roffice 2.HDMl*— Fire TV 1*Z-XHDM12ä- 1080P...
  • Seite 150 Support@yabertech.com Ft-PCME-— < AV port O Right Audio AUX port : Netflixr-jl) *prime video ccoæ— <...
  • Seite 151 Support@yabertech.com Support @ < (HDCPtBä)
  • Seite 152 Support@yabertech.com e-itø FEPCME-— (HDCPtB 7775 —+j—ZÄEt5å0åb€...