Herunterladen Diese Seite drucken

Werbung

Verfügbare Sprachen
  • DE

Verfügbare Sprachen

  • DEUTSCH, seite 22
MUCAR
CDL20

Werbung

loading

Inhaltszusammenfassung für MUCAR CDL20

  • Seite 1 MUCAR CDL20...
  • Seite 2 Safety Precautions and Warnings To avoid personal injury, property loss, or accidental damage to the product, read all of the information in this section before using the product. Data and Software Protection Do not delete unknown files or change the names of files or directories created by others, otherwise the device software may not run.
  • Seite 3 FCC Requirement Changes or modifications not expressly approved by the party responsible for compliance could void the user’ s authority to operate the equipment. This device complies with Part 15 of the FCC Rules. Operation is subject to the following two conditions: (1) this device may not cause harmful interference, and (2) this device must accept any interference received, including interference that may...
  • Seite 4 1. Product Descriptions (1) Diagnostic Cable: Standard OBDII TXGA Diagnostic Cable (2) LCD Display: 1.77 inch display (128*160) (3) Up, down keys: used to select interactive functions (4) Return key: Return to upper function (5) OK Return: Confirm button Code severity alert Full OBDII diagnostics functions,I/M readiness,Freeze Frame date,View data stream,O2 Sensor test,Evap system test,On Board Monitor test,Read&Clear Codes.
  • Seite 5 should be there telling location. For some Asian and European vehicles, the DLC is located behind the ashtray and the ashtray must be removed to access the connector. If the DLC cannot be found, refer to the vehicle’s service manual for the location. Note: Turn on the ignition of the vehicle, the voltage range of the device should be 9-18V, and the throttle should be in the closed position.
  • Seite 6 1.1.1 Select "Diagnosis", click "OK" to enter the system diagnosis, click "OK" and enter the diagnosis function list. 1.1.2 Select "READ CODE" and click "OK" to select vehicle type to view DTC diagnostic data. 1.2 Select "ERASE CODES" to clear the fault code...
  • Seite 7 Note: Erase Codes menu lets you to clear all current and stored DTCs from the control module. Also it erases all temporary ECU information, including freeze frame. So make sure that the selected system are completely checked and serviced by technicians and no vital information will be lost before clearing codes.
  • Seite 8 graphics data flow. Tips: Use the BACK key to return to diagnostic menu. Select "FREEZE FRAME" and click "OK" to view the freeze frame data stream. Freeze Frame menu displays freeze frame data, a snapshot of critical vehicle operating conditions automatically recorded by the on-board computer at the time of the DTC set. It is a good function to help determine what caused the fault.
  • Seite 9 to the required sensors. 1.7 Select "ON-BOARD MONITORING" and click "OK" to view On-Board Monitor data streams. The On-Board Monitor Test function is useful after servicing or after clearing a vehicle ECU’s memory. It receives test results for emission-related powertrain components and systems that are not continuously monitored for Non-CAN vehicles.
  • Seite 10 number, 0-3; other three characters, a hex character, 0-9 or A-F provide additional information on where the DTC originated and the operating conditions that caused it to set. Here below is an example to illustrate the structure of the digits: DTC Example P0201 ldentifies what section of the...
  • Seite 11 mode and sound.
  • Seite 12 The compensation for dashboard damage caused by the defect of this equipment is limited to repair or replacement. MUCAR does not bear any indirect and incidental losses. MUCAR will judge the nature of the equipment damage according to its prescribed inspection methods.
  • Seite 13 1. Product Descriptions (1) Câble de diagnostic : câble de diagnostic OBDII TXGA standard (2) Écran LCD : écran de 1.77 pouces (128*160) (3) Touches haut, bas : utilisées pour sélectionner des fonctions interactives (4) Touche retour : retour à la fonction supérieure (5) OK Retour : bouton Confirmer Alerte de gravité...
  • Seite 14 de bord), sous ou autour du côté conducteur pour la plupart des véhicules. Si le connecteur de liaison de données ne se trouve pas sous le tableau de bord, une étiquette doit être là pour indiquer l'emplacement. Pour certains véhicules asiatiques et européens, le DLC est situé derrière le cendrier et le cendrier doit être retiré...
  • Seite 15 1.1.1 Sélectionnez "Diagnostic", cliquez sur "OK" pour entrer dans le diagnostic du système, cliquez sur "OK" et entrez dans la liste des fonctions de diagnostic. 1.1.2 Entrez dans l'interface "Monitor status", sélectionnez "DTC s in this ECU" et cliquez sur "OK".
  • Seite 16 Remarque : le menu Effacer les codes vous permet d'effacer tous les DTC actuels et enregistrés du module de commande. Il efface également toutes les informations temporaires de l'ECU, y compris l'arrêt sur image. Assurez-vous donc que le système sélectionné est complètement vérifié...
  • Seite 17 Il existe deux manières de récupérer les données de préparation I/M: ● Clé de préparation I/M en un clic. ● Méthode typique : sélectionnez I/M Readiness dans le menu Diagnostic. 1.4 Sélectionnez "DATA STREAM" Afficher tous les flux de données, cliquez ensuite sur "OK", et enfin vous pouvez afficher le flux de données graphiques.
  • Seite 18 Les réglementations OBD II exigent que certains véhicules surveillent et testent les capteurs d'oxygène (O2) pour isoler les défauts liés au carburant et aux émissions. La fonction de test du moniteur d'O2 est utilisée pour récupérer les résultats des tests de moniteur des capteurs d'O2 terminés.
  • Seite 19 3. Codes de problème de diagnostic (DTCs) Les codes de problème de diagnostics OBDII sont des codes qui sont stockés par le système de diagnostic de l'ordinateur de bord en réponse à un problème détecté dans le véhicule. Ces codes identifient une zone de problème particulière et sont destinés à vous fournir un guide pour savoir où...
  • Seite 20 USB-Anschluss des Computers, Typ-C-Anschluss am anderen Ende des Tools. 3.1.3 Stecken Sie das Gerät zuerst in den Computeridentifikationsport und öffnen Sie dann das CDL20-Upgrade-Tool. Suchen Sie die Datei "COMFLG.INI", öffnen Sie sie und ändern Sie den "Seriennamen" in der Datei genauso wie den Computer- und Geräteanschluss "USB- COM-Name".
  • Seite 21 Cette garantie s'applique uniquement aux utilisateurs et aux distributeurs qui achètent les produits https://www.mucarco.com/ MUCAR CDL20 selon les procédures normales. Fournir une garantie gratuite dans un délai d'un an. Garantie MUCAR, y compris les produits électroniques pour les dommages causés par des défauts de matériaux ou de fabrication. Les dommages à...
  • Seite 22 
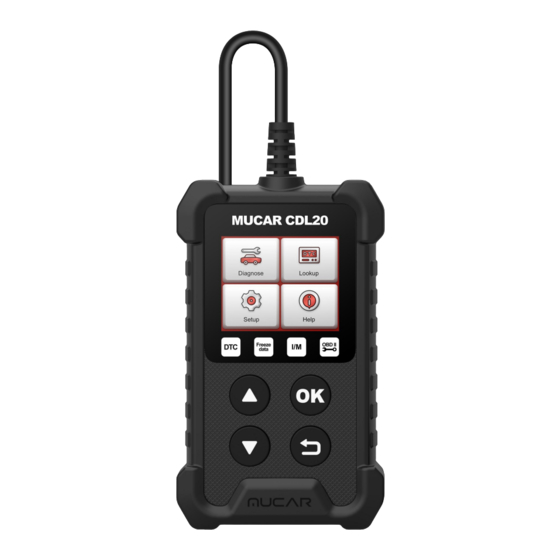
1. Product Descriptions (1) Diagnosekabel: Standard-OBDII TXGA-Diagnosekabel (2) LCD-Anzeige: 1,77-Zoll-Display (128 * 160) (3) Aufwärts-, Abwärts-Tasten: zur Auswahl interaktiver Funktionen (4) Return-Taste: Zurück zur oberen Funktion (5) OK Zurück: Bestätigungstaste Warnung zum Code-Schweregrad Vollständige OBDII-Diagnosefunktionen, I/M-Bereitschaft, Standbilddatum, Datenstrom anzeigen, O2-Sensortest, Evap-Systemtest, On-Board-Monitortest, Codes lesen und löschen. Technische Spezifikationen Anzeige: 1,7 Zoll Display ℉...
  • Seite 23 Instrumententafel (Armaturenbrett) entfernt unter oder um die Fahrerseite. Wenn sich der Data Link Connector nicht unter dem Dashboard befindet, sollte dort ein Etikett angebracht sein, das die Position angibt. Bei einigen asiatischen und europäischen Fahrzeugen befindet sich der DLC hinter dem Aschenbecher und der Aschenbecher muss entfernt werden, um an den Anschluss zu gelangen.
  • Seite 24 1.1.1 Wählen Sie "Diagnose", klicken Sie auf "OK", um die Systemdiagnose einzugeben, klicken Sie auf "OK" und rufen Sie die Diagnosefunktionsliste auf. 1.1.2 Wählen Sie „CODE LESEN“ und klicken Sie auf „OK“, um den Fahrzeugtyp zum Anzeigen der DTC-Diagnosedaten auszuwählen. 1.2 Wählen Sie „CODES LÖSCHEN“, um den Fehlercode zu löschen.
  • Seite 25 Hinweis: Im Menü Codes löschen können Sie alle aktuellen und gespeicherten DTCs vom Steuergerät löschen. Es löscht auch alle temporären ECU-Informationen, einschließlich Standbild. Stellen Sie also sicher, dass das ausgewählte System vollständig von Technikern überprüft und gewartet wird und keine wichtigen Informationen verloren gehen, bevor Sie die Codes löschen.
  • Seite 26 Nachfolgend finden Sie eine Liste mit Abkürzungen und Namen von OBD II-Monitoren, die vom Codeleser unterstützt werden. Es gibt zwei Möglichkeiten, I/M-Bereitschaftsstatusdaten abzurufen: ● I/M-Bereitschaftsschlüssel mit einem Klick. ● Typischer Weg: Wählen Sie I/M-Bereitschaft aus dem Diagnosemenü. 1.4 Wählen Sie "DATA STREAM" Anzeigen aller Datenströme, Klicken Sie als nächstes auf "OK", und schließlich können Sie den Grafikdatenfluss anzeigen.
  • Seite 27 Die OBDII-Vorschriften verlangen, dass bestimmte Fahrzeuge Sauerstoffsensoren (O2) überwachen und testen, um kraftstoff- und emissionsbezogene Fehler zu isolieren. Die Funktion O2-Monitor-Test wird verwendet, um abgeschlossene O2-Sensor-Monitor-Testergebnisse abzurufen. Der O2-Monitortest ist kein On-Demand-Test. O2-Sensoren werden nicht getestet, wenn sie über das Menü ausgewählt werden, aber getestet, wenn die Motorbetriebsbedingungen innerhalb der angegebenen Grenzen liegen.
  • Seite 28 ● Einige Hersteller erlauben keine Werkzeuge zur Steuerung von Fahrzeugsystemen. ● Der Hersteller legt die Kriterien fest, um den Test automatisch zu stoppen. Lesen Sie das entsprechende Fahrzeug-Servicehandbuch, bevor Sie diese Funktion verwenden. Wählen Sie "I/M READINESS“ und klicken Sie auf „OK“, um den I/M-Datenfluss anzuzeigen.
  • Seite 29 DTC Beispiele P0201 Identifiziert, welcher Teil des Systems fehlerhaft funktioniert Systems P=Antriebsstrang B=Karosserie Sub-systems C=Fahrgestell Identifiziert das System, in dem sich das U=Netzwerk Problem befindet. „P“ Code-Systeme sind unten aufgelistet. Die Systeme der „B“-, „C“- und „U“-Codes sind unterschiedlich. 0 - Kraftstoff- und Luftmessung; zusätzliche Code Type Emissionskontrollen 1 - Kraftstoff- und Luftmessung...
  • Seite 30 USB-Anschluss des Computers, Typ-C-Anschluss am anderen Ende des Tools. 3.1.3 Stecken Sie das Gerät zuerst in den Computeridentifikationsport und öffnen Sie dann das CDL20-Upgrade-Tool. Suchen Sie die Datei "COMFLG.INI", öffnen Sie sie und ändern Sie den "Seriennamen" in der Datei genauso wie den Computer- und Geräteanschluss "USB- COM-Name".
  • Seite 31 4. Garantiebedingungen Diese Garantie gilt nur für Benutzer und Händler, die https://www.mucarco.com MUCAR CDL20 Produkte auf normale Weise erwerben. Geben Sie innerhalb eines Jahres kostenlose Garantie. MUCAR Garantie einschließlich elektronischer Produkte für Schäden, die durch Material- oder Verarbeitungsfehler verursacht wurden. Schäden an Geräten oder Komponenten, die durch Missbrauch, nicht autorisierte Modifikation, Verwendung für nicht vorgesehene Zwecke, Betrieb...
  • Seite 32 1. Descripciones de productos (1) Cable de diagnóstico: Cable de diagnóstico estándar OBDII TXGA (2) Pantalla LCD: pantalla de 1,77 pulgadas (128 * 160) (3) Teclas arriba, abajo: se utilizan para seleccionar funciones interactivas (4) Tecla de retorno: vuelve a la función superior (5) Aceptar Regresar: botón Confirmar Alerta de gravedad del código Funciones completas de diagnóstico OBDII, preparación I / M, fecha del cuadro congelado,...
  • Seite 33 del panel de instrumentos (tablero), debajo o alrededor del lado del conductor en la mayoría de los vehículos. Si el conector de enlace de datos no se encuentra debajo del tablero, debe haber una etiqueta que indique la ubicación. Para algunos vehículos asiáticos y europeos, el DLC se encuentra detrás del cenicero y el cenicero debe retirarse para acceder al conector.
  • Seite 34 1.1.1 Seleccione "Diagnóstico", haga clic en "Aceptar" para ingresar al diagnóstico del sistema, haga clic en "Aceptar" y acceda a la lista de funciones de diagnóstico. 1.1.2 Seleccione "LEER CÓDIGO" y haga clic en "Aceptar" para seleccionar el tipo de vehículo y ver los datos de diagnóstico del DTC.
  • Seite 35 Nota: El menú Borrar códigos le permite borrar todos los DTC actuales y almacenados del módulo de control. También borra toda la información temporal de la ECU, incluida la imagen congelada. Por lo tanto, asegúrese de que los técnicos revisen y reparen completamente el sistema seleccionado y que no se pierda información vital antes de borrar los códigos.
  • Seite 36 OBD II compatibles con el lector de códigos. 1.4 Seleccione "TRANSFERENCIA DE DATOS" Ver todas las secuencias de datos, luego haga clic en "Aceptar" y, finalmente, podrá ver el flujo de datos de los gráficos. Sugerencias: Use la tecla ATRÁS para regresar al menú de diagnóstico. Seleccione "FOTO CONGELADO"...
  • Seite 37 de oxígeno (O2) para aislar fallas relacionadas con el combustible y las emisiones. La función de prueba del monitor de O2 se utiliza para recuperar los resultados de la prueba del monitor de los sensores de O2 completados. La prueba del monitor de O2 no es una prueba bajo demanda. Los sensores de O2 no se prueban cuando se seleccionan a través del menú, sino que se prueban cuando las condiciones de funcionamiento del motor están dentro de los límites especificados.
  • Seite 38 3. Códigos de Diagnóstico de Problemas (DTC) Los Códigos de Diagnóstico de Problemas OBDII son códigos almacenados por el sistema de diagnóstico de la computadora a bordo en respuesta a un problema encontrado en el vehículo. Estos códigos identifican un área problemática particular y están destinados a proporcionarle una guía sobre dónde podría estar ocurriendo una falla dentro de un vehículo.
  • Seite 39 3.1.3 Primero inserte el dispositivo en el puerto de identificación de la computadora, luego abra la herramienta de actualización CDL20. Busque el archivo "COMFLG.INI" y ábralo, y cambie el "Nombre de serie" en el archivo al igual que el puerto de la computadora y el dispositivo "Nombre USB-COM".
  • Seite 40 La compensación por daños en el tablero de instrumentos causados por el defecto de este equipo se limita a la reparación o reemplazo. MUCAR no soporta pérdidas indirectas e incidentales. MUCAR juzgará la naturaleza del daño del equipo de acuerdo con sus métodos de inspección prescritos.
  • Seite 41 1. Descrizioni del prodotto (1) Cavo diagnostico: cavo diagnostico standard OBDII TXGA (2) Display LCD: display da 1,77 pollici (128*160) (3) Tasti su, giù: utilizzati per selezionare le funzioni interattive (4) Tasto Invio: torna alla funzione superiore (5) OK Ritorna: pulsante Conferma Code severity alert Full OBDII diagnostics functions,I/M readiness,Freeze Frame date,View data stream,O2 Sensor test,Evap system test,On Board Monitor test,Read&Clear Codes.
  • Seite 42 essere presente un'etichetta che indica la posizione. Per alcuni veicoli asiatici ed europei, il DLC si trova dietro il posacenere e il posacenere deve essere rimosso per accedere al connettore. Se non è possibile trovare il DLC, consultare il manuale di assistenza del veicolo per la posizione.
  • Seite 43 1.1.1 Selezionare "Diagnosi", fare clic su "OK" per accedere alla diagnosi del sistema, fare clic su "OK" e accedere all'elenco delle funzioni di diagnosi. 1.1.2 Selezionare "LEGGI CODICE" e fare clic su "OK" per selezionare il tipo di veicolo per visualizzare i dati diagnostici DTC.
  • Seite 44 Nota: il menu Cancella codici consente di cancellare tutti i DTC correnti e memorizzati dal modulo di controllo. Inoltre cancella tutte le informazioni temporanee della ECU, incluso il fermo immagine. Quindi assicurati che il sistema selezionato sia completamente controllato e riparato dai tecnici e che nessuna informazione vitale andrà...
  • Seite 45 1.4 Selezionare "DATA STREAM" Visualizza tutti i flussi di dati, quindi fare clic su "OK" e infine è possibile visualizzare il flusso di dati grafici. Suggerimenti: utilizzare il tasto BACK per tornare al menu di diagnostica. Selezionare "FREEZE FRAME" e fare clic su "OK" per visualizzare il flusso di dati del fermo immagine.
  • Seite 46 Il test di monitoraggio dell'O2 non è un test su richiesta. I sensori O2 non vengono testati se selezionati tramite il menu, ma testati quando le condizioni di funzionamento del motore rientrano nei limiti specificati. Suggerimenti: diversi modelli di auto hanno rilevato un numero diverso di sensori di ossigeno, controllare in base ai sensori richiesti.
  • Seite 47 3. Codici diagnostici di guasto (DTC) I codici diagnostici di errore OBDII sono codici memorizzati dal sistema diagnostico del computer di bordo in risposta a un problema riscontrato nel veicolo. Questi codici identificano una particolare area problematica e hanno lo scopo di fornire una guida su dove si verifica un guasto potrebbe verificarsi all'interno di un veicolo.
  • Seite 48 3.2 Selezionare "Impostazioni" e fare clic su "OK" per impostare la lingua nativa, l'unità di misura, la modalità di registrazione e l'audio.
  • Seite 49 Si prega di contattare il servizio clienti online tramite l'interfaccia dell'ordine. Linea di servizio: 1-833-692-2766 E-mail servizio clienti: service@mucarco.com Sito Ufficiale: https://www.mucarco.com/ Tutorial dei prodotti, video, FAQ e lista di copertura sono disponibili sul sito ufficiale di MUCAR.
  • Seite 50 1. Descrições do produto (1) Cabo de diagnóstico: Cabo de diagnóstico padrão OBDII TXGA (2) Display LCD: display de 1,77 polegadas (128 * 160) (3) Teclas para cima e para baixo: usadas para selecionar funções interativas (4) Tecla de retorno: retornar à função superior (5) OK Retornar: botão Confirmar Alerta de severidade de código Funções de diagnóstico OBDII completas, prontidão de I / M, data do quadro de congelamento,...
  • Seite 51 (painel), embaixo ou ao redor do lado do motorista para a maioria dos veículos. Se o Data Link Connector não estiver localizado no painel, deve haver uma etiqueta indicando a localização. Para alguns veículos asiáticos e europeus, o DLC está localizado atrás do cinzeiro e o cinzeiro deve ser removido para acessar o conector.
  • Seite 52 1.1.1 Selecione "Diagnóstico", clique em "OK" para acessar o diagnóstico do sistema, clique em "OK" e entre na lista de funções de diagnóstico. 1.1.2 Selecione "LER CÓDIGO" e clique em "OK" para selecionar o tipo de veículo para visualizar os dados de diagnóstico DTC. 1.2 Selecione "ERASE CODES"...
  • Seite 53 Observação: o menu Apagar Códigos permite que você apague todos os DTCs atuais e armazenados do módulo de controle. Também apaga todas as informações temporárias da ECU, incluindo congelar quadro. Portanto, certifique-se de que o sistema selecionado seja completamente verificado e atendido por técnicos e que nenhuma informação vital seja perdida antes de limpar os códigos.
  • Seite 54 1.4 Selecione "FLUXO DE DADOS" Veja todos os fluxos de dados, em seguida clique em "OK" e, finalmente, você pode visualizar o fluxo de dados gráficos. Dicas: Use a tecla BACK para retornar ao menu de diagnóstico. Selecione "CONGELAR FRAME" e clique em "OK" para visualizar o fluxo de dados do quadro congelado.
  • Seite 55 O O2 Monitor Test não é um teste sob demanda. Os sensores de O2 não são testados quando selecionados por meio do menu, mas testados quando as condições de operação do motor estão dentro dos limites especificados. Dicas: Diferentes modelos de carros detectaram diferentes números de sensores de oxigênio, verifique de acordo com os sensores necessários.
  • Seite 56 3. Códigos de problemas de diagnóstico (DTCs) Os códigos de problemas de diagnóstico OBDII são códigos armazenados pelo sistema de diagnóstico do computador de bordo em resposta a um problema encontrado no veículo. Esses códigos identificam uma área de problema específica e têm como objetivo fornecer um guia sobre onde uma falha pode estar ocorrendo dentro de um veículo.
  • Seite 57 3.1.3 Primeiro insira o dispositivo na porta de identificação do computador e, em seguida, abra a ferramenta de atualização CDL20. Encontre o arquivo "COMFLG.INI" e abra e altere o "Nome de série" no arquivo da mesma forma que o computador e a porta do dispositivo "nome USB-COM".
  • Seite 58 é limitada ao reparo ou substituição. A MUCAR não assume quaisquer perdas indiretas e acidentais. A MUCAR julgará a natureza dos danos ao equipamento de acordo com seus métodos de inspeção prescritos.
  • Seite 59 1. 製品の説明 (1) 診断ケーブル:標準 OBDIITXGA 診断ケーブル (2) LCD ディスプレイ:1.77 インチディスプレイ(128 * 160) (3) 上、下キー:インタラクティブ機能を選択するために使用されます (4) リターンキー:上位機能に戻る (5) OK 戻る:確認ボタン コード重大度アラート 完全な OBDII 診断機能、I / M 準備、フリーズフレーム日付、データストリームの表示、O2 セ ンサーテスト、Evap システムテスト、オンボードモニターテスト、コードの読み取りとクリア。 技術仕様 ディスプレイ:1.7 インチディスプレイ 作業環境:0-50℃(32-122 ℉) 保管環境:-20-60℃(-4-140 ℉) 電源:9-18V 車両電源 サポートされているプロトコル:ISO9141、KWP2000(ISO 14230)、J1850PWM、 J1850VPM、CANOBDII プロトコル...
  • Seite 60 ーションをラベルで表示する必要があります。 アジア及びヨーロッパ製の車両では、DLC は灰 皿の後ろにあります。灰皿を取り外さないと、コネクタを使用するのはだめです。 DLC が見つ からない場合は、車両サビースマニュアルのケをご参照くださ。 注:車両のイグニッションをオンにします。デバイスの電圧範囲は 9-18V で、スロットルは 閉位置にある必要があります。 2.2 アプリケーションの概要 コードリーダーが起動すると、ホーム画面が開きます。 この画面には、ユニットにロードされ ているすべてのアプリケーションが表示されます。 次のアプリケーションがコードリーダーに プリロードされています : ● 診断:9 つの一般的な OBD システムテストすべての OBDII 画面が表示されます。 ● ルックアップ:診断トラブルコードルックアップの画面が表示されます。 ● ヘルプ:デバイスの OBD 機能とシステムの説明があります。 ● セットアップ:コードリーダーを使用するときに、自分の好みに合わせてデフォルト設定を 調整するための画面が表示され。 注:このデバイスにリストされているプロトコルのすべての機能オプションがすべての車両 に適用できるわけではありません。 利用可能なオプションは、テストされた車両の年式、モ デル、およびメーカーによって異なる場合があります。 このオプションがテスト対象の車両 に適用されない場合、「X」が表示されます。...
  • Seite 61 1.1.1 「診断」を選択し、「OK」をクリックしてシステム診断を入力し、「OK」をクリ ックして診断機能リストを入力します。 1.1.2 「コードの読み取り」を選択し、「OK」をクリックして車種を選択し、DTC 診断データ を表示します。 1.2 「コードの消去」を選択して、障害コードをクリアします。...
  • Seite 62 注:[ コードの消去 ] メニューを使用すると、現在および保存されているすべての DTC を制御モジュールからクリアできます。 また、フリーズフレームを含むすべての 一時的な ECU 情報を消去します。 したがって、選択したシステムが技術者によって 完全にチェックおよび保守されていることを確認し、コードをクリアする前に重要な 情報が失われないようにしてください。 1.3 「I / MREADINESS」 を選択し、 「OK」 をクリックして I / M データフローを表示します。 ノート : ● I / M レディネスステータスを確認するには、エンジンをオフにしてイグニッションキーがオンになっている ことを確認します。 ● すべてのモニターがすべての車両でサポートされているわけではありません。 I / M 準備は、すべてのモニターが OK か N / A かを確認するために使用される便利な機能です。 車両のコンピューターは、通常の運転状態で排出システムのテストを実行します。特定の運転...
  • Seite 63 トです。 1.4 [ データストリーム ] を選択します。すべてのデータストリームを表示し、次に [OK] をクリ ックすると、最後にグラフィックデータフローを表示できます。 ヒント:診断メニューに戻るには、BACK キーを使用します。 「フリーズフレーム」を選択し、「OK」をクリックしてフリーズフレームデータス トリームを表示します。 フリーズフレームメニューには、フリーズフレームデータが表示されます。これは、DTC 設定 時にオンボードコンピューターによって自動的に記録された重要な車両動作状態のスナップシ ョットです。 障害の原因を特定するのに役立つ優れた機能です。 「O2 センサーテスト」を選択し、「OK」をクリックして、O2 センサーデータスト リームを表示します。 OBD II 規制では、特定の車両が酸素(O2)センサーを監視およびテストして、燃料および排出...
  • Seite 64 物に関連する障害を特定することを義務付けています。 O2 モニターテスト機能は、完成した O2 センサーモニターテスト結果を取得するために使用されます。 O2 モニターテストはオンデマンドテストではありません。 O2 センサーは、メニューから選択 した場合はテストされませんが、エンジンの動作条件が指定された制限内にある場合はテスト されます。 ヒント:車種によって検出される酸素センサーの数は異なります。必要なセンサーに応じて 確認してください。 1.7 「オンボードモニタリング」を選択し、「OK」をクリックしてオンボードモニターのデー タストリームを表示します。 オンボードモニターテスト機能は、整備後または車両 ECU のメモリをクリアした後に役立ちま す。 非 CAN 車両について継続的に監視されていない排出ガス関連のパワートレインコンポーネ ントおよびシステムのテスト結果を受け取ります。 また、CAN 車両の場合、継続的に監視され ている、または監視されていない排出ガス関連のパワートレインコンポーネントおよびシステ ムのテストデータを受信します。 テスト ID とコンポーネント ID の割り当てを担当するのは車 両メーカーです。 「EVAPSYSTEM」を選択し、「OK」をクリックして EVAP データストリームを表示 します。 ノート : ●...
  • Seite 65 3. 故障診断コード (DTCs) OBDII 故障診断コードは車載コンピュータ診断メモリのコードであり、車両から発見された問 題に応答するために使っています これらのコードを通じて、特定の問題領域を識別されます。車両の故障が発生する可能のガイ ドを提供する目的です。OBDII コードは 5 桁の英数字コードから構成されています。最初の文 字がそれぞれの制御システムを表示されます 2 番目の文字、数値、0 〜 3。 他の 3 文字、16 進文字、0-9 または A-F は、DTC の発生場所と、 DTC が設定される原因となった動作条件に関する追加情報を提供します。 以下は、数字の構造 を示す例です: DTC 示例 P0201 システムのどの部分が誤動作している かを識別します システム サブ - システム P= パワートレイン B= ボディ システムのどの部分が故障があるかを識...
  • Seite 66 3.1.1 https://www.mucarco.com の 公 式 Web サ イ ト に ロ グ イ ン し て、「THINKOBD Updata TOOL」を見つけ、コンピューターにツール「Product UpdataToolSetup. exe」をダウンロードしてください。 解凍してコンピュータにインストールします (Windows XP、7、8、および 10 と互換性があります)。 3.1.2 インストールが完了したら、USB データケーブルの一方の端をコンピューターの USB ポ ート、ツールのもう一方の端にある Type-c ポートに接続します。 3.1.3 最初にデバイスをコンピューター識別ポートに挿入し、次に CDL20 アップグレードツー ルを開きます。 「COMFLG.INI」ファイルを見つけて開き、ファイル内の「シリアル名」 をコンピュータとデバイスのポート「USB-COM 名」と同じように変更します。 3.1.4 最後に、OBD500 インストールパッケージファイルの「CReaderVPlus Upgrade Tool. exe」を開き、「StartUpgrade」をクリックしてアップグレードを完了します。...
  • Seite 67 4. 保証条件 この保証は、通常の手順で https://www.mucarco.com/ MUCARCDL20 製品を購入するユーザ ーおよびディストリビューターにのみ適用されます。 1 年以内に無料保証を提供します。材料 または製造上の欠陥によって引き起こされた損害に対する電子製品を含む MUCAR 保証。乱用、 不正改造、設計外の使用、説明書に記載されていない方法での操作などによる機器やコンポー ネントの損傷は、この保証の対象外です。この機器の欠陥によって引き起こされたダッシュボ ードの損傷に対する補償は、修理または交換に限定されます。 MUCAR は、間接的および偶発 的な損失を負いません。 MUCAR は、所定の検査方法に従って機器の損傷の性質を判断します。 注文インターフェースを介してオンラインカスタマーサービスに連絡してください。 サービスライン:1-833-692-2766 カスタマーサービス E メール:service@mucarco.com 公式サイト:https://www.mucarco.com/ 製品チュートリアル、ビデオ、FAQ、およびカバレッジリストは、MUCAR の公式 Web サイト で入手できます。...
  • Seite 68 1. Описания продуктов (1) диагностический кабель: стандартный диагностический кабель OBDII TXGA (2) ЖК-дисплей: 1,77-дюймовый дисплей (128 * 160) (3) Клавиши вверх и вниз: используются для выбора интерактивных функций (4) Клавиша возврата: возврат к верхней функции (5) OK Возврат: кнопка подтверждения Предупреждение...
  • Seite 69 приборной панели, под или вокруг стороны водителя для большинства транспортных средств. Если Data Link Connector не находится под приборной панелью, то там должно быть обозначение метки. Для некоторых азиатских и европейских автомобилях DLC находится за пепельницей, и пепельница должна быть удалена для доступа к разъему. Если...
  • Seite 70 1.1.1 Выберите «Диагностика», нажмите «ОК», чтобы войти в диагностику системы, нажмите «ОК» и войдите в список функций диагностики. 1.1.2 Выберите «СЧИТАТЬ КОД» и нажмите «ОК», чтобы выбрать тип автомобиля для просмотра диагностических данных DTC. 1.2 Выберите «УДАЛИТЬ КОДЫ», чтобы очистить код неисправности.
  • Seite 71 Примечание. Меню «Стереть коды» позволяет удалить все текущие и сохраненные коды неисправности из модуля управления. Также он стирает всю временную информацию ЭБУ, включая стоп-кадр. Поэтому перед сбросом кодов убедитесь, что выбранная система полностью проверена и обслуживается техническими специалистами, и никакая важная...
  • Seite 72 ● Этот ездовой цикл - показывает состояние мониторов с начала текущего ездового цикла. Ниже приведен список сокращений и названий мониторов OBD II, поддерживаемых считывателем кода. 1.4 Выберите «ПОТОК ДАННЫХ». Просмотрите все потоки данных, затем нажмите «ОК», и, наконец, вы сможете просмотреть поток графических данных. Советы: Используйте...
  • Seite 73 Правила OBD II требуют, чтобы определенные автомобили контролировали и проверялидатчики кислорода (O2) для выявления неисправностей, связанных с топливом и выбросами. Функция теста монитора O2 используется для получения результатов завершенного теста монитора датчика O2. Тест монитора O2 - это не тест по запросу. Датчики O2 не проверяются при выборе через меню, но...
  • Seite 74 ● Некоторые производители не разрешают использовать инструменты для управления системами автомобиля. ● Производитель устанавливает критерии для автоматической остановки теста. Перед использованием этой функции обратитесь к руководству по обслуживанию соответствующего автомобиля. Выберите «DTC LOOKUP» и нажмите «OK», чтобы запросить анализ кода неисправности.
  • Seite 75 DTC пример P0201 O п р ед ел я ет, к а к о й р азд ел системы работает со сбоями Система P=Трансмиссии B=Кузов C=Шасси Subsistemas U=Интернет О п р ед ел я ет с и с т е м у, в к от о р о й находится...
  • Seite 76 3.3 Обновить Инструмент можно обновить через USB-кабель. Примечание. Убедитесь, что ваш компьютер подключен к Интернету. 3.1.1 Пожалуйста, войдите на официальный сайт https://www.mucarco.com и найдите «THINKOBD Updata TOOL», загрузите инструмент «Product Updata Tool Setup.exe» на свой компьютер. Разархивируйте и установите его на свой компьютер...
  • Seite 77 и т. Д., Не покрываются настоящей гарантией. Компенсация за повреждение приборной панели, вызванное дефектом этого оборудования, ограничивается ремонтом или заменой. MUCAR не несет никаких косвенных и побочных убытков. MUCAR оценит характер повреждения оборудования в соответствии с предписанными методами проверки. Пожалуйста, свяжитесь со службой поддержки клиентов через интерфейс заказа.