tepro 1164S Bedienungsanleitung

Verwandte Anleitungen für tepro 1164S


Inhaltszusammenfassung für tepro 1164S
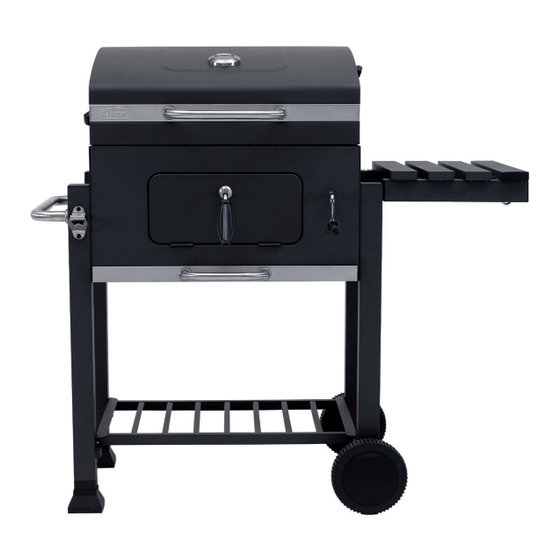
- Seite 1 Bedienungsanleitung Grillwagen „TORONTO click“ Holzkohlengrill t instruction Manual Trolley BBQ “TORONTO click” Version 2019 charcoal grill Art. Nr. 1164S...
-
Seite 3: Inhaltsverzeichnis
Inhalt Bevor Sie das Gerät benutzen ..................4 Lieferumfang ......................4 - 5 Bestimmungsgemäßer Gebrauch ................. 6 Zu Ihrer Sicherheit ..................... 6 - 8 Signalsymbole ......................6 Allgemeine Sicherheitshinweise ................. 6 Sicherheitshinweise ....................6 - 8 Montage ........................8 - 14 Vorbereitung ........................ -
Seite 4: Bevor Sie Das Gerät Benutzen
Bevor Sie das Gerät 1 Standbein LF, benutzen vorne links (5) Prüfen Sie nach dem Auspacken sowie mit Flaschenöffner vor jedem Gebrauch, ob der Artikel Schä- den aufweist. 1 Standbein LB, Sollte dies der Fall sein, benutzen Sie den hinten links (6) Artikel nicht, sondern benachrichtigen Sie bitte Ihren Händler. - Seite 5 1 Warmhalterost (26) 1 Türgriff für Holzkohletür (16) 1 Schließblech, 1 Grillrost mit Grillrosteinleger (27) Holzkohletür (17) 2 Verbindungsstück (28) 1 Griffblende (18) für Holzkohletür Befestigunssortiment A Mutter M10 1 1 Wagengriff (19) B Schraube (M6x10) 1 C Unterlegscheibe M6x16 1 1 Seitenablage rechts (20) mit Haken D Mutter M6 1...
-
Seite 6: Bestimmungsgemäßer Gebrauch
Bestimmungsgemäßer – Nur Anzündhilfen entsprechend EN 1860-3 verwenden! Gebrauch – ACHTUNG! Dieses Grillgerät wird Dieser Grill dient zum Erhitzen, Garen und sehr heiß und darf während des Be- Grillen von Speisen. triebes nicht bewegt werden! Der Grill ist ausschließlich zur Verwen- –... - Seite 7 – Einige Nahrungsmittel erzeugen – Nur langstielige Grillwerkzeuge mit brennbare Fette und Säfte. Grill regel- hitzebeständigen Griffen verwenden. mäßig reinigen, am besten nach jedem – Keine Kleidung mit weiten Ärmeln tragen. Gebrauch. – Nur trockene Anzünder oder spezielle – Asche erst auskippen, wenn die Holz- Grill-Flüssig anzünder entsprechend der kohle vollständig ausgebrannt und ab- EN 1860-3 als Anzündhilfe benutzen.
-
Seite 8: Montage
Montage Sie könnten kleine Teile verschlucken und daran ersticken. Vorbereitung Gefahr Verletzungsgefahr Gefahr Verletzungsgefahr! Am Grill und an den Einzeltei- Die Nichtbeachtung der An- len befinden sich zum Teil weisungen kann zu Problemen scharfe Kanten. und Gefahren bei der Verwen- –... - Seite 9 Schritt 1 Schritt 2 Schritt 3 Schritt 4 6 LB 5 LF...
- Seite 10 Schritt 5 Schritt 6 5 LF 8 RF 9 RB 6 LB Schritt 8 Schritt 7...
- Seite 11 Schritt 9 Schritt 10...
- Seite 12 Schritt 11 Schritt 12 Schritt 13 Schritt 14...
- Seite 13 Schritt 15 Schritt 16 Schritt 18 Schritt 17...
-
Seite 14: Grill Aufstellen
Schritt 19 Schritt 20 Grill aufstellen Schritt 21 Achtung Beschädigungsgefahr! Während des Gebrauchs kön- nen sich die Verschraubungen allmählich lockern und die Sta- bilität des Grills beeinträchti- gen. – Prüfen Sie die Festigkeit der Schrau- ben vor jedem Gebrauch. Ziehen Sie ggf. -
Seite 15: Bedienung
• Einfeuern dass der Untergrund gegen derartige Verunreinigungen ausreichend Vor dem ersten Grillen muss der Grill schützt ist. min. 1-2 Stunden bei einer Temperatur von 100° - 200° C eingefeuert werden. 1. Den Deckel öffnen und den Grillrost Dies ist nötig, um das Innere grillbereit mit Grillrosteinleger (27) entfernen. -
Seite 16: Wartung Und Reinigung
Temperatur im Garraum an. Achten • Ziehen Sie die Ascheauffangschale Sie darauf, dass die Temperatur für (24) heraus und entleeren Sie die kal- das entsprechende Grillgut nicht zu te Asche. Es ist sehr wichtig, dass Sie die Asche herausnehmen, be- hoch wird, da es sonst verbrennen kann. -
Seite 17: Entsorgung
Technische Daten • WICHTIG: Der Grill sollte immer vor Feuchtigkeit geschützt aufbewahrt Produkt: Art. Nr. 1164S, werden. Grillwagen „Toronto Click“ Entsorgung Netto Gewicht: ca. 25,4 kg Gesamtmaße, Die Verpackung besteht aus um- Grill aufgebaut: ca. 115 x 67 x 107 cm... -
Seite 18: Passendes Zubehör (Nicht Im Lieferumfang Enthalten)
Passendes Zubehör (nicht im Lieferumfang enthalten) Erhältlich im stationären- und Online-Handel. Guss-Grillrost-Einleger tepro Artikelnummer 8571 – zum Einlegen in das Rost in Rost System – Guss-Grillrost, ca. Ø 30,5 cm... -
Seite 19: Guss-Pfanne-Einleger
Guss-Pfanne-Einleger tepro Artikelnummer 8573 – zum Einlegen in das Rost in Rost System – Guss-Pfanne, ca. Ø 31,7 x 3,5 cm Pizzastein-Einleger tepro Artikelnummer 8572 – zum Einlegen in das Rost in Rost System – Pizzastein aus Cordierit, ca. Ø 28,5 cm... -
Seite 20: Neu - Guss-Gebäck-Einleger
Weiteres passendes Zubehör (nicht im Lieferumfang enthalten) Universal Abdeckhaube tepro Artikelnummer 8600 – aus hochwertig, strapazierfähigem Polyestergewebe 300x250D – mit wasserabweisender PVB-Beschichtung – widerstandsfähig gegen UV Strahlen – mit Befestigungsklettband Material: Aussenseite: PVB (Polyvinylbutyral) Innenseite:100% Polyester – Haubenmaße ca. 104,1x48,3x101,6 cm NEU –... -
Seite 21: Neu - Guss-Hähnchenhalter-Einleger
– Deckel umgedreht als Pfanne verwendbar – verschließbare Öffnung für Temperaturfühler – integrierter Henkel – inklusive Adapter-Ring für die Verwendung mit dem tepro Rost-in-Rost-System NEU – Guss-Hähnchenhalter-Einleger tepro Artikelnummer 8238 – zum Einlegen in das Rost-in-Rost-System rund 57 cm Ø... - Seite 29 Step 1 Step 2 Step 3 Step 4 6 LB 5 LF...
- Seite 30 Step 5 Step 6 5 LF 8 RF 9 RB 6 LB Step 8 Step 7...
- Seite 31 Step 9 Step 10...
- Seite 32 Step 11 Step 12 Step 13 Step 14...
- Seite 33 Step 15 Step 16 Step 18 Step 17...
-
Seite 37: Disposal
Disposal Technical details Product: Item. No. 1164S, „Toronto Click“ The packaging is made from en- Trolley BBQ vironmentally friendly materials, Net weight: approx. 25,4 kg which you can dispose of at your local recycling points. Overall dimension, Do not under any circumstance BBQ assembled: approx. - Seite 42 P140200-TEPRO_1061_Toronto_20141023...