Inhaltsverzeichnis
Werbung
Verfügbare Sprachen
Verfügbare Sprachen
Quicklinks
Notice d'utilisation et d'installation
Instrucciones de uso e instalación
4.3+
Interphone vidéo
filaire avec badges
Wired door entry system with tags
Videocitofono elettrico con badge
Video portero con cable con tarjetas
Elektro Video-Türsprechanlage mit tags
Bedrade videofoon met tags
Installation and user manual
Installation und Bedienungsanleitung
RFID
BADGES
Manuale d'installazione e uso
Installatie en Gebruiksaanwijzing
2 fils
100m max
Écran tactile
Grand angle
Photos
vidéos
6 mélodies
Gâche et
portail
V.112019 - IndA
Werbung
Inhaltsverzeichnis

Verwandte Anleitungen für SCS Sentinel VisiDoor 4.3+


Inhaltszusammenfassung für SCS Sentinel VisiDoor 4.3+
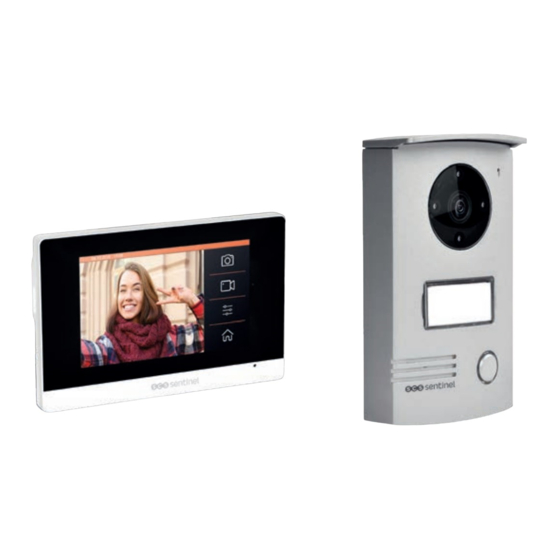
- Seite 1 4.3+ RFID Interphone vidéo filaire avec badges Wired door entry system with tags Videocitofono elettrico con badge Video portero con cable con tarjetas Elektro Video-Türsprechanlage mit tags Bedrade videofoon met tags 2 fils 100m max Écran tactile Grand angle Photos vidéos BADGES 6 mélodies...
-
Seite 2: Inhaltsverzeichnis
SOMMAIRE A- Précautions d’utilisation ..............................2 B- Descriptif ....................................2 C- Câblage / Installation ................................3 D- Utilisation ....................................5 E- Réglages ....................................8 F- Caractéristiques techniques............................... 13 G- Assistance technique ................................13 H- Garantie ....................................14 I- Avertissements ..................................14 J- Déclaration UE de conformité... -
Seite 3: C- Câblage / Installation
4 LED IR Vision Microphone nocturne Visière Caméra Porte étiquette Connecteurs Supprimer Bouton d’appel Haut-parleur les badges RFID Ajuster le volume C- CÂBLAGE / INSTALLATION C1- Installation et raccordement Moniteur Platine de rue Centre de la lentille (mm) Placer la bande d’étanchéité... - Seite 4 Après installation et test, placer un joint silicone transparent sans acide sur le haut et les côtés de la platine de rue (pas sur le bas) pour éviter tout risque d’infiltration. C2- Schéma de câblage Vous avez la possibilité de connecter le moniteur directement à...
-
Seite 5: D- Utilisation
C3- Fonction RFID Ouverture gâche par défaut via le badge RFID. Possibilité ouverture portail via relais 12V contact sec (AAA0009 ). Zoom sur le relais 12V Insérez et soudez les câbles aux cosses. Relais 12V contact sec (AAA0009) Dans ce cas le bouton gâche du moniteur commande l’ouverture du portail. Insérez et connectez les câbles de votre interphone dans le... - Seite 6 D2- Écran principal Indique un appel en absence (pour enlever l’icône cliquer sur l’icône photo ou vidéo) Visionner les vidéos Visionner les photos (actif si il y a une carte SD) Visualiser la caméra / Monitoring Interphone Mise en veille de l’écran (l’écran s’éteint automatiquement Réglages après 1 minute)
- Seite 7 D3- Fonction intercommunication Vous avez la possibilité de connecter jusqu’à 2 moniteurs additionnels sur le moniteur principal et de dialoguer entre moniteurs via les icones décrocher et raccrocher. Décrocher/Raccrocher D4- Affichage des photos et vidéos Photos STOCKAGE Afficher les photos du moniteur STOCKAGE STOCKAGE Micro SD...
- Seite 8 Vidéos L’enregistrement des vidéos se fera automatiquement sur la carte mémoire. L’enregistrement des vidéos ne sera pas possible sans carte mémoire Lecture de la vidéo Pause Supprimer une vidéo Retour à l’écran d’accueil D5- Affichage caméra - fonction monitoring Caméra Vous avez accès de chez vous à...
-
Seite 9: E- Réglages
E- RÉGLAGES Choix mélodie Mode silencieux Réglages écran Réinitialiser Choix langue Sauvegarder les photos Réglage date Choisir si l’appareil (moniteur) prend une photo de la mémoire interne sur et(ou) une vidéo à la carte SD / supprimer toutes les photos/vidéos / chaque appel formater carte micro SD Retour à... -
Seite 10: Réglages Écran
Luminosité Réglages écran Couleur Contraste Volume sonnerie Volume voix Retour à l’écran d’accueil Réinitialiser Cette fonction permet de rétablir toutes les données Au démarrage, appuyer sur les 5 cibles vertes et tous les réglages initiaux de l’appareil. apparaissant les unes après les autres aux 4 coins de l’écran et au centre. - Seite 11 Photo et(ou) vidéo Sauvegarde sur carte micro SD Copier : Copie les photos du moniteur sur la carte micro SD dans le dossier BKUP PIC Choisir si l’appareil prend une photo et(ou) une vidéo à chaque appel Formater : Efface le contenu de la carte micro SD Fonction RFID BADGE UTILISATEUR...
- Seite 12 Suppression d’un badge BIP BIP Badge non enregistré Suppression de tous les badges (en cas de perte ou de vol) BIP BIP Erreur SW2 SW1 LK- LK+ Retirer le capuchon et appuyer longtemps sur le bouton avec une pointe...
-
Seite 13: F- Caractéristiques Techniques
F- CARACTÉRISTIQUES TECHNIQUES Moniteur Alimentation 15V DC 0,8A Ecran Ecran tactile 4.3’’ TFT LCD Résolution LCD 480 x 272 14 Mo. Une fois la mémoire pleine, Mémoire interne (photos) la nouvelle photo remplacera automatiquement la plus ancienne 4 Go - 32 Go classe 4 - 10 (non fournie) Mémoire externe possible sur carte micro SD la carte micro SD doit être (photos ou vidéos) -
Seite 14: H- Garantie
H- GARANTIE SCS Sentinel accorde à ce produit une garantie supérieure à la durée légale, en gage de qualité et de fiabilité. Garantie 3 ans Il est impératif de garder une preuve d’achat durant toute la période de garantie. Conservez soigneusement le code-barre ainsi que votre justificatif d’achat, il vous sera demandé... -
Seite 15: J- Déclaration Ue De Conformité
J- DÉCLARATION UE DE CONFORMITÉ La société SCS Sentinel, déclare sous sa seule responsabilité que le produit désigné ci-dessous : VisioDoor 4.3+ RFID Désignation commerciale : PVF0046 Code article : 3701085203931 Code-barre : Est conforme aux exigences applicables des Directives et Réglementations Européennes suivantes : 2014/53/EU Directive des Equipements Radio –... -
Seite 16: A- Safety Instructions
TABLE OF CONTENTS A- Safety instructions ................................16 B- Description .................................... 16 C- Wiring / Installation ................................17 D- Use ......................................19 E- Settings ....................................23 F- Technical features ................................27 G- Warranty ....................................27 H- Warnings ....................................28 I- EU Declaration of conformity ............................28 A- SAFETY INSTRUCTIONS This manual is an integral part of your product. -
Seite 17: C- Wiring / Installation
4 LED IR Microphone Night vision Rain cover Camera Connection Nameplate port Delete all Call button the RFID Loudspeaker tags Adjust the volume C- WIRING / INSTALLATION C1- Installation Indoor monitor Outdoor station Center of lense (mm) Place the sealing band... - Seite 18 After installing and test, place a transparent acid free silicone seal at the top and on the sides of the door station (not at the bottom) to avoid any risk of infiltration. C2- Wiring diagram You can directly connect the monitor to your electrical panel via a 15V DC 0,8A (minimum) «rail DIN»...
-
Seite 19: D- Use
C3- Function RFID Electric shock opening via RFID tag. Gate opening possible via relay 12V dry contact (AAA0009). Focus on the 12V relay Insert & weld the cables to the thimbles. Relay 12V dry contact (AAA0009) In this case, the electric lock button of the monitor drives the gate opening. Insert &... - Seite 20 D2- Main screen Missed call (please click the photo or video icon to remove the missed call icon) Videos display Photos display (active if there is a micro SD card) Camera view / Monitoring Intercom Standby mode (the screen switch off automatically Settings after 1 minute) In case of disconnection, the monitor can...
- Seite 21 D3- Intercom function You can connect up to 2 additional monitors to the same outdoor station and talk to another monitor. Press call icons to start/end the call. Answer/End a call D4- Photos and videos display Photos Display photos of the device STORAGE STORAGE STORAGE...
- Seite 22 Videos Videos will be recorded on micro SD card. The video recording will not be possible without micro SD card. Play Pause Delete video Back to main screen D5- Camera display - monitoring Camera You can view the street only by clicking the camera icon (monitoring function) D6- Unlocking Electric shock opening by default...
-
Seite 23: E- Settings
E- SETTINGS Set the Silent mode Settings Reset ring melody Set the language Memory settings page. Set the date Select if the device of the monitor & time of the takes a photo and/or Delete all images or monitor video for each call videos on the micro SD card, copy all images on the micro SD card and... -
Seite 24: Settings Screen
Brightness Settings screen Color Contrast Ring volume Voice volume Back to main screen Reset This function resets all the data and all the device’s On start up, press on the 5 green targets which factory settings. appear one after the other in the four corners of the screen and in the center. - Seite 25 Photo and(or) video Back up on SD card Copy : copy the photos from the monitor to the micro Select if the device takes a photo and/or video SD card in the BKUP PIC folder. for each call. Format : Delete the micro SD card content. RFID Function USER DELETE...
-
Seite 26: Delete Of All The Tags (In Case Of Loss Or Theft)
Deletion of tag BIP BIP Tag not registered Badge non enregistré Delete of all the tags (in case of loss or theft) BIP BIP Erreur Error SW2 SW1 LK- LK+ Remove the cap and press a long time the button with a spike... -
Seite 27: F- Technical Features
220V-240V AC 50/60Hz 0,3A - 15V DC 0,8A G- WARRANTY SCS Sentinel grants to this product a warranty period, beyond the legal time, as a sign of quality and reliability. The invoice will be required as proof of purchase date. Please Warranty 3 years keep it during the warranty period. -
Seite 28: H- Warnings
Make your retailer take back these products or use the selective collect of garbage proposed by your city. I- EU DECLARATION OF CONFORMITY SCS Sentinel Company declares under his sole responsibility that the following designated product: VisioDoor 4.3+ RFID Commercial designation :... -
Seite 29: A- Precauzioni Per L'uso
INDICE A- Precauzioni per l’uso ................................29 B- Specifiche....................................29 C- Cablaggio / Installazione ..............................30 D- Utilizzo ....................................32 E- Regolazioni .................................... 36 F- Caratteristiche tecniche ..............................40 G- Assistenza tecnica ................................40 H- Garanzia ....................................41 I- Avvertenze ..................................... 41 J- Dichiarazione di conformita UE ............................ -
Seite 30: C- Cablaggio / Installazione
4 LED IR Visione Microfono notturna Visiera Camera Porta-etichetta Connettore Rimuovere i Pulsante di badge RFID Altoparlante chiamata Regolare il volume C- CABLAGGIO / INSTALLAZIONE C1- Impianto Monitor Pulsantiera esterna Centro della lente (mm) Posizionare il nastro di tenuta... - Seite 31 Dopo l’installazione e test, posizionare una guarnizione di silicone trasparente senza acido in alto e lungo i lati della pulsantiera esterna (non giù) per evitare il rischio di infiltrazioni. C2- Schema di cablaggio Avete la possibilità di connettere direttamente il monitor al vostro quadro elettrico attraverso uno trasformatore 15V DC 0,8A...
-
Seite 32: D- Utilizzo
C3- Funzione RFID Apertura serratura tra distintivo RFID. Possibilità apertura cancello tra relè 12V conttato a seco (AAA0009). Zoom su il relè 12V Inserire e saldare le cavi de suo citofono nel pressacavo ai baccelli. Relè 12V conttato a seco (AAA0009) In tal caso, il pulsante apriporta del monitor controlla l’apertura del cancello. - Seite 33 D2- Schermo principale Indica una chiamata perse (per rimuovere l’icona, premere sull’icona foto o video) Visualizzazione delle foto Visualizzazione delle foto (attiva se c’è una scheda SD) Vista Camera / Monitoring Citofono Oscuramento dello schermo (lo schermo si spegne Regolazioni automaticamente dopo 1 minuto) In caso di disattivazione il monitor può...
- Seite 34 D3- Funzione intercomunicazione È possibile collegare fino a 2 monitor aggiuntivi al monitor principale e dialogare tra monitor tramite l’icona con il simbolo delle cornetta. Rispondere / Riagganciare D4- Visualizzazione foto e video Foto Visualizzare le foto ARCHIVIZIONE ARCHIVIZIONE ARCHIVIZIONE Visualizzare foto della scheda micro SD Micro SD Micro SD...
- Seite 35 Video Il registrazione dei video sarà effettuata automaticamente sul scheda memoria. Il registrazione dei video no sará possibile senza scheda memoria Riproduzione di un video Pausa Eliminare la video Ritorno allo schermo principale D5- Visualizzazione camera / funzione di monitoring Camera Da casa, Hai una vista diretta sull’esterno cliccando sull’icona video (funzione di monitoring)
-
Seite 36: E- Regolazioni
E- REGOLAZIONI Schermo Selezione Modo silenzioso Reset di regolazioni della melodia Scelta Regolazione Scegliere se il Salvataggio su scheda della lingua micro SD / eliminare della data dispositivo scatta una foto e(o) un video tutte le foto / video / Formattare scheda ad ogni chiamata microSD... -
Seite 37: Regolazioni Dello Schermo
Luminosità Regolazioni dello schermo Colore Contrasto Volume della chiamata Volume voce Ritorno allo schermo principale Reset All’inizio, premere sui cinque obiettivi verdi Questa funzione consente di ripristinare tutti i dati e apparendo dopo l’altra ai 4 angoli dello schermo tutte le impostazioni iniziali dell’apparecchio. e al centro. - Seite 38 Salvataggio su scheda SD Foto e(o) video Copiare : Copia le foto del monitor sulla scheda micro SD nella cartella BKUP PIC. Scegliere se il dispositivo scatta una foto e(o) un video ad ogni chiamata Formattare : Cancella il contenuto della scheda micro SD Funzione RFID BADGE...
-
Seite 39: Eliminare Tutti I Distintivi (In Caso Di Perdita O Di Volo)
Eliminare distintivo BIP BIP Badge non Distintivo enregistré no registrato Eliminare tutti i distintivi (in caso di perdita o di volo) BIP BIP Errore Erreur SW2 SW1 LK- LK+ Rimuovere il cappuccio e premere a lungo il pulsante con una punta... -
Seite 40: F- Caratteristiche Tecniche
F- CARACTÉRISTIQUES TECHNIQUES Monitor Alimentazione 15V DC 0,8A Schermo Schermo Touchscreen 4.3’’ TFT LCD Risoluzione dello schermo LCD 480 x 272 14 Mo. Quando la memoria è piena, la Memoria interna (foto) nuova foto sovrascrive automaticamente la foto più vecchia. 4 Go - 32 Go classe 4 - 10 (non fornite) Salvataggio su scheda SD esterna (foto/video) È... -
Seite 41: H- Garanzia
H- GARANZIA SCS Sentinel concede a questo prodotto una garanzia superiore alla durata legale, in garanzia di qualità e affidabilità. Garanzia 3 anni È obbligatorio conservare una prova d’acquisto per tutta la durata della garanzia. Conservare accuratamente sia il codice a barre che lo scontrino : vi saranno richiesti per far valere la garanzia. -
Seite 42: J- Dichiarazione Di Conformita Ue
J- DICHIARAZIONE DI CONFORMITA UE La società SCS Sentinel dichiara sotto la sua esclusiva responsabilità che il prodotto descritto di seguito: VisioDoor 4.3+ RFID Denominazione commerciale : PVF0046 Codice articolo : 3701085203931 Codice a barre : É conforme ai requisiti applicabili delle seguenti direttive e regolamenti europei : 2014/53/EU Direttiva sulle apparecchiature radio –... -
Seite 43: A- Precauciones Para El Uso
ÍNDICE A- Precauciones para el uso ..............................43 B- Descripcíon ................................... 43 C- Cableado / Instalación ................................ 44 D- Uso ....................................46 E- Ajustes ....................................50 F- Características técnicas ..............................54 G- Asistencia técnica................................54 H- Garantía ....................................55 I - Avisos ....................................55 J - Declaración UE de conformidad ............................ -
Seite 44: C- Cableado / Instalación
4 LED IR Visión Micrófono nocturna Visera Camera Porta etiqueta Conector Suprimir Botón de llamada las tarjetas Altavoz RFID Ajustar el volumen C- CABLEADO / INSTALACIÓN C1- Impianto Monitor Placa exterior Centro de la lente (mm) Colocar la banda de sellado... - Seite 45 Después la instalación y prueba, colocar un junta de silicone transparente sin ácido arriba y sobre los lados de la placa exterior (no abajo) para evitar los riesgos de infiltración. C2- Esquema de cableado Tiene la posibilidad de conectar directamente el monitor al panel eléctrico vía un tranformador 15V DC 0,8A (minimum).
-
Seite 46: D- Uso
C3- Functión RFID Apertura cerradura a través tarjeta RFID. Posibilidad apertura portal a travès un relé 12V de contacto seco (AAA0009). Ampliar en el relé 12V Insertar y soldar los cables con las vainas. Relé 12V de contacto seco (AAA0009) Insertar y conectar En este caso, el pulsador cerradero del monitor ordena la apertura del portal. - Seite 47 D2- Pantalla principal Especifica una llamada perdida (para quitar el icono, pulsar en el icono de imagen o vídeo) Visualización de vídeos Visualización de fotos (activo si hay una tarjeta SD) Vista de cámara / Monitoring Intercomunicador Modo de espera (la pantalla se apaga Ajustes automáticamente después de 1 minuto)
- Seite 48 D3- Función de intercommunicación Puede conectar hasta 2 monitores adicionales al monitor principal y dialogar con los monitores a través de los iconos desconectar y colgar. Contestar / Colgar D4- Visualización de fotos y videos Fotos Visualizar fotos del monitor ALMACENAMIENTO ALMACENAMIENTO ALMACENAMIENTO...
- Seite 49 Vídeo El registro de las videos se efectua en la tarjeta de memoría. Sólo es possible grabar en la tarjeta micro SD. Lectura de la video Descanso Suprimir una vídeo Volver a la pantalla principal D5- Visualización camera / monitoring función Camera De su casa, tiene una vista directa de sus exteriores haciendo clic en el icono cámara...
-
Seite 50: E- Ajustes
E- AJUSTES Ajuste Modo silencioso Pantalla de ajustes Reset de la melodía Selección Copia de seguridad de Ajuste de la fecha Seleccionar si el de idiomas aparato toma la memoria interna en la tarjeta micro SD / una foto y(o) un vídeo en cada suprimir todas las fotos llamada... -
Seite 51: Pantalla De Ajustes
Luminosidad Pantalla de ajustes Color Contrasto Volumen de la melodía Volumen de la voz Volver a la pantalla principal Reset Al inicio, apoyar en las 5 metas verdes que aparecen Esta función permite restablecer todas las datas y detrás de otra en las 4 puntos de la pantalla y en todos los adjustes iniciales del aparato. - Seite 52 Foto y(o) un vídeo Copia de seguridad en tarjeta SD Copiar : Copiar las fotos de la memoria interna en la tarjeta micro SD en el archivo BKUP PIC. Seleccionar si el aparato toma una foto y(o) un vídeo en cada llamada Formatear : Borrar el contenido de la tarjeta micro SD Función RFID...
- Seite 53 Suprimir una tarjeta BIP BIP Badge non Tarjeta no registrada enregistré Suprimir todas las tarjetas (en caso de pérdida o de robo) BIP BIP Error Erreur SW2 SW1 LK- LK+ Quitar la capucha y pulsar suficiente el pulsador con una punta...
-
Seite 54: F- Características Técnicas
F- CARACTERÍSTICAS TÉCNICAS Monitor Alimentación 15V DC 0,8A Pantalla Pantalla táctil 4.3’’ TFT LCD Resolución de pantalla LCD 480 x 272 14 Mo. Cuando la memoria está Memoria interna (fotos) llena, la nueva foto sobreescribirá automáticamente la foto más antigua. 4 Go - 32 Go classe 4 - 10 Copia de seguridad en tarjeta SD externa (no suministradas) -
Seite 55: H- Garantía
H- GARANTÍA SCS Sentinel concede a este producto una garantía superior a la duración legal, como referencia de calidad y fiabilidad. Garantía 3 años Conservar el recibo de compra durante todo este período de garantía. Conservar el código de barra así como que su justificante de compra, serán necesarios para hacer uso de la garantía. -
Seite 56: J- Declaración Ue De Conformidad
J- DECLARACIÓN UE DE CONFORMIDAD La empresa SCS Sentinel, declara bajo su exclusiva responsabilidad que el producto designado a continuación : VisioDoor 4.3+ RFID Denominación comercial : PVF0046 Código de artículo : 3701085203931 Código de barras : Cumple con las requisitos aplicables de las Directivas y los reglamentos de la UE siguientes : 2014/53/EU Directiva de los equipos de radio –... -
Seite 57: Übersicht
ÜBERSICHT A- Vorsichtsmassnahmen beim betrieb ..........................57 B- Beschreibung ..................................57 C- Anschluss / installation ..............................58 D- Gebrauch....................................60 E- Einstellungen ..................................64 F- Technische eigenschaften ..............................68 G- Garantie ....................................69 H- Warnhinweise ..................................69 I- EU Konformitätserklärung ..............................70 A- VORSICHTSMASSNAHMEN BEIM BETRIEB Die Gebrauchsanweisung ist fester Bestandteil Ihres Produktes. -
Seite 58: C- Anschluss / Installation
4 LED IR Mikrofon Nachtsicht Visier Kamera Namensschild Stecker Entfernen Rufknopf Sie die RFID- Lautsprecher Ausweise Einzustellen das Volumen C- ANSCHLUSS / INSTALLATION C1- Installation Monitor Auβensprechanlage Mitte der Linse (mm) Das Dichtungsband wird angebracht... - Seite 59 Legen Sie nach der Installation und dem Testen eine klare, säurefreie Silikondichtung oben und an den Seiten der Türstation ein (jedoch nicht oben, um ein Versickern zu verhindern). C2- Schaltplan Sie haben die Möglichkeit, den Monitor direkt an Ihre elektrische Tabelle anzuschließen über 15V DC 0,8A (minimum) «rail DIN»...
-
Seite 60: C3- Funktion Rfid
C3- Funktion RFID Schloss Öffnung mittels RFID Tag. ODER Konzentrieren sie sich auf 12V Relais Möglichkeit der Öffnung eines Portals mittels 12V Relais Trockenkontakt (AAA0009) Führen Sie die Kabel ein und löten Sie sie an die Kabelschuhe. Führen Sie die 12V Relais Trockenkontakt Kabel Ihrer (AAA0009) - Seite 61 D2- Hauptbildschirm Stellt einen fehlenden Anruf fest (Symbol entfernen, Foto- oder Video-Symbol anklicken) Videos anzeigen (Aktiv, wenn eine Fotos anzeigen SD-Karte vorhanden ist) Kameraansicht / Monitoring Türsprechanlage Ruhezustand (Nach einer Minute wird der Einstellungen Bildschirm automatisch ausgeschaltet) Im Falle einer Abschaltung Das Aufleuchten des Monitors kann bis zu 15 Sekunden dauern.
- Seite 62 D3- Wechselsprechfunktion Sie haben die Möglichkeit, bis zu zwei zusätzliche Monitore auf dem Hauptmonitor anzuschließen und zwischen Monitoren zu kommunizieren, indem Sie die Symbole auf- und ausschalten. Abheben / Aufhängen D4- Filmen und Fotos Anzeige Fotos Fotos des Monitors anzeigen GESPEICHERTE GESPEICHERTE DATEN...
-
Seite 63: D5- Kameraanzeige - Monitoring Funktion
Filmen Die Videoaufzeichnung erfolgt automatisch auf der Speicherkarte. Die Videoaufzeichnung ist ohne Speicherkarte nicht möglich Das Video wird wiedergegeben Pause Die Video löschen Zurück zum Startbildschirm D5- Kameraanzeige - Monitoring Funktion Kamera Von zu Hause aus haben Sie einen direkten Blick auf Ihre Umgebung, indem Sie auf das Kamerasymbol klicken D6- Benutzungmarken (Videoüberwachungsfunktion). -
Seite 64: E- Einstellungen
E- EINSTELLUNGEN Wahl der Melodie Der Ruhezustand Bildschirmeinstellungen Reset Auswahl der Datumeinstellung Wählen Sie, ob die Foto-sicherungskopie Sprachversion Kamera bei jedem auf zusätzliche microSD-Karte / alle Anruf ein Foto und (oder) ein Video Fotos und Videos macht löschen /microSD-Karte formatieren Zurück zum Startbildschirm Melodie Beschleunigtes... -
Seite 65: Auswahl Der Sprachversion
Helligkeit Bildschirmeinstellungen Farbe Kontrast Volume Klingel Volume Stimme Zurück zum Startbildschirm Reset Mit dieser Funktion können alle Anfangsdaten und Beim Start, Auf die fünf grünen Ziele drückenauftretendennacheinander 4 Ecken -einstellungen des Geräts wiederhergestellt werden. des Bildschirms und in der Mitte.Warten Sie, bis der Begrüßungsschirm erscheint. -
Seite 66: Funktion Rfid
Sicherungskopie auf SD-Karte Foto und(oder) ein Video Kopiert die Fotos des Monitors auf die Mikro-SD-Karte in der BKUP PIC Akte Wählen Sie, ob die Kamera bei jedem Anruf ein Foto und (oder) ein Video macht Formatieren : Löscht den Inhalt der Mikro-SD-Karte Funktion RFID BENUTZER-TAG... -
Seite 67: Marke Löschen
Marke löschen BIP BIP Marke nicht Badge non enregistré registrierten Sämtliche Marken löschen (bei Verlust oder des Fluges) BIP BIP Fehler Erreur SW2 SW1 LK- LK+ Entfernen Sie die Kappe und lange drücken Sie den Knopf mit einer Spitze... -
Seite 68: F- Technische Eigenschaften
F- TECHNISCHE EIGENSCHAFTEN Monitor Versorgung 15V DC 0,8A Bildschirm Touch screen 4.3’’ TFT LCD Bildschirmauflösung 480 x 272 14 Mo. Wenn der Speicher voll ist, wird Interner Speicher (fotos) das neue Bild automatisch das älteste Bild überschrieben 4 GB - 32 GB classe 4 - 10 (Nicht mitgeliefert) Sicherung auf SD-Karte (fotos / film) Vor Gebrauch, müssen Sie die... -
Seite 69: G- Garantie
G- GARANTIE SCS Sentinel gewährt für dieses Produkt eine Garantie, die über die gesetzliche Dauer hinausgeht, als Gewähr für Qualität und Garantie 3 jahre Zuverlässigkeit. Zu registrieren, um Anspruch auf die Garantie erheben zu können. Bewahren Sie den Strichcode sowie den Kaufbeleg sorgfältig aúf, da diese Elemente nötig sind, um die Garantie beanspruchen zu können. -
Seite 70: I- Eu Konformitätserklärung
I- EU-KONFORMITÄTSERKLÄRUNG Das Unternehmen SCS Sentinel, erklärt unter seiner alleinigen Verantwortung, dass das nachfolgend beschriebene Produkt : VisioDoor 4.3+ RFID Handelsbezeichnung : PVF0046 Artikelnummer : 3701085203931 Barcode : Entspricht den geltenden Anforderungen der folgenden europäischen Richtlinien und Vorschriften : 2014/53/EU Funkanlagenrichtlinie –... -
Seite 71: A- Voorzorgsmaatregelen Bij Gebruik
SAMENVATTING A- Voorzorgsmaatregelen bij gebruik ..........................71 B- Beschrijving ..................................71 C- Bedrading / Installatie ................................ 72 D- Gebruik ....................................74 E- Instellingen .................................... 78 F- Technische specificaties ..............................82 G- Garantie ....................................82 H- Opmerkingen ..................................83 I- EU-Verklaring van overeenstemming ..........................83 A- VOORZORGSMAATREGELEN BIJ GEBRUIK De handleiding maakt integraal onderdeel uit van uw product. -
Seite 72: C- Bedrading / Installatie
4 LED IR Micro Nachtzicht Vizier Camera Naamkaarthouder Kiezer Verwijder Knop voor oproep badges RFID Luidspreker Aanpassen het volume C- BEDRADING / INSTALLATIE C1- Installatie Monitor Straatunit Midden van de lens (mm) Plaats de band van waterdichtheid... - Seite 73 Na installatie en testen, plaatsen Een gezamenlijke transparente zuurvrig siliconenkit Aan de bovenkant en zijkanten Van haar Straatunit (niet naar beneden) zodat Het risico van infiltratie. C2- Bedradingsschema U hebt de mogelijkheid tot het aansluiten van de monitor rechtstreeks naar uw elektrisch paneel via 15V DC 0,8A (minimum) «rail DIN»...
-
Seite 74: D- Gebruik
C3- Functie RFID Slot opening via RFID tag. Mogelijkheid opening portal via relais 12V droog contact (AAA0009). Focus op relais 12V Steek de kabels in en soldeer ze aan de lippen. 12V droog contact (AAA0009) Plaats en inloggen de kabels van uw In dit geval regelt de vergrendelknop van de monitor het openen van de poort. - Seite 75 D2- Hoofdscherm Geef bij afwezigheid een oproep aan (Als u het pictogram wilt verwijderen, klikt u op de foto of video van het pictogram) Video’s bekijken Foto’s bekijken (asset als er een kaart SD is) Camera view / Monitoring Intercom Uitschakeling van het scherm (Het scherm gaat na 1 minuut Instellingen...
- Seite 76 D3- Functie onderlinge communicatie U kunt maximaal 2 extra instructeurs op de hoofdinstructeur aansluiten en een dialoog tussen instructeurs(monitoren) via pictogrammen laten verlopen en ophangen. Afhaken / Ophangen D4- Foto-en video weergave Foto Post de foto’s van de monitor OPSLAG OPSLAG OPSLAG Post de foto’s van de Micro SD kaart...
- Seite 77 De opname van video’s wordt Video automatisch gemaakt op de geheugenkaart. Het opnemen van video’s is niet mogelijk zonder geheugenkaart Lezen van de video Pauze Foto’s verwijderen Terugkeren naar de startpagina D5- Camera weergave / monitoring functie Camera Vanuit uw huis hebt u een direct beeld van uw buitenshuis door op het camerapictogram te D6- Gebruik badges klikken (videobewakingsfunctie)
-
Seite 78: E- Instellingen
E- INSTELLINGEN Selectie Stille modus Beeldscherminstellingen Reset van de melodie Selectie van Sauvegarder les photos Datum selecteren Kies of het de taalversie apparaat een foto de la mémoire interne sur la carte SD / supprimer en een video opneemt in elk toutes les photos/vidéos / gesprek formater carte micro SD... - Seite 79 Lichtsterkte Beeldscherminstellingen Kleur Contrast Volume bel Volume stem Terugkeren naar de startpagina Reset Bij het opstarten, Druk op 5 groene doelen Met deze functie (kantoor) kunt u alle gegevens en verschijnen de ene na de andereIn 4 hoeken alle oorspronkelijke voorschriften van het apparaat van het scherm en in het midden.
- Seite 80 Foto en een video Back-up op een SD kaart Kies of het apparaat een foto en Kopieer de foto’s van de monitor naar de kaart microfoon SD in het dossier BKUP PIC een video opneemt in elk gesprek Formatteren : Wis de inhoud van de kaart microfoon SD Functie RFID GEBRUIKERS TAG...
- Seite 81 Badge’s verwijderen BIP BIP Badge niet Badge non enregistré geregistreerd Ledereen Badge’s verwijderen (In geval van verlies of van vlucht) BIP BIP Fout Erreur SW2 SW1 LK- LK+ Verwijder de dop en druk de knop lang in met een punt...
-
Seite 82: F- Technische Specificaties
Adapter Voeding 220V-240V AC 50/60Hz 0,3A - 15V DC 0,8A G- GARANTIE SCS Sentinel verleent aan dit product een garantie die superieur is aan de wettelijke duur, in veiligheid van kwaliteit en betrouwbaarheid. Garantie 3 jaar Houd de streepjescode en uw aankoopbewijs bij, deze hebt u nodig voor de garantie. -
Seite 83: H- Opmerkingen
Maak gebruik van de selectieve inzameling, die door uw gemeente of distributeur ter beschikking wordt gesteld. I- EU-VERKLARING VAN OVEREENSTEMMING De onderneming SCS Sentinel verklaart op eigen verantwoording dat onderstaand product : VisioDoor 4.3+ RFID Handelsbenaming :... - Seite 84 Toutes les infos sur : www.scs-sentinel.com Route de St Symphorien 85130 Les Landes Génusson FRANCE...